线性逻辑回归的代码实现
线性逻辑回归的代码实现
载入数据
data = np.genfromtxt(r'data.csv', delimiter=',')
x_data = data[:, :-1]  # 特征
y_data = data[:, -1]  # 标签
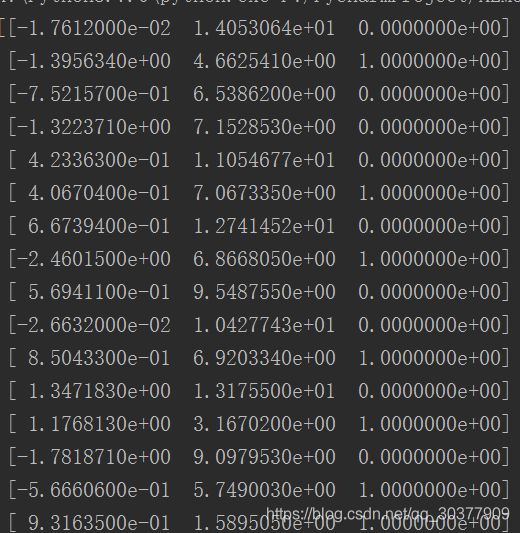
可以看到,这个数据集有3列,前两列为特征,最后一列‘1’和‘0’为标签
作图观察数据集
def plot():
    x0 = []
    x1 = []
    y0 = []
    y1 = []
    # 切分不同类别的数据
    for i in range(len(x_data)):
        if y_data[i] == 0:  # 0类别
            x0.append(x_data[i, 0])
            y0.append(x_data[i, 1])
        else:  # 1类别
            x1.append(x_data[i, 0])
            y1.append(x_data[i, 1])
    #画图
    scatter0 = plt.scatter(x0, y0, c='b', marker='o')  # 蓝色圆点表示0类别
    scatter1 = plt.scatter(x1, y1, c='r', marker='x')  # 红色×表示1类别
    #画图例
    plt.legend(handles=[scatter0, scatter1], labels=['label0', 'label1'], loc='best')

plot()
plt.show()
# 数据处理,添加偏置项
x_data = data[:, :-1]
y_data = data[:, -1, np.newaxis]
# 给样本添加偏置项(x_data是100行2列的数据,y_data是100行1列的数据)
# 可用np.mat(x_data).shape测试
X_data = np.concatenate((np.ones((100, 1)), x_data), axis=1)
到这里,数据准备的工作完成
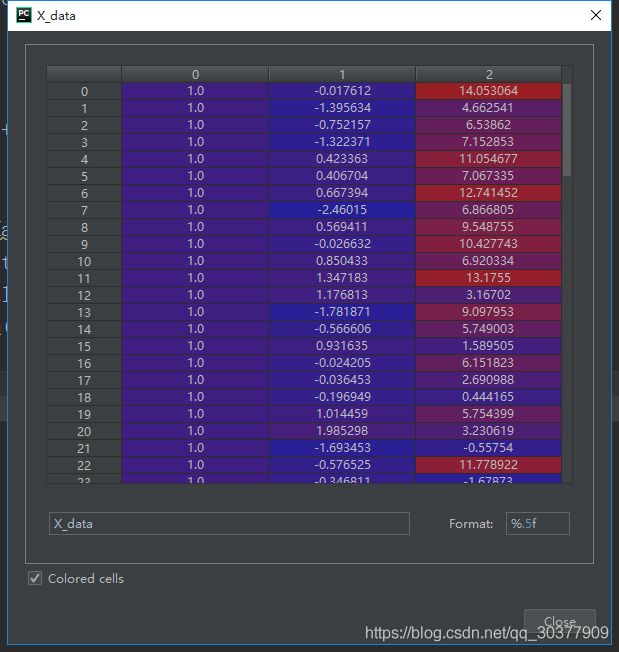
X_data为100行3列的数据,第0列是我们添加的偏置,都为1,后两列为特征值
梯度下降法实现逻辑回归
定义sigmoid函数:
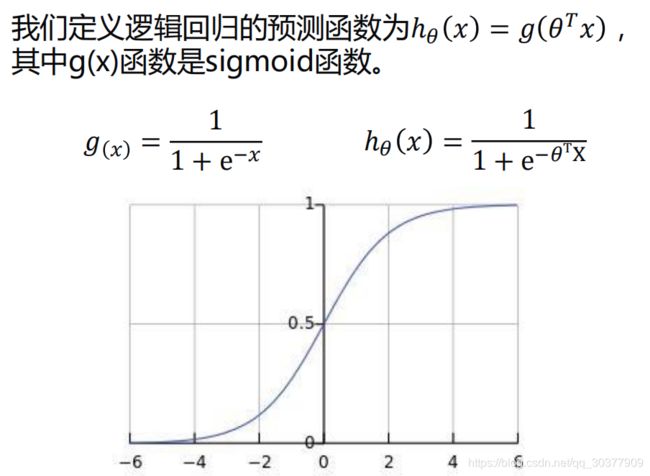
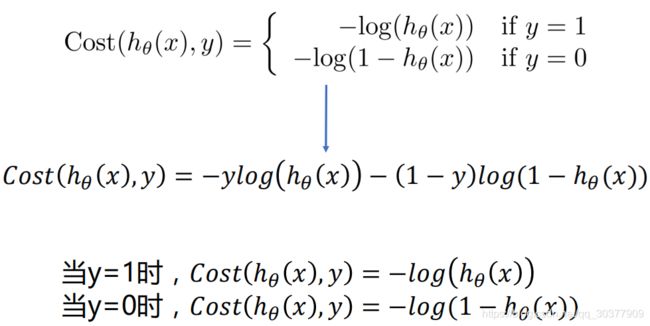
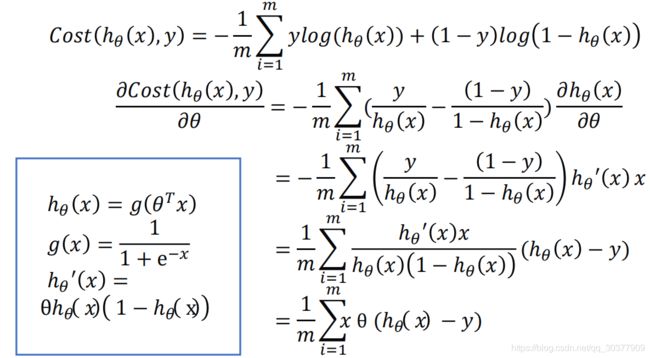
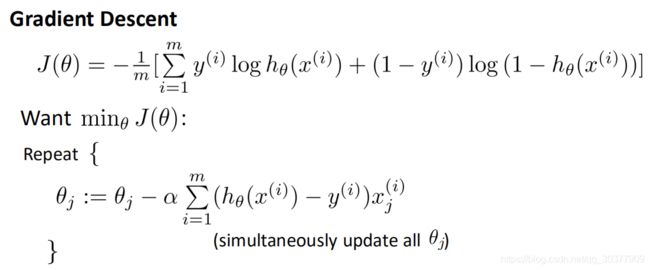
整个计算过程则是根据上面的几张图来进行
def sigmoid(x):
    return 1.0/(1+np.exp(-x))
定义代价函数
def cost(xMat, yMat, ws):
    left = np.multiply(yMat, np.log(sigmoid(xMat*ws)))
    right = np.multiply(1-yMat, np.log(1-sigmoid(xMat*ws)))
    return np.sum(left + right) / -(len(xMat))
定义梯度下降方法
def gradDscent(xArr, yArr):
    if scale == True:
        xArr = preprocessing.scale(xArr)
    xMat = np.mat(xArr)
    yMat = np.mat(yArr)
    lr = 0.001
    epochs = 10000
    costList = []
    # 计算数据行列数
    # 行代表数据个数,列代表权值个数
    m, n = np.shape(xMat)
    # 初始化权值
    ws = np.mat(np.ones((n, 1)))

    for i in range(epochs + 1):
        # xMat和weights矩阵相乘
        h = sigmoid(xMat * ws)
        # 计算误差
        ws_grad = xMat.T*(h - yMat)/m
        ws = ws - lr * ws_grad
        if i % 50 == 0:
            costList.append(cost(xMat, yMat, ws))
    return ws, costList
# 模型训练,得到权值和cost值的变化
ws, costList = gradDscent(X_data, y_data)
print(ws)
计算结果
# 模型训练,得到权值和cost值的变化
ws, costList = gradDscent(X_data, y_data)
print(ws)
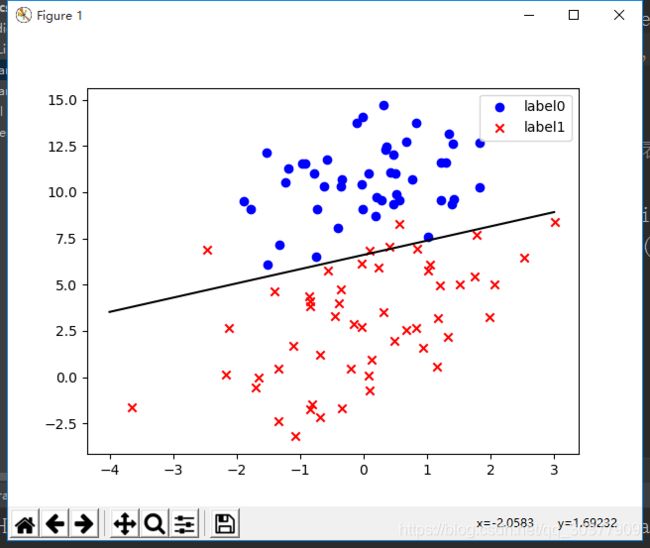
画出决策边界
if scale == True:
    #画图决策边界
    plot()
    x_test = [[-4], [3]]
    y_test = (-ws[0] - x_test * ws[1]) / ws[2]
    plt.plot(x_test, y_test, 'K')
    plt.show()
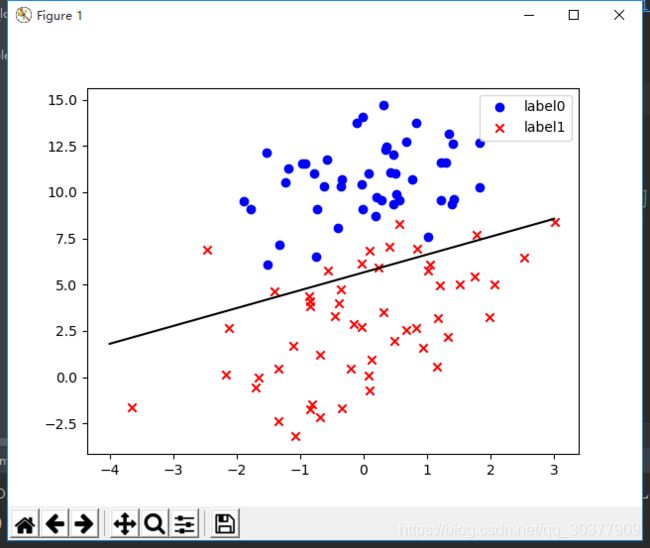
补充:y的求解
前边已经求出了3个权重,则转化为等式
w1x+w2y+w0b=0
y=(-b-w1x)/w2,其中,b=1
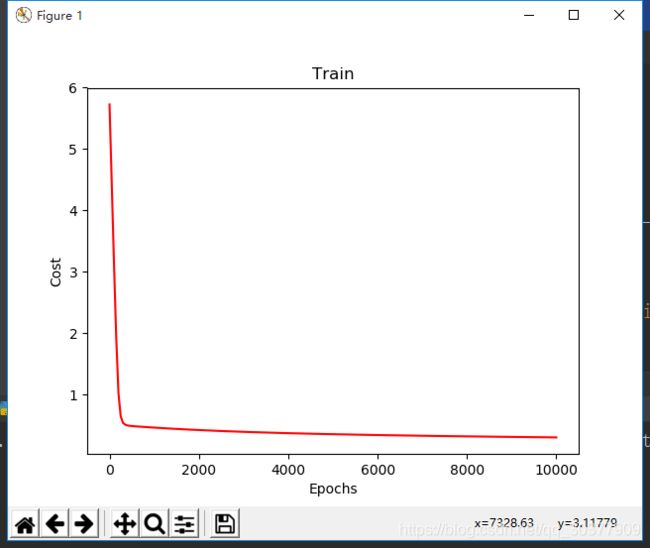
画出损失函数(costLost)变化曲线:
x = np.linspace(0, 10000, 201)
plt.plot(x, costList, c='r')
plt.title('Train')
plt.xlabel('Epochs')
plt.ylabel('Cost')
plt.show()
最后进行预测
导入classification_report
from sklearn.metrics import classification_report
def predict(x_data, ws):
    if scale == True:
        x_data = preprocessing.scale(x_data)
    xMat = np.mat(x_data)
    ws = np.mat(ws)
    # 大于0.5取1,否则返回0
    return[1 if x >= 0.5 else 0 for x in sigmoid(xMat*ws)]


predictions = predict(X_data, ws)
print(classification_report(y_data, predictions))
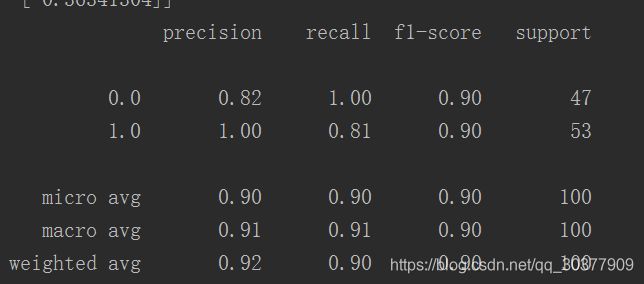
最后可以看到,属于‘1’类的有53个,属于‘0’类的有47个。
sklearn实现逻辑回归
前期的数据处理完全一样,直接从构建模型开始
logistic = linear_model.LogisticRegression()
logistic.fit(x_data, y_data)
画决策边界,计算方法与梯度下降法中的说明一致。
if scale==False:
    # 画图决策边界
    plot()
    x_test = np.array([[-4], [3]])
    y_test = (-logistic.intercept_ -x_test*logistic.coef_[0][0])/logistic.coef_[0][1]
    plt.plot(x_test, y_test, 'k')
    plt.show()

print(logistic.coef_)  # 代表权值,但是二维的数据,所以取值时[0][0]或者[0][1]
predictions = logistic.predict(x_data)
print(classification_report(y_data, predictions))

