c++调用pytorch libtorch(基础篇)
c`++调用pytorch libtorch`
- 1.将pytorch模型转换成Torch Script
- 2.创建cpp文件
- 3.使用cmake进行build
- 4.生成.exe文件
- 4. c++ libtorch forward结果与pytorch结果不一致
-
- 4.1 转tensor时维度变换不对
- 4.2 转tensor时是否忘记了除255
- 5.可能出错的几点
- 参考文献
以GitHub [见参考文献1]为例,学习了c++调用pytorch API libtorch的实现过程。
1.将pytorch模型转换成Torch Script
官方tutorial https://pytorch.org/tutorials/advanced/cpp_export.html中给出了当前将pytorch模型转成Torch Script的两种方式(官方源码如下):
- 1.Converting to Torch Script via Tracing
import torch
import torchvision

# An instance of your model.
model = torchvision.models.resnet18()

# An example input you would normally provide to your model's forward() method.
example = torch.rand(1, 3, 224, 224)

# Use torch.jit.trace to generate a torch.jit.ScriptModule via tracing.
traced_script_module = torch.jit.trace(model, example)
- 2.Converting to Torch Script via Annotation
class MyModule(torch.nn.Module):
    def __init__(self, N, M):
        super(MyModule, self).__init__()
        self.weight = torch.nn.Parameter(torch.rand(N, M))

    def forward(self, input):
        if input.sum() > 0:
          output = self.weight.mv(input)
        else:
          output = self.weight + input
        return output

my_module = MyModule(10,20)
sm = torch.jit.script(my_module)
当然pytorch还提供了Mixing Tracing and Scripting的方法。
这里只介绍自己使用过的torch.jit.trace,使用起来不要太简单~
traced_net = torch.jit.trace(model,random_input)
traced_net.save("model_trace.pt")
如果产生一些warning,可以参考torch.jit.trace 消除TracerWarning。
好的,torch.jit生成c++中libtorch可以加载的模型就先介绍到这。
2.创建cpp文件
#include 整个程序看起来比较简单,先用opencv显示图片,然后调用模型输出结果。
torch::jit::script::Module module = torch::jit::load("./model_trace.pt");
3.使用cmake进行build
这一点与参考github有所修改。
cmake_minimum_required(VERSION 3.0 FATAL_ERROR)
project(custom_ops)

SET(CMAKE_BUILE_TYPE RELEASE)

INCLUDE_DIRECTORIES(
C:/libtorch/include
C:/opencv/build/include
C:/opencv/build/include/opencv2
)

SET(TORCH_LIBRARIES C:/libtorch/lib)
SET(OpenCV_LIBS C:/opencv/build/x64/vc14/lib)

LINK_DIRECTORIES(
${TORCH_LIBRARIES}
${OpenCV_LIBS}
)

add_executable(example-app example-app.cpp)

target_link_libraries(example-app
c10.lib
torch.lib
torch_cpu.lib
opencv_world452.lib
)

set_property(TARGET example-app PROPERTY CXX_STANDARD 11)
通过git bash进行编译:
先cd到project文件夹目录,然后依次输入:
mkdir build #创建bulid文件夹
cd build
cmake.exe ..
build文件夹下会生成如下文件:

4.生成.exe文件
启动vs2019软件,文件/打开/项目解决方案,找到bulid文件夹下的.sln文件,打开项目:
查看项目属性:

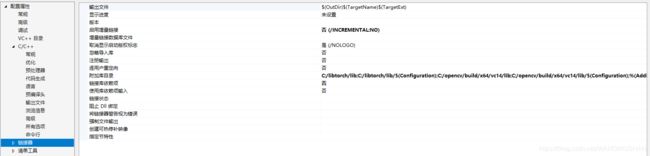
c/c++常规下的附加包含目录及链接器下的附加库目录的内容都与cmakelists.txt相对应了。
把配置管理器属性debug修改为release,执行生成.exe命令:

打开build下release文件夹,就会找到该exe文件:

双击该exe,会提示找到.dll错误:
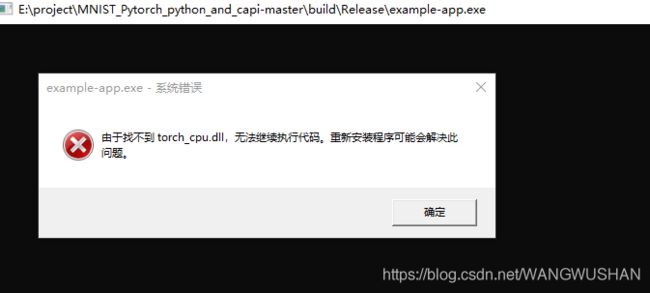
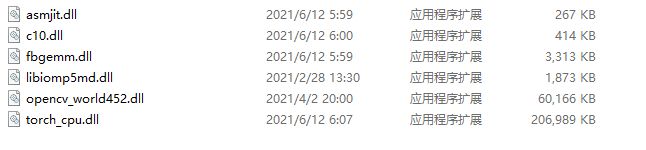
将以下dll放到release文件夹,就可以正常执行了:
4. c++ libtorch forward结果与pytorch结果不一致
4.1 转tensor时维度变换不对
torch::Tensor tensor_image = torch::from_blob(input_image.data, {1, input_image.rows, input_image.cols,3});
tensor_image = tensor_image.permute({0,3,1,2});
读彩图一定要写成这样,否则可能会有问题。
4.2 转tensor时是否忘记了除255
img_tensor = img_tensor.div(255);
#或
img_tensor.convertTo(img_tensor , CV_32FC3, 1.0 / 255.0);
5.可能出错的几点
-
1.程序中需要的图片文件及.pt文件的存放目录,需要放在build文件夹下;如果文件存在位置不正确,程序无法正常执行。
-
2.需下载相应的libtorch及opencv c++版本,这里都是用release version,并且都放在c://目录下。

完整工程可参考https://download.csdn.net/download/WANGWUSHAN/19759271。
参考文献
[1] https://github.com/tobiascz/MNIST_Pytorch_python_and_capi
[2] https://pytorch.org/tutorials/advanced/cpp_export.html
[3] https://zhuanlan.zhihu.com/p/72750321
[4] Libtorch踩坑实录:non-scalar type, ‘->’ has non-pointer type,opencv,Expected Tensor but got Tuple