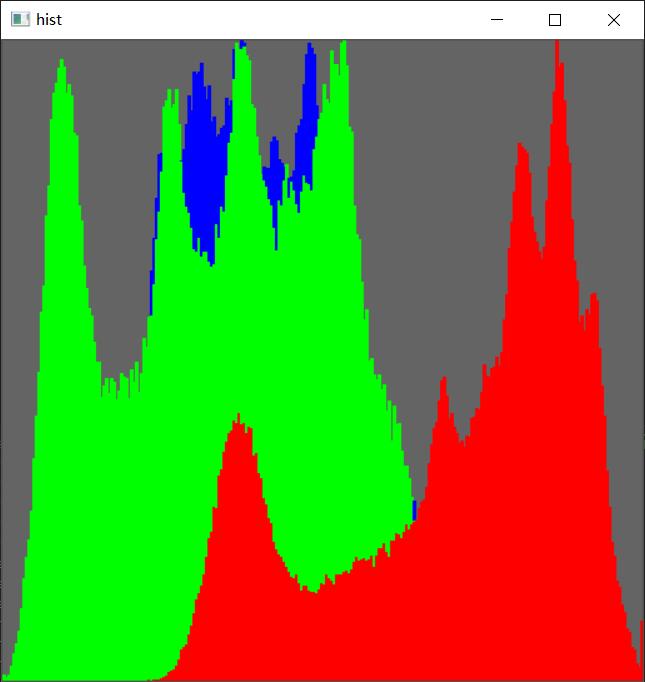
OpenCVSharp4 直方图
直方图是变量分布的统计图,能帮助理解数据的密度估计和概率分布。听起来,似乎很拗口。用灰度图理解,则很清晰。每个像素的灰度的取值取值范围为0~255。所谓直方图就是统计每个取值的像素个数。
            Mat lena = Cv2.ImRead("lena.jpg");
            Mat[] mats = Cv2.Split(lena);//一张图片,将lena拆分成3个图片装进mat
            Mat[] mats0 = new Mat[] { mats[0] };//B
            Mat[] mats1 = new Mat[] { mats[1] };//G
            Mat[] mats2 = new Mat[] { mats[2] };//R
            Mat[] hist = new Mat[] { new Mat(), new Mat(), new Mat() };//一个矩阵数组,用来接收直方图,记得全部初始化
            int[] channels = new int[] { 0 };//一个通道,初始化为通道0
            int[] histsize = new int[] { 256 };//初始化为256箱子
            Rangef[] range = new Rangef[1];//一个通道,范围
            range[0] = new Rangef(0, 256);//从0开始(含),到256结束(不含)
            Mat mask = new Mat();//不做掩码
            Cv2.CalcHist(mats0, channels, mask, hist[0], 1, histsize, range);//对被拆分的图片单独进行计算
            Cv2.CalcHist(mats1, channels, mask, hist[1], 1, histsize, range);//对被拆分的图片单独进行计算
            Cv2.CalcHist(mats2, channels, mask, hist[2], 1, histsize, range);//对被拆分的图片单独进行计算
            Cv2.Normalize(hist[0], hist[0], 0, 256, NormTypes.MinMax);// 归一化
            Cv2.Normalize(hist[1], hist[1], 0, 256, NormTypes.MinMax);// 归一化
            Cv2.Normalize(hist[2], hist[2], 0, 256, NormTypes.MinMax);// 归一化

            double minVal0, maxVal0;
            Cv2.MinMaxLoc(hist[0], out minVal0, out maxVal0);
            double minVal1, maxVal1;
            Cv2.MinMaxLoc(hist[1], out minVal1, out maxVal1);
            double minVal2, maxVal2;
            Cv2.MinMaxLoc(hist[2], out minVal2, out maxVal2);

            double minVal = Math.Min(minVal0, Math.Min(minVal1, minVal2));
            double maxVal = Math.Max(maxVal0, Math.Max(maxVal1, maxVal2));

            int height = 512;
            int width = 512;

            hist[0] = hist[0] * (maxVal != 0 ? height / maxVal : 0.0);
            hist[1] = hist[1] * (maxVal != 0 ? height / maxVal : 0.0);
            hist[2] = hist[2] * (maxVal != 0 ? height / maxVal : 0.0);

            Mat histImage = new Mat(height, width, MatType.CV_8UC3, new Scalar(100, 100, 100));
            int binW = (int)((double)width / histsize[0]);
            for (int i = 0; i < histsize[0]; i++)
            {
                histImage.Rectangle(
                                    new Point(i * binW, histImage.Rows - (int)hist[0].Get(i)),
                                    new Point((i + 1) * binW, histImage.Rows),
                                     new Scalar(255, 0, 0),
                                    -1);

                histImage.Rectangle(
                    new Point(i * binW, histImage.Rows - (int)hist[1].Get(i)),
                    new Point((i + 1) * binW, histImage.Rows),
                     new Scalar(0, 255, 0),
                    -1);

                histImage.Rectangle(
                    new Point(i * binW, histImage.Rows - (int)hist[2].Get(i)),
                    new Point((i + 1) * binW, histImage.Rows),
                     new Scalar(0, 0, 255),
                    -1);
            }
            Cv2.ImShow("hist", histImage);
Cv2.WaitKey(); - 均衡 画面对比度调整。
-
            Mat lena = Cv2.ImRead("lena.jpg", ImreadModes.Color);
            Mat yCbCR = new Mat();
            Cv2.CvtColor(lena, yCbCR, ColorConversionCodes.BGR2YCrCb);
            Mat[] channels = Cv2.Split(yCbCR);//一张图片,将lena拆分成3个图片装进mat
            Cv2.EqualizeHist(channels[0], channels[0]);
            Cv2.Merge(channels, yCbCR);
            Mat result = new Mat();
            Cv2.CvtColor(yCbCR, result, ColorConversionCodes.YCrCb2BGR);

            Cv2.ImShow("origin", lena);
            Cv2.ImShow("EqualizeHist", result);
            Cv2.WaitKey();
此处需要注意的是采用了YCrCB格式,该格式的Y通道是亮度,对其调整,实际上调整的是对比度,不会导致图片本身的失真。

