slowfast训练自定义数据集,识别动物行为
使用slowfast训练人类的行为没有任何问题,但训练动物行为时,出现了不收敛、map值不变等各种奇怪的问题。为解决这个问题,花了一周时间,故在此记录!
动物行为预测,整理动物行为的数据集是最大的难点!刚开始准备的是猪的数据集,但由于猪栏里的猪只太多,导致图片标注的不准确,这应该也是训练过程不收敛的一个原因。
还有一个不收敛的原因,可能是因为最开始我只定义了一种行为,训练过程中,该行为的map值一直为1,后续改成多行为后就再未出现这种情况。
所以先用我家的狗做个测试!!!
1、视频采集
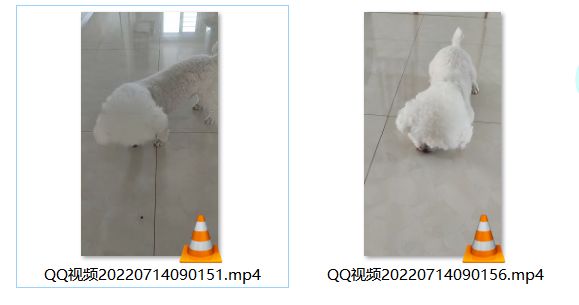
本次训练以实验为目的,采集2段30秒以上的狗的视频!
2、视频抽帧
目的有3个:
1是为了统一各个视频的长度(测试发现,若视频时长不一,训练过程可能出现问题,未作进一步验证)
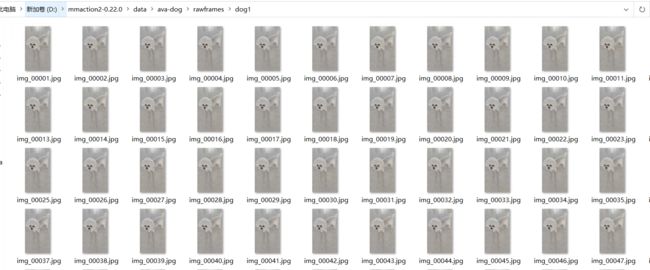
2是为了1秒抽1帧图片,目的是用来标注,ava数据集就是1秒1帧。
3是为了1秒抽30帧图片,目的是为了训练,据说因为slowfast在slow流里1秒会采集到15帧,在fast流里1秒会采集到2帧。
以下是解析脚本,脚本仅支持在linux系统下运行:
video2img.py
import os
import shutil
from tqdm import tqdm
start = 0  #############
seconds = 30  ##############

video_path = './ava/videos'
labelframes_path = './ava/labelframes'
rawframes_path = './ava/rawframes'
cut_videos_sh_path = './cut_videos.sh'

if os.path.exists(labelframes_path):
    shutil.rmtree(labelframes_path)
if os.path.exists(rawframes_path):
    shutil.rmtree(rawframes_path)

fps = 30
raw_frames = seconds*fps

with open(cut_videos_sh_path, 'r') as f:
    sh = f.read()
sh = sh.replace(sh[sh.find('    ffmpeg'):], f'    ffmpeg -ss {start} -t {seconds} -i "${{video}}" -r 30 -strict experimental "${{out_name}}"\n  fi\ndone\n')
with open(cut_videos_sh_path, 'w') as f:
    f.write(sh)
# 902打到1798
os.system('bash cut_videos.sh')
os.system('bash extract_rgb_frames_ffmpeg.sh')
os.makedirs(labelframes_path, exist_ok=True)
video_ids = [video_id[:-4] for video_id in os.listdir(video_path)]
for video_id in tqdm(video_ids):
    for img_id in range(2*fps+1, (seconds-2)*30, fps):
        shutil.copyfile(os.path.join(rawframes_path, video_id, 'img_'+format(img_id, '05d')+'.jpg'),
                        os.path.join(labelframes_path, video_id+'_'+format(start+img_id//30, '05d')+'.jpg'))
extract_rgb_frames_ffmpeg.sh
IN_DATA_DIR="./ava/videos_cut"
OUT_DATA_DIR="./ava/rawframes"

if [[ ! -d "${OUT_DATA_DIR}" ]]; then
  echo "${OUT_DATA_DIR} doesn't exist. Creating it.";
  mkdir -p ${OUT_DATA_DIR}
fi

for video in $(ls -A1 -U ${IN_DATA_DIR}/*)
do
  video_name=${video##*/}

  if [[ $video_name = *".webm" ]]; then
    video_name=${video_name::-5}
  else
    video_name=${video_name::-4}
  fi

  out_video_dir=${OUT_DATA_DIR}/${video_name}
  mkdir -p "${out_video_dir}"

  out_name="${out_video_dir}/img_%05d.jpg"

  ffmpeg -i "${video}" -r 30 -q:v 1 "${out_name}"
done
cut_videos.sh
IN_DATA_DIR="./ava/videos"
OUT_DATA_DIR="./ava/videos_cut"

if [[ ! -d "${OUT_DATA_DIR}" ]]; then
  echo "${OUT_DATA_DIR} doesn't exist. Creating it.";
  mkdir -p ${OUT_DATA_DIR}
fi

for video in $(ls -A1 -U ${IN_DATA_DIR}/*)
do
  out_name="${OUT_DATA_DIR}/${video##*/}"
  if [ ! -f "${out_name}" ]; then
    ffmpeg -ss 0 -t 3 -i "${video}" -r 30 -strict experimental "${out_name}"
  fi
done
以上3个脚本放在同一目录下,并在目录下创建ava/videos文件夹,将我准备的2个视频放在videos是文件夹下,由于2个视频的时长都在30秒以上,所以修改video2img.py中的seconds为30(这里要注意,seconds为视频结束时间,所以准备的视频文件时长都必须超过30秒)。
然后执行:python video2img.py
执行完成后,会在ava文件夹下生成三个文件夹,labelframes里存放的是需要标注的图片(1秒抽1帧的图片),rawframes里放的是每个视频文件每秒30帧的图片(用于slowfast训练),videos_cut文件夹里放的时裁剪后的视频文件(视频时长是1-30秒),videos里放的就是原视频文件。实际在以后的训练过程中,videos_cut和videos里的文件就已经没啥用处了,直接删掉就行。
3、图片标注说明
最开始接触slowfast时,就被图片标注这块绕晕了,实际上图片标注分为两种方式,1是自动标注,2是手动标注。
所谓自动标注,也就是使用faster rcnn自动把图片中的人、动物框出来,然后我们再标注动物的行为,如果待标注的图片数据量比较大,这种方式无疑是很好的,比较手动画框框是很累人的。
所谓手动标注,也就是说,我们手动画框框,然后再标注动物的行为,这种方式比较适合图片数据量比较小的情况。
由于我准备的2个视频文件,视频总长度也就1分钟,1秒抽1帧图片,需要标注的图片顶多也就60张,所以我选择手动标注,手动框选图中的狗,然后标注狗的行为。
4、开始标注图片
slowfast需要ava格式的数据集,先使用via工具标注图片中的行为,然后再使用脚本将导出的csv文件转为slowfast需要的ava格式即可。我使用的via版本为via-3.0.11。
via标注工具下载地址:https://gitlab.com/vgg/via/tree/master
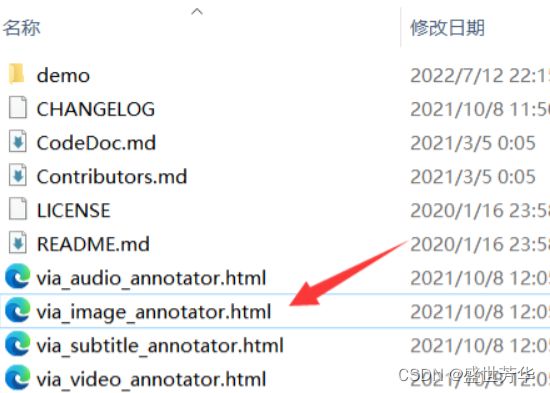
下载完成后,双击via_image_annotator.html打开
点击如下图所示加号图标,将labelframes文件夹下全部图片导入。
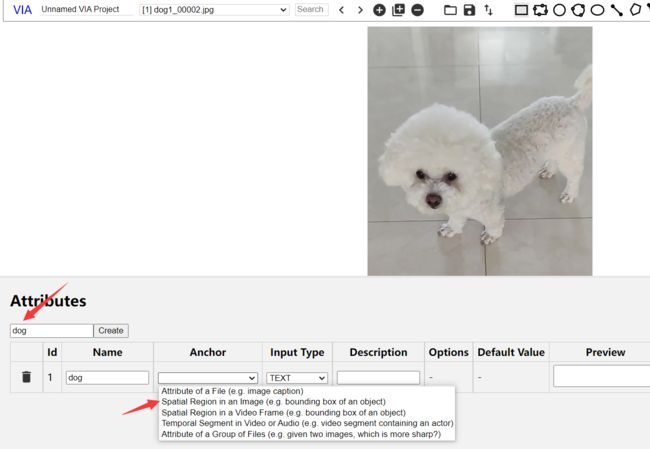
点击如下图所示图标
创建一个attribute,anchor选择第二项
input type选择checkbox
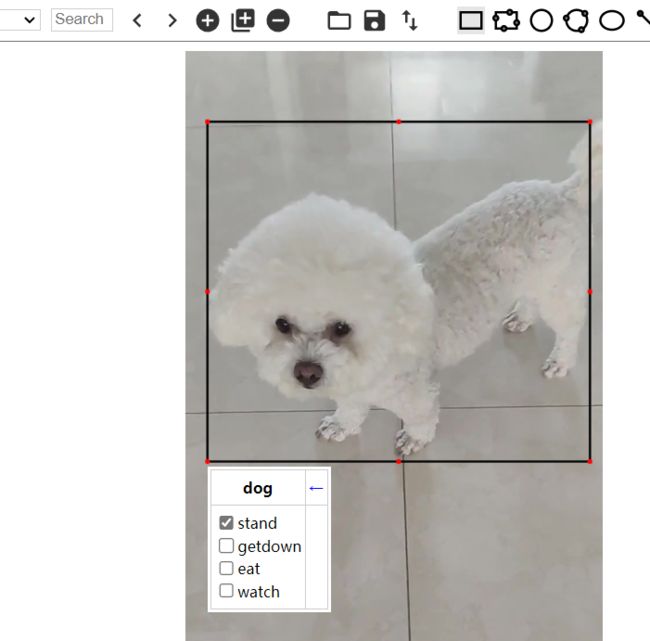
然后再options中定义狗的四个行为,我定义了4个行为,站、趴下、吃、看我,英文字母用英文状态下的逗号分割开,然后preview中勾选四个行为。
接下来开始标注图片,框选图片中的狗,然后点击矩形框,勾选你认为狗出现的行为,如下图所示:
全部标注完成后,点击如下图所示图标:
保持默认选项,点击“Export”导出csv文件,注意,该csv文件最好不要用Excel打开进行编辑!!!
此时会得到一个csv文件。
使用Editplus之类的文本编辑器打开看看
从第11行开始就是每张图的标注情况,关键检查一下有没有漏标行为的。就像下图第13行,就是忘记标注行为了!!!
5、via数据集转为slowfast格式
slowfast数据集要求ava格式,同时需要提供pkl文件,使用以下python脚本可一键生成全部所需配置文件!
via2ava.py
"""
Theme:ava format data transformer

author:Hongbo Jiang

time:2022/3/14/1:51:51

description:

    这是一个数据格式转换器,根据mmaction2的ava数据格式转换规则将来自网站:
    https://www.robots.ox.ac.uk/~vgg/software/via/app/via_video_annotator.html
    的、标注好的、视频理解类型的csv文件转换为mmaction2指定的数据格式。

    转换规则:
        # AVA Annotation Explained

        In this section, we explain the annotation format of AVA in details:

        ```
        mmaction2
        ├── data
        │   ├── ava
        │   │   ├── annotations
        │   │   |   ├── ava_dense_proposals_train.FAIR.recall_93.9.pkl
        │   │   |   ├── ava_dense_proposals_val.FAIR.recall_93.9.pkl
        │   │   |   ├── ava_dense_proposals_test.FAIR.recall_93.9.pkl
        │   │   |   ├── ava_train_v2.1.csv
        │   │   |   ├── ava_val_v2.1.csv
        │   │   |   ├── ava_train_excluded_timestamps_v2.1.csv
        │   │   |   ├── ava_val_excluded_timestamps_v2.1.csv
        │   │   |   ├── ava_action_list_v2.1.pbtxt
        ```

        ## The proposals generated by human detectors

        In the annotation folder, `ava_dense_proposals_[train/val/test].FAIR.recall_93.9.pkl` are human proposals generated by a human detector. They are used in training, validation and testing respectively. Take `ava_dense_proposals_train.FAIR.recall_93.9.pkl` as an example. It is a dictionary of size 203626. The key consists of the `videoID` and the `timestamp`. For example, the key `-5KQ66BBWC4,0902` means the values are the detection results for the frame at the $$902_{nd}$$ second in the video `-5KQ66BBWC4`. The values in the dictionary are numpy arrays with shape $$N \times 5$$ , $$N$$ is the number of detected human bounding boxes in the corresponding frame. The format of bounding box is $$[x_1, y_1, x_2, y_2, score], 0 \le x_1, y_1, x_2, w_2, score \le 1$$. $$(x_1, y_1)$$ indicates the top-left corner of the bounding box, $$(x_2, y_2)$$ indicates the bottom-right corner of the bounding box; $$(0, 0)$$ indicates the top-left corner of the image, while $$(1, 1)$$ indicates the bottom-right corner of the image.

        ## The ground-truth labels for spatio-temporal action detection

        In the annotation folder, `ava_[train/val]_v[2.1/2.2].csv` are ground-truth labels for spatio-temporal action detection, which are used during training & validation. Take `ava_train_v2.1.csv` as an example, it is a csv file with 837318 lines, each line is the annotation for a human instance in one frame. For example, the first line in `ava_train_v2.1.csv` is `'-5KQ66BBWC4,0902,0.077,0.151,0.283,0.811,80,1'`: the first two items `-5KQ66BBWC4` and `0902` indicate that it corresponds to the $$902_{nd}$$ second in the video `-5KQ66BBWC4`. The next four items ($$[0.077(x_1), 0.151(y_1), 0.283(x_2), 0.811(y_2)]$$) indicates the location of the bounding box, the bbox format is the same as human proposals. The next item `80` is the action label. The last item `1` is the ID of this bounding box.

        ## Excluded timestamps

        `ava_[train/val]_excludes_timestamps_v[2.1/2.2].csv` contains excluded timestamps which are not used during training or validation. The format is `video_id, second_idx` .

        ## Label map

        `ava_action_list_v[2.1/2.2]_for_activitynet_[2018/2019].pbtxt` contains the label map of the AVA dataset, which maps the action name to the label index.

"""

import csv
import os
from distutils.log import info
import pickle
from matplotlib.pyplot import contour, show
import numpy as np
import cv2
from sklearn.utils import shuffle


def transformer(origin_csv_path, frame_image_dir,
                train_output_pkl_path, train_output_csv_path,
                valid_output_pkl_path, valid_output_csv_path,
                exclude_train_output_csv_path, exclude_valid_output_csv_path,
                out_action_list, out_labelmap_path, dataset_percent=0.9):
    """
    输入:
    origin_csv_path:从网站导出的csv文件路径。
    frame_image_dir:以"视频名_第n秒.jpg"格式命名的图片,这些图片是通过逐秒读取的。
    output_pkl_path:输出pkl文件路径
    output_csv_path:输出csv文件路径
    out_labelmap_path:输出labelmap.txt文件路径
    dataset_percent:训练集和测试集分割

    输出:无

    """

    # -----------------------------------------------------------------------------------------------
    get_label_map(origin_csv_path, out_action_list, out_labelmap_path)
    # -----------------------------------------------------------------------------------------------
    information_array = [[], [], []]
    # 读取输入csv文件的位置信息段落
    with open(origin_csv_path, 'r') as csvfile:
        count = 0
        content = csv.reader(csvfile)
        for line in content:
            # print(line)
            if count >= 10:
                frame_image_name = eval(line[1])[0]  # str
                # print(line[-2])
                location_info = eval(line[4])[1:]  # list
                action_list = list(eval(line[5]).values())[0].split(',')
                action_list = [int(x) for x in action_list]  # list
                information_array[0].append(frame_image_name)
                information_array[1].append(location_info)
                information_array[2].append(action_list)
            count += 1
    # 将:对应帧图片名字、物体位置信息、动作种类信息汇总为一个信息数组
    information_array = np.array(information_array, dtype=object).transpose()
    # information_array = np.array(information_array)
    # -----------------------------------------------------------------------------------------------
    num_train = int(dataset_percent * len(information_array))
    train_info_array = information_array[:num_train]
    valid_info_array = information_array[num_train:]
    get_pkl_csv(train_info_array, train_output_pkl_path, train_output_csv_path, exclude_train_output_csv_path, frame_image_dir)
    get_pkl_csv(valid_info_array, valid_output_pkl_path, valid_output_csv_path, exclude_valid_output_csv_path, frame_image_dir)


def get_label_map(origin_csv_path, out_action_list, out_labelmap_path):
    classes_list = 0
    classes_content = ""
    labelmap_strings = ""
    # 提取出csv中的第9行的行为下标
    with open(origin_csv_path, 'r') as csvfile:
        count = 0
        content = csv.reader(csvfile)
        for line in content:
            if count == 8:
                classes_list = line
                break
            count += 1
    # 截取种类字典段落
    st = 0
    ed = 0
    for i in range(len(classes_list)):
        if classes_list[i].startswith('options'):
            st = i
        if classes_list[i].startswith('default_option_id'):
            ed = i
    for i in range(st, ed):
        if i == st:
            classes_content = classes_content + classes_list[i][len('options:'):] + ','
        else:
            classes_content = classes_content + classes_list[i] + ','
    classes_dict = eval(classes_content)[0]
    # 写入labelmap.txt文件
    with open(out_action_list, 'w') as f:  # 写入action_list文件
        for v, k in classes_dict.items():
            labelmap_strings = labelmap_strings + "label {{\n  name: \"{}\"\n  label_id: {}\n  label_type: PERSON_MOVEMENT\n}}\n".format(k, int(v)+1)
        f.write(labelmap_strings)
    labelmap_strings = ""
    with open(out_labelmap_path, 'w') as f:  # 写入label_map文件
        for v, k in classes_dict.items():
            labelmap_strings = labelmap_strings + "{}: {}\n".format(int(v)+1, k)
        f.write(labelmap_strings)


def get_pkl_csv(information_array, output_pkl_path, output_csv_path, exclude_output_csv_path, frame_image_dir):
    # 在遍历之前需要对我们的字典进行初始化
    pkl_data = dict()  # 存储pkl键值对信的字典(其值为普通list)
    csv_data = []  # 存储导出csv文件的2d数组
    read_data = {}  # 存储pkl键值对的字典(方便字典的值化为numpy数组)

    for i in range(len(information_array)):
        img_name = information_array[i][0]
        # -------------------------------------------------------------------------------------------
        video_name, frame_name = '_'.join(img_name.split('_')[:-1]), format(int(img_name.split('_')[-1][:-4]), '04d')  # 我的格式是"视频名称_帧名称",格式不同可自行更改
        # -------------------------------------------------------------------------------------------
        pkl_key = video_name + ',' + frame_name
        pkl_data[pkl_key] = []
    # 遍历所有的图片进行信息读取并写入pkl数据
    for i in range(len(information_array)):
        img_name = information_array[i][0]
        # -------------------------------------------------------------------------------------------
        video_name, frame_name = '_'.join(img_name.split('_')[:-1]), str(int(img_name.split('_')[-1][:-4]))  # 我的格式是"视频名称_帧名称",格式不同可自行更改
        # -------------------------------------------------------------------------------------------
        imgpath = frame_image_dir + '/' + img_name
        location_list = information_array[i][1]
        action_info = information_array[i][2]
        image_array = cv2.imread(imgpath)
        h, w = image_array.shape[:2]
        # 进行归一化
        location_list[0] /= w
        location_list[1] /= h
        location_list[2] /= w
        location_list[3] /= h
        location_list[2] = location_list[2]+location_list[0]
        location_list[3] = location_list[3]+location_list[1]
        # 置信度置为1
        # 组装pkl数据

        for kind_idx in action_info:
            csv_info = [video_name, frame_name, *location_list, kind_idx+1, 1]
            csv_data.append(csv_info)

        location_list = location_list + [1]
        pkl_key = video_name + ',' + format(int(frame_name), '04d')
        pkl_value = location_list
        pkl_data[pkl_key].append(pkl_value)

    for k, v in pkl_data.items():
        read_data[k] = np.array(v)

    with open(output_pkl_path, 'wb') as f:  # 写入pkl文件
        pickle.dump(read_data, f)

    with open(output_csv_path, 'w', newline='') as f:  # 写入csv文件, 设定参数newline=''可以不换行。
        f_csv = csv.writer(f)
        f_csv.writerows(csv_data)

    with open(exclude_output_csv_path, 'w', newline='') as f:  # 写入csv文件, 设定参数newline=''可以不换行。
        f_csv = csv.writer(f)
        f_csv.writerows([])

def showpkl(pkl_path):
    with open(pkl_path, 'rb') as f:
        content = pickle.load(f)
    return content


def showcsv(csv_path):
    output = []
    with open(csv_path, 'r') as f:
        content = csv.reader(f)
        for line in content:
            output.append(line)
    return output


def showlabelmap(labelmap_path):
    classes_dict = dict()
    with open(labelmap_path, 'r') as f:
        content = (f.read().split('\n'))[:-1]
        for item in content:
            mid_idx = -1
            for i in range(len(item)):
                if item[i] == ":":
                    mid_idx = i
            classes_dict[item[:mid_idx]] = item[mid_idx + 1:]
    return classes_dict


os.makedirs('./ava/annotations', exist_ok=True)
transformer("./Unnamed-VIA Project13Jul2022_16h01m30s_export.csv", './ava/labelframes',
            './ava/annotations/ava_dense_proposals_train.FAIR.recall_93.9.pkl', './ava/annotations/ava_train_v2.1.csv',
            './ava/annotations/ava_dense_proposals_val.FAIR.recall_93.9.pkl', './ava/annotations/ava_val_v2.1.csv',
            './ava/annotations/ava_train_excluded_timestamps_v2.1.csv', './ava/annotations/ava_val_excluded_timestamps_v2.1.csv',
            './ava/annotations/ava_action_list_v2.1.pbtxt', './ava/annotations/labelmap.txt', 0.9)
print(showpkl('./ava/annotations/ava_dense_proposals_train.FAIR.recall_93.9.pkl'))
print(showcsv('././ava/annotations/ava_train_v2.1.csv'))
print(showlabelmap('././ava/annotations/labelmap.txt'))
将via2ava.py和你的csv文件放在与ava同级目录下,如下图所示:
重点将代码中的“Unnamed-VIA Project13Jul2022_16h01m30s_export.csv”替换为你的csv文件名,然后执行python via2ava.py,此时会在ava/annotations目录下生成slowfast训练时所需的全部文件。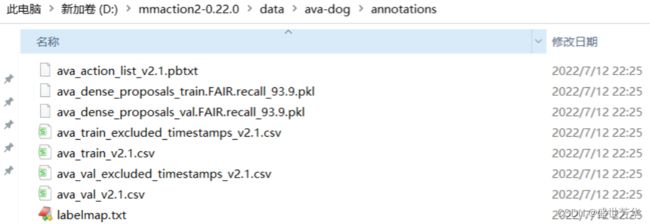
6、slowfast环境部署
MMAction2是一个视频理解工具箱,方便我们快速复现顶会论文。安装步骤也很简单,源码地址:
https://github.com/open-mmlab/mmaction2
conda create -n open-mmlab python=3.8 pytorch=1.10 cudatoolkit=11.3 torchvision -c pytorch -y
conda activate open-mmlab
pip3 install openmim
mim install mmcv-full
mim install mmdet  # optional
mim install mmpose  # optional
git clone https://github.com/open-mmlab/mmaction2.git
cd mmaction2
pip3 install -e .
环境部署成功后,在mmaction2目录下创建data文件夹,然后将与via2ava.py脚本同目录下的ava文件夹放在data下。
7、调整配置文件
进入mmaction2/configs/detection/ava目录,复制slowfast_kinetics_pretrained_r50_4x16x1_20e_ava_rgb.py文件改名为slowfast_kinetics_pretrained_dog_r50_4x16x1_20e_ava_rgb.py,配置文件内容如下:
# model setting
model = dict(
    type='FastRCNN',
    backbone=dict(
        type='ResNet3dSlowFast',
        pretrained=None,
        resample_rate=8,
        speed_ratio=8,
        channel_ratio=8,
        slow_pathway=dict(
            type='resnet3d',
            depth=50,
            pretrained=None,
            lateral=True,
            conv1_kernel=(1, 7, 7),
            dilations=(1, 1, 1, 1),
            conv1_stride_t=1,
            pool1_stride_t=1,
            inflate=(0, 0, 1, 1),
            spatial_strides=(1, 2, 2, 1)),
        fast_pathway=dict(
            type='resnet3d',
            depth=50,
            pretrained=None,
            lateral=False,
            base_channels=8,
            conv1_kernel=(5, 7, 7),
            conv1_stride_t=1,
            pool1_stride_t=1,
            spatial_strides=(1, 2, 2, 1))),
    roi_head=dict(
        type='AVARoIHead',
        bbox_roi_extractor=dict(
            type='SingleRoIExtractor3D',
            roi_layer_type='RoIAlign',
            output_size=8,
            with_temporal_pool=True),
        bbox_head=dict(
            type='BBoxHeadAVA',
            in_channels=2304,
            num_classes=5,
			topk=(1,4),
            multilabel=True,
            dropout_ratio=0.5)),
    train_cfg=dict(
        rcnn=dict(
            assigner=dict(
                type='MaxIoUAssignerAVA',
                pos_iou_thr=0.9,
                neg_iou_thr=0.9,
                min_pos_iou=0.9),
            sampler=dict(
                type='RandomSampler',
                num=32,
                pos_fraction=1,
                neg_pos_ub=-1,
                add_gt_as_proposals=True),
            pos_weight=1.0,
            debug=False)),
    test_cfg=dict(rcnn=dict(action_thr=0.002)))

dataset_type = 'AVADataset'
data_root = '../data/ava/rawframes'
anno_root = '../data/ava/annotations'

ann_file_train = f'{anno_root}/ava_train_v2.1.csv'
ann_file_val = f'{anno_root}/ava_val_v2.1.csv'

exclude_file_train = f'{anno_root}/ava_train_excluded_timestamps_v2.1.csv'
exclude_file_val = f'{anno_root}/ava_val_excluded_timestamps_v2.1.csv'

label_file = f'{anno_root}/ava_action_list_v2.1.pbtxt'

proposal_file_train = (f'{anno_root}/ava_dense_proposals_train.FAIR.'
                       'recall_93.9.pkl')
proposal_file_val = f'{anno_root}/ava_dense_proposals_val.FAIR.recall_93.9.pkl'

img_norm_cfg = dict(
    mean=[123.675, 116.28, 103.53], std=[58.395, 57.12, 57.375], to_bgr=False)

train_pipeline = [
    dict(type='SampleAVAFrames', clip_len=32, frame_interval=2),
    dict(type='RawFrameDecode'),
    dict(type='RandomRescale', scale_range=(256, 320)),
    dict(type='RandomCrop', size=256),
    dict(type='Flip', flip_ratio=0.5),
    dict(type='Normalize', **img_norm_cfg),
    dict(type='FormatShape', input_format='NCTHW', collapse=True),
    # Rename is needed to use mmdet detectors
    dict(type='Rename', mapping=dict(imgs='img')),
    dict(type='ToTensor', keys=['img', 'proposals', 'gt_bboxes', 'gt_labels']),
    dict(
        type='ToDataContainer',
        fields=[
            dict(key=['proposals', 'gt_bboxes', 'gt_labels'], stack=False)
        ]),
    dict(
        type='Collect',
        keys=['img', 'proposals', 'gt_bboxes', 'gt_labels'],
        meta_keys=['scores', 'entity_ids'])
]
# The testing is w/o. any cropping / flipping
val_pipeline = [
    dict(
        type='SampleAVAFrames', clip_len=32, frame_interval=2, test_mode=True),
    dict(type='RawFrameDecode'),
    dict(type='Resize', scale=(-1, 256)),
    dict(type='Normalize', **img_norm_cfg),
    dict(type='FormatShape', input_format='NCTHW', collapse=True),
    # Rename is needed to use mmdet detectors
    dict(type='Rename', mapping=dict(imgs='img')),
    dict(type='ToTensor', keys=['img', 'proposals']),
    dict(type='ToDataContainer', fields=[dict(key='proposals', stack=False)]),
    dict(
        type='Collect',
        keys=['img', 'proposals'],
        meta_keys=['scores', 'img_shape'],
        nested=True)
]

data = dict(
    videos_per_gpu=5,
    workers_per_gpu=2,
    val_dataloader=dict(videos_per_gpu=1),
    test_dataloader=dict(videos_per_gpu=1),
    train=dict(
        type=dataset_type,
        ann_file=ann_file_train,
        exclude_file=exclude_file_train,
        pipeline=train_pipeline,
        label_file=label_file,
        proposal_file=proposal_file_train,
        person_det_score_thr=0.9,
		num_classes=5,
		start_index=1,
        data_prefix=data_root),
    val=dict(
        type=dataset_type,
        ann_file=ann_file_val,
        exclude_file=exclude_file_val,
        pipeline=val_pipeline,
        label_file=label_file,
        proposal_file=proposal_file_val,
        person_det_score_thr=0.9,
		num_classes=5,
		start_index=1,
        data_prefix=data_root))
data['test'] = data['val']

optimizer = dict(type='SGD', lr=0.1125, momentum=0.9, weight_decay=0.00001)
# this lr is used for 8 gpus

optimizer_config = dict(grad_clip=dict(max_norm=40, norm_type=2))
# learning policy

lr_config = dict(
    policy='step',
    step=[10, 15],
    warmup='linear',
    warmup_by_epoch=True,
    warmup_iters=5,
    warmup_ratio=0.1)
total_epochs = 200
checkpoint_config = dict(interval=1)
workflow = [('train', 1)]
evaluation = dict(interval=1, save_best='[email protected]')
log_config = dict(
    interval=20, hooks=[
        dict(type='TextLoggerHook'),
    ])
dist_params = dict(backend='nccl')
log_level = 'INFO'
work_dir = ('./work_dirs/ava/'
            'slowfast_kinetics_pretrained_r50_4x16x1_20e_ava_rgb')
load_from = ('https://download.openmmlab.com/mmaction/recognition/slowfast/'
             'slowfast_r50_4x16x1_256e_kinetics400_rgb/'
             'slowfast_r50_4x16x1_256e_kinetics400_rgb_20200704-bcde7ed7.pth')
resume_from = None
find_unused_parameters = False
注意:
1、替换全部num_classes,我定义了4种行为,所以num_classes=5,要考虑__background__;
2、第42行topk=(1,4),1保持默认,4为行为的数量;
3、62-64行注意训练数据集的路径;
4、若训练过程中显存不够,修改第122行videos_per_gpu的数量;
5、第135、146行要加上start_index=1;
6、163行修改训练次数;
7、第175行load_from可使用预训练模型。
8、开始训练
训练脚本在tools目录下,如果只有1个gpu,那么看一看train.py需要哪些参数,配置好以后python tools/train.py即可。
由于我有4张3090,多GPU训练,就使用了tools目录下的dist_train.sh脚本,进入mmaction2目录:
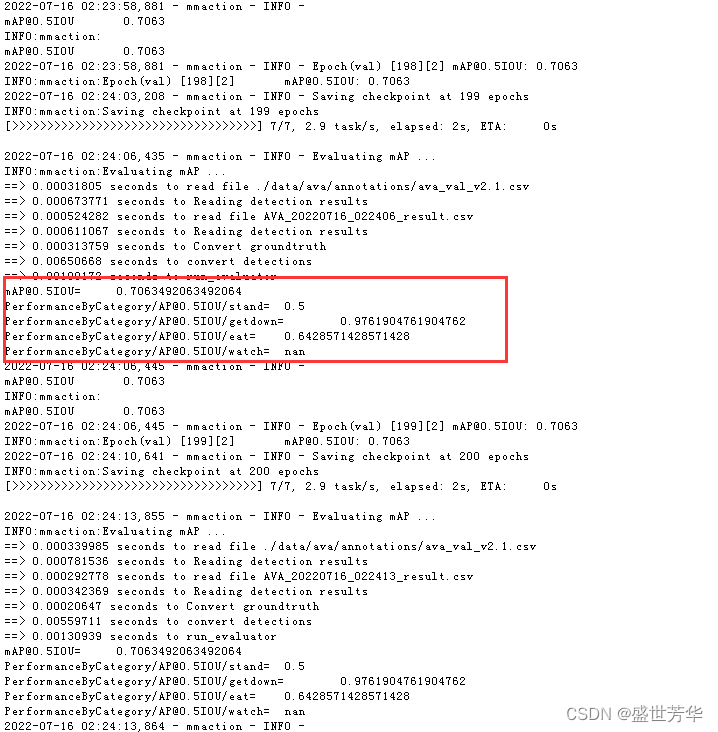
bash tools/dist_train.sh configs/detection/ava/slowfast_kinetics_pretrained_dog_r50_4x16x1_20e_ava_rgb.py 4只要环境、配置没问题,就能看到以上训练过程!
训练结束后,使用训练得到的权重测试一下效果!
9、训练效果
由于slowfast行为识别的前提,是先使用目标识别算法将物体框出来,所以想看训练结果,还需下载mmdetection进行目标识别。
源码地址:https://github.com/open-mmlab/mmdetection.git
安装步骤可参考官方说明文档:https://mmdetection.readthedocs.io/zh_CN/latest/get_started.html#id2
进入mmaction2/demo目录,编辑webcam_demo_spatiotemporal_det.py,查看需要传入哪些参数。我为了省事,直接修改了此文件
parser.add_argument(
        '--config',
        default=('../configs/detection/ava/'
                 'slowfast_kinetics_pretrained_zdpig_r50_4x16x1_20e_ava_rgb.py'),
        help='spatio temporal detection config file path')
    parser.add_argument(
        '--checkpoint',
        default=('../logs/'
                 'epoch_45.pth'),
        help='spatio temporal detection checkpoint file/url')
    parser.add_argument(
        '--action-score-thr',
        type=float,
        default=0.4,
        help='the threshold of human action score')
    parser.add_argument(
        '--det-config',
        default='../mmdetection-2.20.0/configs/yolo/yolov3_d53_mstrain-416_273e_coco.py',
        help='human detection config file path (from mmdet)')
    parser.add_argument(
        '--det-checkpoint',
        default=('../weights/'
                 'yolo_coco_epoch_570.pth'),
        help='human detection checkpoint file/url')
    parser.add_argument(
        '--det-score-thr',
        type=float,
        default=0.1,
        help='the threshold of human detection score')
    parser.add_argument(
        '--input-video',
        default='pig100.mp4',
        type=str,
        help='webcam id or input video file/url')
--config为slowfast训练狗的配置文件
--checkpoint为slowfast训练得到的权重
--det-config为mmdetection的配置文件
--det-checkpoint为mmdetection的权重文件
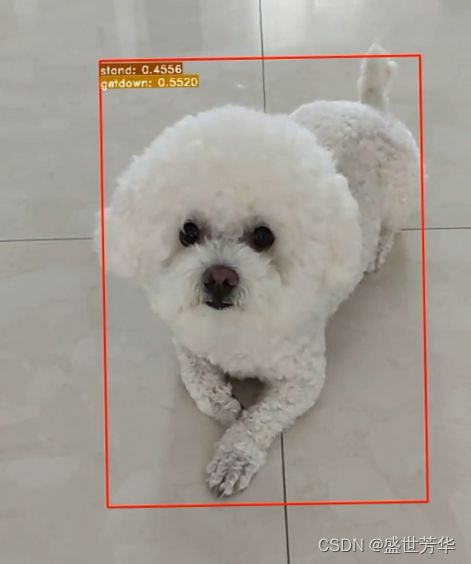
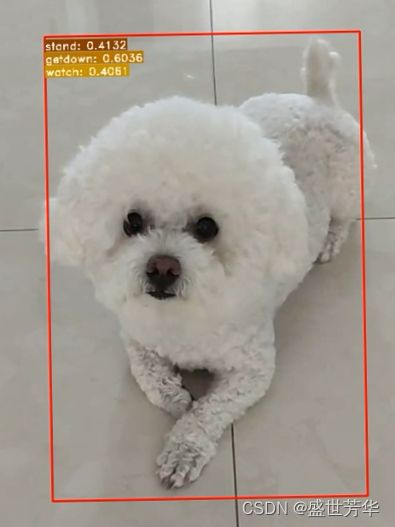
然后执行该脚本,查看识别结果。
采集的数据集有限,迭代次数也并不多,效果基本满意。
迁移训练猪的行为,测试效果还凑合,数据集的质量很重要!
