Vue3 + vite + Ts + pinia + 实战 +electron(学习ing,笔记未完待续......)
文章目录
-
- 一、构建项目
-
- 1、创建项目
- 2、安装依赖
- 3、运行
- 4、安装插件
- 5、配置用户代码块
- 6、安装UI组件库ElementPlus
- 7、搭建页面layout,认识less、scoped、一些css新特性
- 二、vue3基础使用学习
-
- 1、模板语法&vue指令
- 2、Vue核心虚拟Dom和 diff 算法(了解)
- 3、ref和reactive
- 4、toRef、toRefs、toRaw
- 5、computed计算属性
- 6、watch监听
- 7、watchEffect高级监听
- 8、生命周期
- 9、父子组件传参
- 10、全局组件注册
- 11、动态组件
- 12、插槽
- 13、异步组件(涉及性能优化)
- 14、Teleport传送组件
- 15、keep-alive缓存组件
- 16、依赖注入Provide / Inject
- 17、兄弟组件传参
- 18、tsx组件
- 19、v-model
- 20、自定义指令
- 21、自定义hook
- 22、定义全局函数和全局变量
- 23、
一、构建项目
1、创建项目
npm init vite@latest
或使用npm init vue@latest,这种方式配置多一点,包括router,pinia等,专门为构建vue用的,齐全一点,vite(vite? 、vite和webpack区别?)可以构建其他项目,比如react或其他,下面是用第一种方式npm init vite@latest:
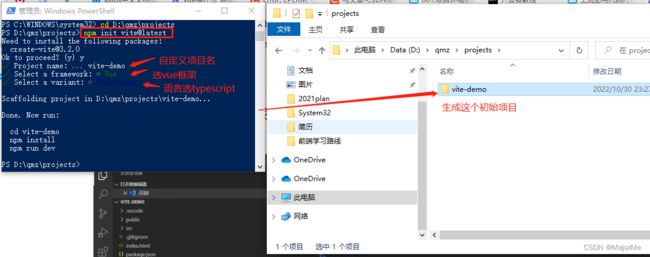
在vsCode打开项目,vite构建的vue项目目录如下:

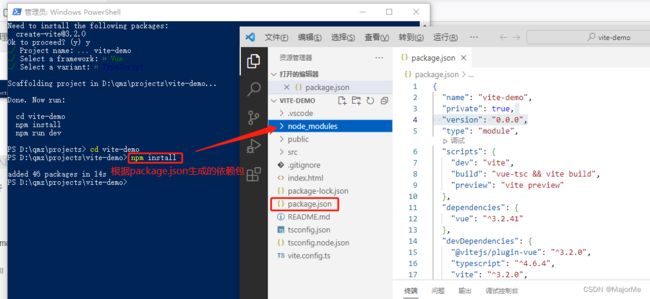
2、安装依赖
进入vite-demo目录,安装依赖(根据项目中的package.json文件安装依赖)
npm install
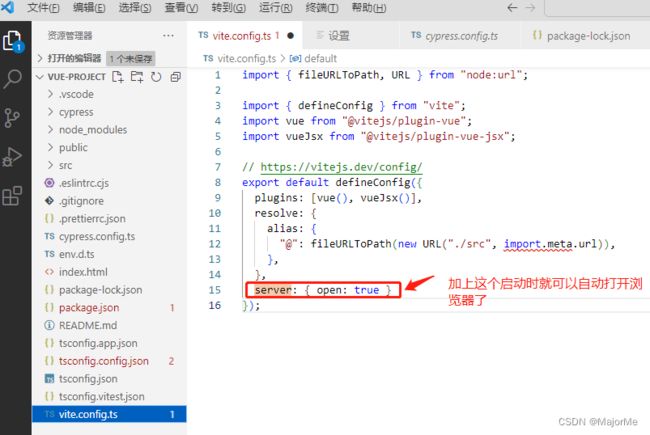
3、运行
- 设置默认启动项目自动开启浏览器:
server: { open: true }
- 运行项目
npm run dev
页面显示如下,项目运行成功 !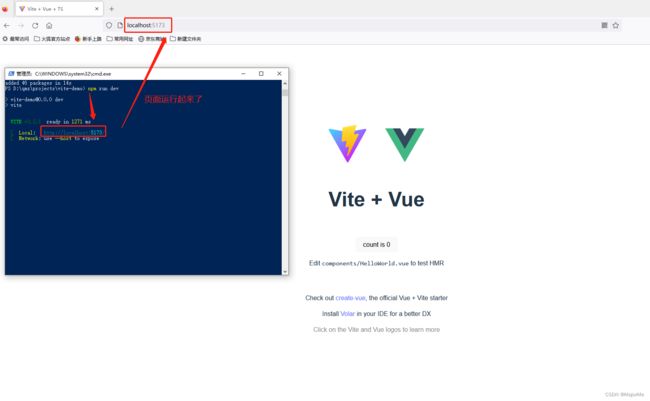
4、安装插件
1、 Vue Language Features (Volar), TypeScript Vue Plugin (Volar)插件
安装后就可以写vue3代码了~
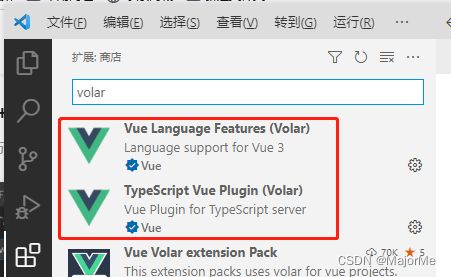
注意:若之前开发vue2有安装vetur插件(对.vue文件中的语法进行高亮显示),开发vue3需要禁用这个插件
2、AutoImport插件
安装插件:npm i -D unplugin-auto-import
配置vite.config.ts:
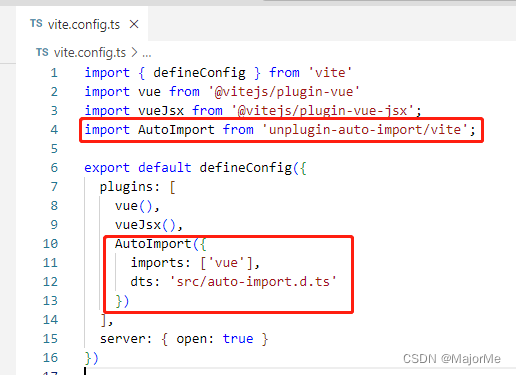
import { defineConfig } from 'vite'
import vue from '@vitejs/plugin-vue'
import vueJsx from '@vitejs/plugin-vue-jsx';
import AutoImport from 'unplugin-auto-import/vite';

export default defineConfig({
  plugins: [
    vue(),
    vueJsx(),
    AutoImport({
      imports: ['vue'],
      dts: 'src/auto-import.d.ts'
    })
  ],
  server: { open: true }
})
<template>
    <div class="parent">
        // 省略了.value
        <button @click="flag=!flag">切换</button>
        {{flag}}
    </div>
</template>
<script setup lang='ts'>
import { ref, reactive } from 'vue'
let flag = ref<boolean>(true)
</script>
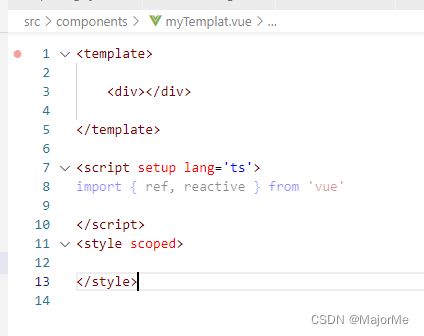
5、配置用户代码块
- 配置
设置—配置用户代码片段—选择vue(vue)或者vue.json(vue)


把下面代码复制到vue.json里面
{
"Print to console": {
"prefix": "vue3",
"body": [
"",
"",
" ",
"",
"",
"",
"",
// 注意 lang='less'前提是安装了less,安装方法在第7点
""
],
"description": "Log output to console"
}
}
- 使用示例
新建一个.vue文件,输入vue3,回车,
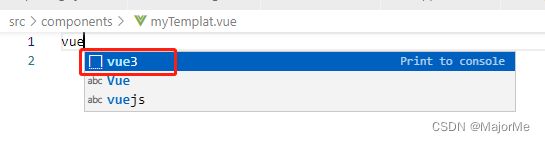
即可一键生成模板
6、安装UI组件库ElementPlus
1)官方说明文档:
-
官方教程
-
快速开始
2)安装element-plus
- 在项目路径下执行命令安装:
npm install element-plus --save
- 安装成功后,全局配置(main.ts):
// main.ts
import { createApp } from 'vue'
import './style.css'
import App from './App.vue'
import ElementPlus from 'element-plus' // 引入ElementPlus 组件
import 'element-plus/dist/index.css' // 引入ElementPlus 组件样式

// createApp(App).mount('#app')
const app = createApp(App)
app.use(ElementPlus) // 使用ElementPlus组件
app.mount('#app')
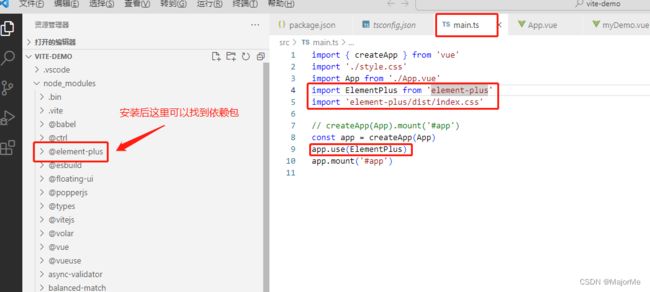
此外还有其他导入方式(自动导入/按需导入、手动导入),请参考官方使用教程
- 使用示例(按钮组件)
 <template>
    <div>
        <ElButton>按钮</ElButton >
    </div>

</template>

<script setup lang="ts">
    import { ElButton } from 'element-plus' // 引入按钮组件
</script>
3)安装icon图标
- 安装
npm install @element-plus/icons-vue
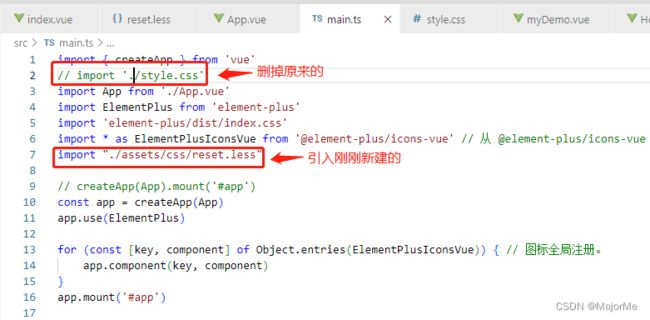
- 注册所有图标(main.ts)
// main.ts
// 如果您正在使用CDN引入,请删除下面一行。
import * as ElementPlusIconsVue from '@element-plus/icons-vue'

const app = createApp(App)
for (const [key, component] of Object.entries(ElementPlusIconsVue)) {
  app.component(key, component)
}
- 使用示例
7、搭建页面layout,认识less、scoped、一些css新特性
1)less的安装和使用
- 安装less
在项目根目录下执行以下命令:
npm install less less-loader -D
- 使用声明
<style lang="less" scoped>
</style>
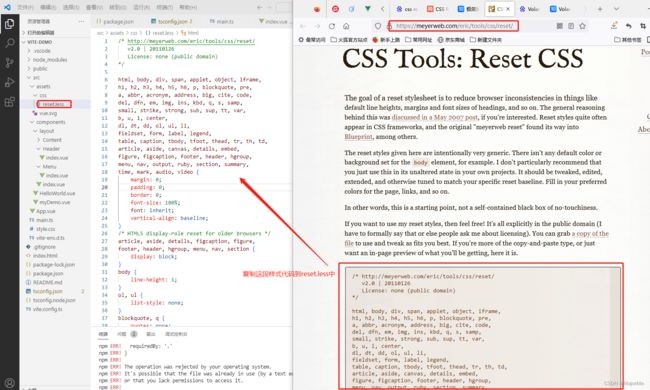
2)了解和配置css reset
- 什么是css rest ?
由于浏览器支持和理解的CSS 规范不同,导致渲染页面效果不一致,会出现很多兼容性问题,比如旧 IE 浏览器不支持 HTML5+标签,不同浏览器对 CSS 行为也不统一,这就导致两个问题:
处理浏览器的兼容性。
跨浏览器样式表现统一。
为解决上面问题,出现了CSS Reaet ,根据对默认样式的改写的轻重程度,可分为三类:
完全重置——硬重置。
规范化重置——软重置。
个性化重置。
- 配置css reset
在src\assets\ 下新建css\reset.less,把css reset样式代码复制到reset.less文件中,如下:
 然后修改一下,初始化html,body,#app外层样式:

接下来在src\main.ts文件中全局进入:
3)layout页面构建
layout包括:Menu、Header、Content
 如图创建相应文件夹和文件:

4)scoped的作用
隔离样式:
 渲染页面的标签会出现 data-v-xxx 属性隔离样式:

5)vue3的一些css新特性
<style>
// deep选择器 一般用于修改组件库里的组件的样式
/deep/ .el_input_inner {
border: 1px solod pink;
}
// 或者
:deep(.el_input_inner) {
border: 1px solod pink;
}

// 插槽选择器:sloted
:sloted(.className) {
color:blue;
}
// 全局选择器:global
:global(.className) {
color:pink;

// 动态css绑定v-bine
.className {
color: v-bine(colorVal); // 假设 let colorVal = ref('pink')
// 或
color: v-bine('obj.colorVal'); // 假设 let obj = ref({colorVal: 'pink'})
}
</style>
6)其他
二、vue3基础使用学习
1、模板语法&vue指令
v- 开头都是vue 的指令
v-text 用来显示文本
v-html 用来展示富文本
v-if 用来控制元素的显示隐藏(切换真假DOM)
v-else-if 表示 v-if 的“else if 块”。可以链式调用
v-else v-if条件收尾语句
v-show 用来控制元素的显示隐藏(display none block Css切换)
v-on 简写@ 用来给元素添加事件
v-bind 简写: 用来绑定元素的属性Attr
v-model 双向绑定
v-for 用来遍历元素
v-on修饰符
参考案例
2、Vue核心虚拟Dom和 diff 算法(了解)
Vue3 源码地址
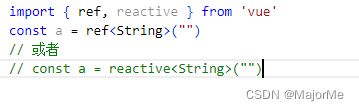
3、ref和reactive
1) vue2和vue3的双向绑定值定义区别
- vue2:
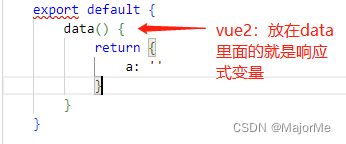
- vue3:使用ref或者reactive包裹,或者自定义customRef
2)ref
- ref接受一个内部值并返回一个响应式且可变的 ref 对象。ref 对象仅有一个 .value property,指向该内部值。
- 使用案例
<template>
    <div>啦啦a:{{a}}</div>
    <button @click="change">变变变</button>
    <form>
        <input  />
    </form>

</template>

<script setup lang="ts">
    import { ref, reactive, isRef } from 'vue'
    const a = ref("我是a") // 对象
    const change = () => {
        a.value = "a变身"  // 赋值的时候需要.value赋值,否则直接a=xxx会报错
    }

</script>
3)reactive
-
ref用来绑定复杂的数据类型 例如对象、数组, 若绑定普通变量类型会报错。

-
使用案例
<template>
    <div>啦啦b:{{b.val}}</div>
    <button @click="change">变变变</button>
    <form>
        <input  />
    </form>

</template>

<script setup lang="ts">
    import { ref, reactive, isRef } from 'vue'
    const b = reactive({
        val: "我是b"
    })
    const change = () => {
        b.val = "b变身"
    }

</script>
- 特别注意:reactive声明的对象和数组,再次赋值不能直接整个赋值,整个赋值页面不会更新。
// 假设
const arr = reactive([]);
const obj= reactive({});
const res = [1,2,3]
const res2 = {a:'1', b: '2'}
直接赋值,即使打印生效,页面也不会更新:
// arr = res // 不可以
// arr.concat(res) // 不可以
// obj = res2  // 不可以
原因: vue3使用proxy,arr= newArr让arr失去了响应性,所以对于对象和数组都不能直接整个赋值:
如何解决?
数组:用push
res.forEach(e => { // 可以
  arr.push(e);
});
arr.push(...[1, 2, 3]) // 可以
};
对象:改用ref定义
const obj= ref({});
obj.value = {...res2 } // 可以
其他方法:用reactive封装一层,然后使用toRefs解构(待验证)
<script setup lang='ts'>
const state = reactive({
  arr: [],
  obj:{}
});
state.arr = [1, 2, 3]
state.obj={...res2}
const { form,obj} = toRefs(state)
4)shallowRef、shallowReactive
只能对浅层的数据,如果是深层的数据只会改变值(打印的是改变的值),不会改变视图(页面不会刷新)
4、toRef、toRefs、toRaw
- toRef、toRefs
注意: 只能解构响应式对象的值
<template>
    <div>name:{{name}}</div>
    <div>age:{{age}}</div>
    <div>num:{{num}}</div>
    <button @click="change">变变变</button>
    <form>
        <input  />
    </form>

</template>

<script setup lang="ts">
    import { ref, toRef, toRefs, reactive, isRef } from 'vue'
    const myInfo = ref({ // 或者 reactive
        name: 'zz',
        age: 18,
        num: 520
    })
    // toRef只能解构响应式对象的值,对普通对象(如const myInfo={name:'zz', age: 18, num: 520})则行不通
    const { name, age } = toRefs(myInfo.value) // toRefs: 若myInfo使用reactive定义,则这里解构改为 const { name, age } = toRefs(myInfo)
    const num = toRef(myInfo.value, "num") // toRef:若myInfo使用reactive定义,则这里解构改为 const num = toRef(myInfo, "num")
    const change = () => {
        name.value = 'zx'
        age.value = 3
        num.value = 1314
        console.log("name:",name)
    }

</script>
- toRaw
把响应式的对象转为普通对象
 <script setup lang="ts">
    import { ref, toRef, toRefs, reactive, isRef, toRaw } from 'vue'
    let myInfo = reactive({
        name: 'zz',
        age: 18,
        num: 520
    })

    const { name, age } = toRefs(myInfo)
    const num = toRef(myInfo, "num")
    console.log("name:",name)
    console.log("toRaw前的myInfo:",myInfo)
    const change = () => {
        name.value = 'zx'
        age.value = 3
        num.value = 1314
        // myInfo = toRaw(myInfo)
        console.log("toRaw(myInfo):", toRaw(myInfo))
    }

</script>

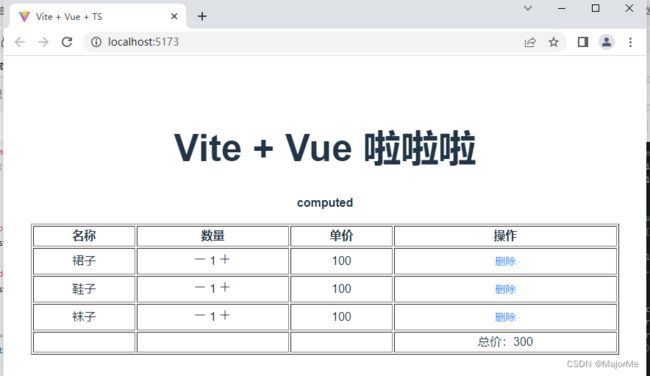
5、computed计算属性
计算属性就是当依赖的属性的值发生变化的时候,才会触发他的更改,如果依赖的值,不发生变化的时候,使用的是缓存中的属性值。
案例:
<template>
    <p style="font-weight: bold;">computed</p>
    <div>
        <table border style="width:800px;text-align: center;">
            <thead>
                <tr>
                    <th>名称</th>
                    <th>数量</th>
                    <th>单价</th>
                    <th>操作</th>
                </tr>
            </thead>
            <tbody>
                <tr :key="'item' + index" v-for="(item, index) in list">
                    <td>{{item.name}}</td>
                    <td>
                        <el-icon class="point" @click="minus(index)"><Minus /></el-icon>
                        {{item.num}}
                        <el-icon class="point" @click="plus(index)"><Plus /></el-icon>
                    </td>
                    <td>
                        {{item.num * item.price}}
                    </td>
                    <td>
                        <ElButton
                        type="primary"
                        text
                        @click="delet(index)"
                        >删除</ElButton
                        >
                    </td>
                </tr>
                <tr>
                    <td></td>
                    <td></td>
                    <td></td>
                    <td>总价:{{total}}</td>
                </tr>
            </tbody>
        </table>
    </div>
</template>

<script setup lang="ts">
    import { ref, reactive, computed } from 'vue'
    import { ElButton } from 'element-plus'
    type goodInfo = {
        name: string,
        num: number,
        price: number
    }
    let total = ref<number>(0)
    const list = reactive<goodInfo[]>(
        [
            {
                name: '裙子',
                num: 1,
                price: 100
            }, {
                name: '鞋子',
                num: 1,
                price: 100
            }, {
                name: '袜子',
                num: 1,
                price: 100
            }
        ]
    )
    const minus = (index:number) => {
        if(list[index].num > 0) {
            list[index].num =  list[index].num - 1
        }
    }
    const plus = (index:number) => {
        list[index].num =  list[index].num + 1
    }
    const delet = (index:number) => {
        list.splice(index, 1)

    }
    total = computed<number>(() => {
        return list.reduce((prev, next) => {
            return prev + (next.num*next.price)
        }, 0)
    })
</script>
<style scoped>
.point {
    cursor: pointer;
}
</style>
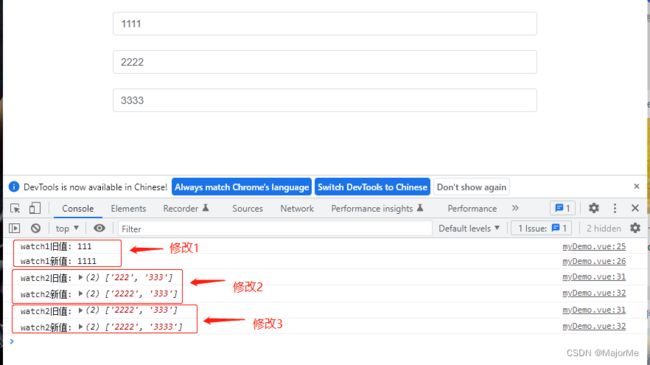
6、watch监听
watch 需要侦听特定的数据源,并在单独的回调函数中执行副作用
watch第一个参数监听源
watch第二个参数回调函数cb(newVal,oldVal)
watch第三个参数一个options配置项是一个对象{
immediate:true //是否立即调用一次
deep:true //是否开启深度监听
- 监听普通类型
<template>
    <p style="font-weight: bold;">computed</p>
    <div>
        <el-input style="margin: 10px 0" v-model="input1"/>
        <el-input style="margin: 10px 0" v-model="input2"/>
        <el-input style="margin: 10px 0" v-model="input3"/>
    </div>
</template>
<script setup lang="ts">
    import { ref, reactive, computed, watch } from 'vue'
    import { ElInput } from 'element-plus'
    let input1 = ref('111')
    let input2 = ref('222')
    let input3 = ref('333')
    watch(input1, (newValue, oldValue) => {
        console.log('watch1旧值:', oldValue)
        console.log('watch1新值:', newValue)
    })
    // 监听多个数据, watch的第一个参数要用数组形式
    watch([input2, input3], (newValue, oldValue) => {
        console.log('watch2旧值:', oldValue)
        console.log('watch2新值:', newValue)
    })
</script>
<style scoped>
</style>
依次修改三个值,监听打印如下:
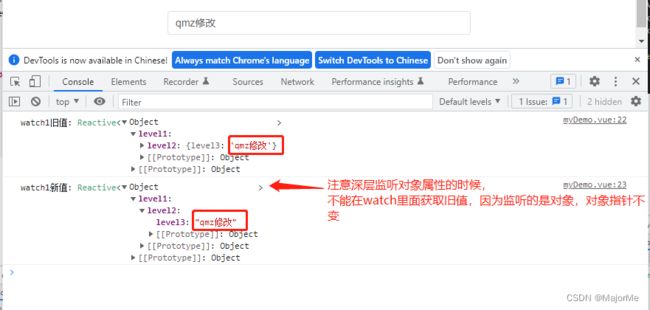
- 监听深层对象
<template>
    <p style="font-weight: bold;">computed</p>
    <div>
        <el-input v-model="obj.level1.level2.level3"/>
    </div>
</template>

<script setup lang="ts">
    import { ref, reactive, computed, watch } from 'vue'
    import { ElInput } from 'element-plus'
    let obj = ref({ // ref改为reactive,则watch函数不需要设置deep参数,始终可以深度监听
        level1: {
            level2: {
                level3: 'qmz'
            }
        }
    })
    watch(
        obj,
        (newValue, oldValue) => {
            console.log('watch1旧值:', oldValue)
            console.log('watch1新值:', newValue)
        },
        { deep: true }
    )
</script>
- 监听reactive 单一值
import { ref, watch ,reactive} from 'vue'
let message = reactive({
    val1:"",
    val2:""
})
watch(()=>message.name, (newValue, oldValue) => {
    console.log('新值----', newValue);
    console.log('旧值----', oldValue);
})
7、watchEffect高级监听
watchEffect相当于将watch 的依赖源和回调函数合并,当任何你有用到的响应式依赖更新时,该回调函数便会重新执行。不同于
watch,watchEffect 的回调函数会被立即执行(即 { immediate: true })
- 非惰性(立即执行)
<script setup lang="ts">
    import { watchEffect } from 'vue'
    watchEffect(() => {
            console.log('不管有没有监听对象,渲染页面或者刷新页面,都会立即执行')
        }
    )
</script>
- 不需要传递你要侦听的内容,自动会感知代码依赖(就是watchEffect内用到了哪个响应式变量,就监听哪个变量)
<template>
    <p style="font-weight: bold;">watchEffect</p>
    <div>
        <el-input v-model="inputVal.value"/>
    </div>
</template>
<script setup lang="ts">
    import { ref, reactive, computed, watchEffect } from 'vue'
    import { ElInput } from 'element-plus'
    let inputVal =  reactive({
        value: '1'
    })
    watchEffect(() => {
            console.log("inputVal.value:", inputVal.value) // 用到inputVal.value,只要它变化了,自动监听到
        }
    )
</script>
- watchEffect的副作用
副作用就是执行某种操作,如对外部可变数据或变量的修改,外部接口的调用等。watchEffect的回调函数就是一个副作用函数,因为我们使用watchEffect就是侦听到依赖的变化后执行某些操作。
- 清除副作用应用
在触发监听之前会调用一个函数可以处理你的逻辑,例如:
1)节流防抖
// 节流防抖
<script setup lang="ts">
    import { ref, reactive, computed, watchEffect } from 'vue'
    import { ElInput } from 'element-plus'
    const id = ref(13)
    watchEffect(onInvalidate => {
    // 异步请求
    const token = performAsyncOperation(id.value)
    // 如果id频繁改变,会触发失效函数,取消之前的接口请求
    onInvalidate(() => {
        // id has changed or watcher is stopped.
        // invalidate previously pending async operation
        token.cancel()
    })
    })
    const performAsyncOperation = (id) => {
        // 这是一个请求接口操作(异步操作)
    }
</script>
2)定时器注册和销毁
<script setup lang="ts">
    import { ref, watchEffect, onMounted } from 'vue'
    import { ElInput } from 'element-plus'

    // 定时器注册和销毁
    watchEffect((onInvalidate) => {
      const timer = setInterval(()=> {
          // ...
      }, 1000)
      onInvalidate(() => clearInterval(timer))
    })
</script>
3)dom的监听和取消监听
<script setup lang="ts">
import { ref, watchEffect, onMounted } from 'vue'
import { ElInput } from 'element-plus'

const handleClick = () => {
  // ...
}

// dom的监听和取消监听
onMounted(()=>{
    watchEffect((onInvalidate) => {
        document.querySelector('.btn').addEventListener('click', handleClick, false)
        onInvalidate(() => document.querySelector('.btn').removeEventListener('click', handleClick))
    })
)}
</script>
- 停止监听
<template>
    <div style="margin: 10px 0">
        <el-input v-model="inputVal1"/>
    </div>
    <el-button type="primary" @click="stop" >停止监听</el-button>
</template>
<script setup lang="ts">
    import { ref, watchEffect, onMounted } from 'vue'
    import { ElInput, ElButton } from 'element-plus'
    let inputVal1 =  ref('111')
    const stop = watchEffect((onInvalidate) => {
        console.log('inputVal1:', inputVal1)
    })
</script>
- 副作用刷新时机 flush (一般使用post)
| pre | sync | post | |
|---|---|---|---|
| 刷新时机 | 组件更新前执行 | 强制效果始终同步触发 | 组件更新后执行 |
8、生命周期
参考笔记
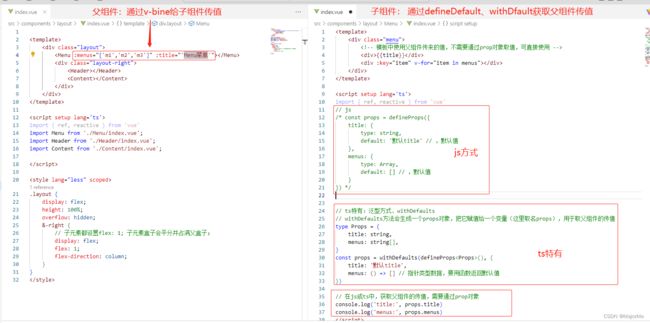
9、父子组件传参
1)父组件给子组件接收传参
// ts特有
type Props = {
    title: string,
    menus: string[],
}
const props = withDefaults(defineProps<Props>(), {
    title: '默认title',
    menus: () => [] // 注意:指针类型数据,要用函数返回默认值
})
2)子组件给父组件抛出事件
// 抛出事件
// const emit = defineEmits(['click1', 'click2'])  // js方式
const emit = defineEmits<{ // ts特有方式
  (e: 'click1', id: string): void
  (e: 'click2', value: string): void
}>()

3)给父组件暴露子组件内部属性
defineExpose 使用 script setup 的组件是默认关闭的,也即通过模板 ref 或者 $parent
链获取到的组件的公开实例,不会暴露任何在