pytorch利用变分自编码器进行MNIST实战
自编码器是一种无监督学习
它的作用:
1、降维
2、预处理
3、可视化
4、利用无监督的数据
5、压缩(有损)、降噪、超分辨率
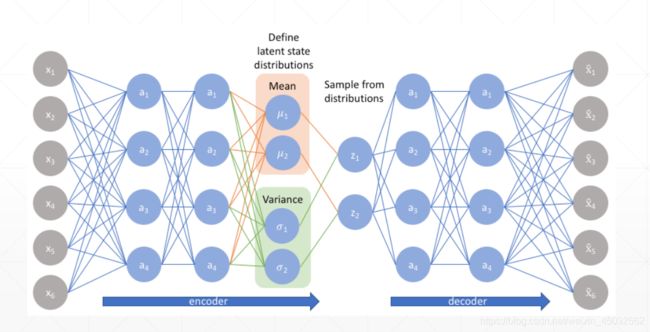
原理
一句话概括,自己训练自己。
怎么训练

PCA和Auto-Encoders的区别
PCA的线性变换对特征维度的类型有限制,AE可以是非线性变换。
降噪AE

KL散度
KL计算公式:

通过这样的技巧,在反向传播中就可以顺利通过了。

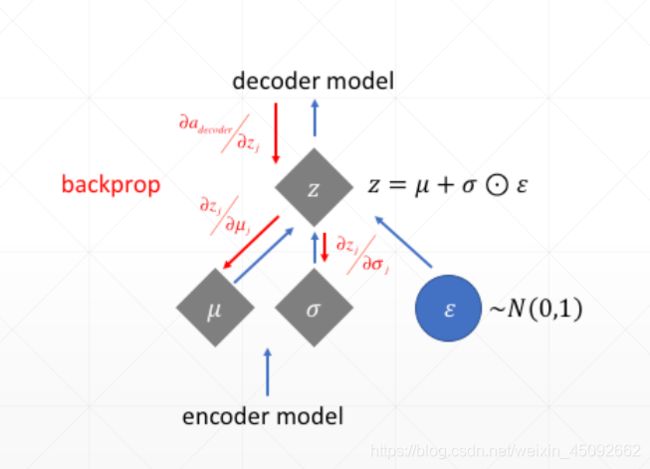
可以理解为这样:
main.py代码为:
import torch
from torch.utils.data import DataLoader
from torch import nn, optim
from torchvision import transforms, datasets
# from ae import AE
from vae import VAE
import visdom


def main():
    mnist_train = datasets.MNIST('mnist', True, transform=transforms.Compose([
        transforms.ToTensor()
    ]), download=True)
    mnist_train = DataLoader(mnist_train, batch_size=256, shuffle=True)

    mnist_test = datasets.MNIST('mnist', False, transform=transforms.Compose([
        transforms.ToTensor()
    ]), download=True)
    mnist_test = DataLoader(mnist_test, batch_size=256, shuffle=True)

    x, _ = iter(mnist_train).next()
    print("x:", x.shape)

    device = torch.device('cuda')
    # model = AE().cuda()
    model = VAE().cuda()
    criteon = nn.MSELoss()
    optimizer = optim.Adam(model.parameters(), lr=1e-3)
    print(model)

    viz = visdom.Visdom()

    for epoch in range(1000):
        for batchidx, (x, _) in enumerate(mnist_train):
            # [b, 1, 28, 28]
            x = x.cuda()

            x_hat, kld = model(x)
            loss = criteon(x_hat, x)

            if kld is not None:
                elbo = -loss - 1.0 * kld
                loss = - elbo

            # backprop
            optimizer.zero_grad()  # 梯度清零
            loss.backward()
            optimizer.step()  # 更新梯度

        print(epoch, 'loss:', loss.item(), 'kld', kld.item())

        x, _ = iter(mnist_test).next()
        x = x.cuda()
        with torch.no_grad():
            x_hat, kld = model(x)
        viz.images(x, nrow=8, win='x', opts=dict(title='x'))
        viz.images(x_hat, nrow=8, win='x_hat', opts=dict(title='x_hat'))


if __name__ == '__main__':
    main()
vae.py代码为:
import torch
from torch import nn


class VAE(nn.Module):
    """

    """

    def __init__(self):
        """

        """
        super(VAE, self).__init__()

        # [b, 784] => [b, 20]
        # u均值: [b, 10]
        # sigma标准差: [b, 10]
        self.encoder = nn.Sequential(
            nn.Linear(784, 256),
            nn.ReLU(),
            nn.Linear(256, 64),
            nn.ReLU(),
            nn.Linear(64, 20),
            nn.ReLU()
        )

        # [b, 10] => [b, 784]
        self.decoder = nn.Sequential(
            nn.Linear(10, 64),
            nn.ReLU(),
            nn.Linear(64, 256),
            nn.ReLU(),
            nn.Linear(256, 784),
            nn.Sigmoid()  # 压缩像素为0到1
        )

    def forward(self, x):
        """

        :param x: [b, 1, 28, 28]
        :return:
        """
        batchsz = x.shape[0]
        # flatten
        x = x.view(batchsz, 784)
        # encoder
        # [b, 784] => [b, 20],包括均值和方差
        h_ = self.encoder(x)
        # [b, 20] => [b, 10] 和 [b, 10]
        mu, sigma = h_.chunk(2, dim=1)
        # 重新参数化技巧,epison ~ N(0,1),变为可导的操作
        h = mu + sigma * torch.randn_like(sigma)
        # torch.pow():幂次运算
        kld = 0.5 * torch.sum(
            torch.pow(mu, 2) +
            torch.pow(sigma, 2) -
            torch.log(1e-8 + torch.pow(sigma, 2)) - 1
        ) / (batchsz * 28 * 28)

        # decoder
        # [b, 10] => [b, 784]
        x_hat = self.decoder(h)
        # reshape, [b, 784] => [b, 1, 28, 28]
        x_hat = x_hat.view(batchsz, 1, 28, 28)

        return x_hat, kld


def main():
    x = torch.randn(256, 1, 28, 28)
    model = VAE()
    out1, out2 = model(x)
    print('x_hat:', out1.shape)
    print('kld:', out2)

    # 查看模型结构
    print(model)


if __name__ == '__main__':
    main()
ae.py代码为:
import torch
from torch import nn


class AE(nn.Module):
    """

    """

    def __init__(self):
        """

        """
        super(AE, self).__init__()

        # [b, 784] => [b, 20]
        self.encoder = nn.Sequential(
            nn.Linear(784, 256),
            nn.ReLU(),
            nn.Linear(256, 64),
            nn.ReLU(),
            nn.Linear(64, 20),
            nn.ReLU()
        )

        # [b, 20] => [b, 784]
        self.decoder = nn.Sequential(
            nn.Linear(20, 64),
            nn.ReLU(),
            nn.Linear(64, 256),
            nn.ReLU(),
            nn.Linear(256, 784),
            nn.Sigmoid()  # 压缩像素为0到1
        )

    def forward(self, x):
        """

        :param x: [b, 1, 28, 28]
        :return:
        """
        batchsz = x.shape[0]
        # flatten,打平数据,[b, 1, 28, 28] => [b, 784]
        x = x.view(batchsz, 784)
        # encoder
        x = self.encoder(x)
        # decoder
        x = self.decoder(x)
        # reshape, [b, 784] => [b, 1, 28, 28]
        x = x.view(batchsz, 1, 28, 28)

        return x


def main():
    x = torch.randn(256, 1, 28, 28)
    model = AE()
    out = model(x)
    print('x:', out.shape)

    # 查看模型结构
    print(model)


if __name__ == '__main__':
    main()
运行时打开visdom可视化界面,代码为:
python -m visdom.server
在网页中输入:
localhost:8097

虽然有点模糊,是因为训练次数比较少,次数多后,后面会原来越来越清晰。
有用请点个赞!!
本站所有文章均为原创,欢迎转载,请注明文章出处:https://blog.csdn.net/weixin_45092662。百度和各类采集站皆不可信,搜索请谨慎鉴别。技术类文章一般都有时效性,本人习惯不定期对自己的博文进行修正和更新,因此请访问出处以查看本文的最新版本。