Violence detection-Hockey Fight-CNN+LSTM暴力检测CNN+LSTM实例
提取属于视频的一组帧,将它们发送到一个名为VGG16的预训练网络,获得其最后一层的输出,并从这些输出训练另一个具有称为LSTM的特殊神经元的网络结构。这些神经元具有记忆能力,能够分析视频的时间信息,如果在任何时候检测到暴力,就会被归类为暴力视频。
对数据的处理以及查看
导入所需要的包:
%matplotlib inline
import cv2
import os
import numpy as np
import keras
import matplotlib.pyplot as plt
# import download
from random import shuffle
from tensorflow.keras.applications import VGG16
from tensorflow.keras import backend as K
from tensorflow.keras.models import Model, Sequential
from tensorflow.keras.layers import Input
from tensorflow.keras.layers import LSTM
from tensorflow.keras.layers import Dense, Activation
import sys
import h5py
使用print_progress函数来打印处理数据集的视频量:
def print_progress(count, max_count):
    # 完成百分比.
    pct_complete = count / max_count

    # 状态消息。请注意\r意味着该行应覆盖自身
    msg = "\r- Progress: {0:.1%}".format(pct_complete)

    # Print it.
    sys.stdout.write(msg)
    sys.stdout.flush()
加载数据:
in_dir = "./Downloads/暴力行为检测/Hockey Fight Detection/data"
数据维度:
# Frame size
img_size = 224

img_size_touple = (img_size, img_size)

# Number of channels (RGB)
num_channels = 3

# Flat frame size
img_size_flat = img_size * img_size * num_channels

# Number of classes for classification (Violence-No Violence)
num_classes = 2

# Number of files to train
_num_files_train = 1

# Number of frames per video
_images_per_file = 20

# Number of frames per training set
_num_images_train = _num_files_train * _images_per_file

# Video extension
video_exts = ".avi"
获取视频帧的get_frames函数,函数用于从视频文件中获取20帧,并将帧转换为适合神经网络的格式。
def get_frames(current_dir, file_name):

    in_file = os.path.join(current_dir, file_name)

    images = []

    vidcap = cv2.VideoCapture(in_file)

    success,image = vidcap.read()

    count = 0

    while count<_images_per_file:

        RGB_img = cv2.cvtColor(image, cv2.COLOR_BGR2RGB)

        res = cv2.resize(RGB_img, dsize=(img_size, img_size),
                                 interpolation=cv2.INTER_CUBIC)

        images.append(res)

        success,image = vidcap.read()

        count += 1

    resul = np.array(images)

    resul = (resul / 255.).astype(np.float16)

    return resul
获取数据的名称并对其进行标记:(如果视频名字带fi则为暴力视频,如果no则为非暴力视频)
def label_video_names(in_dir):

    # list containing video names
    names = []
    # list containin video labels [1, 0] if it has violence and [0, 1] if not
    labels = []


    for current_dir, dir_names,file_names in os.walk(in_dir):

        for file_name in file_names:

            if file_name[0:2] == 'fi':
                labels.append([1,0])
                names.append(file_name)
            elif file_name[0:2] == 'no':
                labels.append([0,1])
                names.append(file_name)


    c = list(zip(names,labels))
    # Suffle the data (names and labels)
    shuffle(c)

    names, labels = zip(*c)

    return names, labels
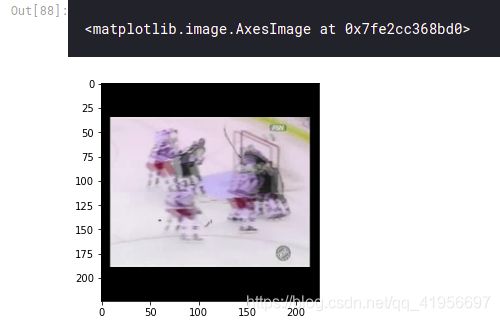
显示视频帧,查看标记是否正确:
# 首先得到整个视频的名称和标签
names, labels = label_video_names(in_dir)
names[12]
frames = get_frames(in_dir, names[12])
将帧转换回uint8像素格式以打印帧
visible_frame = (frames*255).astype('uint8')
plt.imshow(visible_frame[3])
预训练模型VGG16
如果没有下载会自动下载,如果下载失败可以自己百度vgg16_weights_tf_dim_ordering_tf_kernels.h5下载。
# image_model = VGG16(include_top=True, weights='imagenet')
image_model = VGG16(include_top=True, weights='./vgg16_weights_tf_dim_ordering_tf_kernels.h5')
用VGG16模型批量输入和处理20帧视频。当所有的视频经过VGG16模型处理后,得到的传输值保存到一个缓存文件中,我们就可以将这些传输值作为LSTM神经网络的输入。然后,我们将使用暴力数据集(暴力,无暴力)中的类来训练第二个神经网络,以便该网络学习如何基于VGG16模型中的传递值对图像进行分类。
# 我们将在最后的分类层fc2之前使用该层的输出。
transfer_layer = image_model.get_layer('fc2')

image_model_transfer = Model(inputs=image_model.input,
                             outputs=transfer_layer.output)

transfer_values_size = K.int_shape(transfer_layer.output)[1]


print("The input of the VGG16 net have dimensions:",K.int_shape(image_model.input)[1:3])

print("The output of the selecter layer of VGG16 net have dimensions: ", transfer_values_size)
def proces_transfer(vid_names, in_dir, labels):

    count = 0

    tam = len(vid_names)

    # 将数据改为20,224,224,3 以符合VGG16的输入
    shape = (_images_per_file,) + img_size_touple + (3,)

    while count<tam:

        video_name = vid_names[count]

        image_batch = np.zeros(shape=shape, dtype=np.float16)

        image_batch = get_frames(in_dir, video_name)

         # Note that we use 16-bit floating-points to save memory.
        shape = (_images_per_file, transfer_values_size)
        transfer_values = np.zeros(shape=shape, dtype=np.float16)

        transfer_values = \
            image_model_transfer.predict(image_batch)

        labels1 = labels[count]

        aux = np.ones([20,2])

        labelss = labels1*aux

        yield transfer_values, labelss

        count+=1
用于保存VGG16的传输值以供以后使用的函数
def make_files(n_files):

    gen = proces_transfer(names_training, in_dir, labels_training)

    numer = 1

    # Read the first chunk to get the column dtypes
    chunk = next(gen)

    row_count = chunk[0].shape[0]
    row_count2 = chunk[1].shape[0]

    with h5py.File('prueba.h5', 'w') as f:

        # Initialize a resizable dataset to hold the output
        maxshape = (None,) + chunk[0].shape[1:]
        maxshape2 = (None,) + chunk[1].shape[1:]


        dset = f.create_dataset('data', shape=chunk[0].shape, maxshape=maxshape,
                                chunks=chunk[0].shape, dtype=chunk[0].dtype)

        dset2 = f.create_dataset('labels', shape=chunk[1].shape, maxshape=maxshape2,
                                 chunks=chunk[1].shape, dtype=chunk[1].dtype)

         # Write the first chunk of rows
        dset[:] = chunk[0]
        dset2[:] = chunk[1]

        for chunk in gen:

            if numer == n_files:

                break

            # Resize the dataset to accommodate the next chunk of rows
            dset.resize(row_count + chunk[0].shape[0], axis=0)
            dset2.resize(row_count2 + chunk[1].shape[0], axis=0)

            # Write the next chunk
            dset[row_count:] = chunk[0]
            dset2[row_count:] = chunk[1]

            # Increment the row count
            row_count += chunk[0].shape[0]
            row_count2 += chunk[1].shape[0]

            print_progress(numer, n_files)

            numer += 1
def make_files_test(n_files):

    gen = proces_transfer(names_test, in_dir, labels_test)

    numer = 1

    # Read the first chunk to get the column dtypes
    chunk = next(gen)

    row_count = chunk[0].shape[0]
    row_count2 = chunk[1].shape[0]

    with h5py.File('pruebavalidation.h5', 'w') as f:

        # Initialize a resizable dataset to hold the output
        maxshape = (None,) + chunk[0].shape[1:]
        maxshape2 = (None,) + chunk[1].shape[1:]


        dset = f.create_dataset('data', shape=chunk[0].shape, maxshape=maxshape,
                                chunks=chunk[0].shape, dtype=chunk[0].dtype)

        dset2 = f.create_dataset('labels', shape=chunk[1].shape, maxshape=maxshape2,
                                 chunks=chunk[1].shape, dtype=chunk[1].dtype)

         # Write the first chunk of rows
        dset[:] = chunk[0]
        dset2[:] = chunk[1]

        for chunk in gen:

            if numer == n_files:

                break

            # Resize the dataset to accommodate the next chunk of rows
            dset.resize(row_count + chunk[0].shape[0], axis=0)
            dset2.resize(row_count2 + chunk[1].shape[0], axis=0)

            # Write the next chunk
            dset[row_count:] = chunk[0]
            dset2[row_count:] = chunk[1]

            # Increment the row count
            row_count += chunk[0].shape[0]
            row_count2 += chunk[1].shape[0]

            print_progress(numer, n_files)

            numer += 1
将数据集分为训练集和测试集
training_set = int(len(names)*0.8)
test_set = int(len(names)*0.2)

names_training = names[0:training_set]
names_test = names[training_set:]

labels_training = labels[0:training_set]
labels_test = labels[training_set:]
然后我们将通过VGG16处理所有视频帧并保存传输值
make_files(training_set)
make_files_test(test_set)
将缓存的传输值加载到内存中
为了将保存的传输值加载到RAM内存中,我们将使用以下两个函数:
def process_alldata_training():

    joint_transfer=[]
    frames_num=20
    count = 0

    with h5py.File('prueba.h5', 'r') as f:

        X_batch = f['data'][:]
        y_batch = f['labels'][:]

    for i in range(int(len(X_batch)/frames_num)):
        inc = count+frames_num
        joint_transfer.append([X_batch[count:inc],y_batch[count]])
        count =inc

    data =[]
    target=[]

    for i in joint_transfer:
        data.append(i[0])
        target.append(np.array(i[1]))

    return data, target
def process_alldata_test():

    joint_transfer=[]
    frames_num=20
    count = 0

    with h5py.File('pruebavalidation.h5', 'r') as f:

        X_batch = f['data'][:]
        y_batch = f['labels'][:]

    for i in range(int(len(X_batch)/frames_num)):
        inc = count+frames_num
        joint_transfer.append([X_batch[count:inc],y_batch[count]])
        count =inc

    data =[]
    target=[]

    for i in joint_transfer:
        data.append(i[0])
        target.append(np.array(i[1]))

    return data, target
data, target = process_alldata_training()
data_test, target_test = process_alldata_test()
定义LSTM体系结构
VGG16网络从每个帧获得4096个传输值的向量作为输出。从每个视频,我们正在处理20帧,所以我们将有20 x 4096每个视频值。分类必须考虑到视频的20帧。如果他们中的任何一个检测到暴力,视频将被归类为暴力。
chunk_size = 4096
n_chunks = 20
rnn_size = 512

model = Sequential()
model.add(LSTM(rnn_size, input_shape=(n_chunks, chunk_size)))
model.add(Dense(1024))
model.add(Activation('relu'))
model.add(Dense(50))
model.add(Activation('sigmoid'))
model.add(Dense(2))
model.add(Activation('softmax'))
model.compile(loss='mean_squared_error', optimizer='adam',metrics=['accuracy'])
模型训练
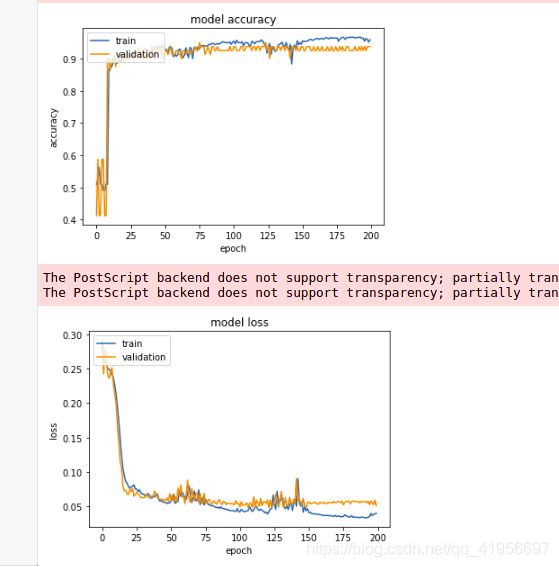
epoch = 200
batchS = 500

history = model.fit(np.array(data[0:720]), np.array(target[0:720]), epochs=epoch,
                    validation_data=(np.array(data[720:]), np.array(target[720:])),
                    batch_size=batchS, verbose=2)
测试模型
result = model.evaluate(np.array(data_test), np.array(target_test))
for name, value in zip(model.metrics_names, result):
    print(name, value)
plt.plot(history.history['accuracy'])
plt.plot(history.history['val_accuracy'])
plt.title('model accuracy')
plt.ylabel('accuracy')
plt.xlabel('epoch')
plt.legend(['train', 'validation'], loc='upper left')
plt.savefig('destination_path.eps', format='eps', dpi=1000)
plt.show()
# summarize history for loss
plt.plot(history.history['loss'])
plt.plot(history.history['val_loss'])
plt.title('model loss')
plt.ylabel('loss')
plt.xlabel('epoch')
plt.legend(['train', 'validation'], loc='upper left')
plt.savefig('destination_path1.eps', format='eps', dpi=1000)
plt.show()

转载于:https://www.kaggle.com/yassershrief/violence-detection-hockey-fight-cnn-lstm/comments


