Datawhale组队学习——Pytorch进阶训练技巧
自定义损失函数
以函数的方式定义
def my_loss(output, target):
    loss = torch.mean((output - target)**2)
    return loss
以类方式定义
更多的时候以类的方式定义,观察Pytorch自带的损失函数,部分损失函数直接继承自_Loss类,部分则先继承自_WeightedLoss类,而_WeightedLoss又继承自_Loss类。_Loss类则最终继承自nn.Module。
_Loss类的定义如下:
class _Loss(Module):
    reduction: str

    def __init__(self, size_average=None, reduce=None, reduction: str = 'mean') -> None:
        super(_Loss, self).__init__()
        if size_average is not None or reduce is not None:
            self.reduction: str = _Reduction.legacy_get_string(size_average, reduce)
        else:
            self.reduction = reduction
因此,我们在自定义损失函数时,可以通过继承nn.Module类。
例如:DiceLoss是一种在分割领域常见的损失函数
d i c e = 2 ∣ X ∩ Y ∣ ∣ X ∣ + ∣ Y ∣ dice = \frac{2|X∩Y|}{|X|+|Y|} dice=∣X∣+∣Y∣2∣X∩Y∣
L d i c e = 1 − 2 ∣ X ∩ Y ∣ ∣ X ∣ + ∣ Y ∣ L_ {dice} =1- \frac {2|X\cap Y|}{|X|+|Y|} Ldice=1−∣X∣+∣Y∣2∣X∩Y∣
代码如下:
class DiceLoss(nn.Module):
    def __init__(self,weight=None,size_average=True):
        super(DiceLoss,self).__init__()

	def forward(self,inputs,targets,smooth=1):
        inputs = F.sigmoid(inputs) # import torch.nn.functional as F
        inputs = inputs.view(-1)
        targets = targets.view(-1)
        intersection = (inputs * targets).sum() # |X∩Y|
        dice = (2.*intersection + smooth)/(inputs.sum() + targets.sum() + smooth)
        return 1 - dice

# 使用方法
criterion = DiceLoss()
loss = criterion(input,targets)
其他常见的损失函数参考1
例如BCE-Dice Loss,即添加了二分类交叉熵损失函数的Diceloss
class DiceBCELoss(nn.Module):
    def __init__(self, weight=None, size_average=True):
        super(DiceBCELoss, self).__init__()

    def forward(self, inputs, targets, smooth=1):
        inputs = F.sigmoid(inputs)
        inputs = inputs.view(-1)
        targets = targets.view(-1)
        intersection = (inputs * targets).sum()
        dice_loss = 1 - (2.*intersection + smooth)/(inputs.sum() + targets.sum() + smooth)
        BCE = F.binary_cross_entropy(inputs, targets, reduction='mean')
        Dice_BCE = BCE + dice_loss

        return Dice_BCE
动态调整学习率
通过一个适当的学习率衰减策略可以提高精度
使用官方scheduler
- 官方提供的scheduler
PyTorch已经在torch.optim.lr_scheduler为我们封装好了一些动态调整学习率的方法供我们使用,参考How to adjust learning rate. - 使用方法
学习率衰减策略应在优化器更新后应用,可以同时使用多个学习率调度器
model = [Parameter(torch.randn(2, 2, requires_grad=True))]
optimizer = SGD(model, 0.1)
scheduler1 = ExponentialLR(optimizer, gamma=0.9)
scheduler2 = MultiStepLR(optimizer, milestones=[30,80], gamma=0.1)

for epoch in range(20):
    for input, target in dataset:
        optimizer.zero_grad()
        output = model(input)
        loss = loss_fn(output, target)
        loss.backward()
        optimizer.step()
    scheduler1.step()
    # scheduler2.step() # 使用多个scheduler
自定义scheduler
通过自定义函数adjust_learning_rate来改变param_group中lr的值。
- 定义:
# 学习率每30轮下降为原来的1/10
def adjust_learning_rate(optimizer, epoch):
    lr = args.lr * (0.1 ** (epoch // 30))
    for param_group in optimizer.param_groups:
        param_group['lr'] = lr
- 调用
optimizer = torch.optim.SGD(model.parameters(),lr = args.lr,momentum = 0.9)
for epoch in range(10):
    train(...)
    validate(...)
    adjust_learning_rate(optimizer,epoch)
模型微调
无法收集到更多的数据时,利用迁移学习将源数据集学到的知识迁移到目标数据集上。
即模型微调:先找到一个同类的别人训练好的模型,把别人现成的训练好的模型拿过来,换成自己的数据,通过训练调整一下参数。
模型微调的流程
具体步骤如下:
1. 在源数据集(如ImageNet数据集)上预训练一个神经网络模型,即源模型。
2. 创建一个新的神经网络模型,即目标模型。它复制了源模型上除了输出层外的所有模型设计及其参数。我们假设这些模型参数包含了源数据集上学习到的知识,且这些知识同样适用于目标数据集。我们还假设源模型的输出层跟源数据集的标签紧密相关,因此在目标模型中不予采用。
3. 为目标模型添加一个输出⼤小为⽬标数据集类别个数的输出层,并随机初始化该层的模型参数。
4. 在目标数据集上训练目标模型。我们将从头训练输出层,而其余层的参数都是基于源模型的参数微调得到的。

使用已有模型结构
以torchvision中的常见模型为例,列出了如何在图像分类任务中使用PyTorch提供的常见模型结构和参数。
- 实例化网络
import torchvision.models as models
resnet18 = models.resnet18()
# resnet18 = models.resnet18(pretrained=False)  等价于与上面的表达式
alexnet = models.alexnet()
vgg16 = models.vgg16()
squeezenet = models.squeezenet1_0()
densenet = models.densenet161()
inception = models.inception_v3()
googlenet = models.googlenet()
shufflenet = models.shufflenet_v2_x1_0()
mobilenet_v2 = models.mobilenet_v2()
mobilenet_v3_large = models.mobilenet_v3_large()
mobilenet_v3_small = models.mobilenet_v3_small()
resnext50_32x4d = models.resnext50_32x4d()
wide_resnet50_2 = models.wide_resnet50_2()
mnasnet = models.mnasnet1_0()
- 传递
pretrained参数
当pretrained = True时表示将使用在一些数据集上预训练得到的权重。
注意事项- PyTorch模型的扩展为
.pt或.pth。 - 在这里选择自己要用的模型,查看其
.py文件中的model_urls下载。预训练模型的权重在Linux和Mac的默认下载路径是用户根目录下的.cache文件夹。在Windows下就是C:\Users\。我们可以通过使用\.cache\torch\hub\checkpoint torch.utils.model_zoo.load_url()设置权重的下载地址。 - 还可以将自己的权重下载下来放到同文件夹下,然后再将参数加载至网络。
self.model = models.resnet50(pretrained=False) self.model.load_state_dict(torch.load('./model/resnet50-19c8e357.pth')) - PyTorch模型的扩展为
训练特定层
在默认情况下,参数的属性.requires_grad = True,如果我们从头开始训练或微调不需要注意这里。但如果我们正在提取特征并且只想为新初始化的层计算梯度,其他参数不进行改变。那我们就需要通过设置requires_grad = False来冻结部分层。在PyTorch官方中提供了这样一个例程。
def set_parameter_requires_grad(model, feature_extracting):
    if feature_extracting:
        for param in model.parameters():
            param.requires_grad = False
在下面我们仍旧使用resnet18为例的将1000类改为4类,但是仅改变最后一层的模型参数,不改变特征提取的模型参数;注意我们先冻结模型参数的梯度,再对模型输出部分的全连接层进行修改,这样修改后的全连接层的参数就是可计算梯度的。
import torchvision.models as models
# 冻结参数的梯度
feature_extract = True
model = models.resnet18(pretrained=True)
set_parameter_requires_grad(model, feature_extract)
# 修改模型
num_ftrs = model.fc.in_features
model.fc = nn.Linear(in_features=512, out_features=4, bias=True)
之后在训练过程中,model仍会进行梯度回传,但是参数更新则只会发生在fc层。通过设定参数的requires_grad属性,我们完成了指定训练模型的特定层的目标,这对实现模型微调非常重要。
半精度训练
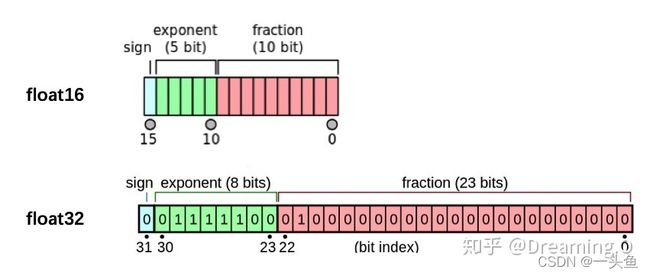
PyTorch默认的浮点数存储方式用的是torch.float32,但绝大多数场景只保留一半的信息也不会影响结果,即使用torch.float16格式,这种方法被称为“半精度”,具体如下图:
半精度训练的设置
在PyTorch中使用autocast配置半精度训练,同时需要在下面三处加以设置:
- import autocast
from torch.cuda.amp import autocast
- 模型设置
在模型定义中,使用python的装饰器方法,用autocast装饰模型中的forward函数。关于装饰器的使用,参考这里:
@autocast()
def forward(self, x):
    ...
    return x
- 训练过程
在训练过程中,只需在将数据输入模型及其之后的部分放入“with autocast():“即可:
 for x in train_loader:
	x = x.cuda()
	with autocast():
        output = model(x)
        ...
注意:
半精度训练主要适用于数据本身的size比较大(比如说3D图像、视频等)。
参考:
thorough-pytorch
