【机器学习16】人脸识别
【物联网工程实践】基于树莓派平台的宿舍人脸智能门锁系统
1.Python安装dlib
1.1conda 换源
c盘用户目录,.condarc文件:
channels:
- https://mirrors.tuna.tsinghua.edu.cn/anaconda/pkgs/free/
- defaults
show_channel_urls: yes

1.2更新conda
conda update -n base -c defaults conda

1.3创建新环境python3.6
名字叫tensorflow
conda create -n tensorflow python=3.6
1.4使用新环境
conda activate tensorflow

1.5更新pip
python -m pip install --upgrade pip
1.6安装cmake,boost,wheel,dlib==19.6.1
pip install cmake boost wheel dlib==19.6.1 -i https://pypi.tuna.tsinghua.edu.cn/simple
1.7安装numpy
pip install numpy opencv-python -i https://pypi.tuna.tsinghua.edu.cn/simple
1.8把新环境路径加到环境变量
PYTHON36    D:\Anaconda\envs\tensorflow

%PYTHON36%\Scripts;

%PYTHON36%\Library\bin;

%PYTHON36%;


1.9打开vscode,首选项设置,找到settings.json
修改python的路径,重启。
"python.pythonPath": "D:\\Anaconda\\envs\\tensorflow",
![]()
2.下载dlib人脸识别resnet模型v1.dat
2.1 下载
dlib_face_recognition_resnet_model_v1.dat
链接:https://pan.baidu.com/s/1XTEal36OfL_TiZozOJ2bFA 提取码:asqm
dlib官方使用resnet训练人脸识别,训练了300万的数据,网络参数保存在dlib_face_recognition_resnet_model_v1.dat中。
2.2自己训练
参考:https://blog.csdn.net/qq_44431690/article/details/106441426
主要步骤:
1.准备数据集
2.划分训练集和测试集
3.手动标注人脸数据,存放于XML文件中
4.使用 Dlib 训练模型
4.1定义参数:大部分参数,在此我们使用默认值,针对我们的训练集,我们主要设定如下几个参数:C: 对误差的宽容度,add_left_right_image_flips:对图片做镜像处理,be_verbose :输出训练的过程中的相关信息,num_threads:设置训练时使用的cpu的核数
4.2训练、生成模型:
import dlib
import os

faces_folder = "step2/data/dlib_example_faces" # 数据集路径

# 1. 定义模型训练需要的参数
options = dlib.simple_object_detector_training_options()

# 2.参数设定
options.add_left_right_image_flips = True	# 对数据集图片做镜像处理
options.C = 5 	# SVM的惩罚因子C为5
options.num_threads = 4 	# 设置训练时使用的cpu的核数为4
options.be_verbose = True	# 输出训练的过程中的相关信息

# 3. 调用训练模型函数
training_xml_path = os.path.join(faces_folder, "training.xml")# 训练集xml路径

# 4. 训练模型
dlib.train_simple_object_detector(training_xml_path, "detector.svm", options)
3.下载形状预测器68人脸特征点检测marks.dat
3.1 下载
链接: http://pan-yz.chaoxing.com/share/info/7ee63fc6f133d7ee

3.2 自己训练
参考链接:https://blog.csdn.net/sinat_28731575/article/details/80723743
dlib_face_recognition_resnet_model_v1.dat是训练好的ResNet人脸识别模型,ResNet是何凯明在微软的时候提出的深度残差网络,在深度和精度上做到了比 CNN 更加强大。
4.通过照片提取人脸特征
path=input("输入图片路径:")
img1=face_det(path)
ts_face_encoding=face_encoding(img1)
ts_face_encoding就是我们需要的人脸特征
大概长这样:
[-0.03668868541717529, -0.018181726336479187, 0.012445647269487381, -0.10581221431493759, -0.18554967641830444, -0.08981926739215851, -0.02888636663556099, -0.07403407245874405, 0.15373672544956207, -0.05050733685493469, 0.11467283219099045, -0.1293904334306717, -0.2213730812072754, -0.026461729779839516, -0.049039870500564575, 0.1515599936246872, -0.16090358793735504, -0.21544229984283447, -0.10326915979385376, -0.016975512728095055, 0.059193070977926254, 0.10775874555110931, -0.017499305307865143, 0.13912634551525116, -0.06453187018632889, -0.36165857315063477, -0.058138657361269, -0.07809735834598541, 0.010542547330260277, -0.057591523975133896, 0.09446749836206436, 0.1998242288827896, -0.09639033675193787, -0.024203138425946236, 0.07816611975431442, 0.09987755119800568, -0.046810753643512726, -0.1557597517967224, 0.22890836000442505, 0.03186391666531563, -0.28750938177108765, -0.04306591674685478, 0.0732765942811966, 0.2449604719877243, 0.26060694456100464, -0.0015156622976064682, 0.04624691605567932, -0.08869553357362747, 0.1395978480577469, -0.32878556847572327, -0.010230062529444695, 0.20035478472709656, 0.05134560912847519, 0.09341169893741608, 0.0702073872089386, -0.23641952872276306, 0.046424005180597305, 0.1431208848953247, -0.26788705587387085, -0.007873844355344772, 0.03596612811088562, -0.11947136372327805, 0.04785142093896866, -0.11098319292068481, 0.1990361213684082, 0.04708528146147728, -0.11738824099302292, -0.17358604073524475, 0.23432423174381256, -0.21375513076782227, -0.1060822606086731, 0.11156371980905533, -0.1238693818449974, -0.18788044154644012, -0.24893292784690857, -0.007100680842995644, 0.38294050097465515, 0.1682031750679016, -0.1348232477903366, 0.08670690655708313, -0.05527481064200401, -0.012847980484366417, -0.02628353238105774, 0.09862830489873886, 0.00018869340419769287, -0.04914264380931854, -0.13194307684898376, -0.045535046607255936, 0.16136352717876434, -0.03002108819782734, 0.010415487922728062, 0.26722434163093567, 0.04098903015255928, 0.03092348575592041, 0.06237806752324104, 0.0527460053563118, -0.095924973487854, 0.10299274325370789, -0.13239020109176636, 0.041926465928554535, -0.030311787500977516, -0.016834571957588196, 0.06799720972776413, 0.06944562494754791, -0.09386222809553146, 0.22887954115867615, -0.046813998371362686, -0.00019801408052444458, -0.11255016177892685, -0.07937939465045929, -0.04509091377258301, 0.01714230701327324, 0.18635845184326172, -0.25975334644317627, 0.14501400291919708, 0.11130683124065399, 0.13450153172016144, 0.22831228375434875, 0.05402415990829468, 0.0915597453713417, -0.001046602614223957, -0.12496338039636612, -0.2162574678659439, -0.02181287296116352, 0.04104631394147873, -0.008672928437590599, -0.031809695065021515, 0.12276595830917358]
5.通过视频提取人脸特征
人脸识别参考链接:https://www.toutiao.com/a6713150087297499659/
capture=cv2.VideoCapture(0)
while True:
    #读取每一帧,ret代表是否获取到图片,frame表示当前帧图片
    ret,frame=capture.read()
    gray = cv2.cvtColor(frame, cv2.COLOR_BGR2GRAY)
    dets=detector(gray,1)
    if(len(dets)>0):
        img1=frame
        break
    cv2.imshow( 'face', frame) #显示
    if cv2.waitKey(5) & 0xFF == ord( 'q' ):
        break
#释放资源
capture.release()
#关团窗口
cv2.destroyAllWindows()
ts_face_encoding=face_encoding(img1)
6.输入照片进行人脸识别
def return_euclidean_distance(feature_1,feature_2):
    feature_1 = np.array(feature_1)
    feature_2 = np.array(feature_2)
    dist = np.sqrt(np.sum(np.square(feature_1 - feature_2)))
    if dist>0.6:#井欧拉距离参数,参数越大,代表2个人脸数据差距越大
        return 'diff'
    else:
        return "same"
if return_euclidean_distance(face_encoding,feature_average)=="same":
                name.append(known_face_name[L])
                changestatus(known_face_name[L])
                play("欢迎光临"+known_face_name[L])
                break
                ....

7.输入视频进行人脸识别
import cv2
import dlib
import numpy as np
from selectFromMysql import selectall
from changestatus import changestatus
import time
from playsound import play

def face_det(filepath):
    img=cv2.imread(filepath)
    return img

def face_encoding(img):
    img_gray = cv2.cvtColor(img, cv2.COLOR_BGR2RGB)
    dets = detector(img_gray, 1) #检测到人脸
    feature_average = []
    feature_list = []
    shape=predictor(img_gray, dets[0]) #人脸68点特征数据
    face_descriptor = facerec.compute_face_descriptor (img_gray, shape)
    #人脸数据
    feature_list.append (face_descriptor)
   # 为了防止人脸数据越界,重新编辑整理人脸数据
    if len(feature_list) > 0:
        for j in range (128):
            #防止越界
            feature_average.append(0)
            for i in range (len(feature_list)):
                feature_average[j] += feature_list[i][j]
            feature_average[j] = (feature_average[j]) / len(feature_list)
    return feature_average
def return_euclidean_distance(feature_1,feature_2):
    feature_1 = np.array(feature_1)
    feature_2 = np.array(feature_2)
    dist = np.sqrt(np.sum(np.square(feature_1 - feature_2)))
    if dist>0.6:#井欧拉距离参数,参数越大,代表2个人脸数据差距越大
        return 'diff'
    else:
        return "same"


#dlib_face_recognition_resnet_model_v1.dat
facerec=dlib.face_recognition_model_v1(".\\model\\dlib_face_recognition_resnet_model_v1.dat")
#
detector=dlib.get_frontal_face_detector()
predictor=dlib.shape_predictor(".\\model\\shape_predictor_68_face_landmarks.dat")

known_face_name=[]
known_face_encodings=[]
datalist=selectall()
for i in range(len(datalist)):
    known_face_name.append(datalist[i][0])
    known_face_encoding=[]
    for j in range(len(datalist[i][1])):
        tmp=float(datalist[i][1][j])
        known_face_encoding.append(tmp)
    known_face_encodings.append(known_face_encoding)

capture=cv2.VideoCapture(r"./TaylorSwift.mp4")
while True:
    #读取每一帧,ret代表是否获取到图片,frame表示当前帧图片
    ret,frame=capture.read()
    gray = cv2.cvtColor(frame, cv2.COLOR_BGR2GRAY)
    dets=detector(gray,1)
    # print("发现{0}个人脸".format(len(dets)))
    k=0
    name=[]
    while (len(dets)-k)!=0:
        feature_average=[]
        feature_list=[]
        shape=predictor(gray,dets[k])

        face_descriptor=facerec.compute_face_descriptor(frame,shape)
        feature_list.append(face_descriptor)
        if len(feature_list) > 0:
            for j in range (128):
                #井防止越界
                feature_average.append(0)
                for i in range (len(feature_list)):
                    feature_average[j] += feature_list[i][j]
                feature_average[j] = (feature_average[j]) / len (feature_list)
        L=0
        for face_encoding in known_face_encodings:
            if return_euclidean_distance(face_encoding,feature_average)=="same":
                name.append(known_face_name[L])
                changestatus(known_face_name[L])
                play("欢迎光临"+known_face_name[L])
                break
            else:
                L=L+1
            if L==len(known_face_name):
                name.append("unknown")
        # print(name)
        k=k+1
    if cv2.waitKey(5) & 0xFF == ord( 'q' ):
        break
#释放资源
capture.release()
#关团窗口
cv2.destroyAllWindows()

8.输入摄像头进行人脸识别
capture=cv2.VideoCapture(0)
while True:
    #读取每一帧,ret代表是否获取到图片,frame表示当前帧图片
    ret,frame=capture.read()
    gray = cv2.cvtColor(frame, cv2.COLOR_BGR2GRAY)
    dets=detector(gray,1)
    # print("发现{0}个人脸".format(len(dets)))
    k=0
    name=[]
    while (len(dets)-k)!=0:
        feature_average=[]
        feature_list=[]
        shape=predictor(gray,dets[k])

        face_descriptor=facerec.compute_face_descriptor(frame,shape)
        feature_list.append(face_descriptor)
        if len(feature_list) > 0:
            for j in range (128):
                #井防止越界
                feature_average.append(0)
                for i in range (len(feature_list)):
                    feature_average[j] += feature_list[i][j]
                feature_average[j] = (feature_average[j]) / len (feature_list)
        L=0
        for face_encoding in known_face_encodings:
            if return_euclidean_distance(face_encoding,feature_average)=="same":
                name.append(known_face_name[L])
                changestatus(known_face_name[L])
                play("欢迎光临"+known_face_name[L])
                break
            else:
                L=L+1
            if L==len(known_face_name):
                name.append("unknown")
        # print(name)
        k=k+1
    ##画框框
    for (index, face) in enumerate(dets): # 5个参数,一个参数图片,2: 坐标原点,3识别大小,4.颜色5,线
        cv2.rectangle(frame, (face.left(),face.top()),(face.right(),face.bottom()), (0, 255,0), 2)
        # Draw a 1abel with a name below the face
        cv2.rectangle(frame,(face.left(),face.bottom() + 35), (face.right(), face.bottom()),
                        (0, 0, 255),cv2.FILLED)
        font = cv2.FONT_HERSHEY_DUPLEX
        cv2.putText (frame, name[index], (face.left() + 6,face.bottom() + 28),font, 1.0,
                        (255,255,255),1)

    cv2.imshow( 'face', frame) #显示
    if cv2.waitKey(5) & 0xFF == ord( 'q' ):
        break
#释放资源
capture.release()
#关团窗口
cv2.destroyAllWindows()
9.Python语音播报
Python将文字转成语音并读出来:
两种方式:
1.先将文字转成语音,然后再通过读取语音实现发音。
2.直接调用系统内置的语音引擎实现发音。
我们采用第二种。参考链接:https://blog.csdn.net/sinat_29957455/article/details/86352095
def play(strr):
    import win32com.client as win
    speak = win.Dispatch("SAPI.SpVoice")
    speak.Speak(strr)
10.Python连接数据库
参考链接:https://www.cnblogs.com/insane-Mr-Li/p/10195901.html
10.1安装mysql-python
#亲测不行
pip install MySQL-python
#这个可以
pip install mysqlclient==1.3.10
pip install pymysql
10.2设计数据库
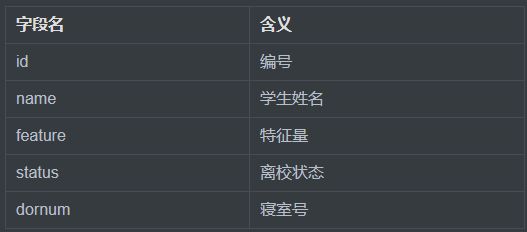

10.3连接数据库
import cv2
import dlib
import numpy as np
import pymysql.cursors

def selectall():
    # 连接数据库
    connect = pymysql.Connect(
        host='localhost',
        port=3306,
        user='root',
        passwd='zjp14961204.',
        db='ai',
        charset='utf8'
    )

    # 获取游标
    cursor = connect.cursor()
    users=[]
    # 查询数据
    sql = "SELECT * FROM user"
    try:
        # 执行SQL语句
        cursor.execute(sql)
        # 获取所有记录列表
        results = cursor.fetchall()
        for it in results:
            user=[]
            user.append(it[1])
            user.append(it[2].replace("[","").replace("]","").split(","))
            users.append(user)

    except:
        print("Error: unable to fecth data")

    # 关闭连接
    cursor.close()
    connect.close()
    return users
string="[-0.1, -0.2, 0.3, -0.4, -0.5, -0.7, -0.8, -0.9, 0]"转为数组:
.replace("[","").replace("]","").split(",")
11.把人脸特征存入数据库
import cv2
import dlib
import numpy as np
def face_det(filepath):
    img=cv2.imread(filepath)
    return img

def face_encoding(img):
    img_gray = cv2.cvtColor(img, cv2.COLOR_BGR2RGB)
    dets = detector(img_gray, 1) #检测到人脸
    feature_average = []
    feature_list = []
    shape=predictor(img_gray, dets[0]) #人脸68点特征数据
    face_descriptor = facerec.compute_face_descriptor (img_gray, shape)
    #人脸数据
    feature_list.append (face_descriptor)
   # 为了防止人脸数据越界,重新编辑整理人脸数据
    if len(feature_list) > 0:
        for j in range (128):
            #防止越界
            feature_average.append(0)
            for i in range (len(feature_list)):
                feature_average[j] += feature_list[i][j]
            feature_average[j] = (feature_average[j]) / len(feature_list)
    return feature_average
def return_euclidean_distance(feature_1,feature_2):
    feature_1 = np.array(feature_1)
    feature_2 = np.array(feature_2)
    dist = np.sqrt(np.sum(np.square(feature_1 - feature_2)))
    print("欧式距离:",dist)
    if dist>0.6:#井欧拉距离参数,参数越大,代表2个人脸数据差距越大
        return 'diff'
    else:
        return "same"


#dlib_face_recognition_resnet_model_v1.dat
facerec=dlib.face_recognition_model_v1(".\\model\\dlib_face_recognition_resnet_model_v1.dat")
#
detector=dlib.get_frontal_face_detector()
predictor=dlib.shape_predictor(".\\model\\shape_predictor_68_face_landmarks.dat")


path=input("输入图片路径:")
img1=face_det(path)
ts_face_encoding=face_encoding(img1)

known_face_name=input("输入人物名称:")

#保存np.array(feature_1)-------feature_1--------ts_face_encoding
#保存known_face_name
import pymysql.cursors

# 连接数据库
connect = pymysql.Connect(
    host='localhost',
    port=3306,
    user='root',
    passwd='zjp14961204.',
    db='ai',
    charset='utf8'
)

# 获取游标
cursor = connect.cursor()

# 插入数据
sql = "INSERT INTO user (name, feature) VALUES ( '%s', '%s')"
data = (known_face_name, ts_face_encoding)
cursor.execute(sql % data)
connect.commit()
print('成功插入', cursor.rowcount, '条数据')
print(type(ts_face_encoding))

# 关闭连接
cursor.close()
connect.close()
12.Java设计宿舍出入管理网页
12.1环境
Maven+Springboot+Thymeleaf
12.2新建Springboot项目
用人人开源逆向工程代码生成器生成controller,dao,entity,service
加入common(自己的通用类)

12.3pom.xml
除了基本的springboot-starter,还有thymeleaf,druid,mybatis-plus,lombok,mysql-connector,httpcore
<project xmlns="http://maven.apache.org/POM/4.0.0" xmlns:xsi="http://www.w3.org/2001/XMLSchema-instance"
         xsi:schemaLocation="http://maven.apache.org/POM/4.0.0 https://maven.apache.org/xsd/maven-4.0.0.xsd">
    <modelVersion>4.0.0modelVersion>
    <parent>
        <groupId>org.springframework.bootgroupId>
        <artifactId>spring-boot-starter-parentartifactId>
        <version>2.3.1.RELEASEversion>
        <relativePath/>
    parent>
    <groupId>com.ufogroupId>
    <artifactId>aiartifactId>
    <version>0.0.1-SNAPSHOTversion>
    <name>ainame>
    <description>Demo project for Spring Bootdescription>

    <properties>
        <java.version>1.8java.version>
    properties>

    <dependencies>
        <dependency>
            <groupId>org.springframework.bootgroupId>
            <artifactId>spring-boot-starter-webartifactId>
        dependency>

        <dependency>
            <groupId>org.springframework.bootgroupId>
            <artifactId>spring-boot-starter-testartifactId>
            <scope>testscope>
            <exclusions>
                <exclusion>
                    <groupId>org.junit.vintagegroupId>
                    <artifactId>junit-vintage-engineartifactId>
                exclusion>
            exclusions>
        dependency>

        <dependency>
            <groupId>org.springframework.bootgroupId>
            <artifactId>spring-boot-starter-thymeleafartifactId>
        dependency>
        <dependency>
            <groupId>com.alibabagroupId>
            <artifactId>druidartifactId>
            <version>1.1.13version>
            <scope>compilescope>
        dependency>
        <dependency>
            <groupId>org.projectlombokgroupId>
            <artifactId>lombokartifactId>
            <version>1.18.12version>
            <scope>compilescope>
        dependency>
        <dependency>
            <groupId>commons-langgroupId>
            <artifactId>commons-langartifactId>
            <version>2.6version>
        dependency>
        <dependency>
            <groupId>com.baomidougroupId>
            <artifactId>mybatis-plus-boot-starterartifactId>
            <version>3.3.1version>
        dependency>
        <dependency>
            <groupId>mysqlgroupId>
            <artifactId>mysql-connector-javaartifactId>
            <version>8.0.19version>
        dependency>
        <dependency>
            <groupId>org.apache.httpcomponentsgroupId>
            <artifactId>httpcoreartifactId>
            <version>4.4.13version>
        dependency>

    dependencies>

    <build>
        <plugins>
            <plugin>
                <groupId>org.springframework.bootgroupId>
                <artifactId>spring-boot-maven-pluginartifactId>

            plugin>
        plugins>
    build>

project>
12.4页面设计
hello.html:采用bootstrap4和layui美化,采用thymeleaf数据操作,采用ajax发送请求.
js onclick传参数:
th:οnclick="'javascript:sushe(\''+${dor}+'\',\''+${dor}+'\')'"
<html lang="en" xmlns:th="http://www.thymeleaf.org">
<head>
    <meta charset="UTF-8"/>
    <title>宿舍管理title>

    <link rel="stylesheet" href="https://cdn.staticfile.org/twitter-bootstrap/4.3.1/css/bootstrap.min.css">


    <script src="https://cdn.staticfile.org/jquery/3.2.1/jquery.min.js">script>


    <script src="https://cdn.staticfile.org/popper.js/1.15.0/umd/popper.min.js">script>


    <script src="https://cdn.staticfile.org/twitter-bootstrap/4.3.1/js/bootstrap.min.js">script>
    <link th:href="@{/layui/css/layui.css}" rel="stylesheet"/>
head>

<body class="back">

<div class="layui-side layui-bg-black">
    <div class="layui-side-scroll">

        <ul class="layui-nav layui-nav-tree" lay-filter="test">
            <li class="layui-nav-item layui-nav-itemed tm "><a class=""
                                                               href="javascript:;">宿舍编号a>
                <dl class="layui-nav-child">
                    <tr th:each="dor : ${dor}">
                        <dd>
                            <button type="button" class="btn btn-dark" style="width:100%" th:text="${dor}">button>
                        dd>
                    tr>
                dl>
            li>
        ul>
    div>
div>
<div class="layui-body">
    <div class="container back" style="width:100%">
        <p class="midd">宿舍人脸进出记录p>
        <table class="table table-dark table-hover" style="width:100%">
            <tr>
                <th>编号th>
                <th>姓名th>
                <th>状态th>
                <th>宿舍号th>
            tr>
            <tr th:each="user : ${users.list}">
                <td th:text="${user.id}">td>
                <td th:text="${user.name}">td>
                <td th:text="${user.status ==1?'在校':'离校'}">td>
                <td th:text="${user.dornum !=null?user.dornum:'未设置'}">td>

            tr>
        table>
        <button type="button" id="luru" class="btn btn-outline-dark" onclick="luru()">录入button>
        <button type="button" id="recog" class="btn btn-outline-dark" onclick="recog()">识别button>
    div>
div>
<style>
    .back {
        background: silver;
        width: 100%

    }

    .midd {
        text-align: center;
        font-size: 30px;
    }

    .tm {
        text-align: center;
    }

style>
<script>
    var W_height = $(window).height();
    var W_width = $(window).width();
    $(".back").css("height", W_height);
    // ajax1.js
    function retrieveGuests() {
        var url = '/luru';
        $("#resultsBlock").load(url);
    }
    function luru() {
            alert("录入,确定打开摄像头");
            $.get("/service/user/luru", function () {

        });
    }
    function recog() {
            alert("识别,确定打开摄像头");
            $.get("/service/user/recog", function () {

            });
    }
script>
body>
html>
页面效果:

13.Java调用识别和录入功能
 @GetMapping("/recog")
    public void recog() {
        String batPath = "E:\\qq下载的\\人工智能\\物联网工程实践\\recog.bat"; // 把你的bat脚本路径写在这里
        File batFile = new File(batPath);
        boolean batFileExist = batFile.exists();
        System.out.println("batFileExist:" + batFileExist);
        if (batFileExist) {
            callCmd(batPath);
        }
    }

    @GetMapping("/luru")
    public void luru() {
        String batPath = "E:\\qq下载的\\人工智能\\物联网工程实践\\luru.bat"; // 把你的bat脚本路径写在这里
        File batFile = new File(batPath);
        boolean batFileExist = batFile.exists();
        System.out.println("batFileExist:" + batFileExist);
        if (batFileExist) {
            callCmd("cmd /c start "+batPath);
        }
    }

    private static void  callCmd(String locationCmd) {
        StringBuilder sb = new StringBuilder();
        try {
            Process child = Runtime.getRuntime().exec(locationCmd);
            InputStream in = child.getInputStream();
            BufferedReader bufferedReader = new BufferedReader(new InputStreamReader(in));
            String line;
            while ((line = bufferedReader.readLine()) != null) {
                sb.append(line + "\n");
            }
            in.close();
            try {
                child.waitFor();
            } catch (InterruptedException e) {
                System.out.println(e);
            }
            System.out.println("sb:" + sb.toString());
            System.out.println("callCmd execute finished");
        } catch (IOException e) {
            System.out.println(e);
        }
    }
14.重装树莓派
原因:所用树莓派空间不足.
去官网,下载安装软件和镜像zip的文件,下这两个:

解压zip,选择img进去,选择sdcard进去,安装即可.时间20分钟.插回树莓派,连接显示器,开机即可.
15.连接树莓派
采用vnc连接:
参考链接:https://shumeipai.nxez.com/2018/08/31/raspberry-pi-vnc-viewer-configuration-tutorial.html
sudo raspi-config
Interfacing Options -> VNC -> Yes。之后系统会提示你是否要安装 VNC 服务,输入 y 之后回车,等待系统自动下载安装完成,一切顺利的话 VNC 服务就启动了!
然后win10下载VNC viewer,输入ip,账户,密码,即可连接。如下图:

16.项目移植树莓派
16.1树莓派apt-get国内镜像加速配置
参考链接:https://blog.csdn.net/Winter_chen001/article/details/105105102
16.2 pip下载参数
/etc/pip.conf:
[global]
extra-index-url= https://pypi.tuna.tsinghua.edu.cn/simple
16.3树莓派暗安装dlib
参考链接:https://www.jianshu.com/p/848014d8dea9
需要pip3安装的package有:cython numpy boost wheel
pip3 install numpy  -i https://pypi.tuna.tsinghua.edu.cn/simple
pip3 install scipy -i https://pypi.tuna.tsinghua.edu.cn/simple
pip3 install scikit-image -i https://pypi.tuna.tsinghua.edu.cn/simple
下载dlib,解压,
tar xvjf dlibxxxx.tar.bz2
编译(1小时)
sudo python3 setup.py install
16.4下载mariadb:
sudo apt-get install mariadb-server
连接mysql:
sudo mysql
配置密码访问
use mysql;
UPDATE user SET password=password('password') WHERE user='root';
UPDATE user SET plugin='mysql_native_password' WHERE user = 'root';
flush privileges;
exit
以上执行完成后,重启服务
sudo systemctl restart mariadb
mysql -u root -p
解决本地访问不了mysql:
https://blog.csdn.net/ShilohXiang/article/details/89053745
解决远程访问不了mysql:
在/etc/mysql中找到my.cnf,然而内容很简单,显示设置指向两个文件夹conf.d和mariadb.conf.d,在mariadb.conf.d文件夹下有一个50-server.cnf,将其中[mysqld]块下的bind-address值改为0.0.0.0后解决。
17.树莓派测试项目
由于树莓派没有摄像头,我们采用手机网络摄像头当做输入:
参考链接:https://www.cnblogs.com/yhstcxx/p/11692859.html
手机端下载:IP摄像头
电脑端连接:
# 开启ip摄像头
video = "http://admin:[email protected]:8081/"  # 此处@后的ipv4 地址需要改为app提供的地址
capture = cv2.VideoCapture(video)
运行:
python3 recognizeByVideo.py

网页项目还未来得及移到树莓派,所以只能win10展示,效果如下:
