Pytorch
文章目录
- pytorch
-
- self.register_buffer(‘my_buffer’, self.tensor)
- torch.masked_fill_()
- torch.bmm()
- nn.Embeding()
- nn.tensor()
- nn.Cov2d()
- nn.convTransposed()
- torch.nn.functional.unfold()
- torch.nn.MaxPool2d()
- torch.nn.AdaptiveAvgPool2d()
- torch.Linear()
- n.ReLu(inplace=false)
- nn.dropout2d()
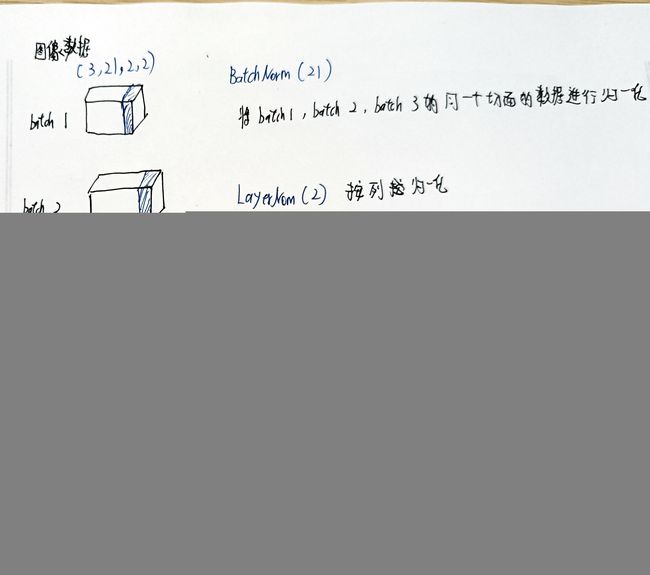
- nn.BatchNorm1d/2d() nn.LayerNorm()未
- torch.randn(size,*args)
- torch.optim
- forward函数
- nn.MSELoss(X,Y,reduction) mean square error
- torch.nn.NLLLoss()
- torch.manual_seed()
- torch.sum()
- model.state_dict().items()
- torch.max()
- torch.nn.Module.zero_grad() 有待考究
- backward()反向传播函数
- torch.optim.SGD()
- torch.optim.lr_scheduler()
- 梯度下降 反向传播 更新参数
- torch.nn.functional.interpolate()
- torch.load()&torch.load_state_dict()& torch.save()
- torch.flatten()
- torch.softmax()在图像分割中的使用
- nn.ModuleList() 和nn.Sequential()
- torch.utils.data.DataLoader() 有待考究
- model.train 与model.val
- torch.item()
- torch.tensor() 与torch.from_numpy()的区别
- .cuda() 与 .to(device)将模型送到GPU上训练
- torch.nn.DataParallel() 有待考究
- param.requires_grad = False 有待考究
- torch.update() model.apply()
- Variable的使用
- DataLoder参数详解
- torch.tile()
- torchvision
-
- torchvision.transform.Normalize()
- torchvision.transform.Tensor()
- torchvision.Datasets.ImageFolder
- torchvision.transforms
- torch.backends.cudnn.benchmark
- argparse.ArgumentParser()
- TorchSummary
- tqdm
- tensorboard
- torch hub
- 其他注意事项
-
- epoch、iteration和batchsize
- self.modules() children () parameters()
- permute(dims) & torch.transpose()
- reshape()/view()
- squeeze()/unsqueeze()
- pytorch网络模型参数形式
- Variable在神经网络中的使用
- crop与resize的区别
pytorch
self.register_buffer(‘my_buffer’, self.tensor)
- 参考链接3
- 模型参数有两种,一种是Parameter和buffer,parameter在model.state_dict()中,可以通过torch.save(model.state_dict())保存parameter,要想parameter不更新参数,可以设置grad_required=False并且将其梯度清零(因为grad_required=False只是梯度不更新,为了参数不更新,还需要将梯度清零)。buffer类型变量不参与模型更新
- 对于类成员变量,其无法通过model.state_dict()存储下来,类成员变量不在模型参数里面,为了解决这个问题,可以将类成员变量进行登记,self.register_buffer(“名字”,张量),登记完之后,类成员变量的类型是buffer。类成员变量就会跟随model进入GPU或是CPU,但buffer类型的变量是不会进行数据更新的
- 总而言之,类成员变量是类的,需要将其作为模型参数的话,需要进行登记,并且登记完之后的类型是buffer,不参与梯度更新。
import torch.nn
import torch.nn as nn
class my_model(nn.Module):
    def __init__(self):
        super(my_model, self).__init__()
        self.conv = nn.Conv2d(1, 1, 3, 1, 1)
        self.tensor = torch.randn(size=(1, 1, 5, 5))
        self.register_buffer('my_buffer', self.tensor)

    def forward(self, x):
        return self.conv(x) + self.my_buffer
x = torch.randn(size=(1, 1, 5, 5))
x = x.to('cuda')
model = my_model().cuda()
model(x)
print(model.state_dict())  # 登记之后就包括buffer和parameter两个类型的参数
print(model.my_buffer)     # 可以通过model.parameter()或者是model.buffer()来查看参数
##torch.repeat()
- 参考链接
- 一个参数x 将数据看做一个整体,重复x次 维度不变
- 两个参数m,n 将数据看做一个整体,做到m行n列 升维
- 三个参数c,m,n 将数据看做一个整体,做到 (c,m,n) 升维
torch.masked_fill_()
- torch.mask_fill_(mask,value) 用value的值填充mask中为ture的值
import torch
# 需要保证mask的和要被mask的数据是相同大小的
a = torch.randn(5, 6)
x = [5, 4, 3, 2, 1]
mask = torch.zeros(5, 6, dtype=torch.float)
for e_id, src_len in enumerate(x):
    mask[e_id, src_len:] = 1
mask = mask.to(device='cpu')
mask = mask > 0
print(mask)

a = a.masked_fill_(mask, -float('inf'))
print(a)
# tensor([[False, False, False, False, False,  True],
#         [False, False, False, False,  True,  True],
#         [False, False, False,  True,  True,  True],
#         [False, False,  True,  True,  True,  True],
#         [False,  True,  True,  True,  True,  True]])
# tensor([[ 0.0789,  1.1909, -0.7155,  1.1650,  0.5295,    -inf],
#         [-1.8139, -0.9412, -0.5908,  1.5424,    -inf,    -inf],
#         [-0.7571, -0.1321, -0.0579,    -inf,    -inf,    -inf],
#         [ 0.8245,  0.4047,    -inf,    -inf,    -inf,    -inf],
#         [ 0.5517,    -inf,    -inf,    -inf,    -inf,    -inf]])
torch.bmm()
- 第一个维度不算,剩下维度进行矩阵相乘
nn.Embeding()
- num_embeddings 词数量,但在embeding中,使用的是词向量的下标
- embedding_dim 用多少维的向量表示词
- padding_idx 指定索引为0
- Embeding是根据词语下标进行词嵌入
- 这样不设计参数的模式,词嵌入是随机初始化的,可以考虑用embdein.parameter来设计参数
# 将hello的下边输入进行词嵌入
word_to_id = {'hello':0, 'world':1}
embeds = nn.Embedding(2, 10)
hello_idx = torch.LongTensor([word_to_id['hello']])
hello_embed = embeds(hello_idx)
print(hello_embed)
# x 就是词所代表的下标,padding_idx会将索引为3的置于0
# embeding已经将参数设计好了,所以不同序列相同词下标的位置嵌入是一样的
x = torch.LongTensor([[2, 2, 3], [1, 3, 5]])
embeddings = nn.Embedding(6, 4, padding_idx=3)
print(embeddings(x))
print(embeddings(x).size())
nn.tensor()
生成张量,可以是tensor类型,numpy类型,list类型。。。。
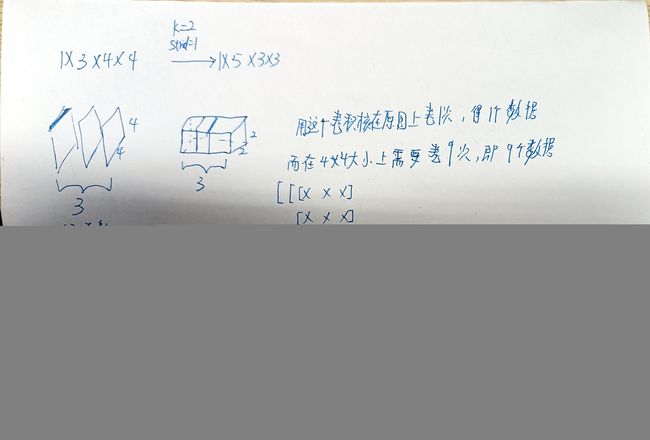
nn.Cov2d()
- torch.nn.Conv2d(in_channels, out_channels, kernel_size, stride=1, padding=0, dilation=1, groups=1, bias=True)
是一个二维卷积操作dilation 扩张卷积 bias 学习偏差 groups 分组卷积的意思当groups==inchannel时,就是深度可分离卷积的depthwise conv- 卷积核的参数默认不为1,而且还各不相同,其实也无所谓,反正这些参数也是要学习的
- 计算公式
卷积一般是向下取整,池化一般是向上取整
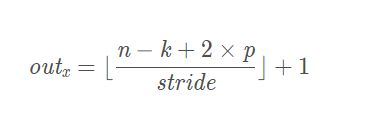
- n:特征图的宽或者高
- k:卷积核的尺寸
- p:padding的数值,一般指单侧填充几个单元
- stride:顾名思义
# import torch
# from torch import nn
# torch.random.manual_seed(123)
# data = torch.randint(0, 2, size=(1, 3, 2, 2), dtype=torch.float)
# print(data)
# cov1 = nn.Conv2d(in_channels=3, out_channels=1, kernel_size=2,bias=False)
# data1 = cov1(data)
# print(data1)
# print(cov1.weight)
# print(cov1.bias)
import torch
from torch import nn
torch.random.manual_seed(123)
data = torch.randint(0, 2, size=(1, 3, 4, 4), dtype=torch.float)
print(data)
cov1 = nn.Conv2d(in_channels=3, out_channels=5, kernel_size=2,bias=False)
data1 = cov1(data)
print(data1)
print(cov1.weight)
print(cov1.bias)
nn.convTransposed()
import os
import torch
import torchvision
data = torch.randint(0, 3, (1, 3, 2, 2),dtype=torch.float)
print(data)
transposed = torch.nn.ConvTranspose2d(in_channels=3, out_channels=3, kernel_size=3, padding=0, output_padding=0, bias=True)、
# 这里步长没写,默认为1
m = transposed(data)
print(m)
# tensor([[[[0., 1.],
#           [2., 1.]],
#
#          [[0., 2.],
#           [2., 1.]],
#
#          [[2., 2.],
#           [1., 0.]]]])
# tensor([[[[-0.0821, -0.4113,  0.0484,  0.4625],
#           [ 0.1062,  0.2858,  0.2982,  0.0472],
#           [-0.0353, -0.7860, -0.3782, -0.4534],
#           [-0.5581, -0.2484, -0.3132, -0.1749]],
#
#          [[-0.0031, -0.3477,  0.1190,  0.1946],
#           [-0.0188,  0.3423,  0.4817,  0.5761],
#           [ 0.4029,  0.0881,  0.7544,  0.1780],
#           [-0.2401, -0.0292,  0.0744, -0.0255]],
#
#          [[-0.1855, -0.2864,  0.0705,  0.7010],
#           [-0.8852, -0.6460,  1.1196,  1.0175],
#           [-0.4024,  0.7571,  1.3162,  0.1160],
#           [ 0.3959,  0.3643, -0.3875, -0.2538]]]],
torch.nn.functional.unfold()
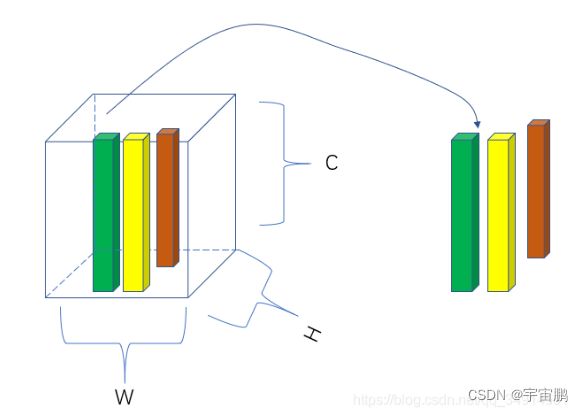
- 主要用于将图片进行patch分片操作
- 设置kernel_size等同于patch的分辨率,padding设置为kernel_size是为了不重叠。然后会将得到的立体柱自动拉成一维张量也就是token;序列长度不需要再计算
def unfold(input, kernel_size, dilation=1, padding=0, stride=1):
    """
    input: tensor数据,四维, Batchsize, channel, height, width
    kernel_size: 核大小,决定输出tensor的数目。稍微详细讲
    dilation: 输出形式是否有间隔,稍后详细讲。
    padding:一般是没有用的必要
    stride: 核的滑动步长。稍后详细讲
"""
import numpy as np
import torch
import torch.nn.functional as f
image_data = torch.randn(1,3,224,224)

output = f.unfold(image_data,kernel_size=(16,16),stride=16)
print(output.shape)
# 224*224/16/16=196
# 16*16*3=768#
# 序列长度和token要重排列
# torch.Size([1, 768, 196])
torch.nn.MaxPool2d()
参数依次为- kernel_size :表示做最大池化的窗口大小,可以是单个值,也可以是tuple元组
- stride :步长,可以是单个值,也可以是tuple元组
- padding :填充,可以是单个值,也可以是tuple元组
- dilation :控制窗口中元素步幅
- return_indices :布尔类型,返回最大值位置索引
- ceil_mode :布尔类型,为True,用向上取整的方法,计算输出形状;默认是向下取整。
import torch
from torch import nn
torch.random.manual_seed(123)
data = torch.randint(0, 2, size=(1, 3, 4, 4), dtype=torch.float)
print(data)
pool1 = nn.MaxPool2d(kernel_size=2,stride=2)
data1 = pool1(data)
print(data1)
# tensor([[[[0., 1., 0., 0.],
#           [0., 0., 0., 1.],
#           [1., 0., 1., 1.],
#           [0., 1., 0., 1.]],
#
#          [[0., 1., 1., 0.],
#           [0., 0., 1., 1.],
#           [1., 0., 1., 0.],
#           [0., 0., 0., 1.]],
#
#          [[1., 1., 0., 0.],
#           [1., 0., 0., 1.],
#           [0., 1., 0., 1.],
#           [1., 1., 0., 0.]]]])
# tensor([[[[1., 1.],
#           [1., 1.]],
#
#          [[1., 1.],
#           [1., 1.]],
#
#          [[1., 1.],
#           [1., 1.]]]])
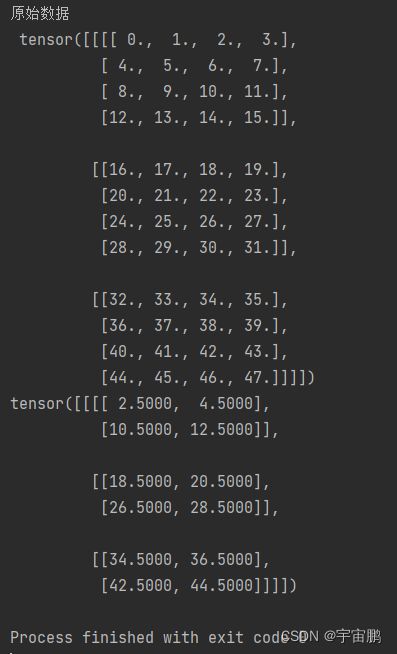
torch.nn.AdaptiveAvgPool2d()
- 自适应平均池化 通道数不变,但可以指定输出特征层的长和宽 并且单个参数x表示指定长宽为x*x,与torch.nn.AdaptiveAvgPool2d((x,x))一个意思,当然长宽也可以不一样
意义:可能也许就是降维、去除冗余信息、对特征进行压缩、简化网络复杂度、减小计算量、减小内存消耗等等
参考链接1 函数解析
参考链接2 函数参数设置
参考链接3 池化的种类和意义
import torch
import numpy as np
from torch import nn
if __name__ == '__main__':
    torch.manual_seed(123)
    data = torch.arange(0, 48).view(1, 3, 4, 4).float()
    print("原始数据\n", data)
    module1 = nn.AdaptiveAvgPool2d(2) # 跟(2,2)一个意思
    # module2 = nn.AdaptiveAvgPool2d((2, 2))
    module3 = nn.AdaptiveAvgPool2d((2, 1))  # 指定长为2 宽为1
    print(module1(data))
    # print(module2(data))
    # print(module3(data))
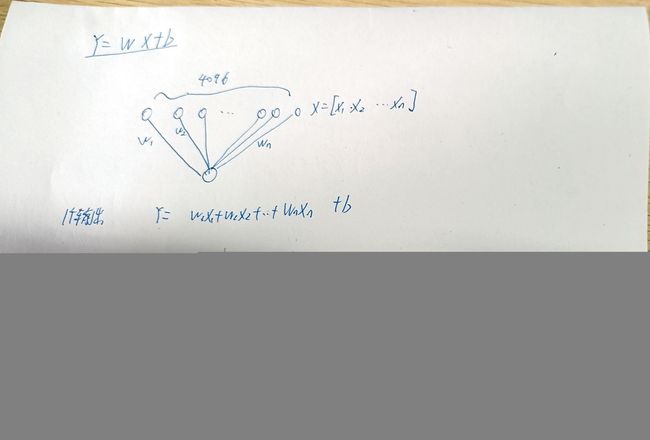
torch.Linear()
- torch.Linear(in_chanel,out_chanel,bias)
Y = W * X + b,W是权重,b是偏差,X是输入张量,Y输出张量,这里偏置不是张量的每一维度上都有偏置,而是权重和张量相乘后,再加上偏置b,有多少个输出向量就有多少个偏置- 假设输入一个多维张量,size=6 * 6 * 256,将其先flatten成一维张量,大小为4096,可以看成1 * 1*4096,也可以看成4096个点,设置输出通道为1,则权重张量1 * 4096,偏置张量大小1 ; 设置输出通道为10,则权重张量为10 * 4096(相当于10行的1 * 4096,一个1 * 4096一个输出,10行则10个输出),偏置张量大小为10
- 记忆为向量的内积
import torch
from torch import nn
data = torch.randint(0, 5, size=(1, 3, 3, 3), dtype=torch.float)
print(data)
data1 = torch.flatten(data)
print(data1)
connected_layer = nn.Linear(in_features=27, out_features=10)
print(connected_layer.weight.shape)
print(connected_layer.bias.shape)
data2 = connected_layer(data1)
print(data2)
# tensor([[[[1., 0., 0.],
#           [4., 0., 1.],
#           [2., 4., 0.]],
#
#          [[0., 4., 0.],
#           [4., 3., 1.],
#           [4., 3., 1.]],
#
#          [[4., 1., 2.],
#           [1., 2., 0.],
#           [1., 4., 2.]]]])
# tensor([1., 0., 0., 4., 0., 1., 2., 4., 0., 0., 4., 0., 4., 3., 1., 4., 3., 1.,
#         4., 1., 2., 1., 2., 0., 1., 4., 2.])
# torch.Size([10, 27])
# torch.Size([10])
# tensor([-0.9377, -0.8973, -1.1362,  0.4944, -0.3523,  0.6868, -0.6572,  1.0271,
#         -0.5543, -0.7574], grad_fn=)
- 多维张量的全连接 ,16 * 10的多维向量,模型w是3 * 10 ,当用一行的w在多维向量上全连接是,分别得到16个数,按列排列;一共三行,故输出维16 * 3的多维向量
import torch
import torch.nn as nn
model = nn.Linear(10, 3)
print(model.state_dict()['weight'].shape)
x = torch.randn(16, 10)
y = torch.randint(0, 3, size=(16,))  # (16, )
logits = model(x)  # (16, 3)
print(logits.shape)
# torch.Size([3, 10])
# torch.Size([16, 3])
n.ReLu(inplace=false)
- 激活函数
- inplace
原地 - inplace默认false(不原地) 原对象不变,会产生一个新的对象 类似值传递
- inplace为true(原地),原对象的值会改变,不产生一个新的对象,地址传递 参考链接

import torch
import torch.nn as nn
class net(nn.Module):
    def __init__(self):
        super(net, self).__init__()
        # self.linear = nn.Linear(3, 5)
        self.relu1 = nn.ReLU(inplace=False)
    def forward(self,x):
        # x = self.Linear(x)
        print(x)  # 输入数据x
        y = self.relu1(x)
        print(x)   # 当inplace=False,x保持不变,当inplace=True,x的值会变,更y一样

        return  y

if __name__ == '__main__':
    model = net()
    torch.manual_seed(1223)
    input =torch.randn(3,2)
    model(input)
nn.dropout2d()
- nn.dropout( p) p是概率,以p概率将某一维度的参数置为0, nn.dropoutd()是以概率p将某参数置为0
参考链接
nn.BatchNorm1d/2d() nn.LayerNorm()未
#————————————————————————BatchNorm1d与BatchNorm2d在二维数据和三维数据下数据呈现————————————————————————
import torch
from torch.nn import BatchNorm1d
from torch.nn import BatchNorm2d
import numpy as np
from torch.nn import LayerNorm
input = torch.randint(0, 4, size=(4, 3), dtype=torch.float)
# input = torch.randint(0, 4, size=( 2, 4, 3), dtype=torch.float)
# 在前面加入批次2,就变得很奇怪 BatchNorm1d(4)才跑的通  有理解的大哥可以私我
print(input)
c = BatchNorm1d(3)
print('-'*100)
print(c(input))
print('-'*100)
input = torch.randint(0, 4, size=(2, 3, 2, 2), dtype=torch.float)
print(input)
print('-'*100)
b = BatchNorm2d(3)
print(b(input))
print('-'*100)
import torch
from torch.nn import LayerNorm
input = torch.randint(0, 3, size=(2, 2, 2, 3), dtype=torch.float)
print(input)
print('-'*100)
# b = LayerNorm((3))
# b = LayerNorm((2, 3))
# b = LayerNorm((2, 2, 3))
b = LayerNorm((2, 2, 2, 3))
print(b(input))
print('-'*100)
torch.randn(size,*args)
- randn是
标准正态分布函数,返回一个指定shape的由标准正态分布数据组成的对象 X= torch.randn(2,2,3,4) 这就表示batch_size =2,通道为2 图片高为3 宽为4这样调用torch.Cov2d(2·····)时iin_channels=2batch_size分批卷积的意思
torch.randn(4) 4行1列
tensor([-2.1436, 0.9966, 2.3426, -0.6366])
torch.randn(2, 3) 2行3列
tensor([[ 1.5954, 2.8929, -1.0923],
[ 1.1719, -0.4709, -0.1996]])
torch.optim
- 是一个
优化函数库,其中可以设置学习率lr 一般设置为1e-2
forward函数
- 实例化模型对象的时候,不需要调用forward,会自动执行,因为在__call__函数中调用了forward函数
nn.MSELoss(X,Y,reduction) mean square error
torch.nn.NLLLoss()
- 使用
torch.nn.NLLLoss()需要先对数据进行过log_softmax()因为softmax之后,数据都是在0 1之间,再经过log之后,数据全都为负数,但是求取损失的时候,使用的是绝对值 - 参考链接
- 因为标签和输出的维度是不一样的,所以计算的时候会先对label进行补0,使得标签和输出数据的维度一样。
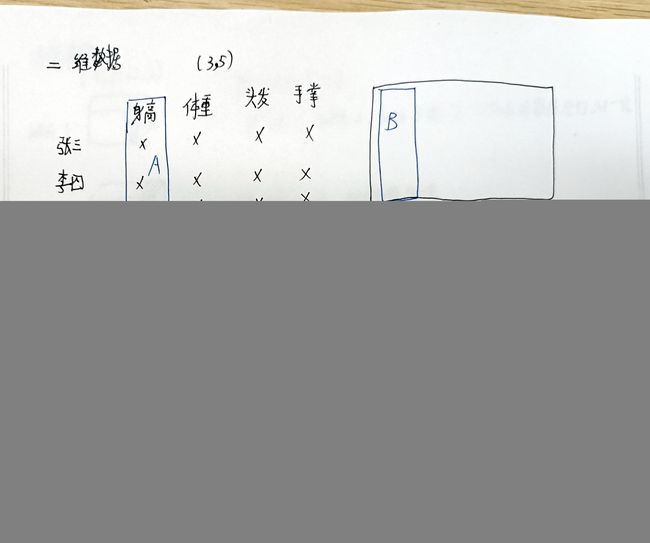
- 在二维情况下,数据为B * C(B这里应该是类别,C是类别的属性,就是身高体重这些) ,则标签为1 * B ,进行损失函数计算的时候,会根据标签,在B * C 的多维向量上进行0 1填充。之后根据P(x)log(Q(x))计算交叉熵。
参考链接更清晰。

# CrossEntropyLoss()=log_softmax() + NLLLoss()
import torch
torch.manual_seed(123)
input = torch.randn(3, 3)
output = torch.log_softmax(input,dim=1)
print(output)
label = torch.tensor([0,1,2])
print(label)
LOSS = torch.nn.NLLLoss()
print(LOSS(output, label))
cerrition = torch.nn.CrossEntropyLoss()
print(cerrition(input,label))

# tensor([[-1.1097, -0.8778, -1.3678],
#         [-1.0825, -2.0390, -0.6328],
#         [-1.7747, -1.5574, -0.4784]])
# tensor([0, 1, 2])
# tensor(1.2090)
# tensor(1.2090)
- 对于图片,B * C * H * W,则标签为B * H * W,通道数C是类别总数,有21类,则C为21 在对像素点分类的时候,对通道数进行log_softmax,之后根据标签选择数据计算作为loss(根据交叉熵
P(x)log(Q(x)) P为真值,Q为预测值,标签选中的值是1,没有选中的值为0 在像素点分类中,假设 21个通道,就是21个类别,label=10,根据公式,因为没有选中为0,就不需要管,选中为1,根据公式计算就得到loss),这是一个点。对整张图片 就是所有像素点的各自的loss相加求取均值,作为图像的loss - 值得注意的是,nn.CrossEntropyLoss()中的参数可以设置权重,用来平衡类别不均匀的情况,reduction可以选择是mean还是sum
import torch
data = torch.rand(1, 3, 1, 1)
print(data)
label = torch.randint(0, 3, (1, 1, 1))
print(label)
soft_data = torch.softmax(data, dim=1)
print(soft_data)
log_soft_data = torch.log(soft_data)
print(log_soft_data)
criterion = torch.nn.CrossEntropyLoss()
print(criterion(data, label))
# tensor([[[[0.4181]],
#
#          [[0.6438]],
#
#          [[0.6271]]]])
# tensor([[[1]]])
# tensor([[[[0.2869]],
#
#          [[0.3595]],
#
#          [[0.3536]]]])
# tensor([[[[-1.2486]],
#
#          [[-1.0230]],
#
#          [[-1.0397]]]])
# tensor(1.0230)
torch.manual_seed()
- manual(手工)设置随机数种子,这样每次运行得到的随机数都一样
就相当于给生成的一群随机数一个编号
import torch
torch.manual_seed(0)
print(torch.rand(1)) # 返回一个张量,包含了从区间[0, 1)的均匀分布中抽取的一组随机数
# 结果总是tensor([0.4963]) 就相当于给生成的一群随机数一个编号
torch.sum()
求和函数,默认求取所有数字和,并且维度压缩,也可以指定维度,求取指定维度的和,torch.sum(input,dim,keepdim)- dim指定维度(bool型 0,1,····) keepdim是都压缩维度,因为求和之后宽度会带来维度的减少
- 如果是高维的话,比如data = (3, 2, 2),dim=0,指的是按通道进行相加(用一根针朝通道方向穿过覆盖的点);dim=1,指高度方向进行相加(依然用一根针朝高度方向穿过,将覆盖的点相加)。另外一个就是可以切面相加,比如说指定dim=(0,1)在data数据中,就表示切面
import torch
import torch.nn.functional as F
torch.manual_seed(123)
inputs = torch.randint(0, 4, (3, 2, 2), dtype=torch.float)
print(inputs)
# 如果维度不是列表就表示穿过的线上的点进行相加
print('穿针:')
print(torch.sum(inputs, axis=[0]))
print(torch.sum(inputs, axis=[1]))

# 如果维度是2个维度,这个就表示切片 面上所有点进行相加
print('切片')
print(torch.sum(inputs, dim=[0, 1]))
print(torch.sum(inputs, dim=[1, 2]))
# 换言之,如果维度是三个,那不就刚好是切一个立体块块出来
print('切立体块')
print(torch.sum(inputs))
print(torch.sum(inputs, dim=[0, 1, 2]))
# tensor([[[2., 1.],
#          [2., 2.]],
#
#         [[0., 2.],
#          [2., 1.]],
#
#         [[3., 2.],
#          [3., 1.]]])
# 穿针:
# tensor([[5., 5.],
#         [7., 4.]])
# tensor([[4., 3.],
#         [2., 3.],
#         [6., 3.]])
# 切片
# tensor([12.,  9.])
# tensor([7., 5., 9.])
# 切立体快
# tensor(21.)
# tensor(21.)
model.state_dict().items()
- state_dict是在定义了model或optimizer之后pytorch自动生成的,可以直接调用.保留了可以训练的偏差、权重等
- state_dict参数字典 items的意思是字典键值对输出
for name, param in model.state_dict().items():
	print(name,param.requires_grad=True)
torch.max()
- 求取指定维度的最大值 或者全局最大值 (0 为列 1 为行)
- 返回为元组(指定维度的最大值,指定维度的索引)
import torch

data = torch.randint(1, 10, size=(3, 3))
print(data)
print(torch.max(data,dim=0))
print(torch.max(data,dim=0)[0])
print(torch.max(data,dim=0).values)
# tensor([[8, 5, 5],
#         [8, 7, 9],
#         [2, 3, 8]])
# torch.return_types.max(
# values=tensor([8, 7, 9]),
# indices=tensor([0, 1, 1]))
# tensor([8, 7, 9])
# tensor([8, 7, 9])
参考链接
torch.nn.Module.zero_grad() 有待考究
- 反向传播前,将模型所有参数
梯度(grad)清零 参考链接
backward()反向传播函数
- 计算误差后,通过反向传播计算梯度,来使误差最小 。反向传播的目标是优化权重,以便神经网络能够学习如何正确地将任意输入映射到输出。
参考链接
torch.optim.SGD()
- params 需要随机梯度下降的参数,一般是模型的可学习的参数
- lr 学习率,过大,收敛快,但容易跳过极值点;过小,收敛速度慢
momentum 冲量,使数据具有惯性,减少动荡,增加离开局部盆地的可能性 有待考究- 其他暂无
torch.optim.lr_scheduler()
- optimizer 优化器
- epoch_size 轮次,多少轮后更新一次学习率
- gamma 学习率变为原来的几分之几
- 参考链接
import torch
import torch.nn as nn
from torch.optim.lr_scheduler import StepLR
import itertools
class model(nn.Module):
    def __init__(self):
        super().__init__()
        self.conv1 = nn.Conv2d(in_channels=3, out_channels=3, kernel_size=3)

    def forward(self, x):
        pass
net_1 = model()
optimizer_1 = torch.optim.Adam(net_1.parameters(), lr=0.1)
scheduler_1 = StepLR(optimizer_1, step_size=3, gamma=0.1)

print("初始化的学习率:", optimizer_1.defaults['lr'])
for epoch in range(1, 11):
    # train

    optimizer_1.zero_grad()
    optimizer_1.step()
    print("第%d个epoch的学习率:%f" % (epoch, optimizer_1.param_groups[0]['lr']))
    scheduler_1.step()
# 初始化的学习率: 0.1
# 第1个epoch的学习率:0.100000
# 第2个epoch的学习率:0.100000
# 第3个epoch的学习率:0.100000
# 第4个epoch的学习率:0.010000
# 第5个epoch的学习率:0.010000
# 第6个epoch的学习率:0.010000
# 第7个epoch的学习率:0.001000
# 第8个epoch的学习率:0.001000
# 第9个epoch的学习率:0.001000
# 第10个epoch的学习率:0.000100
梯度下降 反向传播 更新参数
- 这三个往往同时出现
for i in range(3000):
    y_predict=model(x)
    loss=Loss(y_predict,y)
    optimizer.zero_grad() # 梯度反向传播前清0   因为每次迭代之后,梯度并不清除,不归零,梯度会累加
    loss.backward()       # 反向传播 来使可以更新权重 使误差下降
    optimizer.step()      # 更新参数
    if (i+1)%100==0:
        print("[training] step: {0} , loss: {1}".format(i+1,loss))
torch.nn.functional.interpolate()
插值函数,将图像的分辨率提高,更加的清晰- torch.nn.functional.interpolate(input, size=None, scale_factor=None, mode=‘nearest’, align_corners=None)
input为输入数据,size为指定输出大小,scale_factor为放大倍数,mode是选择插值函数align_corners为是否选择对齐对角像素点 - size和scale_factor说明一个就行
例输入1 * 3 * 2 * 2 ,想要得到1 * 3 * 4 * 4 指定size(4,4)或者指定scale_factor为4就行 - mode 有多个选择 有线性插值 双线性差值等
- align_corners=True 表示输入 输出图像的对角像素点相等(就是一般我们理解的插值),align_corners=False 表示一般情况下对输入输出图像的对角像素不相等 而且二者插值方式有一些不一样 具体不清楚 搞不懂
import torch.nn.functional as F
import torch
if __name__ == '__main__':
    data = torch.arange(0, 4).view(1, 1, 2, 2).float()
    print("原始数据:\n",data)
    new_data1 = F.interpolate(data, mode="bilinear", size=(4, 4), align_corners=True)
    new_data2 = F.interpolate(data, mode="bilinear", scale_factor=2, align_corners=True)
    new_data3= F.interpolate(data, mode="bilinear",size=(4, 4), align_corners=False)
    print("new_data1\n", new_data1)
    print("new_data1与new_data2相比:", new_data2.equal(new_data1))
    print("new_data3:\n",new_data3)
#     原始数据:
#     tensor([[[[0., 1.],
#               [2., 3.]]]])
# new_data1
# tensor([[[[0.0000, 0.3333, 0.6667, 1.0000],
#           [0.6667, 1.0000, 1.3333, 1.6667],
#           [1.3333, 1.6667, 2.0000, 2.3333],
#           [2.0000, 2.3333, 2.6667, 3.0000]]]])
# new_data1与new_data2相比: True
# new_data3:
# tensor([[[[0.0000, 0.2500, 0.7500, 1.0000],
#           [0.5000, 0.7500, 1.2500, 1.5000],
#           [1.5000, 1.7500, 2.2500, 2.5000],
#           [2.0000, 2.2500, 2.7500, 3.0000]]]])
torch.load()&torch.load_state_dict()& torch.save()
- torch.load(model,map_location) 加载模型 map_device是分布式训练使用的
- torch.load_state_dict() 加载模型参数
- torch.save() 可以选择存储模型还是模型参数
import torch
from torch import nn
class module(nn.Module):
    def __init__(self):
        super(module, self).__init__()
        self.linear1 = nn.Linear(10,2)
    def forward(self, x):
        x = self.linear1(x)
        return x
module1 = module()
print(module1.state_dict())
# 仅仅保存模型参数
torch.save(module1.state_dict(), 'F:\机器学习\AlexNet\save_model/module1.pth')
# 保存整个模型
# torch.save(model, 'F:\机器学习\AlexNet\save_model/module1.pth') 保存整个模型
# 加载参数
module2.load_state_dict(torch.load('F:\机器学习\AlexNet\save_model/module1.pth'))
# 加载整个模型
# module2.load('F:\机器学习\AlexNet\save_model/module1.pth')
torch.flatten()
- 将多维张量压平成一维张量
import torch
from torch import nn
import torch.nn.functional as F
import numpy as np
data = np.random.randint(0,10,12).reshape(1,3,2,2)
print(data)
print(torch.flatten(torch.tensor(data)))
# [[[[0 1]
#    [6 6]]
#   [[5 1]
#    [6 4]]
#   [[7 5]
#    [4 6]]]]
# tensor([0, 1, 6, 6, 5, 1, 6, 4, 7, 5, 4, 6], dtype=torch.int32
- 这个就很有意思,他是求了均值,不是直接拉长
import torch
import torch.nn as nn
data = torch.randn(1,3,224,224)
data = data.mean(3).mean(2)
print(data)
# tensor([[-0.0015, -0.0096, -0.0064]])
torch.softmax()在图像分割中的使用
- 当指定维度为通道数时,softmax对像素点的每一个通道进行作用。用一根针扎下去,同一个点的各通道概率值相加为1
import torch
import torch.nn.functional as f
data = torch.randint(0, 4, size=(1, 3, 2, 2), dtype=torch.float)
print(data)
out = f.softmax(data,dim=1)
print(out)
# tensor([[[[0., 0.],
#           [1., 1.]],
#
#          [[2., 0.],
#           [1., 0.]],
#
#          [[2., 1.],
#           [3., 1.]]]])
# tensor([[[[0.0634, 0.2119],
#           [0.1065, 0.4223]],
#
#          [[0.4683, 0.2119],
#           [0.1065, 0.1554]],
#
#          [[0.4683, 0.5761],
#           [0.7870, 0.4223]]]])
nn.ModuleList() 和nn.Sequential()
torch.utils.data.DataLoader() 有待考究
model.train 与model.val
- 参考链接
- 如果模型中有BN层(Batch Normalization)和 Dropout,需要在训练时添加
model.train()。model.train()是保证BN层能够用到每一批数据的均值和方差。对于Dropout,model.train()是随机取一部分网络连接来训练更新参数。 - 如果模型中有BN层(Batch Normalization)和Dropout,在测试时添加
model.eval()。model.eval()是保证BN层能够用全部训练数据的均值和方差,即测试过程中要保证BN层的均值和方差不变。对于Dropout,model.eval()是利用到了所有网络连接,即不进行随机舍弃神经元。 - 网络模型加入Droupt是随机忽略神经元,防止过拟合,这样在每个批次训练的可以随机忽略一些神经元,但下一批次训练忽略的神经元可能不是同一批。 这样做的目的是——忽略一些神经节点, 即使这些被忽略的神经节点非常关键,模型依然有好的训练效果。但
测试的时候,不需要忽略这些神经元,因为训练是为了防止过拟合需要忽略,测试是为了更好的结果,不需要忽略
torch.item()
- 用于损失及精确度,更加准确的浮点数字
import torch
data = torch.randn(size=(1,1))
print(data)
print(data.item())
# tensor([[0.5983]])
# 0.5982968807220459
torch.tensor() 与torch.from_numpy()的区别
torch.tensor()是深拷贝,会开辟一个新的变量空间torch.from_numpy()是浅拷贝,生成的张量会和numpy共用内存空间,效率更高(修改numpy中的元素,张量中的元素也会变化)
#创建一个numpy array的数组
array = np.array([1,2,3,4])

#将numpy array转换为torch tensor
tensor = torch.tensor(array)
Tensor = torch.Tensor(array)
as_tensor  = torch.as_tensor(array)
from_array = torch.from_numpy(array)

#修改数组的值
array[0] = 10

#打印结果
print(tensor)       #tensor([1, 2, 3, 4])
print(Tensor)       #tensor([1., 2., 3., 4.])
print(as_tensor)    #tensor([10,  2,  3,  4])
print(from_array)   #tensor([10,  2,  3,  4])
.cuda() 与 .to(device)将模型送到GPU上训练
- 1、需要将模型送到GPU上;2、需要将数据集送到GPU上;3、将损失函数送到GPU上
- device = ‘cuda’ if torch.cuda.is_available() else “cpu”
- 二者没有区别
- 参考链接
# 第一种方式
定义好模型,数据集,损失函数后
if torch.cuda.is_available():
	net = model.cuda()
····················
if torch.cuda.is_available():
	img= img.cuda()
	label = label.cuda()
····················
if torch.cuda.is_available():
	loss_func = loss.cuda() # 定义好损失函数后将其送到GPU上训练
# 第二种方式
device = torch.device('cuda' if torch.cuda.is_available() else "cpu")
model.to(device)
img/label = img/label.to(device)
loss_func = loss.to(device) #将定义好的交叉损失函数或者其他损失函数送到GPU上
torch.nn.DataParallel() 有待考究
- 多GPU训练
param.requires_grad = False 有待考究
torch.update() model.apply()
- torch.update() 主要用于网络参数的更替 (主要是预训练模型的参数)
- torch.apply() 主要用在init_weight函数定义完之后,对网络模型参数的初始化(自定义参数)
import torch
from torch import nn
class Net(nn.Module):
    def __init__(self, in_dim, n_hidden_1, n_hidden_2, out_dim):
        super().__init__()
        self.layer = nn.Sequential(
            nn.Linear(in_dim, n_hidden_1),
            nn.ReLU(True),
            nn.Linear(n_hidden_1, n_hidden_2),
            nn.ReLU(True),
            nn.Linear(n_hidden_2, out_dim)
             )
    def forward(self, x):
        x = self.layer1(x)
        x = self.layer2(x)
        x = self.layer3(x)
        return x
def weight_init(m):
    if isinstance(m, nn.Linear):
        nn.init.xavier_normal_(m.weight)
        nn.init.constant_(m.bias, 0)
    elif isinstance(m, nn.Conv2d):
        nn.init.kaiming_normal_(m.weight, mode='fan_out', nonlinearity='relu')
    elif isinstance(m, nn.BatchNorm2d):
        nn.init.constant_(m.weight, 1)
        nn.init.constant_(m.bias, 0)

model = Net(in_dim, n_hidden_1, n_hidden_2, out_dim)

model.apply(weight_init)
  model_dict = model.state_dict()  # PSPNet的可用参数和偏置  定义了网络模型后自动生成的

    pretrained_dict = torch.load(model_path)  # 加载pspnet_resnet50.pth这个模型

    pretrained_dict = {k: v for k, v in pretrained_dict.items() if np.shape(model_dict[k]) == np.shape(v)}
    # 或者 pretrained_dict = {k: v for k, v in pretrained_dict.items() if k in model_dict}  还需要咂摸一下

    model_dict.update(pretrained_dict)  # 更新参数
    model.load_state_dict(model_dict)   # 加载新的参数
Variable的使用
- Variable是 torch.autograd import Variable的核心类,封装了Tensor张量
- Variable包含三部分
属性
1. x.data 单单是x表示x.data
2. x.grad 存储了梯度
3. x.grad_fn 指向Function对象,用于反向传播的梯度计算之用不懂
DataLoder参数详解
dataset数据集batch_sizeshuffle对每一个epoch是否打乱数据num_workers=0, 工作线程数量,需要根据自己的cpu核数进行设计;默认为0,表示主进程collate_fn, 对batch_size的数据进行处理,不是对整个DataLoder处理(可以将数据预处理放这里,节省内存)pin_memorydrop_last是否抛弃最后一组无法构成batch_size大小的数据- 其他参数默认即可
torch.tile()
- 指定维度扩充倍数,将源数据进行平铺扩充
import torch

image_data = torch.rand(3, 2)
print(image_data)
output = torch.tile(image_data,[2,3])
print(output)
# tensor([[0.5001, 0.6157],
#         [0.9579, 0.8233],
#         [0.3933, 0.9854]])
# tensor([[0.5001, 0.6157, 0.5001, 0.6157, 0.5001, 0.6157],
#         [0.9579, 0.8233, 0.9579, 0.8233, 0.9579, 0.8233],
#         [0.3933, 0.9854, 0.3933, 0.9854, 0.3933, 0.9854],
#         [0.5001, 0.6157, 0.5001, 0.6157, 0.5001, 0.6157],
#         [0.9579, 0.8233, 0.9579, 0.8233, 0.9579, 0.8233],
#         [0.3933, 0.9854, 0.3933, 0.9854, 0.3933, 0.9854]])
torchvision
torchvision是pytorch的一个图形库,它服务于PyTorch深度学习框架的,由以下几部分组成
torchvision.datasets: 常用数据库
torchvision.models:常用的预训练模型
torchvision.transforms: 常用的图片转换,一般这里会对图片进行裁剪、翻转、转化为张量、归一化等预处理操作
torchvision.utils: others
参考链接
torchvision.transform.Normalize()
- 对数据的每一个通道进行归一化
- transforms.Normalize((0.5, 0.5, 0.5), (0.5, 0.5, 0.5)) 因为之前已经将图片转为张量,数据在 0~1范围,(0.5, 0.5, 0.5), (0.5, 0.5, 0.5)的意思是三个通道的均值 方差都为0.5,则新的数据范围是 ((0 ~1)–0.5)/0.5 = – 1~ 1 之间,其中的0.5分别是均值 方差
from torchvision import transforms
import torch
from PIL import Image
import numpy as np
root = r'F:\机器学习\AlexNet\spilted_data\train\Cat\0.jpg'
image = Image.open(root, mode='r')

tensor = transforms.ToTensor()
normalize = transforms.Normalize((0.5, 0.5, 0.5), (0.5, 0.5, 0.5))
print(normalize(tensor(image)))
torchvision.transform.Tensor()
- 将图片转为tensor张量,并且将所有像素点的数据/255,使数据在 0~1之间
from torchvision import transforms
import torch
from PIL import Image
import numpy as np
root = r'F:\机器学习\AlexNet\spilted_data\train\Cat\0.jpg'
image = Image.open(root, mode='r')

tensor = transforms.ToTensor()
print(tensor(image))
torchvision.Datasets.ImageFolder
- ImageFloder假设图片已经按照文件夹分号类别,并且图片是以0 1 2 ……为标签的
有待考究
train_datasets_transform = transforms.Compose([
    transforms.Resize((224, 224)),
    transforms.RandomVerticalFlip(p=0.5),
    transforms.ToTensor(),
    normalize    # 或者直接transforms.Normalize([0.5, 0.5, 0.5], [0.5, 0.5, 0.5])
])
train_datasets = ImageFolder(root=train_datasets_root, transform=train_datasets_transform)
torchvision.transforms
- 图像裁剪:随机裁剪、中心裁剪等
# 对图像和图像对应的标签进行相同的变换
import torchvision.transforms.functional as TF
from torchvision.transforms import transforms as tfs
def rand_crop(data, label,  height, width):
  crop_size=[height,width]
  i, j, h, w = tfs.RandomCrop.get_params(data, output_size=crop_size)
  data = TF.crop(data, i, j, h, w)
  label = TF.crop(label, i, j, h, w)
  return data, label
# 这不是完全随机裁剪,这是从坐标(i,j)开始裁剪  ,左上角大概率裁掉,右下角大概率还在
torch.backends.cudnn.benchmark
backend后端benchmark基准线- 设置为
ture,程序会事先找到适合每一层卷积层的卷积算法(卷积算法是有很多种的),这样会加快训练速度,仅适用于网络模型是静态的。 运用于动态网路,运行时间反而有可能增大。
argparse.ArgumentParser()
使用方式: 1.创建实例;2.申明参数;3.参数解析- name:名称 不管是–name还是 name-name,一律调用都是name或者name_name 忽略横线
- default:默认值
- help:帮助文档
- type:参数类型
- metavar:帮助文档才管
- nargs:参数个数
import argparse
parser = argparse.ArgumentParser()
parser.add_argument("square", help="display a square of a given number", type=int)
args = parser.parse_args()
TorchSummary
- pytorch的模型可视化工具
- 可以看到参数量、输出形状等。但不利于了解模型结构、卷积核大小 还不如print(model)来的实用
import torch
from torchsummary import summary
from backbone import fcn
device = torch.device("cuda" if torch.cuda.is_available() else "cpu")
model = fcn(21).to(device)
summary(model, input_size=(3, 224, 224))
#  ConvTranspose2d-124           [-1, 21, 14, 14]           7,056
#           Conv2d-125           [-1, 21, 14, 14]           5,397
#           Conv2d-126           [-1, 21, 28, 28]           2,709
#  ConvTranspose2d-127           [-1, 21, 28, 28]           7,056
#  ConvTranspose2d-128         [-1, 21, 224, 224]         112,896
# ================================================================
# Total params: 21,430,559
# Trainable params: 21,430,559
# Non-trainable params: 0
# ----------------------------------------------------------------
# Input size (MB): 0.57
# Forward/backward pass size (MB): 104.64
# Params size (MB): 81.75
# Estimated Total Size (MB): 186.96
# ----------------------------------------------------------------
tqdm
- 第三方进度条库
postfix后缀tqdm.update(1)默认为1;进度条增加的速度tqdm.close()关闭进度条 有可能进度条也会覆盖到其他加载的数据total 迭代总量tqdm.setdescription()设置前缀tqdm.setpostfix()设置后缀
———————————————————tqdm在深度学习中的使用————————————————————
for epoch in range(epochs):
	for img,label in train_dataloder:
			…………

———————————————————————————修改为1———————————————————————————
for eoch in range(epoches):
	pbar= tqdm(train_dataloder,total=len(train_dataloder))  #用tqdm去包装数据train_dataloder设置了batch_size=8就理解为一捆数据
	for img,label in pbar:
		…………
		pbar.setdescription()#设置前缀
		pbar.setpostfix()#设置后缀
	pbar.close()  #☆☆☆ ☆☆☆这里可以考虑关闭,免得会给其他加载数据也加上了进度条☆☆☆☆☆
———————————————————————————修改为2————————————————————————————
for epoch in range(epochs):
	with tqdm(total=len(train_dataloder)) as pbar:
		for img,label in train_dataloder:
			…………
		pbar.setdescription()#设置前缀
		pbar.setpostfix()#设置后缀
tensorboard
- 可视化网络结构
import torch
from backbone import fcn
from torch.utils.tensorboard import SummaryWriter
num_classes = 21
net = fcn(num_classes)
data = torch.rand(2, 3, 224, 224)
with SummaryWriter(comment='fcn') as w:
    w.add_graph(net, (data,))
- 可视化损失、准确率等
writer = SummaryWriter(comment='.test1') # 写在迭代训练外面
writer.add_scalar('train_acc', train_acc, epoch)  # 分别表示标签,y轴,x轴,写在迭代内部,train_acc是表示当前循环的损失
torch hub
- huggingface发布的预训练神经模型库
其他注意事项
epoch、iteration和batchsize
- 参考链接

- 训练模型的过程就是学习卷积核参数的过程,通过反向传播,调整梯度,从而调整卷积核参数。假设总样本的标签只有0 1两个类别,输入一张图片,然后根据标签与实际输出值的不同,调整梯度,调整卷积核参数,再输入一张图片,再调整卷积核参数。这样显然不合理。所以,对于小数据集,直接将样本一次性读入,计算总的均方误差(或者其他误差),然后调整卷积核参数,更能代表该数据集的总体情况;对于大数据集,可以选择一定batch_size的样本进行参数学习,然后迭代直到总样本全部被学习完,也可以再多次重复学习。为什么要打乱呢,我觉得更具普遍性吧。
self.modules() children () parameters()
import torch
from torch import nn
in_dim = 1
n_hidden_1 = 1
n_hidden_2 = 1
out_dim = 1
class Net(nn.Module):
    def __init__(self, in_dim, n_hidden_1, n_hidden_2, out_dim):
        super().__init__()

        self.layer = nn.Sequential(
            nn.Linear(in_dim, n_hidden_1),
            nn.ReLU(True)
        )
        self.layer2 = nn.Sequential(
            nn.Linear(n_hidden_1, n_hidden_2),
            nn.ReLU(True),
        )
        self.layer3 = nn.Linear(n_hidden_2, out_dim)

    def forward(self, x):
        x = self.layer1(x)
        x = self.layer2(x)
        x = self.layer3(x)
        return x
model = Net(in_dim, n_hidden_1, n_hidden_2, out_dim)
for num in model.children():
    print(num,end='-'*20)
    print('\n')
#     Sequential(
#         (0): Linear(in_features=1, out_features=1, bias=True)
#     (1): ReLU(inplace=True)
#     )--------------------
#
#     Sequential(
#         (0): Linear(in_features=1, out_features=1, bias=True)
#     (1): ReLU(inplace=True)
#     )--------------------
#
# Linear(in_features=1, out_features=1, bias=True)--------------------
permute(dims) & torch.transpose()
- 参考链接
- permute
坐标重排列的意思用法是 tensor.permute() - pytorch中,数据可能是
B C H W,可以用这个函数重排列为B H W C(具体数据会跟着变化),之后处理完毕后再重排列为B C H W,数据恢复为原状 - torch.transpose() 也可以
重新排列维度,但一次只能交换两个维度(只能有两个参数),但可以连续transposed达到permute的效果 - 二者
元素排列顺序改变 - transpose后的张量与原张量是
内存共享的 修改其中一个张量的元素,都会影响另一个张量的值
import torch
data = torch.arange(0, 18).view(3, 2, 3)
print(data.shape)
# torch.Size([3, 2, 3])
print(data)
# tensor([[[ 0,  1,  2],
#          [ 3,  4,  5]],
#
#         [[ 6,  7,  8],
#          [ 9, 10, 11]],
#
#         [[12, 13, 14],
#          [15, 16, 17]]])
new_data = data.permute(1, 2, 0)
print(new_data)
# tensor([[[ 0,  6, 12],
#          [ 1,  7, 13],
#          [ 2,  8, 14]],
#
#         [[ 3,  9, 15],
#          [ 4, 10, 16],
#          [ 5, 11, 17]]])

print(new_data.shape)
# torch.Size([2, 3, 3])
back_new_data = new_data.permute(2, 0, 1)
print(back_new_data)
# tensor([[[ 0,  1,  2],
#          [ 3,  4,  5]],
#
#         [[ 6,  7,  8],
#          [ 9, 10, 11]],
#
#         [[12, 13, 14],
#          [15, 16, 17]]])
temp_inputs = inputs.transpose(1, 2).transpose(2, 3).contiguous().view(-1, c)
import torch
x = torch.randn(3, 2)
print(x)
y = x.transpose(0, 1)
print(y)
x[0, 0] = 233
print(x)
print(y[0, 0])
#tensor([[-2.2697, -0.0395],
#         [ 0.0415, -1.1239],
#         [-0.5022,  0.3883]])
# tensor([[-2.2697,  0.0415, -0.5022],
#         [-0.0395, -1.1239,  0.3883]])
# tensor([[ 2.3300e+02, -3.9459e-02],
#         [ 4.1472e-02, -1.1239e+00],
#         [-5.0219e-01,  3.8831e-01]])
# tensor(233.)
reshape()/view()
功能一样,自定义大小,元素排列顺序不变,这跟permute的坐标系变换不同
squeeze()/unsqueeze()
- squeeze()对数据降维 ; unsqueeze()对数据进行升维
suqeeze()不指定维度,将维度为1,的全部压缩suqeeze(dim)指定维度压缩,指定的维度为1,进行压缩;不为1,则不进行压缩unsqueeze()假设数据维度为A * B * C,unsqueeze(0),表示为1* A * B * C;unsqueeze(1),表示为 A * 1 * B * C;unsqueeze(2),表示为 A * B * 1 * C;unsqueeze(-1),表示为 A * B * C * 1;
pytorch网络模型参数形式
- 参数返回类型是
Parameter - 可以通过
Parameter.weight(bias).data获取权重和偏置。
import torch
import torch.nn as nn
data = torch.randint(0, 10, size=(1, 3, 2, 2),dtype=torch.float)
conv_transposed = nn.ConvTranspose2d(3, 3, 4, 2, 1)
new_data = conv_transposed(data)
print(conv_transposed.weight.shape)
# 这个和下面的写法等价,建议下面那个
# print(conv_transposed.weight.data.shape)
# torch.Size([3, 3, 4, 4])
# torch.Size([3, 3, 4, 4])
# print(conv_transposed.bias)
Variable在神经网络中的使用
- 弃用
crop与resize的区别
crop是裁剪resize是伸缩变换
from PIL import Image
import  torchvision.transforms as tfs
from matplotlib import pyplot as plt
import numpy as np
import  os
os.environ["KMP_DUPLICATE_LIB_OK"] = "TRUE"

root = r'F:\机器学习\AlexNet\spilted_data\train\Cat\4.jpg'

img = Image.open(root)
tranformer = tfs.Resize(200)
plt.subplot(1,2,1), plt.imshow(img)
new_img = tranformer(img)
plt.subplot(1,2,2), plt.imshow(new_img)
plt.show()
