yolov3 指定gpu_YOLOV3 - 使用 Darknet 训练检测模型
YOLOV3 网络结构:

1. YOLOV3 Darknet 编译
[1] - Clone 项目文件:git clone https://github.com/pjreddie/darknet
cd darknet
[2] - 根据环境,修改 Makefile 文件,如:GPU=1 # 0 或 1
CUDNN=1 # 0 或 1
OPENCV=1 # 0 或 1
OPENMP=0 # 0 或 1
DEBUG=0 # 0 或 1
# 使用 GPU 和 CUDA 时,根据 GPU 设置:
ARCH= -gencode arch=compute_30,code=sm_30 \
-gencode arch=compute_35,code=sm_35 \
-gencode arch=compute_50,code=[sm_50,compute_50] \
-gencode arch=compute_52,code=[sm_52,compute_52]
# -gencode arch=compute_20,code=[sm_20,sm_21] \ This one is deprecated?
# This is what I use, uncomment if you know your arch and want to specify
# ARCH= -gencode arch=compute_52,code=compute_52
# Darknet 默认使用 stb_image.h 进行图片加载.
# https://github.com/nothings/stb/blob/master/stb_image.h
# 在使用 OpenCV 时,
ifeq ($(OPENCV), 1)
COMMON+= -DOPENCV
CFLAGS+= -DOPENCV
LDFLAGS+= `pkg-config --libs opencv` -lstdc++
COMMON+= `pkg-config --cflags opencv`
# LDFLAGS+= `pkg-config --libs opencv4` -lstdc++
# COMMON+= `pkg-config --cflags opencv4`
endif
# CUDA 库路径:
ifeq ($(GPU), 1)
COMMON+= -DGPU -I/usr/local/cuda/include/
CFLAGS+= -DGPU
LDFLAGS+= -L/usr/local/cuda/lib64 -lcuda -lcudart -lcublas -lcurand
endif
# CUDNN:
ifeq ($(CUDNN), 1)
COMMON+= -DCUDNN
CFLAGS+= -DCUDNN
LDFLAGS+= -lcudnn
endif
[3] - 项目编译:make
[4] - 测试:# 下载预训练模型
wget https://pjreddie.com/media/files/yolov3.weights
# 或:
wget https://pjreddie.com/media/files/yolov3-tiny.weights
# 简单测试,默认在 ID=0 的 GPU 上运行
./darknet detect cfg/yolov3.cfg yolov3.weights data/dog.jpg
# 指定 GPU ID
./darknet -i 1 detect cfg/yolov3.cfg yolov3.weights data/dog.jpg
# 修改预测结果的置信阈值:
./darknet detect cfg/yolov3.cfg yolov3.weights data/dog.jpg -thresh 0.2
2. YOLOV3 训练自定义数据
2.1. 数据准备
主要是创建图片的 txt 文件.
[1] - 对每个 .jpg 图片创建一个对应的 .txt 文件,其具有相同的文件名. 即:一张图片对应一个 txt Label 文件,如图片名为 0001.jpg,则对应的 Label 文件为 0001.txt.
在 txt Label 文件中保存了物体类别 ID 和物体的位置坐标,每个目标占一行,格式为:
其中, - 类别ID(第几个类别,从 0 开始索引, classes-1). 整型数值
- 物体边界框中心点坐标x、物体边界框中心点坐标y. [0.0 - 1.0] 间的浮点数值,相对于图片的 width 和 height 的比值. 如: = / 和 = / .
- 物体边界框宽度、物体边界框高度. 相对于图片的 width 和 height 的比值.
如,对于图片 0001.jpg,可以创建包含如下信息的标注文件 0001.txt:1 0.716797 0.395833 0.216406 0.147222
0 0.687109 0.379167 0.255469 0.158333
2 0.420312 0.395833 0.140625 0.166667
...
示例1:
比如,图片尺寸为 360*480,其包含一个目标物体:dog. 有:image_width = 360
image_height = 480
absolute_x = 30 (dog x position from image)
absolute_y = 40 (dog y position from image)
absolute_height = 200 (original height of dog from image)
absolute_width = 200 (original width of dog from image)
则,可以得到 txt 标注文件内容每行包含 ( / ) ( / ) ( / ) ( / ). 如:0 (30/360) (40/480) (200/360) (200/480)
0 0.0833 0.0833 0.556 0.417
示例2: VOC 到 YOLO 标注Label 的转换:# voc box:
# xmin,xmax,ymin,ymax
def convert(size, box):
dw = 1./(size[0]) # 图片 width
dh = 1./(size[1]) # 图片 height
x = (box[0] + box[1])/2.0 - 1
y = (box[2] + box[3])/2.0 - 1
w = box[1] - box[0]
h = box[3] - box[2]
x = x*dw
w = w*dw
y = y*dh
h = h*dh
return (x,y,w,h)
2.2. 训练数据集文件
图片和标注文件准备好后,即可制作训练数据和测试数据集文件.import glob, os
imgs_dir = '/path/to/NFPA/NFPA_dataset'
print(imgs_dir)
#用作 test 的图片数据的比例
percentage_test = 10;
#创建训练数据集和测试数据集:train.txt 和 test.txt
file_train = open('train.txt', 'w')
file_test = open('test.txt', 'w')
counter = 1
index_test = round(100 / percentage_test)
for pathAndFilename in glob.iglob(os.path.join(imgs_dir, "*.jpg")):
title, ext = os.path.splitext(os.path.basename(pathAndFilename))
if counter == index_test:
counter = 1
file_test.write(imgs_dir + "/" + title + '.jpg' + "\n")
else:
file_train.write(imgs_dir + "/" + title + '.jpg' + "\n")
counter = counter + 1
会得到两个文件:train.txt 和 test.txt,内容格式类似于:/path/to/NFPA/NFPA_dataset/pos-217.jpg
/path/to/NFPA/NFPA_dataset/pos-16.jpg
/path/to/NFPA/NFPA_dataset/pos-14.jpg
/path/to/NFPA/NFPA_dataset/pos-246.jpg
/path/to/NFPA/NFPA_dataset/pos-39.jpg
......
2.3. 数据集配置
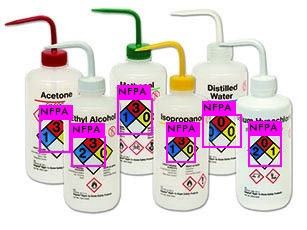
[1] - 标签名(类别名)文件 - 如NFPA/obj.names(每一行为一个标签(类别)):NFPA #每一行为一个类别
[2] - 数据集配置文件 - 如 NFPA/obj.data:classes= 1 # 标签(类别)数量
train = /path/to/NFPA/train.txt # 训练数据集文件
valid = /path/to/NFPA/test.txt # 测试数据集文件
names = /path/to/NFPA/obj.names # 标签名(类别名)文件
backup = /path/to/NFPA/backup # 模型备份路径
[3] - 模型配置文件 - 如 NFPA/yolov3-tiny.cfg:[net]
# Testing
batch=1 # 测试时,取消该两行注释,并注释掉 Training 的两行
subdivisions=1
# Training
# batch=64 # 训练时,取消该两行注释,并注释掉 Testing 的两行
# batchsize,每 batch 个样本更新一次模型参数
# subdivisions=16 # 每批训练的个数=batch/subvisions
# 根据GPU显存修改,显存不够改大一些
# darknet代码中,会将batch/subdivisions记为batch
width=416 # 网络输入的宽度
height=416 # 网络输入的高度
channels=3 # 网络输入的通道数
momentum=0.9
decay=0.0005 # 权重衰减正则项,防止过拟合.
angle=0 # 旋转角度,数据增强
saturation = 1.5 # 调整饱和度,数据增强
exposure = 1.5 # 调整曝光量,数据增强
hue=.1 # 调整Hue,数据增强
learning_rate=0.001 # 初始学习率
burn_in=1000
max_batches = 50200 # 训练的最大迭代次数
policy=steps # 学习率调整策略,如 constant,step,exp,ploy,setps,random等
steps=40000,45000 # 学习率衰减的迭代次数处
scales=.1,.1 # 学习率变化的比例,累计相乘
并修改网络输出通道数 - [yolo] 标签及上一[convolutional] 标签(包含三处):[convolutional]
size=1
stride=1
pad=1
filters=18 # filters = 3 * ( classes + 5 ),如,filters=3*(1+4+1)
activation=linear
[yolo]
mask = 0,1,2 # 当前属于的第几个预选框
anchors = 10,13, 16,30, 33,23, # 预选框,可手工挑选,
30,61, 62,45, 59,119, # 也可 K-means 从训练样本中得到.
116,90, 156,198, 373,326
classes=1 # 修改为自定义数据集的类别数
num=9 # 预选框的个数, anchors的总数
jitter=.3 # 添加抖动来增加噪声,以抑制过拟合
ignore_thresh = .5 # 论文里的阈值1
truth_thresh = 1 # 论文里的阈值2
random=1 # 0 - 关闭多尺度训练(显存小时可以设置为0.)
2.4. 模型训练
模型训练:./darknet detector train \
/path/to/NFPA/obj.data \
/path/to/NFPA/yolov3-tiny.cfg \
/path/to/yolov3-tiny.conv.15
模型训练过程如:yolov3-tiny
layer filters size input output
0 conv 16 3 x 3 / 1 416 x 416 x 3 -> 416 x 416 x 16 0.150 BFLOPs
1 max 2 x 2 / 2 416 x 416 x 16 -> 208 x 208 x 16
2 conv 32 3 x 3 / 1 208 x 208 x 16 -> 208 x 208 x 32 0.399 BFLOPs
3 max 2 x 2 / 2 208 x 208 x 32 -> 104 x 104 x 32
4 conv 64 3 x 3 / 1 104 x 104 x 32 -> 104 x 104 x 64 0.399 BFLOPs
5 max 2 x 2 / 2 104 x 104 x 64 -> 52 x 52 x 64
6 conv 128 3 x 3 / 1 52 x 52 x 64 -> 52 x 52 x 128 0.399 BFLOPs
7 max 2 x 2 / 2 52 x 52 x 128 -> 26 x 26 x 128
8 conv 256 3 x 3 / 1 26 x 26 x 128 -> 26 x 26 x 256 0.399 BFLOPs
9 max 2 x 2 / 2 26 x 26 x 256 -> 13 x 13 x 256
10 conv 512 3 x 3 / 1 13 x 13 x 256 -> 13 x 13 x 512 0.399 BFLOPs
11 max 2 x 2 / 1 13 x 13 x 512 -> 13 x 13 x 512
12 conv 1024 3 x 3 / 1 13 x 13 x 512 -> 13 x 13 x1024 1.595 BFLOPs
13 conv 256 1 x 1 / 1 13 x 13 x1024 -> 13 x 13 x 256 0.089 BFLOPs
14 conv 512 3 x 3 / 1 13 x 13 x 256 -> 13 x 13 x 512 0.399 BFLOPs
15 conv 255 1 x 1 / 1 13 x 13 x 512 -> 13 x 13 x 255 0.044 BFLOPs
16 yolo
17 route 13
18 conv 128 1 x 1 / 1 13 x 13 x 256 -> 13 x 13 x 128 0.011 BFLOPs
19 upsample 2x 13 x 13 x 128 -> 26 x 26 x 128
20 route 19 8
21 conv 256 3 x 3 / 1 26 x 26 x 384 -> 26 x 26 x 256 1.196 BFLOPs
22 conv 18 1 x 1 / 1 26 x 26 x 256 -> 26 x 26 x 18 0.006 BFLOPs
23 yolo
Loading weights from /data/hgf/detection/darknet/pretrained/darknet53.conv.74...Done!
Learning Rate: 0.001, Momentum: 0.9, Decay: 0.0005
Resizing
384
Loaded: 0.000031 seconds
Region 16 Avg IOU: 0.683222, Class: 0.499940, Obj: 0.499600, No Obj: 0.499578, .5R: 1.000000, .75R: 0.250000, count: 8
Region 23 Avg IOU: 0.230419, Class: 0.497310, Obj: 0.499917, No Obj: 0.499317, .5R: 0.142857, .75R: 0.000000, count: 7
Region 16 Avg IOU: 0.733487, Class: 0.500262, Obj: 0.499577, No Obj: 0.499578, .5R: 1.000000, .75R: 0.375000, count: 8
Region 23 Avg IOU: 0.152336, Class: 0.497174, Obj: 0.500159, No Obj: 0.499307, .5R: 0.000000, .75R: 0.000000, count: 5
1: 277.039764, 277.039764 avg, 0.000000 rate, 0.203770 seconds, 24 images
Loaded: 0.000037 seconds
Region 16 Avg IOU: 0.733951, Class: 0.500144, Obj: 0.499601, No Obj: 0.499578, .5R: 1.000000, .75R: 0.454545, count: 11
Region 23 Avg IOU: 0.240497, Class: 0.497174, Obj: 0.500157, No Obj: 0.499313, .5R: 0.000000, .75R: 0.000000, count: 3
Region 16 Avg IOU: 0.606808, Class: 0.500103, Obj: 0.499518, No Obj: 0.499578, .5R: 1.000000, .75R: 0.000000, count: 5
Region 23 Avg IOU: 0.198287, Class: 0.497175, Obj: 0.500158, No Obj: 0.499323, .5R: 0.000000, .75R: 0.000000, count: 9
2: 277.279144, 277.063690 avg, 0.000000 rate, 0.188760 seconds, 48 images
Loaded: 0.000036 seconds
注1: 关于 yolov3-tiny.conv.15./darknet partial ./cfg/yolov3-tiny.cfg ./pretrained/yolov3-tiny.weights ./pretrained/yolov3-tiny.conv.15 15
注2: 训练时的注意事项.
权重在前 900 次迭代,每 100 次迭代保存一次模型;之后每 10000 次保存一次模型训练结果. 如果需要修改,则可参考:
2.5. 模型简单测试
训练得到模型后,即可简单测试下.
如:./darknet detector test \
/path/to/NFPA/obj.data \
/path/to/NFPA/yolov3-tiny.cfg \
yolov3-tiny_600.weights \
data/manivannan.jpg
输出结果类似于如下:


3. YOLOV3 训练 COCO 数据集
3.1. COCO 数据集准备
[scripts/get_coco_dataset.sh]() 是COCO数据集图片和标签获取的脚本,运行即可:cp scripts/get_coco_dataset.sh data
cd data
bash get_coco_dataset.sh
也可以手工下载 COCO 数据集:# COCO 图片
wget -c https://pjreddie.com/media/files/train2014.zip
wget -c https://pjreddie.com/media/files/val2014.zip
unzip -q train2014.zip
unzip -q val2014.zip
# COCO Metadata
wget -c https://pjreddie.com/media/files/instances_train-val2014.zip
wget -c https://pjreddie.com/media/files/coco/5k.part
wget -c https://pjreddie.com/media/files/coco/trainvalno5k.part
wget -c https://pjreddie.com/media/files/coco/labels.tgz
tar xzf labels.tgz
unzip -q instances_train-val2014.zip
# 图片列表
paste 5k.txt
paste trainvalno5k.txt
3.2. 修改 COCO 训练用的 cfg 配置文件
[cfg/coco.data]() 配置文件,指定 COCO 数据集的相关信息:classes= 80
train = /home/pjreddie/data/coco/trainvalno5k.txt
valid = coco_testdev
#valid = data/coco_val_5k.list
names = data/coco.names
backup = /home/pjreddie/backup/ # 训练结果文件保存的路径
eval=coco
3.3. 模型训练./darknet detector train cfg/coco.data cfg/yolov3.cfg darknet53.conv.74
# 多 GPU 训练
./darknet detector train cfg/coco.data cfg/yolov3.cfg darknet53.conv.74 -gpus 0,1,2,3
# 从断点 checkpoint 恢复训练
./darknet detector train cfg/coco.data cfg/yolov3.cfg backup/yolov3.backup -gpus 0,1,2,3
4. 参考文献