opencv和pytorch中的warp操作函数:cv2.warpAffine, torch.nn.functional.grid_sample, cv2.warpPerspective
关于图像的warp操作是指利用一个旋转缩放矩阵对图像进行操作。
常见的操作有,平移,绕某个点旋转,缩放。
opencv中有getRotationMatrix2D,warpAffine, getAffineTransform等函数
pytorch有torch.nn.functional.grid_sample用处比较多
和affine_grid(theta, size, align_corners=None)函数
1. cv2.getRotationMatrix2D(center, angle, scale)

[1]https://blog.csdn.net/qq_34914551/article/details/107132145
cv2.getRotationMatrix2D(center, angle, scale)通过设置旋转中心,角度,缩放尺度来获取转换尺度
%matplotlib inline
import matplotlib.pyplot as plt

image = cv2.imread('featprop.png')
print(image.shape)
plt.imshow( image)
plt.show()

# 4 个 转换矩阵,设置旋转中心,角度和 缩放尺度
center, angle, scale = (100,100), 0, 1             # center表示的是旋转的中心, angle==0时,center没有作用
t1 = cv2.getRotationMatrix2D(center, angle, scale)
print(t1)

center, angle, scale = (0,0), 30, 1                # angle表示的是旋转的角度
t2 = cv2.getRotationMatrix2D(center, angle, scale)
print(t2)

center, angle, scale = (0,0), 0, 0.6               # scale表示的是缩放的尺度
t3 = cv2.getRotationMatrix2D(center, angle, scale)
print(t3)

center, angle, scale = (200,200), 45, 0.9          # 绕[200,200]逆时针旋转45读,并缩放为原来的0.9
t4 = cv2.getRotationMatrix2D(center, angle, scale)
print(t4)
return

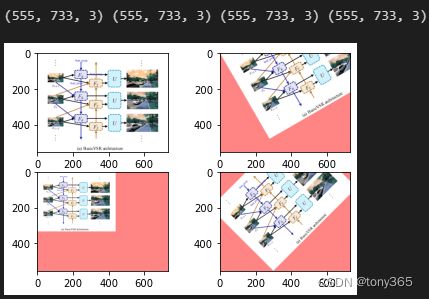
2.对图像应用上面4个转换矩阵cv2.warpAffine(image, A, (width, height))得到如下
h, w, c = image.shape
it1 = cv2.warpAffine(image, t1, [w, h], borderValue = (255,133,133))
it2 = cv2.warpAffine(image, t2, [w, h], borderValue = (255,133,133))
it3 = cv2.warpAffine(image, t3, [w, h], borderValue = (255,133,133))
it4 = cv2.warpAffine(image, t4, [w, h], borderValue = (255,133,133))

print(it1.shape, it2.shape, it3.shape, it4.shape)

plt.subplot(221)
plt.imshow(it1)
plt.subplot(222)
plt.imshow(it2)
plt.subplot(223)
plt.imshow(it3)
plt.subplot(224)
plt.imshow(it4)
plt.show()
return
3. 通过3个对应点来求解转换矩阵(在实际应用时如果有多个对应点,可以利用最小二乘法求解转换矩阵)

import numpy as np
import cv2
import matplotlib.pyplot as plt
%matplotlib inline

src = image
# 设置3个对应点的坐标
srcTri = np.array( [[0, 0],
                    [src.shape[1] - 1, 0],
                    [0, src.shape[0] - 1]] ).astype(np.float32)

dstTri = np.array( [[0, src.shape[1]*0.33],
                    [src.shape[1]*0.85, src.shape[0]*0.25],
                    [src.shape[1]*0.15, src.shape[0]*0.7]] ).astype(np.float32)
# 求解旋转矩阵
warp_mat = cv2.getAffineTransform(srcTri, dstTri)
# warp操作
warp_dst = cv2.warpAffine(src, warp_mat, (src.shape[1], src.shape[0]))
print(warp_mat)

plt.imshow(warp_dst)
plt.show()
return

[2]https://docs.opencv.org/3.4/d4/d61/tutorial_warp_affine.html
4. torch.nn.functional.grid_sample(input, grid, mode=‘bilinear’, padding_mode=‘zeros’, align_corners=None)
这个函数是网格采样函数,也可以理解为是查找表函数。
input 支持 4D 和 5D。
4D的时候,input with shape (N, C, H_in, W_in) ,
and grid with shape (N, H_out, W_out, 2) ,
the output will have shape (N, C, H_out, W_out)
5D的时候input with shape (N, C, D_in, H_in, W_in) ,
and grid with shape (N, D_out, H_out, W_out, 2) ,
the output will have shape (N, C, D_out, H_out, W_out)
想象不考虑N个样本和C个通道,其实就是2Dlut和3Dlut。 通过输入的position(x,y)或者(x,y,z), 查找原图中的值。由于position(x,y)或者(x,y,z)不一定在原图中的特定点,需要插值。
此外使用的时候,grid 被 input的尺寸归一化 到[-1,1]。建议 padding_mode=“border”。
具体的介绍可以参看 官方说明
basic_vsr中一个使用例子用于 warp image or feature
def flow_warp(x,
              flow,
              interpolation='bilinear',
              padding_mode='zeros',
              align_corners=True):
    """Warp an image or a feature map with optical flow.
    Args:
        x (Tensor): Tensor with size (n, c, h, w).
        flow (Tensor): Tensor with size (n, h, w, 2). The last dimension is
            a two-channel, denoting the width and height relative offsets.
            Note that the values are not normalized to [-1, 1].
        interpolation (str): Interpolation mode: 'nearest' or 'bilinear'.
            Default: 'bilinear'.
        padding_mode (str): Padding mode: 'zeros' or 'border' or 'reflection'.
            Default: 'zeros'.
        align_corners (bool): Whether align corners. Default: True.
    Returns:
        Tensor: Warped image or feature map.
    """
    if x.size()[-2:] != flow.size()[1:3]:
        raise ValueError(f'The spatial sizes of input ({x.size()[-2:]}) and '
                         f'flow ({flow.size()[1:3]}) are not the same.')
    _, _, h, w = x.size()
    # create mesh grid
    grid_y, grid_x = torch.meshgrid(torch.arange(0, h), torch.arange(0, w))
    grid = torch.stack((grid_x, grid_y), 2).type_as(x)  # (h, w, 2)
    grid.requires_grad = False

    grid_flow = grid + flow
    # scale grid_flow to [-1,1]
    grid_flow_x = 2.0 * grid_flow[:, :, :, 0] / max(w - 1, 1) - 1.0
    grid_flow_y = 2.0 * grid_flow[:, :, :, 1] / max(h - 1, 1) - 1.0
    grid_flow = torch.stack((grid_flow_x, grid_flow_y), dim=3)  # n * h * w * 2
    output = F.grid_sample(
        x,
        grid_flow,
        mode=interpolation,
        padding_mode=padding_mode,
        align_corners=align_corners)
    return output
5.PyTorch中affine_grid(theta, size, align_corners=None)
def affine_grid(theta, size, align_corners=None):
    '''
    theta: 一个 N*2*3的张量,N是batch size。
    size: 是得到的网格的尺度,也就是希望仿射变换之后得到的图像大小
    '''
这个函数的意思是根据一个旋转矩阵 得到 一个映射网格表,得到的这个表可以用于F.grid_sample中的grid参数
import torch
import torch.nn.functional as F
angle = 30 * np.pi / 180  # np默认角度为弧度制
offsetx, offsety = -1, -1 # 平移的范围感觉像是[-2, 2]?为什么


def torch_warp(angle, offsetx, offsety):
    theta = np.array([np.cos(angle), np.sin(-angle), offsetx,
                        np.sin(angle), np.cos(angle), offsetx])  # 30度的旋转矩阵
    theta = theta.reshape(1, 2, 3)
    theta = torch.from_numpy(theta).float()  # 调整dtype


    grid = F.affine_grid(theta, [1, 3, h, w], align_corners=True)  # 得到grid 用于grid sample
    print(grid.min(), grid.max())

    img_tensor = torch.from_numpy(image).float().permute(2, 0, 1).unsqueeze(0)
    warp_img = F.grid_sample(img_tensor, grid, align_corners=True).squeeze().permute(1, 2, 0).numpy()

    print(grid.shape, img_tensor.shape, image.shape, warp_img.shape)
    warp_img = np.clip(warp_img, 0, 255).astype(np.uint8)
    return warp_img

warp_img1 = torch_warp(0, -1.9, -1.9)
warp_img2 = torch_warp(0, -1, -1)
warp_img3 = torch_warp(0, -0.5, -0.5)
warp_img4 = torch_warp(0, 0, 0)
warp_img5 = torch_warp(0, 0.5, 0.5)
warp_img6 = torch_warp(0, 1, 1)
warp_img7 = torch_warp(0, 1.9, 1.9)
plt.figure(figsize=(100,50))

plt.subplot(241)
plt.imshow(warp_img1)
plt.subplot(242)
plt.imshow(warp_img2)
plt.subplot(243)
plt.imshow(warp_img3)
plt.subplot(244)
plt.imshow(warp_img4)
plt.subplot(245)
plt.imshow(warp_img5)
plt.subplot(246)
plt.imshow(warp_img6)
plt.subplot(247)
plt.imshow(warp_img7)
# offsetx和offsety实现的是图像的平移操作,整幅图像的尺寸好像是[-2,2]。 offsetx和offsety = 2的时候图像就完全消失。
angle = 30 * np.pi / 180  # np默认角度为弧度制
# pytorch 以图片中心为原点进行旋转,并且在旋转过程中会发生图片缩放(为什么有图片缩放呢,缩放系数是多少?有看过源码了解的同学欢迎指教)
warp_img1 = torch_warp(angle, -1.9, -1.9)
warp_img2 = torch_warp(angle, -1, -1)
warp_img3 = torch_warp(angle, -0.5, -0.5)
warp_img4 = torch_warp(angle, 0, 0)
warp_img5 = torch_warp(angle, 0.5, 0.5)
warp_img6 = torch_warp(angle, 1, 1)
warp_img7 = torch_warp(angle, 1.9, 1.9)
plt.figure(figsize=(100,50))

plt.subplot(241)
plt.imshow(warp_img1)
plt.subplot(242)
plt.imshow(warp_img2)
plt.subplot(243)
plt.imshow(warp_img3)
plt.subplot(244)
plt.imshow(warp_img4)
plt.subplot(245)
plt.imshow(warp_img5)
plt.subplot(246)
plt.imshow(warp_img6)
plt.subplot(247)
plt.imshow(warp_img7)
return:

6. opencv的 warpAffine 和 warpPerspective
warpAffine 只包括旋转,缩放,平移操作 。仿射变换
warpPerspective 透视变换

[1]http://man.hubwiz.com/docset/OpenCV.docset/Contents/Resources/Documents/da/d6e/tutorial_py_geometric_transformations.html
[2]https://opencv-python-tutorials.readthedocs.io/zh/latest/4. OpenCV中的图像处理/4.2. 图像的几何变换/
相关的一些方法介绍
[3]https://docs.opencv.org/4.x/da/d54/group__imgproc__transform.html
示例
[4]http://www.juzicode.com/opencv-python-warpaffine-rotate-warpperspective/