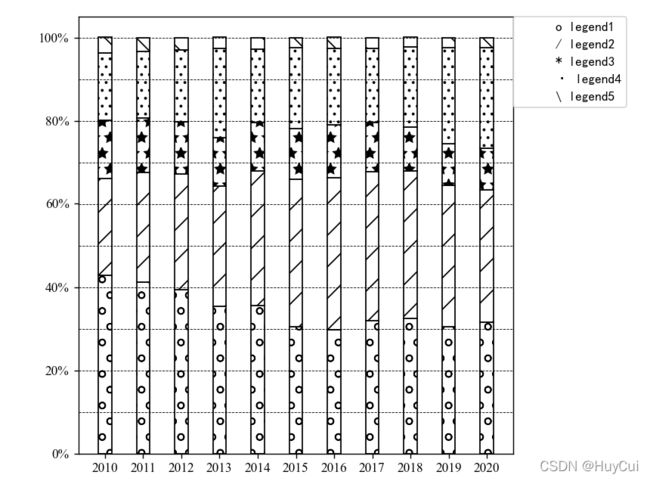
通过Python百分比堆叠柱状图并填充图案
通过Python中的matplotlib绘制百分比堆叠柱状图,并为每一个类别设置不同的填充图案。主要原因是有些论文打印出是黑白色的,不同类别之间区分不明显,所以做了这种方案。
存在一个问题:不知道如何根据填充图案设置图例,本文中可谓“曲线救国”,将图例的颜色块设置为了白色,所以如果有人知道如何根据hatching设置图例可以评论区讨论,原始的legend方法中是未提供该类参数的。
图形如下:

代码如下
import numpy as np
import matplotlib.pyplot as plt
import matplotlib.patches as mpatches
import matplotlib.ticker as mtick
from matplotlib.ticker import PercentFormatter

#设置填充的图案
marks = ['o','/','*','..','\\']
labels = [i for i in range(2010, 2021)]
#数据
first = [42.85,	41.15,39.41,35.35,35.53,30.45,29.81,31.85,32.41,30.42,31.49]
second = [23.20,26.40,27.77,29.02,32.30,35.40,36.42,35.95,35.45,34.00,31.93]
third = [14.08,12.99,12.51,11.54,11.70,12.27,12.69,11.81,10.63,9.98,9.95]
fourth = [16.14,16.17,17.34,21.53,17.66,19.36,18.40,17.83,19.15,23.09,24.10]
others = [3.73,3.28,2.98,2.57,2.81,2.53,2.67,2.57,2.36,2.51,2.54]
data = [first, second, third, fourth, others]

x = range(len(labels))

width = 0.35
# 将bottom_y元素都初始化为0
bottom_y = np.zeros(len(labels))
data = np.array(data)
# 为计算百分比做准备
sums = np.sum(data, axis=0)
j = 0
figsize = 8,6
figure, ax = plt.subplots(figsize=figsize)
plt.rcParams['font.sans-serif'] = ['SimHei']
for i in data:
    y = i / sums
    plt.bar(x, y, width, hatch=np.array(marks)[j], bottom=bottom_y, color='white', edgecolor='black')
    bottom_y = y + bottom_y
    plt.xticks(x, labels)
    #plt.yticks(range(1), ylabel)
    legend_labels = ['o legend1', '/ legend2', '* legend3', '· legend4',r'\ legend5']
    color = ['white', 'white', 'white', 'white', 'white']

    patches = [mpatches.Patch(color=color[h],label="{:s}".format(legend_labels[h])) for h in range(len(legend_labels))]
    ax = plt.gca()
    box = ax.get_position()

    #纵轴设置为百分比
    plt.gca().yaxis.set_major_formatter(PercentFormatter(1))

    ax.legend(handles=patches,ncol=1, bbox_to_anchor=(1, 1), borderaxespad = 0.)  # 生成legend
    figure.subplots_adjust(right=0.7)
    j+=1
#绘制平行于x轴的虚线
for i in range(1, 11, 1):
    plt.axhline(y=i/10, linestyle='dashed', color='black', linewidth=0.5)
labels = ax.get_xticklabels() + ax.get_yticklabels()
#设置数字label字体
[label.set_fontname('Times New Roman') for label in labels]
plt.savefig(r'filename.svg', format='svg')
plt.show()