(三)mmclassification图像分类——模型训练
(三)mmclassification图像分类——模型训练和测试
- 1.模型训练
-
- 1.1使用预训练模型
- 1.2使用自己的数据训练
-
- 1.2.1制作数据集
- 1.2.2修改模型参数(configs文件)
-
- (1)models
- (2)datasets
- (3)schedules
- (4)新建mobilenet_v2_b32x8_car.py
- 1.3训练模型
-
- 单卡模型训练
- 多卡模型训练
- 2.模型测试
- 3.pth模型转化为onnx模型
先放一个官网文档: https://mmclassification.readthedocs.io/en/latest/k
1.模型训练
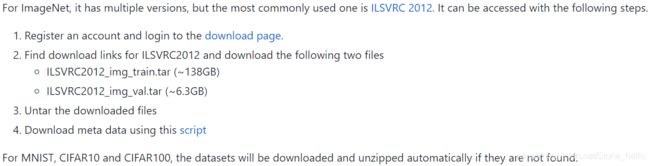
1.1使用预训练模型
从mmclassification官网教程可以看出,imagenet非常大(138GB、6.3GB),所以我选择先用cifar进行模型训练。
cifar模型:
model_zoo链接:链接: https://github.com/open-mmlab/mmclassification/blob/master/docs/model_zoo.md
resnet18模型下载链接:链接: https://download.openmmlab.com/mmclassification/v0/resnet/resnet18_b16x8_cifar10_20200823-f906fa4e.pth

- 网络:configs/resnet/resnet18_b16x8_cifar10.py
- 模型:checkpoints/resnet18_b16x8_cifar10_20200823-f906fa4e.pth
运行代码:
mkdir checkpoints
cd checkpoints
wget https://download.openmmlab.com/mmclassification/v0/resnet/resnet18_b16x8_cifar10_20200823-f906fa4e.pth
cd ../
python tools/test.py configs/resnet/resnet18_b16x8_cifar10.py checkpoints/resnet18_b16x8_cifar10_20200823-f906fa4e.pth
训练结果:

1.2使用自己的数据训练
1.2.1制作数据集
mmclassification的数据集除了cifar10等这种封装好的,就是ImageNet格式的。它的文件夹格式是这样的:

所以首先需要把数据集先按照类别分别存放于一个子文件夹,所有子文件夹放在同一个大文件夹下。接着,通过随机划分训练集、验证集和测试集的代码,将三者划分成为7:2:1。划分的代码如下:
- moveFile.py
# coding=utf-8
import os, random, shutil

def moveFile(fileDir):
    pathDir = os.listdir(fileDir)  # 取图片的原始路径
    filenumber = len(pathDir)
    picknumber = int(filenumber * ratio)  # 按照rate比例从文件夹中取一定数量图片
    sample = random.sample(pathDir, picknumber)  # 随机选取picknumber数量的样本图片
    for name in sample:
        shutil.move(os.path.join(fileDir, name), os.path.join(tarDir, name))
    return

if __name__ == '__main__':
    ori_path = '/home/py005/syy/mycode/ImageClassification/LoadData/CarColor/train'  # 最开始train的文件夹路径
    split_Dir = '/home/py005/syy/mycode/ImageClassification/LoadData/CarColor/val'  # 移动到新的文件夹路径
    ratio=0.70  # 抽取比例  ******自己改*******
    for firstPath in os.listdir(ori_path):
        fileDir = os.path.join(ori_path, firstPath)  # 原图片文件夹路径
        tarDir = os.path.join(split_Dir, firstPath)  # val下子文件夹名字
        if not os.path.exists(tarDir): #如果val下没有子文件夹,就创建
            os.makedirs(tarDir)
        moveFile(fileDir)  # 从每个子类别开始逐个划分
    print("Successfully split the train and val!")
划分好后,得到如下所示的文件树结构:

接下来就是要制作标签
制作标签的代码:
# -*- coding: utf-8 -*-
"""
Created on Wed May  5 15:10:59 2021
---------把数据集分类放在对应的文件夹中即可,所有类别文件夹在一个大文件夹下-----------
@author: shi'ying
"""
import tensorflow as tf
import pathlib
import random
import os

# path = './images/training/training'
# path = '/home/py005/syy/mycode/ImageClassification/LeNet5/images/training/training'
# 首先制作验证集的标签  ***注意做val和test的时候要不同的注释一下
# path='./CarColor/val'
# 然后制作测试集的标签
path='./CarColor/test'

data_path = pathlib.Path(path)
all_images_path = list(data_path.glob('*/*'))
all_images_path = [str(path) for path in all_images_path]  # 所有图片路径名存入列表
random.shuffle(all_images_path)  # 打散

print(len(all_images_path))
print(all_images_path[:5])  # 打印前五个

# 开始制作标签
label_names = sorted(item.name for item in data_path.glob('*/') if item.is_dir())
print(label_names)  # 打印类别名  注:下一步是制作与类别名对应的标签
label_to_index = dict((name, index) for index, name in enumerate(label_names))

all_image_labels = [label_to_index[pathlib.Path(path).parent.name] for path in all_images_path]


for image, label in zip(all_images_path[:5], all_image_labels[:5]):
   print(image, '-----', label)

filename='./CarColor/test.txt'     # ***这里也要记得改***
with open(filename,'w') as f:
   for image,label in zip(all_images_path,all_image_labels):
       image=image.split("/")[-2]+"/"+image.split("/")[-1]
       f.write(image+" "+str(label)+"\n")
print("\nAll images and labels have been written in the car.txt!\n")
得到以下文件:
- classes.txt(这个视情况可以自己手写,多的话就os.listdir)
black
blue
cyan
gray
green
red
white
yellow
- val.txt
red/snap_201202221206124220_蒙K6A231_蓝_20120222120627_2.jpg 5
black/snap_201202241037024510_蒙BMM981_蓝_20120224103714_2.jpg 0
white/snap_201202221126059590_蒙KKC178_蓝_20120222112624_2.jpg 6
gray/snap_201202250950560670_蒙K46664_黄_20120225095105_2.jpg 3
......
- test.txt
black/snap_201202221608536060_蒙K2N360_蓝_20120222160905_1.jpg 0
red/snap_201202221210097700_蒙K69193_黄_20120222121017_2.jpg 5
blue/snap_201203021419261610_蒙KET456_蓝_20120302141937_1.jpg 1
......
至此,图片训练集、验证集、测试集就都准备好啦!
1.2.2修改模型参数(configs文件)
这是mobilenet_v2的配置文件代码,主要涉及了4个文件,分别进去看看是什么。
_base_ = [
    '../_base_/models/mobilenet_v2_1x.py',
    '../_base_/datasets/imagenet_bs32_pil_resize.py',
    '../_base_/schedules/imagenet_bs256.py',
    '../_base_/default_runtime.py'
]
(1)models
…/base/models/mobilenet_v2_1x.py写的是模型配置
# model settings
model = dict(
    type='ImageClassifier',
    backbone=dict(type='MobileNetV2', widen_factor=1.0),
    neck=dict(type='GlobalAveragePooling'),
    head=dict(
        type='LinearClsHead',
        num_classes=1000,
        in_channels=1280,
        loss=dict(type='CrossEntropyLoss', loss_weight=1.0),
        topk=(1, 5),
    ))
(2)datasets
…/base/datasets/imagenet_bs32_pil_resize.py写的是数据集配置
# dataset settings
dataset_type = 'ImageNet'
img_norm_cfg = dict(
    mean=[123.675, 116.28, 103.53], std=[58.395, 57.12, 57.375], to_rgb=True)    # 像素值归一化的均值和标准差
train_pipeline = [                                                               # 定义数据加载流水线
    dict(type='LoadImageFromFile'),                                              # 从文件中读取图像
    dict(type='RandomResizedCrop', size=224, backend='pillow'),                  # 随即裁剪与缩放
    dict(type='RandomFlip', flip_prob=0.5, direction='horizontal'),              # 随机水平翻转
    dict(type='Normalize', **img_norm_cfg),                                      # 像素值归一化
    dict(type='ImageToTensor', keys=['img']),                                    # 将数据转换为PyTorch Tensor
    dict(type='ToTensor', keys=['gt_label']),
    dict(type='Collect', keys=['img', 'gt_label'])
]
test_pipeline = [
    dict(type='LoadImageFromFile'),
    dict(type='Resize', size=(256, -1), backend='pillow'),
    dict(type='CenterCrop', crop_size=224),
    dict(type='Normalize', **img_norm_cfg),
    dict(type='ImageToTensor', keys=['img']),
    dict(type='Collect', keys=['img'])
]
data = dict(
    samples_per_gpu=32,
    workers_per_gpu=2,
    train=dict(
        type=dataset_type,
        data_prefix='data/imagenet/train',
        pipeline=train_pipeline),
    val=dict(
        type=dataset_type,
        data_prefix='data/imagenet/val',
        ann_file='data/imagenet/meta/val.txt',
        pipeline=test_pipeline),
    test=dict(
        # replace `data/val` with `data/test` for standard test
        type=dataset_type,
        data_prefix='data/imagenet/val',
        ann_file='data/imagenet/meta/val.txt',
        pipeline=test_pipeline))
evaluation = dict(interval=1, metric='accuracy')
(3)schedules
…/base/schedules/imagenet_bs256.py写的是训练配置
# optimizer
optimizer = dict(type='SGD', lr=0.1, momentum=0.9, weight_decay=0.0001)
optimizer_config = dict(grad_clip=None)
# learning policy
lr_config = dict(policy='step', step=[30, 60, 90])
runner = dict(type='EpochBasedRunner', max_epochs=100)
(4)新建mobilenet_v2_b32x8_car.py
原本的文件不动,直接在这个新建的文件里把要修改的配置一一添加。
主要改了:
- num_classes=8
- topk=(1, 3)
- workers_per_gpu=0
- data_prefix=‘data/CarColor/train’ (训练集、验证集、测试集,都要改)
- classes=‘data/CarColor/classes.txt’(训练集、验证集、测试集,都要改)
- ann_file=‘data/CarColor/val.txt’(训练集、验证集、测试集,都要改)
- evaluation
- max_epochs
- step=[1]
- load_from 模型路径
改完后得到mobilenet_v2_b32x8_car.py:
_base_ = [
    '../_base_/models/mobilenet_v2_1x.py',
    '../_base_/datasets/imagenet_bs32_pil_resize.py',
    '../_base_/schedules/imagenet_bs256.py',
    '../_base_/default_runtime.py'
]

# model settings
model = dict(
    head=dict(
        num_classes=8,
        topk=(1, 3),
    ))

# dataset settings
data = dict(
    samples_per_gpu=32,
    workers_per_gpu=0,
    train=dict(
        data_prefix='data/CarColor/train',
        classes='data/CarColor/classes.txt'),
    val=dict(
        data_prefix='data/CarColor/val',
        ann_file='data/CarColor/val.txt',
        classes='data/CarColor/classes.txt'),
    test=dict(
        # replace `data/val` with `data/test` for standard test
        data_prefix='data/CarColor/test',
        ann_file='data/CarColor/test.txt',
        classes='data/CarColor/classes.txt'))
evaluation = dict(metric_options={'topk':(1,3)})

# optimizer
optimizer = dict(type='SGD', lr=0.01, momentum=0.9, weight_decay=0.0001)
optimizer_config = dict(grad_clip=None)
# learning policy
lr_config = dict(policy='step', step=[1])
runner = dict(type='EpochBasedRunner', max_epochs=5)

load_from = 'checkpoints/mobilenet_v2_batch256_imagenet_20200708-3b2dc3af.pth'
1.3训练模型
单卡模型训练
python tools/train.py configs/mobilenet_v2/mobilenet_v2_b32x8_car.py --work-dir work_dirs/mobilenet_v2_b32x8_car
多卡模型训练
./tools/dist_train.sh configs/mobilenet_v2/mobilenet_v2_b32x8_car.py 4
训练结果:

训练好的模型在work_dirs/mobilenet_v2_b32x8_car文件夹下:
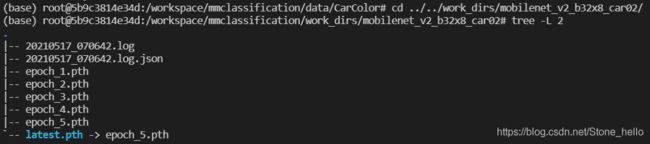
- 20210517_070642.log
- 20210517_070642.log.json
是记录文件
- epoch_1.pth
- epoch_2.pth
- epoch_3.pth
- epoch_4.pth
- epoch_5.pth
是每个一个epoch都保存了一下模型
- latest.pth -> epoch_5.pth
是最近的那个模型的软链接
2.模型测试
- 模型路径:work_dirs/mobilenet_v2_b32x8_car/latest.pth
- 配置文件路径:configs/configs/mobilenet_v2/mobilenet_v2_b32x8_car.py
使用tools/test.py对模型进行测试
# single-gpu
python tools/test.py ${CONFIG_FILE} ${CHECKPOINT_FILE} [--metrics ${METRICS}] [--out ${RESULT_FILE}]

# multi-gpu
./tools/dist_test.sh ${CONFIG_FILE} ${CHECKPOINT_FILE} ${GPU_NUM} [--metrics ${METRICS}] [--out ${RESULT_FILE}]
这里有一些可选参数可以进行配置:
- –metrics:评价方式,这依赖于数据集,比如准确率a
- –metrics-options:对于评估过程的自定义操作,如topk=1
# single-gpu
python tools/test.py configs/mobilenet_v2_b32x8/mobilenet_v2_b32x8_car.py work_dirs/mobilenet_v2_b32x8_car/latest.pth --metrics=accuracy  --metrics-options=topk=1

# multi-gpu
./tools/dist_test.sh \
configs/mobilenet_v2_b32x8/mobilenet_v2_b32x8_car.py  \
work_dirs/mobilenet_v2_b32x8_car/epoch_100.pth \
4 \
--metrics accuracy \
--out work_dirs/mobilenet_v2_b32x8_car/result.txt
3.pth模型转化为onnx模型
python tools/deployment/pytorch2onnx.py \
configs/mobilenet_v2/mobilenet_v2_b32x8_car.py \
--checkpoint work_dirs/mobilenet_v2_b32x8_car/epoch_100.pth \
--output-file work_dirs/mobilenet_v2_b32x8_car/car_20210522.onnx