信用卡反欺诈模型
信用卡反欺诈模型——kaggle项目
原文链接为:
Credit Fraud || Dealing with Imbalanced Datasets
分析背景
信用卡公司如果能够识别欺诈性的信用卡交易,客户就不会因为他们没有购买的物品而被收取费用,这也是反欺诈模型的存在意义。
内容
数据包含2013年9月欧洲地区持卡人通过信用卡进行的交易数据。
此数据集显示,两天内发生的284807笔交易中,有492笔欺诈,而且数据集高度不平衡,正类(欺诈)占所有交易的0.172%。
数据集只包含PCA变换后的数值输入变量。由于机密性问题,无法提供数据原始意义和更多有关数据的背景信息。特征V1,V2,…V28是主成分分析法得到的主成分,只有时间和数量特征没有被主成分分析法转换。
特征“Time”包含每个交易与数据集中第一个交易之间经过的秒数。
特征’amount’是交易金额。
特征“Class”是响应变量,如果存在欺诈,则值为1,否则为0。
介绍
在这个kernel中,我们将使用各种预测模型来查看它们在检测交易是正常支付还是欺诈方面的准确性。如数据集中所述,由于隐私原因数据特征被缩放并且不显示特征的名称。尽管如此,我们仍然可以分析数据集的一些重要方面。
目标:
了解极少数样本数据的分布。
创建“欺诈”和“非欺诈”交易的50/50比率数据集。
确定我们将要使用的分类算法,找出其中精度最高的一个算法。
创建神经网络,并将其精度与我们的最佳分类算法进行比较。
了解不平衡数据集造成的常见错误。
大纲:
一 、了解数据
a) 收集数据
二、 预处理
a) 缩放和分布
b) 拆分数据
三、 随机欠采样和过采样
a) 分布与关联
b) 异常检测
c) 降维聚类(t-SNE)
d) 分类器
e) Logistic回归的深入研究
f) 过采样
四、测试
a) Logistic回归检验
b) 神经网络测试(欠采样与过采样)
# 导入数据库
import numpy as np # linear algebra
import pandas as pd # data processing, CSV file I/O (e.g. pd.read_csv)
import tensorflow as tf
import matplotlib.pyplot as plt
import seaborn as sns
from sklearn.manifold import TSNE
from sklearn.decomposition import PCA, TruncatedSVD
import matplotlib.patches as mpatches
import time

# Classifier Libraries
from sklearn.linear_model import LogisticRegression
from sklearn.svm import SVC
from sklearn.neighbors import KNeighborsClassifier
from sklearn.tree import DecisionTreeClassifier
from sklearn.ensemble import RandomForestClassifier
import collections


# Other Libraries
from sklearn.model_selection import train_test_split
from sklearn.pipeline import make_pipeline
from imblearn.pipeline import make_pipeline as imbalanced_make_pipeline
from imblearn.over_sampling import SMOTE
from imblearn.under_sampling import NearMiss
from imblearn.metrics import classification_report_imbalanced
from sklearn.metrics import precision_score, recall_score, f1_score, roc_auc_score, accuracy_score, classification_report
from collections import Counter
from sklearn.model_selection import KFold, StratifiedKFold
import warnings
warnings.filterwarnings("ignore")


df = pd.read_csv('../input/creditcard.csv')
df.head()
df.describe()
#检查是否有确实值
df.isnull().sum().max()
df.columns
# The classes are heavily skewed we need to solve this issue later.
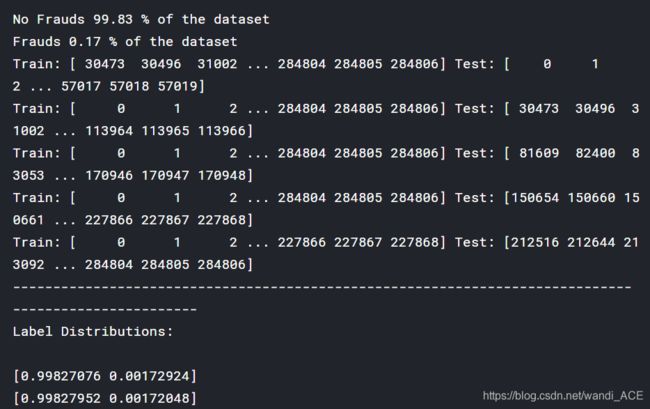
print('No Frauds', round(df['Class'].value_counts()[0]/len(df) * 100,2), '% of the dataset')
print('Frauds', round(df['Class'].value_counts()[1]/len(df) * 100,2), '% of the dataset')
No Frauds 99.83 % of the dataset
Frauds 0.17 % of the dataset
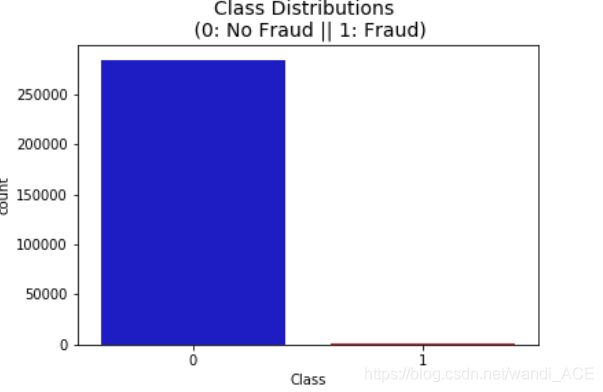
注意: 原始数据集非常不平衡!大多数交易都是非欺诈性的。如果我们使用这个数据框架作为我们的预测模型和分析的基础,我们可能会得到很多错误,我们的算法可能会过拟合,因为它会“假设”大多数交易不是欺诈。但我们不希望我们的模型假设,我们希望我们的模型检测出有欺诈迹象的模式!
colors = ["#0101DF", "#DF0101"]

sns.countplot('Class', data=df, palette=colors)
plt.title('Class Distributions \n (0: No Fraud || 1: Fraud)', fontsize=14)
分布: 通过查看分布,可以了解这些特性的偏态分布程度,还可以进一步看到其他特性的分布。下文会用一些技术帮助减少偏态分布的程度。
fig, ax = plt.subplots(1, 2, figsize=(18,4))

amount_val = df['Amount'].values
time_val = df['Time'].values

sns.distplot(amount_val, ax=ax[0], color='r')
ax[0].set_title('Distribution of Transaction Amount', fontsize=14)
ax[0].set_xlim([min(amount_val), max(amount_val)])

sns.distplot(time_val, ax=ax[1], color='b')
ax[1].set_title('Distribution of Transaction Time', fontsize=14)
ax[1].set_xlim([min(time_val), max(time_val)]

plt.show()
缩放和分布
在这个阶段,我们将首先缩放Time和Amount两列特征。我们还需要创建一个数据集的子样本,以便拥有相等数量的欺诈和非欺诈案例,帮助我们的算法更好地理解确定交易是否为欺诈的模式。
什么是子样本?
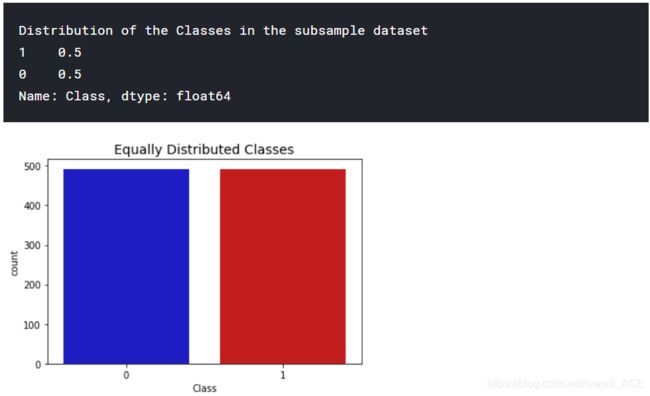
子样本将是一个具有50/50欺诈和非欺诈交易比率的数据集。
为什么要创建子样本?
原有的数据集严重失衡!使用原始数据集将导致以下问题:
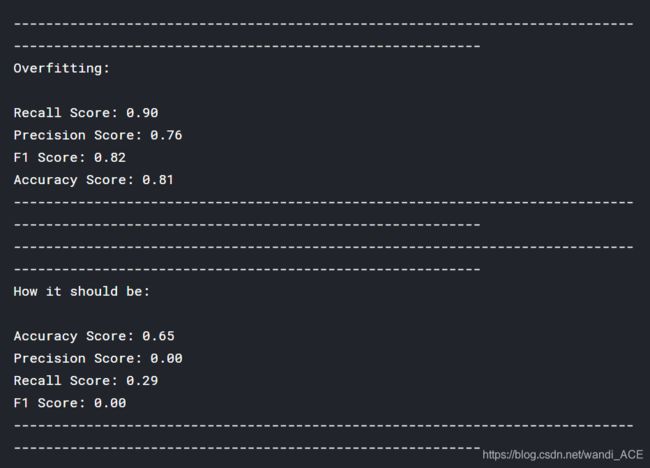
过度拟合:我们的分类模型将假设在大多数情况下没有欺诈!我们希望我们的模型能够确定欺诈何时发生。
错误关联:虽然我们不知道“V”特征代表什么,但是了解每个特征是如何影响结果(欺诈或不欺诈)是很有用的。在不平衡的数据集下,我们无法看到类和特征之间的真正关联的。
总结:
- 新增的缩放特征Amount和Time是具有缩放值的列。
- 我们的数据集中有492个欺诈案例,因此我们可以随机获得492个非欺诈案例来创建新的均衡的子数据集。
- 我们收集了492个欺诈和非欺诈案例,创建了一个新的子样本。
from sklearn.preprocessing import StandardScaler, RobustScaler

#RobustScaler 不容易受异常值的影响

std_scaler = StandardScaler()
rob_scaler = RobustScaler()

df['scaled_amount'] = rob_scaler.fit_transform(df['Amount'].values.reshape(-1,1))
df['scaled_time'] = rob_scaler.fit_transform(df['Time'].values.reshape(-1,1))

df.drop(['Time','Amount'], axis=1, inplace=True)
scaled_amount = df['scaled_amount']
scaled_time = df['scaled_time']

df.drop(['scaled_amount', 'scaled_time'], axis=1, inplace=True)
df.insert(0, 'scaled_amount', scaled_amount)
df.insert(1, 'scaled_time', scaled_time)

Amount and Time are Scaled!

df.head()
拆分数据(原始数据集)
在进行随机欠采样技术之前,我们必须拆分原始数据集。尽管我们在实现随机欠采样或过采样技术时正在分割数据,但我们希望在原始测试集上测试我们的模型,而不是在采样创建的测试集上测试,这样就可以检测训练出的模型是否可以判断出原始数据集的少数欺诈案列。
过采样和欠采样是处理非平衡分类问题时的常用手段
拿二元分类为例,如果训练集中阳性样本有1000个,阴性样本有10万个,两者比例为1:100严重失衡。为了一些模型的性能考虑,我们需要进行一些处理使得两者的比例尽可能接近。
过采样:对少的一类进行重复选择,比如我们对1000个阳性样本进行有放回的抽样,抽5万次(当然其中有很多重复的样本),现在两类的比例就变成了1:2,比较平衡。
欠采样:对多的一类进行少量随机选择,比如我们对10万个阴性样本进行随机选择,抽中2000个(当然原样本中很多样本未被选中),现在两类的比例就变成了1:2,比较平衡。
from sklearn.model_selection import train_test_split
from sklearn.model_selection import StratifiedShuffleSplit

X = df.drop('Class', axis=1)
y = df['Class']

sss = StratifiedKFold(n_splits=5, random_state=None, shuffle=False)

for train_index, test_index in sss.split(X, y):
    print("Train:", train_index, "Test:", test_index)
    original_Xtrain, original_Xtest = X.iloc[train_index], X.iloc[test_index]
    original_ytrain, original_ytest = y.iloc[train_index], y.iloc[test_index]

# We already have X_train and y_train for undersample data thats why I am using original to distinguish and to not overwrite these variables.
# original_Xtrain, original_Xtest, original_ytrain, original_ytest = train_test_split(X, y, test_size=0.2, random_state=42)

# Check the Distribution of the labels


# Turn into an array
original_Xtrain = original_Xtrain.values
original_Xtest = original_Xtest.values
original_ytrain = original_ytrain.values
original_ytest = original_ytest.values

# See if both the train and test label distribution are similarly distributed
train_unique_label, train_counts_label = np.unique(original_ytrain, return_counts=True)
test_unique_label, test_counts_label = np.unique(original_ytest, return_counts=True)
print('-' * 100)

print('Label Distributions: \n')
print(train_counts_label/ len(original_ytrain))
print(test_counts_label/ len(original_ytest))
随机欠采样:
到这一步,我们将实现“随机欠采样”,基本上包括删除数据,以获得更平衡的数据集,从而避免我们的模型过度拟合。
步骤:
-
第一件事是确定class类的不平衡程度(在class列上用“value_counts()属性”来确定每个标签的数量)
-
一旦确定欺诈交易(fraud=“1”)案例的数量,我们应抽出同等数量的非欺诈交易的案例(假设50/50的比率),这将相当于492个欺诈案例和492个非欺诈交易案例。
-
在随机欠采样之后,得到了一个class列类别数量为50/50比率组成的子样本。然后下一步是对数据进行洗牌,确认模型在每次运行模型时是否能够保持一定的准确性。
注:“随机欠采样”的主要问题是,由于存在大量信息损失(从284315笔非欺诈交易中带来492笔非欺诈交易),分类模型可能无法达到我们希望的精度
# 因为数据集在交易时间和交易数额上数据分布不均衡,创造子集之前
对数据进行洗牌

df = df.sample(frac=1)

# amount of fraud classes 492 rows.
fraud_df = df.loc[df['Class'] == 1]
non_fraud_df = df.loc[df['Class'] == 0][:492]

normal_distributed_df = pd.concat([fraud_df, non_fraud_df])

# Shuffle dataframe rows
new_df = normal_distributed_df.sample(frac=1, random_state=42)

new_df.head()
print('Distribution of the Classes in the subsample dataset')
print(new_df['Class'].value_counts()/len(new_df))

sns.countplot('Class', data=new_df, palette=colors)
plt.title('Equally Distributed Classes', fontsize=14)
plt.show()
相关性矩阵
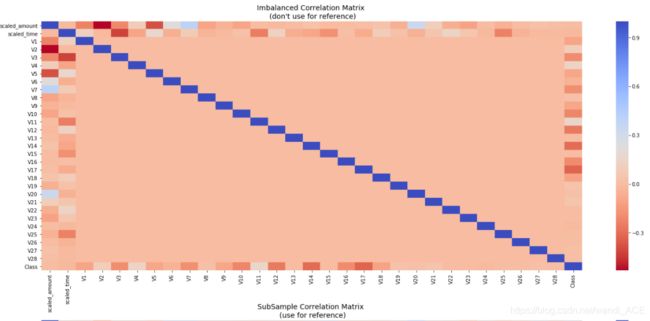
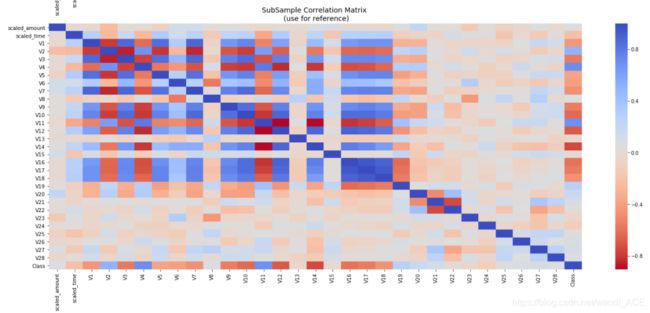
相关性矩阵可以表明各个特征对class类判别的影响程度。然而,我们必须使用正确的数据集(子样本),以便了解哪些特征与欺诈交易具有高度的正相关或负相关。
总结与说明:
负相关:V17、V14、V12、V10呈负相关。这些值越低,最终结果越有可能是欺诈交易。
正相关:V2、V4、V11和V19正相关。这些值越高,最终结果越有可能是欺诈交易。
BoxPlots:使用箱线图来更好地了解这些特征在欺诈和非欺诈案列中的分布。
注意: 必须确保在相关性矩阵中使用子样本,否则相关性矩阵将受到class特征高度不平衡的影响。
# Make sure we use the subsample in our correlation

f, (ax1, ax2) = plt.subplots(2, 1, figsize=(24,20))

# Entire DataFrame
corr = df.corr()
sns.heatmap(corr, cmap='coolwarm_r', annot_kws={'size':20}, ax=ax1)
ax1.set_title("Imbalanced Correlation Matrix \n (don't use for reference)", fontsize=14)


sub_sample_corr = new_df.corr()
sns.heatmap(sub_sample_corr, cmap='coolwarm_r', annot_kws={'size':20}, ax=ax2)
ax2.set_title('SubSample Correlation Matrix \n (use for reference)', fontsize=14)
plt.show()
f, axes = plt.subplots(ncols=4, figsize=(20,4))

# Negative Correlations with our Class (The lower our feature value the more likely it will be a fraud transaction)
sns.boxplot(x="Class", y="V17", data=new_df, palette=colors, ax=axes[0])
axes[0].set_title('V17 vs Class Negative Correlation')

sns.boxplot(x="Class", y="V14", data=new_df, palette=colors, ax=axes[1])
axes[1].set_title('V14 vs Class Negative Correlation')


sns.boxplot(x="Class", y="V12", data=new_df, palette=colors, ax=axes[2])
axes[2].set_title('V12 vs Class Negative Correlation')


sns.boxplot(x="Class", y="V10", data=new_df, palette=colors, ax=axes[3])
axes[3].set_title('V10 vs Class Negative Correlation')

plt.show()
f, axes = plt.subplots(ncols=4, figsize=(20,4))

# Positive correlations (The higher the feature the probability increases that it will be a fraud transaction)
sns.boxplot(x="Class", y="V11", data=new_df, palette=colors, ax=axes[0])
axes[0].set_title('V11 vs Class Positive Correlation')

sns.boxplot(x="Class", y="V4", data=new_df, palette=colors, ax=axes[1])
axes[1].set_title('V4 vs Class Positive Correlation')


sns.boxplot(x="Class", y="V2", data=new_df, palette=colors, ax=axes[2])
axes[2].set_title('V2 vs Class Positive Correlation')


sns.boxplot(x="Class", y="V19", data=new_df, palette=colors, ax=axes[3])
axes[3].set_title('V19 vs Class Positive Correlation')

plt.show()
异常检测:
异常检测的主要目的是从与类class高度相关的特征中删除“极端异常值”。这将对模型的准确性产生积极影响。
四分位间距法:
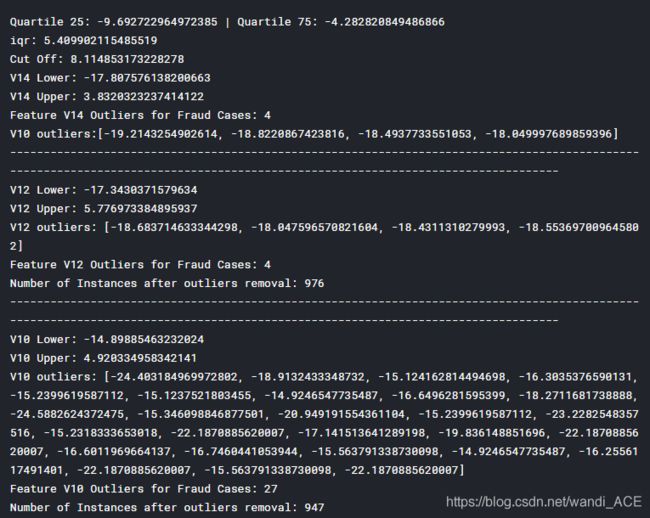
- 四分位范围(IQR):我们通过75%和25%之间的差值来计算。我们的目标是创建一个超过75%和25%的阈值,如果某个实例通过此阈值,则该实例将被删除。
- 方块图:除了很容易看到25和75个百分位(两个正方形的末端),也很容易看到极端的异常值(点超过较低和较高的极端值)。
异常值移除权衡:
必须注意的是,去除异常值的阈值应该设置多大。我们用一个数字(例:1.5)乘以(四分位范围)来确定阈值。此阈值越高,检测到的异常值就越少(乘以较高的数字ex:3),此阈值越低,检测到的异常值就越多。
折衷方案:阈值越低,删除的异常值越多。然而,我们希望更多地关注“极端异常值”,而不仅仅是异常值。为什么?因为我们可能会面临信息丢失的风险,这将导致我们的模型具有较低的准确性。可以测试不同阈值的大小,看看它如何影响我们的分类模型的准确性。
总结:
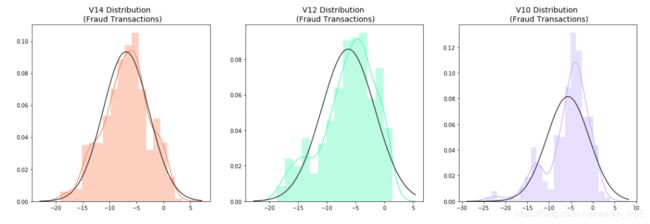
- 可视化分布:首先可视化看一下将要消除异常值的特征的分布情况。与特征V12和V10相比,V14是唯一具有高斯分布的特征。
- 确定阈值:在我们确定IQR的系数之后,依据下图的方法来确定上限和下限阈值。
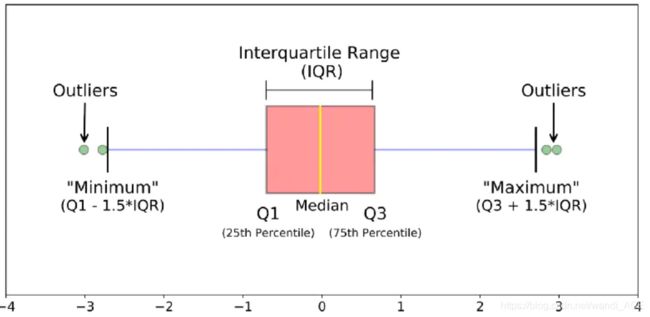
- 删除条件:最后,我们创建一个删除条件,声明如果有极限值超过了“阈值”,则该实例将被删除。
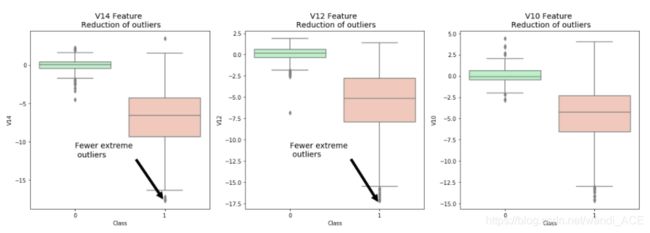
- 箱线图表示法:通过箱线图直观地看到“极端异常值”的数量已经减少到相当大的数量。
注意:在异常值减少后,模型的精度提高了3%以上!一些异常值可能会扭曲模型的准确性,但是,也要必须避免大量的信息丢失,否则模型可能会存在拟合不足的风险。
from scipy.stats import norm

f, (ax1, ax2, ax3) = plt.subplots(1,3, figsize=(20, 6))

v14_fraud_dist = new_df['V14'].loc[new_df['Class'] == 1].values
sns.distplot(v14_fraud_dist,ax=ax1, fit=norm, color='#FB8861')
ax1.set_title('V14 Distribution \n (Fraud Transactions)', fontsize=14)

v12_fraud_dist = new_df['V12'].loc[new_df['Class'] == 1].values
sns.distplot(v12_fraud_dist,ax=ax2, fit=norm, color='#56F9BB')
ax2.set_title('V12 Distribution \n (Fraud Transactions)', fontsize=14)

v10_fraud_dist = new_df['V10'].loc[new_df['Class'] == 1].values
sns.distplot(v10_fraud_dist,ax=ax3, fit=norm, color='#C5B3F9')
ax3.set_title('V10 Distribution \n (Fraud Transactions)', fontsize=14)

plt.show()
# # -----> V14 Removing Outliers (Highest Negative Correlated with Labels)
v14_fraud = new_df['V14'].loc[new_df['Class'] == 1].values
q25, q75 = np.percentile(v14_fraud, 25), np.percentile(v14_fraud, 75)
print('Quartile 25: {} | Quartile 75: {}'.format(q25, q75))
v14_iqr = q75 - q25
print('iqr: {}'.format(v14_iqr))

v14_cut_off = v14_iqr * 1.5
v14_lower, v14_upper = q25 - v14_cut_off, q75 + v14_cut_off
print('Cut Off: {}'.format(v14_cut_off))
print('V14 Lower: {}'.format(v14_lower))
print('V14 Upper: {}'.format(v14_upper))

outliers = [x for x in v14_fraud if x < v14_lower or x > v14_upper]
print('Feature V14 Outliers for Fraud Cases: {}'.format(len(outliers)))
print('V10 outliers:{}'.format(outliers))

new_df = new_df.drop(new_df[(new_df['V14'] > v14_upper) | (new_df['V14'] < v14_lower)].index)
print('----' * 44)

# -----> V12 removing outliers from fraud transactions
v12_fraud = new_df['V12'].loc[new_df['Class'] == 1].values
q25, q75 = np.percentile(v12_fraud, 25), np.percentile(v12_fraud, 75)
v12_iqr = q75 - q25

v12_cut_off = v12_iqr * 1.5
v12_lower, v12_upper = q25 - v12_cut_off, q75 + v12_cut_off
print('V12 Lower: {}'.format(v12_lower))
print('V12 Upper: {}'.format(v12_upper))
outliers = [x for x in v12_fraud if x < v12_lower or x > v12_upper]
print('V12 outliers: {}'.format(outliers))
print('Feature V12 Outliers for Fraud Cases: {}'.format(len(outliers)))
new_df = new_df.drop(new_df[(new_df['V12'] > v12_upper) | (new_df['V12'] < v12_lower)].index)
print('Number of Instances after outliers removal: {}'.format(len(new_df)))
print('----' * 44)


# Removing outliers V10 Feature
v10_fraud = new_df['V10'].loc[new_df['Class'] == 1].values
q25, q75 = np.percentile(v10_fraud, 25), np.percentile(v10_fraud, 75)
v10_iqr = q75 - q25

v10_cut_off = v10_iqr * 1.5
v10_lower, v10_upper = q25 - v10_cut_off, q75 + v10_cut_off
print('V10 Lower: {}'.format(v10_lower))
print('V10 Upper: {}'.format(v10_upper))
outliers = [x for x in v10_fraud if x < v10_lower or x > v10_upper]
print('V10 outliers: {}'.format(outliers))
print('Feature V10 Outliers for Fraud Cases: {}'.format(len(outliers)))
new_df = new_df.drop(new_df[(new_df['V10'] > v10_upper) | (new_df['V10'] < v10_lower)].index)
print('Number of Instances after outliers removal: {}'.format(len(new_df)))
f,(ax1, ax2, ax3) = plt.subplots(1, 3, figsize=(20,6))

colors = ['#B3F9C5', '#f9c5b3']
# Boxplots with outliers removed
# Feature V14
sns.boxplot(x="Class", y="V14", data=new_df,ax=ax1, palette=colors)
ax1.set_title("V14 Feature \n Reduction of outliers", fontsize=14)
ax1.annotate('Fewer extreme \n outliers', xy=(0.98, -17.5), xytext=(0, -12),
            arrowprops=dict(facecolor='black'),
            fontsize=14)

# Feature 12
sns.boxplot(x="Class", y="V12", data=new_df, ax=ax2, palette=colors)
ax2.set_title("V12 Feature \n Reduction of outliers", fontsize=14)
ax2.annotate('Fewer extreme \n outliers', xy=(0.98, -17.3), xytext=(0, -12),
            arrowprops=dict(facecolor='black'),
            fontsize=14)

# Feature V10
sns.boxplot(x="Class", y="V10", data=new_df, ax=ax3, palette=colors)
ax3.set_title("V10 Feature \n Reduction of outliers", fontsize=14)
ax3.annotate('Fewer extreme \n outliers', xy=(0.95, -16.5), xytext=(0, -12),
            arrowprops=dict(facecolor='black'),
            fontsize=14)


plt.show()
降维和聚类
通过三种降维函数,可视化样本数据,了解数据分布
# New_df is from the random undersample data (fewer instances)
X = new_df.drop('Class', axis=1)
y = new_df['Class']


# T-SNE Implementation
t0 = time.time()
X_reduced_tsne = TSNE(n_components=2, random_state=42).fit_transform(X.values)
t1 = time.time()
print("T-SNE took {:.2} s".format(t1 - t0))

# PCA Implementation
t0 = time.time()
X_reduced_pca = PCA(n_components=2, random_state=42).fit_transform(X.values)
t1 = time.time()
print("PCA took {:.2} s".format(t1 - t0))

# TruncatedSVD
t0 = time.time()
X_reduced_svd = TruncatedSVD(n_components=2, algorithm='randomized', random_state=42).fit_transform(X.values)
t1 = time.time()
print("Truncated SVD took {:.2} s".format(t1 - t0))
f, (ax1, ax2, ax3) = plt.subplots(1, 3, figsize=(24,6))
# labels = ['No Fraud', 'Fraud']
f.suptitle('Clusters using Dimensionality Reduction', fontsize=14)


blue_patch = mpatches.Patch(color='#0A0AFF', label='No Fraud')
red_patch = mpatches.Patch(color='#AF0000', label='Fraud')


# t-SNE scatter plot
ax1.scatter(X_reduced_tsne[:,0], X_reduced_tsne[:,1], c=(y == 0), cmap='coolwarm', label='No Fraud', linewidths=2)
ax1.scatter(X_reduced_tsne[:,0], X_reduced_tsne[:,1], c=(y == 1), cmap='coolwarm', label='Fraud', linewidths=2)
ax1.set_title('t-SNE', fontsize=14)

ax1.grid(True)

ax1.legend(handles=[blue_patch, red_patch])


# PCA scatter plot
ax2.scatter(X_reduced_pca[:,0], X_reduced_pca[:,1], c=(y == 0), cmap='coolwarm', label='No Fraud', linewidths=2)
ax2.scatter(X_reduced_pca[:,0], X_reduced_pca[:,1], c=(y == 1), cmap='coolwarm', label='Fraud', linewidths=2)
ax2.set_title('PCA', fontsize=14)

ax2.grid(True)

ax2.legend(handles=[blue_patch, red_patch])

# TruncatedSVD scatter plot
ax3.scatter(X_reduced_svd[:,0], X_reduced_svd[:,1], c=(y == 0), cmap='coolwarm', label='No Fraud', linewidths=2)
ax3.scatter(X_reduced_svd[:,0], X_reduced_svd[:,1], c=(y == 1), cmap='coolwarm', label='Fraud', linewidths=2)
ax3.set_title('Truncated SVD', fontsize=14)

ax3.grid(True)

ax3.legend(handles=[blue_patch, red_patch])

plt.show()
分类器(欠采样):
在本节中,将训练四种类型的分类器,并决定哪种分类器更能有效地检测欺诈交易。先将特征与标签分离后,然后将数据分割成训练集和测试集。
总结:
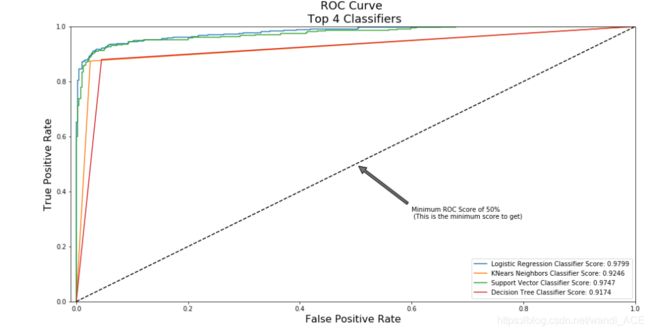
在大多数情况下,Logistic回归分类器比其他三种分类器更准确。(后面将进一步分析Logistic回归)
GridSearchCV用于确定为分类器提供最佳预测分数的参数。
Logistic回归具有最佳的ROC,也就是说logisticsregression能非常准确地区分欺诈和非欺诈交易。
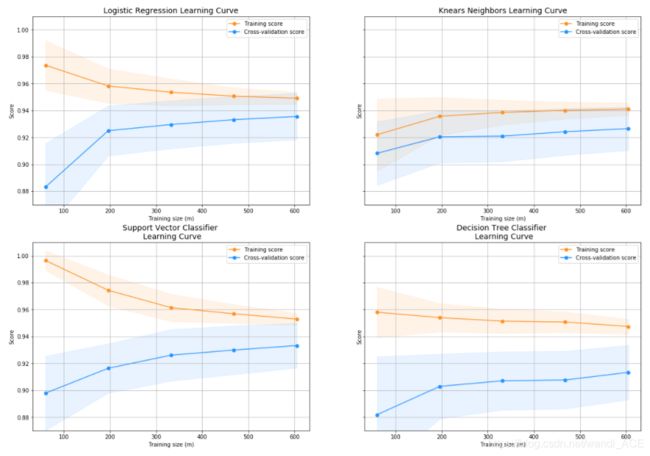
学习曲线:
训练集分数和交叉验证的分数之间的差值越大,模型越有可能过度拟合(高方差)。
如果训练组和交叉验证组的得分都很低,这表明我们的模型不合适(高偏差)
Logistic回归分类器在训练集和交叉验证集上都是最高的分数。
# Undersampling before cross validating (prone to overfit)
X = new_df.drop('Class', axis=1)
y = new_df['Class']
# Our data is already scaled we should split our training and test sets
from sklearn.model_selection import train_test_split

# This is explicitly used for undersampling.
X_train, X_test, y_train, y_test = train_test_split(X, y, test_size=0.2, random_state=42)
# Turn the values into an array for feeding the classification algorithms.
X_train = X_train.values
X_test = X_test.values
y_train = y_train.values
y_test = y_test.values
# Let's implement simple classifiers

classifiers = {
    "LogisiticRegression": LogisticRegression(),
    "KNearest": KNeighborsClassifier(),
    "Support Vector Classifier": SVC(),
    "DecisionTreeClassifier": DecisionTreeClassifier()
}
# Wow our scores are getting even high scores even when applying cross validation.
from sklearn.model_selection import cross_val_score


for key, classifier in classifiers.items():
    classifier.fit(X_train, y_train)
    training_score = cross_val_score(classifier, X_train, y_train, cv=5)
    print("Classifiers: ", classifier.__class__.__name__, "Has a training score of", round(training_score.mean(), 2) * 100, "% accuracy score")
# Use GridSearchCV to find the best parameters.
from sklearn.model_selection import GridSearchCV


# Logistic Regression
log_reg_params = {"penalty": ['l1', 'l2'], 'C': [0.001, 0.01, 0.1, 1, 10, 100, 1000]}


grid_log_reg = GridSearchCV(LogisticRegression(), log_reg_params)
grid_log_reg.fit(X_train, y_train)
# We automatically get the logistic regression with the best parameters.
log_reg = grid_log_reg.best_estimator_

knears_params = {"n_neighbors": list(range(2,5,1)), 'algorithm': ['auto', 'ball_tree', 'kd_tree', 'brute']}

grid_knears = GridSearchCV(KNeighborsClassifier(), knears_params)
grid_knears.fit(X_train, y_train)
# KNears best estimator
knears_neighbors = grid_knears.best_estimator_

# Support Vector Classifier
svc_params = {'C': [0.5, 0.7, 0.9, 1], 'kernel': ['rbf', 'poly', 'sigmoid', 'linear']}
grid_svc = GridSearchCV(SVC(), svc_params)
grid_svc.fit(X_train, y_train)

# SVC best estimator
svc = grid_svc.best_estimator_

# DecisionTree Classifier
tree_params = {"criterion": ["gini", "entropy"], "max_depth": list(range(2,4,1)),
              "min_samples_leaf": list(range(5,7,1))}
grid_tree = GridSearchCV(DecisionTreeClassifier(), tree_params)
grid_tree.fit(X_train, y_train)

# tree best estimator
tree_clf = grid_tree.best_estimator_
# Overfitting Case

log_reg_score = cross_val_score(log_reg, X_train, y_train, cv=5)
print('Logistic Regression Cross Validation Score: ', round(log_reg_score.mean() * 100, 2).astype(str) + '%')


knears_score = cross_val_score(knears_neighbors, X_train, y_train, cv=5)
print('Knears Neighbors Cross Validation Score', round(knears_score.mean() * 100, 2).astype(str) + '%')

svc_score = cross_val_score(svc, X_train, y_train, cv=5)
print('Support Vector Classifier Cross Validation Score', round(svc_score.mean() * 100, 2).astype(str) + '%')

tree_score = cross_val_score(tree_clf, X_train, y_train, cv=5)
print('DecisionTree Classifier Cross Validation Score', round(tree_score.mean() * 100, 2).astype(str) + '%')
# Let's Plot LogisticRegression Learning Curve
from sklearn.model_selection import ShuffleSplit
from sklearn.model_selection import learning_curve

def plot_learning_curve(estimator1, estimator2, estimator3, estimator4, X, y, ylim=None, cv=None,
                        n_jobs=1, train_sizes=np.linspace(.1, 1.0, 5)):
    f, ((ax1, ax2), (ax3, ax4)) = plt.subplots(2,2, figsize=(20,14), sharey=True)
    if ylim is not None:
        plt.ylim(*ylim)
    # First Estimator
    train_sizes, train_scores, test_scores = learning_curve(
        estimator1, X, y, cv=cv, n_jobs=n_jobs, train_sizes=train_sizes)
    train_scores_mean = np.mean(train_scores, axis=1)
    train_scores_std = np.std(train_scores, axis=1)
    test_scores_mean = np.mean(test_scores, axis=1)
    test_scores_std = np.std(test_scores, axis=1)
    ax1.fill_between(train_sizes, train_scores_mean - train_scores_std,
                     train_scores_mean + train_scores_std, alpha=0.1,
                     color="#ff9124")
    ax1.fill_between(train_sizes, test_scores_mean - test_scores_std,
                     test_scores_mean + test_scores_std, alpha=0.1, color="#2492ff")
    ax1.plot(train_sizes, train_scores_mean, 'o-', color="#ff9124",
             label="Training score")
    ax1.plot(train_sizes, test_scores_mean, 'o-', color="#2492ff",
             label="Cross-validation score")
    ax1.set_title("Logistic Regression Learning Curve", fontsize=14)
    ax1.set_xlabel('Training size (m)')
    ax1.set_ylabel('Score')
    ax1.grid(True)
    ax1.legend(loc="best")

    # Second Estimator
    train_sizes, train_scores, test_scores = learning_curve(
        estimator2, X, y, cv=cv, n_jobs=n_jobs, train_sizes=train_sizes)
    train_scores_mean = np.mean(train_scores, axis=1)
    train_scores_std = np.std(train_scores, axis=1)
    test_scores_mean = np.mean(test_scores, axis=1)
    test_scores_std = np.std(test_scores, axis=1)
    ax2.fill_between(train_sizes, train_scores_mean - train_scores_std,
                     train_scores_mean + train_scores_std, alpha=0.1,
                     color="#ff9124")
    ax2.fill_between(train_sizes, test_scores_mean - test_scores_std,
                     test_scores_mean + test_scores_std, alpha=0.1, color="#2492ff")
    ax2.plot(train_sizes, train_scores_mean, 'o-', color="#ff9124",
             label="Training score")
    ax2.plot(train_sizes, test_scores_mean, 'o-', color="#2492ff",
             label="Cross-validation score")
    ax2.set_title("Knears Neighbors Learning Curve", fontsize=14)
    ax2.set_xlabel('Training size (m)')
    ax2.set_ylabel('Score')
    ax2.grid(True)
    ax2.legend(loc="best")

    # Third Estimator
    train_sizes, train_scores, test_scores = learning_curve(
        estimator3, X, y, cv=cv, n_jobs=n_jobs, train_sizes=train_sizes)
    train_scores_mean = np.mean(train_scores, axis=1)
    train_scores_std = np.std(train_scores, axis=1)
    test_scores_mean = np.mean(test_scores, axis=1)
    test_scores_std = np.std(test_scores, axis=1)
    ax3.fill_between(train_sizes, train_scores_mean - train_scores_std,
                     train_scores_mean + train_scores_std, alpha=0.1,
                     color="#ff9124")
    ax3.fill_between(train_sizes, test_scores_mean - test_scores_std,
                     test_scores_mean + test_scores_std, alpha=0.1, color="#2492ff")
    ax3.plot(train_sizes, train_scores_mean, 'o-', color="#ff9124",
             label="Training score")
    ax3.plot(train_sizes, test_scores_mean, 'o-', color="#2492ff",
             label="Cross-validation score")
    ax3.set_title("Support Vector Classifier \n Learning Curve", fontsize=14)
    ax3.set_xlabel('Training size (m)')
    ax3.set_ylabel('Score')
    ax3.grid(True)
    ax3.legend(loc="best")

    # Fourth Estimator
    train_sizes, train_scores, test_scores = learning_curve(
        estimator4, X, y, cv=cv, n_jobs=n_jobs, train_sizes=train_sizes)
    train_scores_mean = np.mean(train_scores, axis=1)
    train_scores_std = np.std(train_scores, axis=1)
    test_scores_mean = np.mean(test_scores, axis=1)
    test_scores_std = np.std(test_scores, axis=1)
    ax4.fill_between(train_sizes, train_scores_mean - train_scores_std,
                     train_scores_mean + train_scores_std, alpha=0.1,
                     color="#ff9124")
    ax4.fill_between(train_sizes, test_scores_mean - test_scores_std,
                     test_scores_mean + test_scores_std, alpha=0.1, color="#2492ff")
    ax4.plot(train_sizes, train_scores_mean, 'o-', color="#ff9124",
             label="Training score")
    ax4.plot(train_sizes, test_scores_mean, 'o-', color="#2492ff",
             label="Cross-validation score")
    ax4.set_title("Decision Tree Classifier \n Learning Curve", fontsize=14)
    ax4.set_xlabel('Training size (m)')
    ax4.set_ylabel('Score')
    ax4.grid(True)
    ax4.legend(loc="best")
    return plt
cv = ShuffleSplit(n_splits=100, test_size=0.2, random_state=42)
plot_learning_curve(log_reg, knears_neighbors, svc, tree_clf, X_train, y_train, (0.87, 1.01), cv=cv, n_jobs=4)
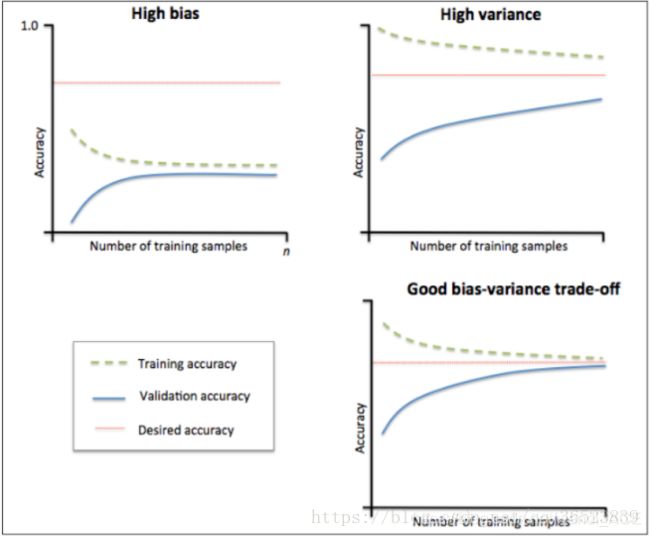
1:观察左上图,训练集准确率与验证集准确率收敛,但是两者收敛后的准确率远小于我们的期望准确率(上面那条红线),所以由图可得该模型属于欠拟合(underfitting)问题。由于欠拟合,所以我们需要增加模型的复杂度,比如,增加特征、增加树的深度、减小正则项等等,此时再增加数据量是不起作用的。
2:观察右上图,训练集准确率高于期望值,验证集则低于期望值,两者之间有很大的间距,误差很大,对于新的数据集模型适应性较差,所以由图可得该模型属于过拟合(overfitting)问题。由于过拟合,所以我们降低模型的复杂度,比如减小树的深度、增大分裂节点样本数、增大样本数、减少特征数等等。
3:一个比较理想的学习曲线图应当是:低偏差、低方差,即收敛且误差小。
链接: 点击了解更多关于学习曲线的内容.
from sklearn.metrics import roc_curve
from sklearn.model_selection import cross_val_predict
# Create a DataFrame with all the scores and the classifiers names.

log_reg_pred = cross_val_predict(log_reg, X_train, y_train, cv=5,
                             method="decision_function")

knears_pred = cross_val_predict(knears_neighbors, X_train, y_train, cv=5)

svc_pred = cross_val_predict(svc, X_train, y_train, cv=5,
                             method="decision_function")

tree_pred = cross_val_predict(tree_clf, X_train, y_train, cv=5)
from sklearn.metrics import roc_auc_score

print('Logistic Regression: ', roc_auc_score(y_train, log_reg_pred))
print('KNears Neighbors: ', roc_auc_score(y_train, knears_pred))
print('Support Vector Classifier: ', roc_auc_score(y_train, svc_pred))
print('Decision Tree Classifier: ', roc_auc_score(y_train, tree_pred))
log_fpr, log_tpr, log_thresold = roc_curve(y_train, log_reg_pred)
knear_fpr, knear_tpr, knear_threshold = roc_curve(y_train, knears_pred)
svc_fpr, svc_tpr, svc_threshold = roc_curve(y_train, svc_pred)
tree_fpr, tree_tpr, tree_threshold = roc_curve(y_train, tree_pred)


def graph_roc_curve_multiple(log_fpr, log_tpr, knear_fpr, knear_tpr, svc_fpr, svc_tpr, tree_fpr, tree_tpr):
    plt.figure(figsize=(16,8))
    plt.title('ROC Curve \n Top 4 Classifiers', fontsize=18)
    plt.plot(log_fpr, log_tpr, label='Logistic Regression Classifier Score: {:.4f}'.format(roc_auc_score(y_train, log_reg_pred)))
    plt.plot(knear_fpr, knear_tpr, label='KNears Neighbors Classifier Score: {:.4f}'.format(roc_auc_score(y_train, knears_pred)))
    plt.plot(svc_fpr, svc_tpr, label='Support Vector Classifier Score: {:.4f}'.format(roc_auc_score(y_train, svc_pred)))
    plt.plot(tree_fpr, tree_tpr, label='Decision Tree Classifier Score: {:.4f}'.format(roc_auc_score(y_train, tree_pred)))
    plt.plot([0, 1], [0, 1], 'k--')
    plt.axis([-0.01, 1, 0, 1])
    plt.xlabel('False Positive Rate', fontsize=16)
    plt.ylabel('True Positive Rate', fontsize=16)
    plt.annotate('Minimum ROC Score of 50% \n (This is the minimum score to get)', xy=(0.5, 0.5), xytext=(0.6, 0.3),
                arrowprops=dict(facecolor='#6E726D', shrink=0.05),
                )
    plt.legend()

graph_roc_curve_multiple(log_fpr, log_tpr, knear_fpr, knear_tpr, svc_fpr, svc_tpr, tree_fpr, tree_tpr)
plt.show()
下面单独看一下逻辑回归的ROC曲线
def logistic_roc_curve(log_fpr, log_tpr):
plt.figure(figsize=(12,8))
plt.title('Logistic Regression ROC Curve', fontsize=16)
plt.plot(log_fpr, log_tpr, 'b-', linewidth=2)
plt.plot([0, 1], [0, 1], 'r--')
plt.xlabel('False Positive Rate', fontsize=16)
plt.ylabel('True Positive Rate', fontsize=16)
plt.axis([-0.01,1,0,1])
logistic_roc_curve(log_fpr, log_tpr)
plt.show()

from sklearn.metrics import precision_recall_curve

precision, recall, threshold = precision_recall_curve(y_train, log_reg_pred)
from sklearn.metrics import recall_score, precision_score, f1_score, accuracy_score
y_pred = log_reg.predict(X_train)

# Overfitting Case
print('---' * 45)
print('Overfitting: \n')
print('Recall Score: {:.2f}'.format(recall_score(y_train, y_pred)))
print('Precision Score: {:.2f}'.format(precision_score(y_train, y_pred)))
print('F1 Score: {:.2f}'.format(f1_score(y_train, y_pred)))
print('Accuracy Score: {:.2f}'.format(accuracy_score(y_train, y_pred)))
print('---' * 45)

# How it should look like
print('---' * 45)
print('How it should be:\n')
print("Accuracy Score: {:.2f}".format(np.mean(undersample_accuracy)))
print("Precision Score: {:.2f}".format(np.mean(undersample_precision)))
print("Recall Score: {:.2f}".format(np.mean(undersample_recall)))
print("F1 Score: {:.2f}".format(np.mean(undersample_f1)))
print('---' * 45)
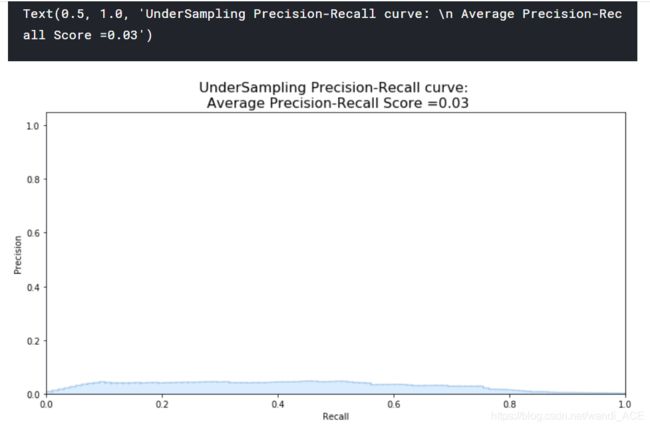
undersample_y_score = log_reg.decision_function(original_Xtest)
from sklearn.metrics import average_precision_score

undersample_average_precision = average_precision_score(original_ytest, undersample_y_score)

print('Average precision-recall score: {0:0.2f}'.format(
      undersample_average_precision))
SMOTE Technique (Over-Sampling):
以上都是采用随机的欠采样技术,下面使用SMOTE过采样技术重新采集样本数据,然后测试逻辑回归算法
from imblearn.over_sampling import SMOTE
# SMOTE Technique (OverSampling) After splitting and Cross Validating
sm = SMOTE(ratio='minority', random_state=42)
# Xsm_train, ysm_train = sm.fit_sample(X_train, y_train)


# This will be the data were we are going to
Xsm_train, ysm_train = sm.fit_sample(original_Xtrain, original_ytrain)

# We Improve the score by 2% points approximately
# Implement GridSearchCV and the other models.

# Logistic Regression
t0 = time.time()
log_reg_sm = grid_log_reg.best_estimator_
log_reg_sm.fit(Xsm_train, ysm_train)
t1 = time.time()
print("Fitting oversample data took :{} sec".format(t1 - t0))
![]()
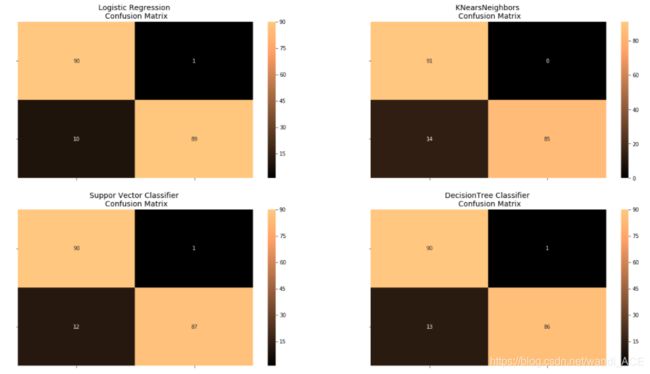
Test Data with Logistic Regression:
from sklearn.metrics import confusion_matrix
# Logistic Regression fitted using SMOTE technique
y_pred_log_reg = log_reg_sm.predict(X_test)

# Other models fitted with UnderSampling
y_pred_knear = knears_neighbors.predict(X_test)
y_pred_svc = svc.predict(X_test)
y_pred_tree = tree_clf.predict(X_test)


log_reg_cf = confusion_matrix(y_test, y_pred_log_reg)
kneighbors_cf = confusion_matrix(y_test, y_pred_knear)
svc_cf = confusion_matrix(y_test, y_pred_svc)
tree_cf = confusion_matrix(y_test, y_pred_tree)

fig, ax = plt.subplots(2, 2,figsize=(22,12))


sns.heatmap(log_reg_cf, ax=ax[0][0], annot=True, cmap=plt.cm.copper)
ax[0, 0].set_title("Logistic Regression \n Confusion Matrix", fontsize=14)
ax[0, 0].set_xticklabels(['', ''], fontsize=14, rotation=90)
ax[0, 0].set_yticklabels(['', ''], fontsize=14, rotation=360)

sns.heatmap(kneighbors_cf, ax=ax[0][1], annot=True, cmap=plt.cm.copper)
ax[0][1].set_title("KNearsNeighbors \n Confusion Matrix", fontsize=14)
ax[0][1].set_xticklabels(['', ''], fontsize=14, rotation=90)
ax[0][1].set_yticklabels(['', ''], fontsize=14, rotation=360)

sns.heatmap(svc_cf, ax=ax[1][0], annot=True, cmap=plt.cm.copper)
ax[1][0].set_title("Suppor Vector Classifier \n Confusion Matrix", fontsize=14)
ax[1][0].set_xticklabels(['', ''], fontsize=14, rotation=90)
ax[1][0].set_yticklabels(['', ''], fontsize=14, rotation=360)

sns.heatmap(tree_cf, ax=ax[1][1], annot=True, cmap=plt.cm.copper)
ax[1][1].set_title("DecisionTree Classifier \n Confusion Matrix", fontsize=14)
ax[1][1].set_xticklabels(['', ''], fontsize=14, rotation=90)
ax[1][1].set_yticklabels(['', ''], fontsize=14, rotation=360)


plt.show()
# Final Score in the test set of logistic regression
from sklearn.metrics import accuracy_score

# Logistic Regression with Under-Sampling
y_pred = log_reg.predict(X_test)
undersample_score = accuracy_score(y_test, y_pred)


# Logistic Regression with SMOTE Technique (Better accuracy with SMOTE t)
y_pred_sm = best_est.predict(original_Xtest)
oversample_score = accuracy_score(original_ytest, y_pred_sm)


d = {'Technique': ['Random UnderSampling', 'Oversampling (SMOTE)'], 'Score': [undersample_score, oversample_score]}
final_df = pd.DataFrame(data=d)

# Move column
score = final_df['Score']
final_df.drop('Score', axis=1, inplace=True)
final_df.insert(1, 'Score', score)

# Note how high is accuracy score it can be misleading!
final_df


