gitchat训练营15天共度深度学习入门课程笔记(六)
第4章 神经网络的学习
- 4.3 数值微分
-
- 4.3.1 导数
- 4.3.2 数值微分的例子
- 4.3.3 偏导数
- 4.4 梯度
-
- 4.4.1 梯度法
- 4.4.2 神经网络的梯度
- 4.5 学习算法的实现
-
- 4.5.1 2 层神经网络的类
- 4.5.2 mini-batch 的实现
- 4.5.3 基于测试数据的评价
4.3 数值微分
4.3.1 导数
导数定义公式如下:
d f ( x ) d x = lim h → 0 f ( x + h ) − f ( x ) h \frac{df(x)}{dx}=\lim_{h\to0}\frac{f(x+h)-f(x)}{h} dxdf(x)=h→0limhf(x+h)−f(x)
数值微分方法(用数值方法计算导数)实现:
def numerical_diff(f,x):
	h=10e-50
	return (f(x+h)-f(x))/h
这种方法产生误差原因:
- 这种方式对于特别小的数会出现舍入误差,如
float32表示1e-50时,就因为1e-50太小,就直接表示成了0.0。 - h不可能无限小
- 这种方法是数值微分:用数值方法计算导数,而解析性求导得到的是真的导数
所以这里为了进一步减小误差,采取中心差分的方法求导数,而不采用向前差分和向后差分。
def numerical_diff(f,x):
	h=1e-4 #减小舍入误差
	return((f(x+h)-f(x-h))/2*h)
4.3.2 数值微分的例子
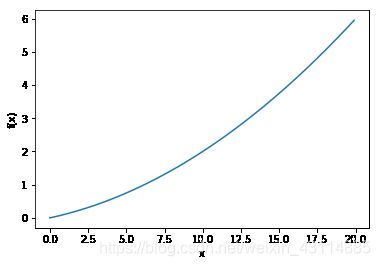
我们下面用python来实现一个函数的导数,函数式如下:
y = 0.01 x 2 + 0.1 x y=0.01x^2+0.1x y=0.01x2+0.1x
import numpy as np
import matplotlib. pylab as plt
def function_1(x):
    return 0.01*x**2 + 0.1*x
x=np.arange(0.0,20.0,0.1)
y=function_1(x)
plt.xlabel("x")
plt.ylabel("f(x)")
plt.plot(x, y)
plt.show()
绘制出该函数的图像如下:
再将带入numerical_diff(f,x)求 x = 5 x=5 x=5和 x = 10 x=10 x=10的导数的值
print(numerical_diff(function_1,5))
print(numerical_diff(function_1,10))
运行结果如下:
1.9999999999908982e-09
2.999999999986347e-09
而真的导数为:
d f ( x ) d x = 0.02 x + 0.1 \frac{df(x)}{dx}=0.02x+0.1 dxdf(x)=0.02x+0.1
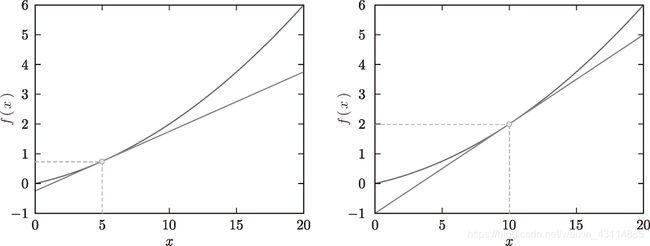
在 x = 5 x=5 x=5和 x = 10 x=10 x=10处导数的值为0.2和0.3
并且得到的函数切线图像如下,代码在课程的ch04/gradient_1d.py里:
4.3.3 偏导数
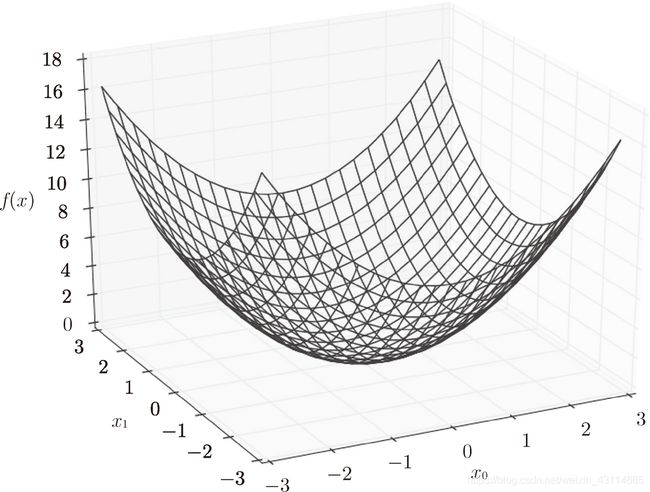
当有两个变量时,表示函数在某处的变化率就需要求偏导了,如函数:
f ( x 0 , x 1 ) = x 0 2 + x 1 2 f(x_0,x_1)=x_0^2+x_1^2 f(x0,x1)=x02+x12
python实现如下:
def function_2(x):
	return np.sum(x**2)
这个函数的图像是三维的:
下面实现求在 x 0 = 3 x_0=3 x0=3和 x 1 = 4 x_1=4 x1=4的情况下的 ∂ y ∂ x 0 \frac{\partial{y}}{\partial{x_0}} ∂x0∂y和 ∂ y ∂ x 1 \frac{\partial{y}}{\partial{x_1}} ∂x1∂y
def function_tmp1(x0):
	return x0*x0+2*4
print(numerical_diff(function_tmp1,3.0))
运行结果如下:
6.000000000003781e-08
def function_tmp1(x1):
	return 2*3+x1*x1
print(numerical_diff(function_tmp1,4.0))
运行结果如下:
7.999999999999119e-08
对于上面的这个例子,简单来说,就是要求哪个变量的偏导,就把另一个变量看作常量就可以了。
4.4 梯度
- 梯度:由全部变量的偏导汇总而成的向量,如( ∂ y ∂ x 0 \frac{\partial{y}}{\partial{x_0}} ∂x0∂y, ∂ y ∂ x 1 \frac{\partial{y}}{\partial{x_1}} ∂x1∂y)
实现求一个数组的代码如下:
def numerical_gradient(f, x):
    h = 1e-4 # 0.0001
    grad = np.zeros_like(x) # 生成和x形状相同的数组,其中元素全部为0
    for idx in range(x.size): #遍历数组x
        tmp_val = x[idx] #把x的第idx个元素给tmp_val
        # f(x+h)的计算
        x[idx] = tmp_val + h #x[idx]+h放回x数组
        fxh1 = f(x)#把函数的值全计算一遍,x[idx]+h处不同
        # f(x-h)的计算
        x[idx] = tmp_val - h  #x[idx]-h放回x数组
        fxh2 = f(x)#把函数的值全计算一遍,x[idx]-h处不同
        grad[idx] = np.sum((fxh1 - fxh2) / (2*h))#只有idx处的值不同,相减非0,相当于求出了idx处变量的偏导
        x[idx] = tmp_val # 还原值
    return grad
print(numerical_gradient(function_2, np.array([3.0, 4.0])))
print(numerical_gradient(function_2, np.array([0.0, 2.0])))
print(numerical_gradient(function_2, np.array([3.0, 0.0])))
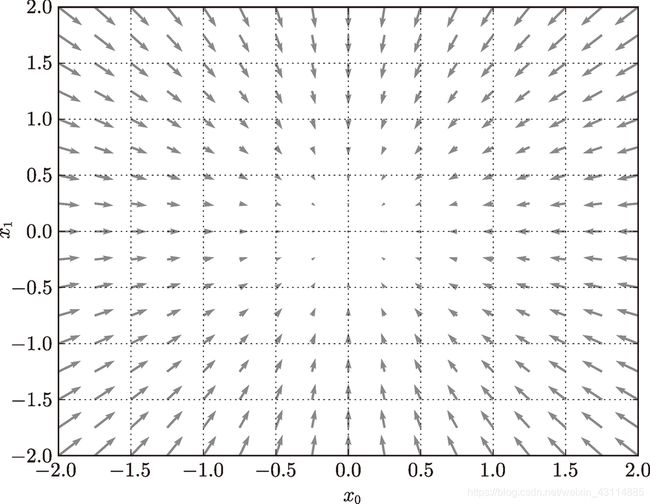
- 梯度指向函数 f ( x 0 , x 1 ) f(x_0,x_1) f(x0,x1) 的“最低处”(最小值)
- 离“最低处”越远,箭头越大
- 实际上,梯度会指向各点处的函数值降低的方向。更严格地讲,梯度指示的方向是各点处的函数值减小最多的方向
- 方向导数 = cos(θ) × 梯度,因此,所有的下降方向中,梯度方向下降最多。
方向导数如: ∂ y ∂ l ⃗ = ∂ y ∂ x 0 ⃗ cos α + ∂ y ∂ x 1 ⃗ cos β \frac{\partial{y}}{\partial{\vec{l}}}=\frac{\partial{y}}{\partial{\vec{x_0}}}\cos{\alpha}+\frac{\partial{y}}{\partial{\vec{x_1}}}\cos{\beta} ∂l∂y=∂x0∂ycosα+∂x1∂ycosβ
4.4.1 梯度法
机器学习和深度学习就是要在学习时找最优参数,而最优参数能使损失函数值最小,所以我们就可以利用梯度。
- 沿着梯度的方向能够最大限度地减小函数的值
- 函数的极小值、最小值以及被称为鞍点(saddle point)的地方,梯度为 0
梯度法:函数的取值从当前位置沿着梯度方向前进一定距离,然后在新的地方重新求梯度,再沿着新梯度方向前进,如此反复,不断地沿梯度方向前进。
梯度法公式:
x 0 = x 0 − η ∂ f ∂ x 0 x_0=x_0-\eta\frac{\partial{f}}{\partial{x_0}} x0=x0−η∂x0∂f
x 1 = x 1 − η ∂ f ∂ x 1 x_1=x_1-\eta\frac{\partial{f}}{\partial{x_1}} x1=x1−η∂x1∂f
η 表示更新量,在神经网络的学习中,称为学习率(learning rate)。学习率决定在一次学习中,应该学习多少,以及在多大程度上更新参数,并且要在学习前和学习时不断确定它(人工设定的超参数)。
python实现:
def gradient_descent(f, init_x, lr=0.01, step_num=100): #lr是学习率,step_num是梯度法重复次数
    x = init_x

    for i in range(step_num):
        grad = numerical_gradient(f, x)
        x -= lr * grad

    return x
使用这个函数可以求函数的极小值,顺利的话,还可以求函数的最小值,如:
def function_2(x): #定义了一个需要两个变量的函数
    return x[0]**2 + x[1]**2

init_x = np.array([-3.0, 4.0])
print(gradient_descent(function_2, init_x=init_x, lr=0.1, step_num=100))
运行结果如下:
[-6.11110793e-10 8.14814391e-10]
非常接近(0,0)
梯度法更新过程,代码在课程的ch04/gradient_method.py里:
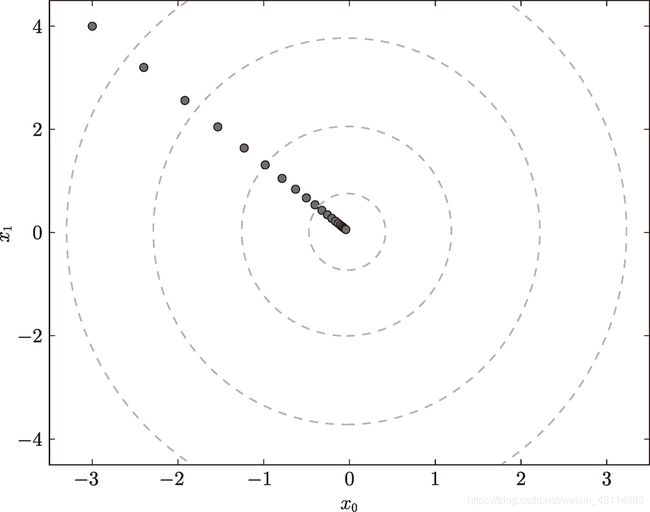
- 学习率过大,每次更新的值会变得很大
- 学习率过小,没怎么更新就结束了
4.4.2 神经网络的梯度
- 损失函数的梯度 ∂ L ∂ W \frac{\partial L}{\partial \boldsymbol{W}} ∂W∂L 的形状和 权重参数 W \boldsymbol{W} W 相同
简单神经网络实现梯度:
import sys, os
sys.path.append(os.pardir)
import numpy as np
from common.functions import softmax, cross_entropy_error #引入softmax函数和交叉熵误差函数
from common.gradient import numerical_gradient #引入梯度函数

class simpleNet:
    def __init__(self):
        self.W = np.random.randn(2,3) # 用高斯分布进行权重初始化

	def predict(self, x):
        return np.dot(x, self.W)

	def loss(self, x, t):
    	z = self.predict(x) #矩阵乘法求加权和到输出层前
		y = softmax(z) #softmax函数输出层激活函数
		loss = cross_entropy_error(y, t) #交叉熵误差函数实现损失函数

		return loss
def f(W):
	return net.loss(x, t)

net = simpleNet()
x = np.array([0.6, 0.9])
p = net.predict(x)
t = np.array([0, 0, 1]) # 正确解标签
dW = numerical_gradient(f, net.W)
print(dW)
运行结果如下:
[[ 0.21924763 0.14356247 -0.36281009]
[ 0.32887144 0.2153437 -0.54421514]]
- ∂ L ∂ w 11 \frac{\partial L}{\partial w_{11}} ∂w11∂L 的值大约是
0.2,将 w 11 w_{11} w11 增加h,那么损失函数的值会增加0.2h,所以应该向负向更新。 - ∂ L ∂ w 23 \frac{\partial L}{\partial w_{23}} ∂w23∂L 对应的值大约是
-0.5,将 w 23 w_{23} w23 增加h,损失函数的值将减小0.5h,所以应该向正向更新,且贡献值比 w 11 w_{11} w11 大。 - lambda表示函数法:
f = lambda w: net.loss(x, t)
dW = numerical_gradient(f, net.W)
4.5 学习算法的实现
本书介绍的神经网络学习步骤:
- 对于随机选择的
mini batch数据,采用随机梯度下降法(stochastic gradient descent)。在深度学习的很多框架中,随机梯度下降法一般由一个名为SGD的函数来实现。
4.5.1 2 层神经网络的类
我们要实现为一个名为 TwoLayerNet 的类,代码在课程的ch04/two_layer_net.py里
import sys, os
sys.path.append(os.pardir)
from common.functions import *
from common.gradient import numerical_gradient

class TwoLayerNet:

    def __init__(self, input_size, hidden_size, output_size,
                 weight_init_std=0.01): #初始化时包含输入层的神经元数、隐藏层的神经元数、输出层的神经元数
        # 初始化权重函数
        self.params = {}
        self.params['W1'] = weight_init_std * \
                            np.random.randn(input_size, hidden_size) #高斯分布的随机数进行权重初始化
        self.params['b1'] = np.zeros(hidden_size)#偏置使用 0 进行初始化
        self.params['W2'] = weight_init_std * \
                            np.random.randn(hidden_size, output_size)
        self.params['b2'] = np.zeros(output_size)

    def predict(self, x): # 神经网络识别函数
        W1, W2 = self.params['W1'], self.params['W2']
        b1, b2 = self.params['b1'], self.params['b2']

        a1 = np.dot(x, W1) + b1
        z1 = sigmoid(a1)
        a2 = np.dot(z1, W2) + b2
        y = softmax(a2)

        return y

    # x:输入数据, t:监督数据
    def loss(self, x, t): #损失函数
        y = self.predict(x)

        return cross_entropy_error(y, t)

    def accuracy(self, x, t): #识别精度函数
        y = self.predict(x)
        y = np.argmax(y, axis=1) #取概率最大值
        t = np.argmax(t, axis=1) #取最大值标签

        accuracy = np.sum(y == t) / float(x.shape[0])
        return accuracy

    # x:输入数据, t:监督数据
    def numerical_gradient(self, x, t): #梯度函数
        loss_W = lambda W: self.loss(x, t)

        grads = {} #grads保存梯度的字典型变量
        grads['W1'] = numerical_gradient(loss_W, self.params['W1'])
        grads['b1'] = numerical_gradient(loss_W, self.params['b1'])
        grads['W2'] = numerical_gradient(loss_W, self.params['W2'])
        grads['b2'] = numerical_gradient(loss_W, self.params['b2'])

        return grads
所有的函数在之前的学习中都已经涉及到了,不再多做赘述。
4.5.2 mini-batch 的实现
使用 MNIST 数据集进行学习,代码在课程的ch04/train_neuralnet.py里
import numpy as np
from dataset.mnist import load_mnist
from two_layer_net import TwoLayerNet

(x_train, t_train), (x_test, t_test) = \ load_mnist(normalize=True, one_hot_
label = True)

train_loss_list = []

# 超参数
iters_num = 10000 #更新的循环次数
train_size = x_train.shape[0] #训练数据大小
batch_size = 100 #要选出的数据大小
learning_rate = 0.1 #学习率

network = TwoLayerNet(input_size=784, hidden_size=50, output_size=10)

for i in range(iters_num):
    # 获取mini-batch
    batch_mask = np.random.choice(train_size, batch_size)
    x_batch = x_train[batch_mask]
    t_batch = t_train[batch_mask]

    # 计算梯度
    grad = network.numerical_gradient(x_batch, t_batch)
    # grad = network.gradient(x_batch, t_batch) # 误差反向传播法

    # 更新参数
    for key in ('W1', 'b1', 'W2', 'b2'):
        network.params[key] -= learning_rate * grad[key]

    # 记录学习过程
    loss = network.loss(x_batch, t_batch)
    train_loss_list.append(loss)
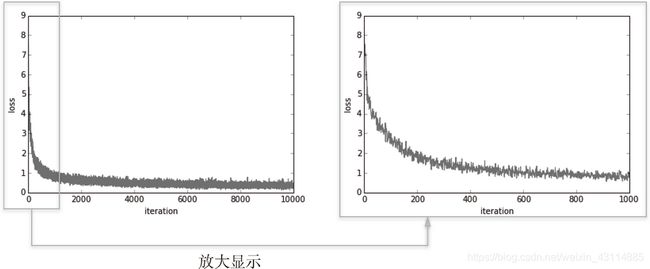
我们可以看到损失函数的值在循环中不断更新,越来越小,这是神经网络正在学习的信号,说明神经网络正在向最优参数拟合。
4.5.3 基于测试数据的评价
除了看损失函数的值这一个信号,还不能确定是否会发生过拟合,所以,我们采取的方法是,每经过一个 epoch,记录下训练数据和测试数据的识别精度。
- epoch:学习中所有训练数据均被使用过一次时的更新次数,在mini-batch中,我们抽取了100个数据,100就是一个epoch,10000次重复的更新中,每到100的倍数时就检验一次识别精度
在4.5.2的代码之上,我们增加以下代码:
train_acc_list = [] #训练数据识别精度数组
test_acc_list = [] #测试数据识别精度数组
# 平均每个epoch的重复次数
iter_per_epoch = max(train_size / batch_size, 1) #epoch大小
...
# 计算每个epoch的识别精度
    if i % iter_per_epoch == 0:
        train_acc = network.accuracy(x_train, t_train)
        test_acc = network.accuracy(x_test, t_test)
        train_acc_list.append(train_acc)#每次的识别精度加入到数组中
        test_acc_list.append(test_acc)
        print("train acc, test acc | " + str(train_acc) + ", " + str(test_acc))
结果得到的训练数据和测试数据的识别精度变化如下:

说明变化参数的过程中,两者识别精度都上升了,而且基本一致,没有发生过拟合现象。
end
- 原书为《深度学习入门 基于Python的理论与实现》作者:斋藤康毅
人民邮电出版社 - 本文章是gitchat的《陆宇杰的训练营:15天共读深度学习》1的课程读书笔记
- 本文章大量引用原书中的内容和训练营课程中的内容作为笔记
《陆宇杰的训练营:15天共读深度学习》 ↩︎
