大数据平台ambari
调研发现网易猛犸、金山云采用的军事ambari,甚至在易观直接把大数据平台中ambari的截图放到了官网上,足见它的影响力有多强。
ambari长啥样子,可以参考使用Apache Ambari管理Hadoop集群
而Ambari 2.7.3与HDP 3.1.0安装过程,虽然这篇文章讲的笔记好,但是实际环境可能更为复杂,系统盘有35G,而数据盘有29T空间,那么ambari以及其他依赖环境应该部署在/appdata中,为了防止错误,那么ambari的用户是否需要新建一个呢,如果安装在root用户下面,很容易犯错。
[root@bigdata-0002 ~]# df -lh
Filesystem                 Size  Used Avail Use% Mounted on
devtmpfs                    32G     0   32G   0% /dev
tmpfs                       32G     0   32G   0% /dev/shm
tmpfs                       32G  8.8M   32G   1% /run
tmpfs                       32G     0   32G   0% /sys/fs/cgroup
/dev/vda1                   40G  2.3G   35G   7% /
tmpfs                      6.3G     0  6.3G   0% /run/user/0
/dev/mapper/vgdata-lvData   29T   20K   28T   1% /appdata
1 创建用户
1.1 创建hadoop用户
将用户的工作目录调整到数据盘
adduser hadoop
passwd hadoop
id hadoop
mkdir -p /appdata/home/hadoop
chown -R hadoop:hadoop /appdata/home/hadoop
usermod -d /appdata/home/hadoop -u 1001 hadoop
rpm -qa |grep finger
yum install finger -y
# 目录更改过来了
[root@bigdata-0002 ~]# finger hadoop
Login: hadoop         			Name:
Directory: /appdata/home/hadoop     	Shell: /bin/bash
Never logged in.
No mail.
No Plan.
chmod -v u+w /etc/sudoers
vi /etc/sudoers
# 添加下面的配置
hadoop    ALL=(ALL)       NOPASSWD:ALL

chmod -v u-w /etc/sudoers
1.2 免密登陆
隔一段时间后,配置免密登陆我总是配置不好,奇怪貌似不是一件很难的事情啊,Linux下实现免密码登录(超详细),
ssh-keygen -t rsa
# .ssh目录的权限必须是700
cd ~/.ssh/
# id_rsa : 生成的私钥文件
# id_rsa.pub : 生成的公钥文件
# know_hosts : 已知的主机公钥清单
# .ssh/authorized_keys文件权限必须是600
cat id_rsa.pub>> authorized_keys
最终参考了CentOS机器之间实现免密互相登陆,执行ssh-keygen -t rsa,还是不用输入passphrase,因为如果有密码的化,在远程登陆的时候回提示让你输入,那还叫什么免密呢?
-bash-4.2$ ssh-keygen -t rsa
Generating public/private rsa key pair.
Enter file in which to save the key (/appdata/home/hadoop/.ssh/id_rsa):
Enter passphrase (empty for no passphrase):
Enter same passphrase again:
Your identification has been saved in /appdata/home/hadoop/.ssh/id_rsa.
Your public key has been saved in /appdata/home/hadoop/.ssh/id_rsa.pub.
The key fingerprint is:

-bash-4.2$ ssh [email protected]
Enter passphrase for key '/appdata/home/hadoop/.ssh/id_rsa':
Last login: Sat Dec 26 16:36:16 2020
接下来,因为服务器之间需要交叉验证,这里需要在每一台机器上执行,因为需要将自己的公钥发给其他的服务器,才能实现免密登陆,可以查看tail /var/log/secure -n 20系统日志
# bg1
ssh-keygen -t rsa
chmod 700 .ssh
chmod 600 .ssh/authorized_keys
ssh-copy-id [email protected]
ssh-copy-id [email protected]
# bg2
ssh-keygen -t rsa
chmod 700 .ssh
chmod 600 .ssh/authorized_keys
ssh-copy-id [email protected]
ssh-copy-id [email protected]
# bg3
ssh-keygen -t rsa
chmod 700 .ssh
chmod 600 .ssh/authorized_keys
ssh-copy-id [email protected]
ssh-copy-id [email protected]

# 其余的服务器,按照上面的操作执行即可
2 安装基础环境
2.1 jdk
先说一下oracle jdk的商业授权,JDK8u202之后,需要商业授权,但不限制个人和开发使用,那么openjdk是否可用呢?OpenJDK和Oracle JDK有什么区别和联系?
在Java SE 8 Archive Downloads (JDK 8u202 and earlier)这个里面选择一个版本,我这里选择了jdk-8u181-linux-x64.tar.gz,jdk安装在root用户下面
2.2 时钟同步
2.2 本地源
Ambari Repositories 2.7.3.0
在主服务器搭建ambari本地源,这里也参考了
wget http://public-repo-1.hortonworks.com/ambari/centos7/2.x/updates/2.7.3.0/ambari-2.7.3.0-centos7.tar.gz
wget http://public-repo-1.hortonworks.com/HDP/centos7/3.x/updates/3.1.0.0/HDP-3.1.0.0-centos7-rpm.tar.gz
wget http://public-repo-1.hortonworks.com/HDP-UTILS-1.1.0.22/repos/centos7/HDP-UTILS-1.1.0.22-centos7.tar.gz
# 创建解压的目录
mkdir -p /appdata/home/hadoop/www/{ambari,hdp/HDP-UTILS-1.1.0.22}

# 这里解压到数据盘,因为文件比较大,云端服务器一般40G,所以不敢轻易往系统盘安装。
tar -zxvf ambari-2.7.3.0-centos7.tar.gz -C /appdata/home/hadoop/www/ambari/
tar -zxvf HDP-3.1.0.0-centos7-rpm.tar.gz -C /appdata/home/hadoop/www/hdp/
tar -zxvf HDP-UTILS-1.1.0.22-centos7.tar.gz -C /appdata/home/hadoop/www/hdp/HDP-UTILS-1.1.0.22/
#
-bash-4.2$ ls -lht
total 8.5G
-rw-rw-r-- 1 hadoop hadoop 8.5G Dec 11  2018 HDP-3.1.0.0-centos7-rpm.tar.gz

-bash-4.2$ ls -lht
total 1.9G
-rw-rw-r-- 1 hadoop hadoop 1.9G Dec 11  2018 ambari-2.7.3.0-centos7.tar.gz
本地的yum源需要通过代理出去,httpd参考centos7.5+Ambari2.7.3部署安装
和nginx参考Ambari 2.7.3与HDP 3.1.0安装过程
yum -y install httpd
service httpd restart
chkconfig httpd on
systemctl status httpd
# httpd默认访问目录是/var/www/html,但是我想改一下,创建软连接
cd /var/www/html
ln -s /appdata/home/hadoop/www/ambari /var/www/html/ambari
ln -s /appdata/home/hadoop/www/hdp /var/www/html/hdp
# 生成本地yum源
yum install createrepo -y
createrepo /appdata/home/hadoop/www/hdp/HDP/centos7/
createrepo /appdata/home/hadoop/www/hdp/HDP-UTILS-1.1.0.22/
另外在所有节点
#
vi /etc/yum.repos.d/ambari.repo

#VERSION_NUMBER=2.7.3.0-139
[ambari-2.7.3.0]
#json.url = http://public-repo-1.hortonworks.com/HDP/hdp_urlinfo.json
name=ambari Version - ambari-2.7.3.0
baseurl=http://bg2.whty.com/ambari/ambari/centos7/2.7.3.0-139/
gpgcheck=1
gpgkey=http://bg2.whty.com/ambari/ambari/centos7/2.7.3.0-139/RPM-GPG-KEY/RPM-GPG-KEY-Jenkins
enabled=1
priority=1
#
vi /etc/yum.repos.d/HDP.repo

#VERSION_NUMBER=3.1.0.0-78
[HDP-3.1.0.0]
name=HDP Version - HDP-3.1.0.0
baseurl=http://bg2.whty.com/hdp/HDP/centos7/
gpgcheck=1
gpgkey=http://bg2.whty.com/hdp/HDP/centos7/3.1.0.0-78/RPM-GPG-KEY/RPM-GPG-KEY-Jenkins
enabled=1
priority=1

[HDP-UTILS-1.1.0.22]
name=HDP-UTILS Version - HDP-UTILS-1.1.0.22
baseurl=http://bg2.whty.com/hdp/HDP-UTILS-1.1.0.22/
gpgcheck=1
gpgkey=http://bg2.whty.com/hdp/HDP-UTILS-1.1.0.22/HDP-UTILS/centos7/1.1.0.22/RPM-GPG-KEY/RPM-GPG-KEY-Jenkins
enabled=1
priority=1
我需要将这个repo配置发送到其他机器上,因为机器很多于是写一个批处理脚本,这里参考了文件批量scp分发脚本,之前并不会shell脚本,现学现用.直接复制过去,倒是很简单,分发过去,要不要执行yum源更新命令呢?
#!/bin/bash
SERVERS="bg3.test.com bg4.test.com bg5.test.com bg6.test.com"
PASSWORD=密码


auto_ssh_copy_file() {
    expect -c "set timeout -1;
        spawn scp /etc/yum.repos.d/ambari.repo root@$1:/etc/yum.repos.d;
        expect {
            *(yes/no)* {send -- yes\r;exp_continue;}
            *assword:* {send -- $2\r;exp_continue;}
            eof        {exit 0;}
        }";
    expect -c "set timeout -1;
        spawn scp /etc/yum.repos.d/HDP.repo root@$1:/etc/yum.repos.d;
        expect {
            *(yes/no)* {send -- yes\r;exp_continue;}
            *assword:* {send -- $2\r;exp_continue;}
            eof        {exit 0;}
        }";
}

# 循环所有的机器,开始copy
ssh_copy_id_to_all() {
    for SERVER in $SERVERS
        do
            auto_ssh_copy_file $SERVER $PASSWORD
        done
}
ssh_copy_id_to_all
2.3 文件限制
打开文件句柄限制 - 所有机器
vim /etc/security/limits.conf
# End of file
* soft nofile 65536
* hard nofile 65536
* soft nproc 131072
* hard nproc 131072
2.4 安装ambari-server
yum install -y ambari-server
# sql语句在这个目录下面
/var/lib/ambari-server/resources/

# 接下来,是要把sql导入到的云数据库中
# 在mac电脑上,把sql脚本下载到本地
scp root@bg2:/var/lib/ambari-server/resources/Ambari-DDL-MySQL-CREATE.sql /Users/dzm/Downloads
# 然后在sql脚本在云数据库中执行
yum install -y mysql-connector-java
ambari-server setup --jdbc-db=mysql --jdbc-driver=/usr/share/java/mysql-connector-java.jar

[root@bg2 ~]# ambari-server setup
Using python  /usr/bin/python
Setup ambari-server
Checking SELinux...
SELinux status is 'disabled'
Customize user account for ambari-server daemon [y/n] (n)? y
Enter user account for ambari-server daemon (root):hadoop
Adjusting ambari-server permissions and ownership...
Checking firewall status...
Checking JDK...
[1] Oracle JDK 1.8 + Java Cryptography Extension (JCE) Policy Files 8
[2] Custom JDK
==============================================================================
Enter choice (1): 2
WARNING: JDK must be installed on all hosts and JAVA_HOME must be valid on all hosts.
WARNING: JCE Policy files are required for configuring Kerberos security. If you plan to use Kerberos,please make sure JCE Unlimited Strength Jurisdiction Policy Files are valid on all hosts.
Path to JAVA_HOME: /appdata/home/hadoop/app/jdk1.8.0_181
Validating JDK on Ambari Server...done.
Check JDK version for Ambari Server...
JDK version found: 8
Minimum JDK version is 8 for Ambari. Skipping to setup different JDK for Ambari Server.
Checking GPL software agreement...
GPL License for LZO: https://www.gnu.org/licenses/old-licenses/gpl-2.0.en.html
Enable Ambari Server to download and install GPL Licensed LZO packages [y/n] (n)? y
Completing setup...
Configuring database...
Enter advanced database configuration [y/n] (n)? y
Configuring database...
==============================================================================
Choose one of the following options:
[1] - PostgreSQL (Embedded)
[2] - Oracle
[3] - MySQL / MariaDB
[4] - PostgreSQL
[5] - Microsoft SQL Server (Tech Preview)
[6] - SQL Anywhere
[7] - BDB
==============================================================================
Enter choice (1): 3
Hostname (localhost): rds.test.com
Port (3306):
Database name (ambari):
Username (ambari):
Enter Database Password (bigdata):
Re-enter password:
Configuring ambari database...
Should ambari use existing default jdbc /usr/share/java/mysql-connector-java.jar [y/n] (y)? y
Configuring remote database connection properties...
WARNING: Before starting Ambari Server, you must run the following DDL directly from the database shell to create the schema: /var/lib/ambari-server/resources/Ambari-DDL-MySQL-CREATE.sql
Proceed with configuring remote database connection properties [y/n] (y)? y
Extracting system views...
.ambari-admin-2.7.3.0.139.jar
...
Ambari repo file contains latest json url http://public-repo-1.hortonworks.com/HDP/hdp_urlinfo.json, updating stacks repoinfos with it...
Adjusting ambari-server permissions and ownership...
Ambari Server 'setup' completed successfully.
You have new mail in /var/spool/mail/root
接着启动ambari
[root@bg2 ~]# ambari-server start
Using python  /usr/bin/python
Starting ambari-server
Ambari Server running with administrator privileges.
Organizing resource files at /var/lib/ambari-server/resources...
Ambari database consistency check started...
Server PID at: /var/run/ambari-server/ambari-server.pid
Server out at: /var/log/ambari-server/ambari-server.out
Server log at: /var/log/ambari-server/ambari-server.log
Waiting for server start................................
Server started listening on 8080

DB configs consistency check: no errors and warnings were found.
Ambari Server 'start' completed successfully.
安装成功后,日志是安装在系统盘,如果想更改日志安装目录
vim /etc/ambari-server/conf/log4j.properties
#ambari.log.dir=${ambari.root.dir}/var/log/ambari-server
ambari.log.dir=/appdata/home/hadoop/logs/ambari-server
mac下面的sz命令提示B00000000000000,参考解决在Mac下iTerm2终端使用sz和rz命令报错问题和Mac OS 下 iTerm 实现使用 rz/sz 命令从服务器上传下载文件
[root@bg2 resources]# sz Ambari-DDL-MySQL-CREATE.sql
?**B00000000000000

#
cd /usr/local/bin
git clone https://github.com/aikuyun/iterm2-zmodem
chmod +x  /usr/local/bin/iterm2-zmodem

# 安装iterm2
brew install iterm2

# 打开 iTerm2 的 Preferences-> Profiles -> Default -> Advanced -> Triggers 的 Edit 按钮,输入下面的配置信息

Regular expression: rz waiting to receive.\*\*B0100
Action: Run Silent Coprocess
Parameters: /usr/local/bin/iterm2-zmodem/iterm2-send-zmodem.sh
Instant: checked

Regular expression: \*\*B00000000000000
Action: Run Silent Coprocess
Parameters: /usr/local/bin/iterm2-zmodem/iterm2-recv-zmodem.sh
Instant: checked
2.5 安装ambari-agent
参考Ambari学习笔记-删除ambari
yum install -y ambari-agent

# 删除重装
yum remove -y ambari-agent

rm -rf /var/lib/ambari-agent
rm -rf /var/log/ambari-agent
rm -rf /etc/ambari-agent
rm -rf /var/run/ambari-agent
rm -rf /usr/lib/ambari-agent
需要在17台机器上都执行这个命令,因为刚学了expect,于是写个脚本批量执行,这样就不用登陆到每台机器
# 一般云服务器应该都有
rpm -qa | grep expect
yum install expect
2.6 部署hdp
这里将ambari-server的id_rsa中的内容复制进来,
http://bg2.test.com/hdp/HDP/centos7
http://public-repo-1.hortonworks.com/HDP-GPL/centos7/3.x/updates/3.1.0.0
http://bg2.test.com/hdp/HDP-UTILS-1.1.0.22

进入下一步的时候,除了自身节点,其他节点都报错,详细日志如下,应该是权限问题,因为我的免密登陆是hadoop用户中执行的,而ambari-server是yum安装,在root用户下面。
下面的问题很好解决,直接sudo chown hadoop:hadoop /var/lib/ambari-agent/tmp/create-python-wrap.sh即可
==========================
Command start time 2021-01-03 10:06:18
chmod: changing permissions of ‘/var/lib/ambari-agent/tmp/create-python-wrap.sh’: Operation not permitted

Connection to bg1.test.com closed.
SSH command execution finished
host=bg1.test.com, exitcode=1
Command end time 2021-01-03 10:06:19
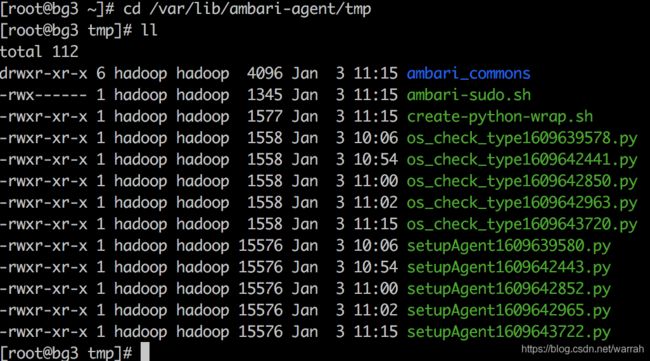
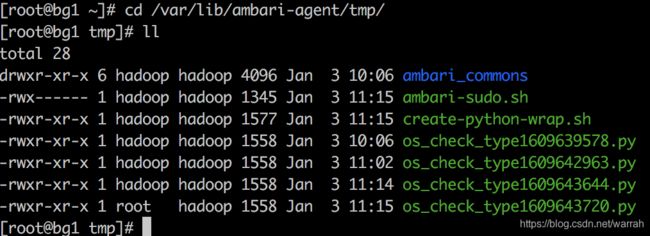
但是新的问题又诞生了,每次在重新执行,就会创建新的临时文件,刚好权限跟其他的服务器节点不一样,看下图。
INFO:root:BootStrapping hosts ['bg1.test.com'] using /usr/lib/ambari-server/lib/ambari_server cluster primary OS: redhat7 with user 'hadoop'with ssh Port '2
2' sshKey File /var/run/ambari-server/bootstrap/18/sshKey password File null using tmp dir /var/run/ambari-server/bootstrap/18 ambari: bg2.test.com; server_
port: 8080; ambari version: 2.7.3.0; user_run_as: root
INFO:root:Executing parallel bootstrap
ERROR:root:ERROR: Bootstrap of host bg1.test.com fails because previous action finished with non-zero exit code (1)
ERROR MESSAGE: Connection to bg1.test.com closed.

STDOUT: chmod: changing permissions of ‘/var/lib/ambari-agent/tmp/os_check_type1609670734.py’: Operation not permitted

Connection to bg1.test.com closed.

INFO:root:Finished parallel bootstrap
在运行正常的机器上,看到文件都是hadoop用户下面

有异常的服务器,居然多了一个root用户,解决这个问题,我直接进入服务器后,登陆后成功了,不能通过ssh进去,没有细推理为什么,但是结果是ok的

再看一下只装了ambari-agent报的错误,意思是连不上ambari-server,原因是云上的安全规则做了限制,配置入网方向开放8080给内网即可,
Command start time 2021-01-03 10:06:20
Host registration aborted. Ambari Agent host cannot reach Ambari Server 'bg2.test.com:8080'. Please check the network connectivity between the Ambari Agent host and the Ambari Server
2.7 host