- 机器学习与深度学习间关系与区别
ℒℴѵℯ心·动ꦿ໊ོ꫞
人工智能学习深度学习python
一、机器学习概述定义机器学习(MachineLearning,ML)是一种通过数据驱动的方法,利用统计学和计算算法来训练模型,使计算机能够从数据中学习并自动进行预测或决策。机器学习通过分析大量数据样本,识别其中的模式和规律,从而对新的数据进行判断。其核心在于通过训练过程,让模型不断优化和提升其预测准确性。主要类型1.监督学习(SupervisedLearning)监督学习是指在训练数据集中包含输入
- 理解Gunicorn:Python WSGI服务器的基石
范范0825
ipythonlinux运维
理解Gunicorn:PythonWSGI服务器的基石介绍Gunicorn,全称GreenUnicorn,是一个为PythonWSGI(WebServerGatewayInterface)应用设计的高效、轻量级HTTP服务器。作为PythonWeb应用部署的常用工具,Gunicorn以其高性能和易用性著称。本文将介绍Gunicorn的基本概念、安装和配置,帮助初学者快速上手。1.什么是Gunico
- Python数据分析与可视化实战指南
William数据分析
pythonpython数据
在数据驱动的时代,Python因其简洁的语法、强大的库生态系统以及活跃的社区,成为了数据分析与可视化的首选语言。本文将通过一个详细的案例,带领大家学习如何使用Python进行数据分析,并通过可视化来直观呈现分析结果。一、环境准备1.1安装必要库在开始数据分析和可视化之前,我们需要安装一些常用的库。主要包括pandas、numpy、matplotlib和seaborn等。这些库分别用于数据处理、数学
- python os.environ
江湖偌大
python深度学习
os.environ['TF_CPP_MIN_LOG_LEVEL']='0'#默认值,输出所有信息os.environ['TF_CPP_MIN_LOG_LEVEL']='1'#屏蔽通知信息(INFO)os.environ['TF_CPP_MIN_LOG_LEVEL']='2'#屏蔽通知信息和警告信息(INFO\WARNING)os.environ['TF_CPP_MIN_LOG_LEVEL']='
- Python中os.environ基本介绍及使用方法
鹤冲天Pro
#Pythonpython服务器开发语言
文章目录python中os.environos.environ简介os.environ进行环境变量的增删改查python中os.environ的使用详解1.简介2.key字段详解2.1常见key字段3.os.environ.get()用法4.环境变量的增删改查和判断是否存在4.1新增环境变量4.2更新环境变量4.3获取环境变量4.4删除环境变量4.5判断环境变量是否存在python中os.envi
- Pyecharts数据可视化大屏:打造沉浸式数据分析体验
我的运维人生
信息可视化数据分析数据挖掘运维开发技术共享
Pyecharts数据可视化大屏:打造沉浸式数据分析体验在当今这个数据驱动的时代,如何将海量数据以直观、生动的方式展现出来,成为了数据分析师和企业决策者关注的焦点。Pyecharts,作为一款基于Python的开源数据可视化库,凭借其丰富的图表类型、灵活的配置选项以及高度的定制化能力,成为了构建数据可视化大屏的理想选择。本文将深入探讨如何利用Pyecharts打造数据可视化大屏,并通过实际代码案例
- Python教程:一文了解使用Python处理XPath
旦莫
Python进阶python开发语言
目录1.环境准备1.1安装lxml1.2验证安装2.XPath基础2.1什么是XPath?2.2XPath语法2.3示例XML文档3.使用lxml解析XML3.1解析XML文档3.2查看解析结果4.XPath查询4.1基本路径查询4.2使用属性查询4.3查询多个节点5.XPath的高级用法5.1使用逻辑运算符5.2使用函数6.实战案例6.1从网页抓取数据6.1.1安装Requests库6.1.2代
- python os.environ_python os.environ 读取和设置环境变量
weixin_39605414
pythonos.environ
>>>importos>>>os.environ.keys()['LC_NUMERIC','GOPATH','GOROOT','GOBIN','LESSOPEN','SSH_CLIENT','LOGNAME','USER','HOME','LC_PAPER','PATH','DISPLAY','LANG','TERM','SHELL','J2REDIR','LC_MONETARY','QT_QPA
- 将cmd中命令输出保存为txt文本文件
落难Coder
Windowscmdwindow
最近深度学习本地的训练中我们常常要在命令行中运行自己的代码,无可厚非,我们有必要保存我们的炼丹结果,但是复制命令行输出到txt是非常麻烦的,其实Windows下的命令行为我们提供了相应的操作。其基本的调用格式就是:运行指令>输出到的文件名称或者具体保存路径测试下,我打开cmd并且ping一下百度:pingwww.baidu.com>./data.txt看下相同目录下data.txt的输出:如果你再
- 使用Faiss进行高效相似度搜索
llzwxh888
faisspython
在现代AI应用中,快速和高效的相似度搜索是至关重要的。Faiss(FacebookAISimilaritySearch)是一个专门用于快速相似度搜索和聚类的库,特别适用于高维向量。本文将介绍如何使用Faiss来进行相似度搜索,并结合Python代码演示其基本用法。什么是Faiss?Faiss是一个由FacebookAIResearch团队开发的开源库,主要用于高维向量的相似性搜索和聚类。Faiss
- python是什么意思中文-在python中%是什么意思
编程大乐趣
Python中%有两种:1、数值运算:%代表取模,返回除法的余数。如:>>>7%212、%操作符(字符串格式化,stringformatting),说明如下:%[(name)][flags][width].[precision]typecode(name)为命名flags可以有+,-,''或0。+表示右对齐。-表示左对齐。''为一个空格,表示在正数的左侧填充一个空格,从而与负数对齐。0表示使用0填
- Day1笔记-Python简介&标识符和关键字&输入输出
~在杰难逃~
Pythonpython开发语言大数据数据分析数据挖掘
大家好,从今天开始呢,杰哥开展一个新的专栏,当然,数据分析部分也会不定时更新的,这个新的专栏主要是讲解一些Python的基础语法和知识,帮助0基础的小伙伴入门和学习Python,感兴趣的小伙伴可以开始认真学习啦!一、Python简介【了解】1.计算机工作原理编程语言就是用来定义计算机程序的形式语言。我们通过编程语言来编写程序代码,再通过语言处理程序执行向计算机发送指令,让计算机完成对应的工作,编程
- python八股文面试题分享及解析(1)
Shawn________
python
#1.'''a=1b=2不用中间变量交换a和b'''#1.a=1b=2a,b=b,aprint(a)print(b)结果:21#2.ll=[]foriinrange(3):ll.append({'num':i})print(11)结果:#[{'num':0},{'num':1},{'num':2}]#3.kk=[]a={'num':0}foriinrange(3):#0,12#可变类型,不仅仅改变
- 每日算法&面试题,大厂特训二十八天——第二十天(树)
肥学
⚡算法题⚡面试题每日精进java算法数据结构
目录标题导读算法特训二十八天面试题点击直接资料领取导读肥友们为了更好的去帮助新同学适应算法和面试题,最近我们开始进行专项突击一步一步来。上一期我们完成了动态规划二十一天现在我们进行下一项对各类算法进行二十八天的一个小总结。还在等什么快来一起肥学进行二十八天挑战吧!!特别介绍小白练手专栏,适合刚入手的新人欢迎订阅编程小白进阶python有趣练手项目里面包括了像《机器人尬聊》《恶搞程序》这样的有趣文章
- Python快速入门 —— 第三节:类与对象
孤华暗香
Python快速入门python开发语言
第三节:类与对象目标:了解面向对象编程的基础概念,并学会如何定义类和创建对象。内容:类与对象:定义类:class关键字。类的构造函数:__init__()。类的属性和方法。对象的创建与使用。示例:classStudent:def__init__(self,name,age,major):self.name&#
- pyecharts——绘制柱形图折线图
2224070247
信息可视化pythonjava数据可视化
一、pyecharts概述自2013年6月百度EFE(ExcellentFrontEnd)数据可视化团队研发的ECharts1.0发布到GitHub网站以来,ECharts一直备受业界权威的关注并获得广泛好评,成为目前成熟且流行的数据可视化图表工具,被应用到诸多数据可视化的开发领域。Python作为数据分析领域最受欢迎的语言,也加入ECharts的使用行列,并研发出方便Python开发者使用的数据
- Python 实现图片裁剪(附代码) | Python工具
剑客阿良_ALiang
前言本文提供将图片按照自定义尺寸进行裁剪的工具方法,一如既往的实用主义。环境依赖ffmpeg环境安装,可以参考我的另一篇文章:windowsffmpeg安装部署_阿良的博客-CSDN博客本文主要使用到的不是ffmpeg,而是ffprobe也在上面这篇文章中的zip包中。ffmpy安装:pipinstallffmpy-ihttps://pypi.douban.com/simple代码不废话了,上代码
- 【华为OD技术面试真题 - 技术面】- python八股文真题题库(4)
算法大师
华为od面试python
华为OD面试真题精选专栏:华为OD面试真题精选目录:2024华为OD面试手撕代码真题目录以及八股文真题目录文章目录华为OD面试真题精选**1.Python中的`with`**用途和功能自动资源管理示例:文件操作上下文管理协议示例代码工作流程解析优点2.\_\_new\_\_和**\_\_init\_\_**区别__new____init__区别总结3.**切片(Slicing)操作**基本切片语法
- python os 环境变量
CV矿工
python开发语言numpy
环境变量:环境变量是程序和操作系统之间的通信方式。有些字符不宜明文写进代码里,比如数据库密码,个人账户密码,如果写进自己本机的环境变量里,程序用的时候通过os.environ.get()取出来就行了。os.environ是一个环境变量的字典。环境变量的相关操作importos"""设置/修改环境变量:os.environ[‘环境变量名称’]=‘环境变量值’#其中key和value均为string类
- Python爬虫解析工具之xpath使用详解
eqa11
python爬虫开发语言
文章目录Python爬虫解析工具之xpath使用详解一、引言二、环境准备1、插件安装2、依赖库安装三、xpath语法详解1、路径表达式2、通配符3、谓语4、常用函数四、xpath在Python代码中的使用1、文档树的创建2、使用xpath表达式3、获取元素内容和属性五、总结Python爬虫解析工具之xpath使用详解一、引言在Python爬虫开发中,数据提取是一个至关重要的环节。xpath作为一门
- 【华为OD技术面试真题 - 技术面】- python八股文真题题库(1)
算法大师
华为od面试python
华为OD面试真题精选专栏:华为OD面试真题精选目录:2024华为OD面试手撕代码真题目录以及八股文真题目录文章目录华为OD面试真题精选1.数据预处理流程数据预处理的主要步骤工具和库2.介绍线性回归、逻辑回归模型线性回归(LinearRegression)模型形式:关键点:逻辑回归(LogisticRegression)模型形式:关键点:参数估计与评估:3.python浅拷贝及深拷贝浅拷贝(Shal
- 数字里的世界17期:2021年全球10大顶级数据中心,中国移动榜首
张三叨
你知道吗?2016年,全球的数据中心共计用电4160亿千瓦时,比整个英国的发电量还多40%!前言每天,我们都会创造超过250万TB的数据。并且随着物联网(IOT)的不断普及,这一数据将持续增长。如此庞大的数据被存储在被称为“数据中心”的专用设施中。虽然最早的数据中心建于20世纪40年代,但直到1997-2000年的互联网泡沫期间才逐渐成为主流。当前人类的技术,比如人工智能和机器学习,已经将我们推向
- nosql数据库技术与应用知识点
皆过客,揽星河
NoSQLnosql数据库大数据数据分析数据结构非关系型数据库
Nosql知识回顾大数据处理流程数据采集(flume、爬虫、传感器)数据存储(本门课程NoSQL所处的阶段)Hdfs、MongoDB、HBase等数据清洗(入仓)Hive等数据处理、分析(Spark、Flink等)数据可视化数据挖掘、机器学习应用(Python、SparkMLlib等)大数据时代存储的挑战(三高)高并发(同一时间很多人访问)高扩展(要求随时根据需求扩展存储)高效率(要求读写速度快)
- 《Python数据分析实战终极指南》
xjt921122
python数据分析开发语言
对于分析师来说,大家在学习Python数据分析的路上,多多少少都遇到过很多大坑**,有关于技能和思维的**:Excel已经没办法处理现有的数据量了,应该学Python吗?找了一大堆Python和Pandas的资料来学习,为什么自己动手就懵了?跟着比赛类公开数据分析案例练了很久,为什么当自己面对数据需求还是只会数据处理而没有分析思路?学了对比、细分、聚类分析,也会用PEST、波特五力这类分析法,为啥
- Python中深拷贝与浅拷贝的区别
yuxiaoyu.
转自:http://blog.csdn.net/u014745194/article/details/70271868定义:在Python中对象的赋值其实就是对象的引用。当创建一个对象,把它赋值给另一个变量的时候,python并没有拷贝这个对象,只是拷贝了这个对象的引用而已。浅拷贝:拷贝了最外围的对象本身,内部的元素都只是拷贝了一个引用而已。也就是,把对象复制一遍,但是该对象中引用的其他对象我不复
- Python开发常用的三方模块如下:
换个网名有点难
python开发语言
Python是一门功能强大的编程语言,拥有丰富的第三方库,这些库为开发者提供了极大的便利。以下是100个常用的Python库,涵盖了多个领域:1、NumPy,用于科学计算的基础库。2、Pandas,提供数据结构和数据分析工具。3、Matplotlib,一个绘图库。4、Scikit-learn,机器学习库。5、SciPy,用于数学、科学和工程的库。6、TensorFlow,由Google开发的开源机
- Python编译器
鹿鹿~
Python编译器Pythonpython开发语言后端
嘿嘿嘿我又来了啊有些小盆友可能不知道Python其实是有编译器的,也就是PyCharm。你们可能会问到这个是干嘛的又不可以吃也不可以穿好像没有什么用,其实你还说对了这个还真的不可以吃也不可以穿,但是它用来干嘛的呢。用来编译你所打出的代码进行运行(可能这里说的有点不对但是只是个人认为)现在我们来说说PyCharm是用来干嘛的。PyCharm是一种PythonIDE,带有一整套可以帮助用户在使用Pyt
- 一文掌握python面向对象魔术方法(二)
程序员neil
pythonpython开发语言
接上篇:一文掌握python面向对象魔术方法(一)-CSDN博客目录六、迭代和序列化:1、__iter__(self):定义迭代器,使得类可以被for循环迭代。2、__getitem__(self,key):定义索引操作,如obj[key]。3、__setitem__(self,key,value):定义赋值操作,如obj[key]=value。4、__delitem__(self,key):定义
- 一文掌握python常用的list(列表)操作
程序员neil
pythonpython开发语言
目录一、创建列表1.直接创建列表:2.使用list()构造器3.使用列表推导式4.创建空列表二、访问列表元素1.列表支持通过索引访问元素,索引从0开始:2.还可以使用切片操作访问列表的一部分:三、修改列表元素四、添加元素1.append():在末尾添加元素2.insert():在指定位置插入元素五、删除元素1.del:删除指定位置的元素2.remove():删除指定值的第一个匹配项3.pop():
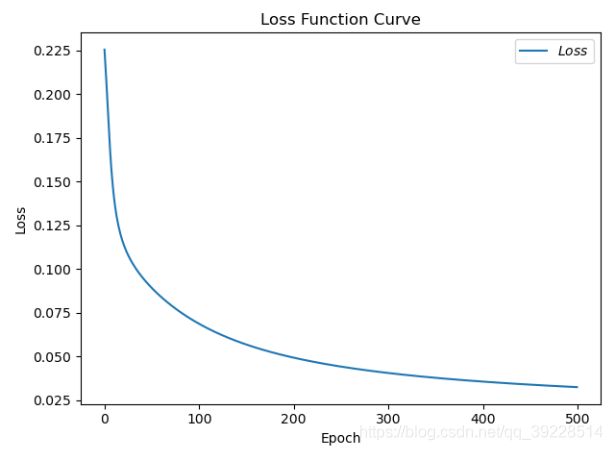
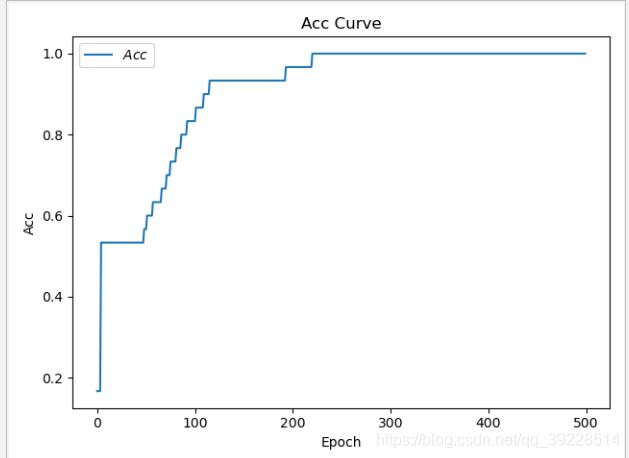
- Python实现简单的机器学习算法
master_chenchengg
pythonpython办公效率python开发IT
Python实现简单的机器学习算法开篇:初探机器学习的奇妙之旅搭建环境:一切从安装开始必备工具箱第一步:安装Anaconda和JupyterNotebook小贴士:如何配置Python环境变量算法初体验:从零开始的Python机器学习线性回归:让数据说话数据准备:从哪里找数据编码实战:Python实现线性回归模型评估:如何判断模型好坏逻辑回归:从分类开始理论入门:什么是逻辑回归代码实现:使用skl
- scala的option和some
矮蛋蛋
编程scala
原文地址:
http://blog.sina.com.cn/s/blog_68af3f090100qkt8.html
对于学习 Scala 的 Java™ 开发人员来说,对象是一个比较自然、简单的入口点。在 本系列 前几期文章中,我介绍了 Scala 中一些面向对象的编程方法,这些方法实际上与 Java 编程的区别不是很大。我还向您展示了 Scala 如何重新应用传统的面向对象概念,找到其缺点
- NullPointerException
Cb123456
androidBaseAdapter
java.lang.NullPointerException: Attempt to invoke virtual method 'int android.view.View.getImportantForAccessibility()' on a null object reference
出现以上异常.然后就在baidu上
- PHP使用文件和目录
天子之骄
php文件和目录读取和写入php验证文件php锁定文件
PHP使用文件和目录
1.使用include()包含文件
(1):使用include()从一个被包含文档返回一个值
(2):在控制结构中使用include()
include_once()函数需要一个包含文件的路径,此外,第一次调用它的情况和include()一样,如果在脚本执行中再次对同一个文件调用,那么这个文件不会再次包含。
在php.ini文件中设置
- SQL SELECT DISTINCT 语句
何必如此
sql
SELECT DISTINCT 语句用于返回唯一不同的值。
SQL SELECT DISTINCT 语句
在表中,一个列可能会包含多个重复值,有时您也许希望仅仅列出不同(distinct)的值。
DISTINCT 关键词用于返回唯一不同的值。
SQL SELECT DISTINCT 语法
SELECT DISTINCT column_name,column_name
F
- java冒泡排序
3213213333332132
java冒泡排序
package com.algorithm;
/**
* @Description 冒泡
* @author FuJianyong
* 2015-1-22上午09:58:39
*/
public class MaoPao {
public static void main(String[] args) {
int[] mao = {17,50,26,18,9,10
- struts2.18 +json,struts2-json-plugin-2.1.8.1.jar配置及问题!
7454103
DAOspringAjaxjsonqq
struts2.18 出来有段时间了! (貌似是 稳定版)
闲时研究下下! 貌似 sruts2 搭配 json 做 ajax 很吃香!
实践了下下! 不当之处请绕过! 呵呵
网上一大堆 struts2+json 不过大多的json 插件 都是 jsonplugin.34.jar
strut
- struts2 数据标签说明
darkranger
jspbeanstrutsservletScheme
数据标签主要用于提供各种数据访问相关的功能,包括显示一个Action里的属性,以及生成国际化输出等功能
数据标签主要包括:
action :该标签用于在JSP页面中直接调用一个Action,通过指定executeResult参数,还可将该Action的处理结果包含到本页面来。
bean :该标签用于创建一个javabean实例。如果指定了id属性,则可以将创建的javabean实例放入Sta
- 链表.简单的链表节点构建
aijuans
编程技巧
/*编程环境WIN-TC*/ #include "stdio.h" #include "conio.h"
#define NODE(name, key_word, help) \ Node name[1]={{NULL, NULL, NULL, key_word, help}}
typedef struct node { &nbs
- tomcat下jndi的三种配置方式
avords
tomcat
jndi(Java Naming and Directory Interface,Java命名和目录接口)是一组在Java应用中访问命名和目录服务的API。命名服务将名称和对象联系起来,使得我们可以用名称
访问对象。目录服务是一种命名服务,在这种服务里,对象不但有名称,还有属性。
tomcat配置
- 关于敏捷的一些想法
houxinyou
敏捷
从网上看到这样一句话:“敏捷开发的最重要目标就是:满足用户多变的需求,说白了就是最大程度的让客户满意。”
感觉表达的不太清楚。
感觉容易被人误解的地方主要在“用户多变的需求”上。
第一种多变,实际上就是没有从根本上了解了用户的需求。用户的需求实际是稳定的,只是比较多,也比较混乱,用户一般只能了解自己的那一小部分,所以没有用户能清楚的表达出整体需求。而由于各种条件的,用户表达自己那一部分时也有
- 富养还是穷养,决定孩子的一生
bijian1013
教育人生
是什么决定孩子未来物质能否丰盛?为什么说寒门很难出贵子,三代才能出贵族?真的是父母必须有钱,才能大概率保证孩子未来富有吗?-----作者:@李雪爱与自由
事实并非由物质决定,而是由心灵决定。一朋友富有而且修养气质很好,兄弟姐妹也都如此。她的童年时代,物质上大家都很贫乏,但妈妈总是保持生活中的美感,时不时给孩子们带回一些美好小玩意,从来不对孩子传递生活艰辛、金钱来之不易、要懂得珍惜
- oracle 日期时间格式转化
征客丶
oracle
oracle 系统时间有 SYSDATE 与 SYSTIMESTAMP;
SYSDATE:不支持毫秒,取的是系统时间;
SYSTIMESTAMP:支持毫秒,日期,时间是给时区转换的,秒和毫秒是取的系统的。
日期转字符窜:
一、不取毫秒:
TO_CHAR(SYSDATE, 'YYYY-MM-DD HH24:MI:SS')
简要说明,
YYYY 年
MM 月
- 【Scala六】分析Spark源代码总结的Scala语法四
bit1129
scala
1. apply语法
FileShuffleBlockManager中定义的类ShuffleFileGroup,定义:
private class ShuffleFileGroup(val shuffleId: Int, val fileId: Int, val files: Array[File]) {
...
def apply(bucketId
- Erlang中有意思的bug
bookjovi
erlang
代码中常有一些很搞笑的bug,如下面的一行代码被调用两次(Erlang beam)
commit f667e4a47b07b07ed035073b94d699ff5fe0ba9b
Author: Jovi Zhang <
[email protected]>
Date: Fri Dec 2 16:19:22 2011 +0100
erts:
- 移位打印10进制数转16进制-2008-08-18
ljy325
java基础
/**
* Description 移位打印10进制的16进制形式
* Creation Date 15-08-2008 9:00
* @author 卢俊宇
* @version 1.0
*
*/
public class PrintHex {
// 备选字符
static final char di
- 读《研磨设计模式》-代码笔记-组合模式
bylijinnan
java设计模式
声明: 本文只为方便我个人查阅和理解,详细的分析以及源代码请移步 原作者的博客http://chjavach.iteye.com/
import java.util.ArrayList;
import java.util.List;
abstract class Component {
public abstract void printStruct(Str
- 利用cmd命令将.class文件打包成jar
chenyu19891124
cmdjar
cmd命令打jar是如下实现:
在运行里输入cmd,利用cmd命令进入到本地的工作盘符。(如我的是D盘下的文件有此路径 D:\workspace\prpall\WEB-INF\classes)
现在是想把D:\workspace\prpall\WEB-INF\classes路径下所有的文件打包成prpall.jar。然后继续如下操作:
cd D: 回车
cd workspace/prpal
- [原创]JWFD v0.96 工作流系统二次开发包 for Eclipse 简要说明
comsci
eclipse设计模式算法工作swing
JWFD v0.96 工作流系统二次开发包 for Eclipse 简要说明
&nb
- SecureCRT右键粘贴的设置
daizj
secureCRT右键粘贴
一般都习惯鼠标右键自动粘贴的功能,对于SecureCRT6.7.5 ,这个功能也已经是默认配置了。
老版本的SecureCRT其实也有这个功能,只是不是默认设置,很多人不知道罢了。
菜单:
Options->Global Options ...->Terminal
右边有个Mouse的选项块。
Copy on Select
Paste on Right/Middle
- Linux 软链接和硬链接
dongwei_6688
linux
1.Linux链接概念Linux链接分两种,一种被称为硬链接(Hard Link),另一种被称为符号链接(Symbolic Link)。默认情况下,ln命令产生硬链接。
【硬连接】硬连接指通过索引节点来进行连接。在Linux的文件系统中,保存在磁盘分区中的文件不管是什么类型都给它分配一个编号,称为索引节点号(Inode Index)。在Linux中,多个文件名指向同一索引节点是存在的。一般这种连
- DIV底部自适应
dcj3sjt126com
JavaScript
<!DOCTYPE html PUBLIC "-//W3C//DTD XHTML 1.0 Transitional//EN" "http://www.w3.org/TR/xhtml1/DTD/xhtml1-transitional.dtd">
<html xmlns="http://www.w3.org/1999/xhtml&q
- Centos6.5使用yum安装mysql——快速上手必备
dcj3sjt126com
mysql
第1步、yum安装mysql
[root@stonex ~]# yum -y install mysql-server
安装结果:
Installed:
mysql-server.x86_64 0:5.1.73-3.el6_5 &nb
- 如何调试JDK源码
frank1234
jdk
相信各位小伙伴们跟我一样,想通过JDK源码来学习Java,比如collections包,java.util.concurrent包。
可惜的是sun提供的jdk并不能查看运行中的局部变量,需要重新编译一下rt.jar。
下面是编译jdk的具体步骤:
1.把C:\java\jdk1.6.0_26\sr
- Maximal Rectangle
hcx2013
max
Given a 2D binary matrix filled with 0's and 1's, find the largest rectangle containing all ones and return its area.
public class Solution {
public int maximalRectangle(char[][] matrix)
- Spring MVC测试框架详解——服务端测试
jinnianshilongnian
spring mvc test
随着RESTful Web Service的流行,测试对外的Service是否满足期望也变的必要的。从Spring 3.2开始Spring了Spring Web测试框架,如果版本低于3.2,请使用spring-test-mvc项目(合并到spring3.2中了)。
Spring MVC测试框架提供了对服务器端和客户端(基于RestTemplate的客户端)提供了支持。
&nbs
- Linux64位操作系统(CentOS6.6)上如何编译hadoop2.4.0
liyong0802
hadoop
一、准备编译软件
1.在官网下载jdk1.7、maven3.2.1、ant1.9.4,解压设置好环境变量就可以用。
环境变量设置如下:
(1)执行vim /etc/profile
(2)在文件尾部加入:
export JAVA_HOME=/home/spark/jdk1.7
export MAVEN_HOME=/ho
- StatusBar 字体白色
pangyulei
status
[[UIApplication sharedApplication] setStatusBarStyle:UIStatusBarStyleLightContent];
/*you'll also need to set UIViewControllerBasedStatusBarAppearance to NO in the plist file if you use this method
- 如何分析Java虚拟机死锁
sesame
javathreadoracle虚拟机jdbc
英文资料:
Thread Dump and Concurrency Locks
Thread dumps are very useful for diagnosing synchronization related problems such as deadlocks on object monitors. Ctrl-\ on Solaris/Linux or Ctrl-B
- 位运算简介及实用技巧(一):基础篇
tw_wangzhengquan
位运算
http://www.matrix67.com/blog/archives/263
去年年底写的关于位运算的日志是这个Blog里少数大受欢迎的文章之一,很多人都希望我能不断完善那篇文章。后来我看到了不少其它的资料,学习到了更多关于位运算的知识,有了重新整理位运算技巧的想法。从今天起我就开始写这一系列位运算讲解文章,与其说是原来那篇文章的follow-up,不如说是一个r
- jsearch的索引文件结构
yangshangchuan
搜索引擎jsearch全文检索信息检索word分词
jsearch是一个高性能的全文检索工具包,基于倒排索引,基于java8,类似于lucene,但更轻量级。
jsearch的索引文件结构定义如下:
1、一个词的索引由=分割的三部分组成: 第一部分是词 第二部分是这个词在多少