MMDetection自定义双主干Transformer模型(一)
目录
1、添加自定义的主干网络
2、导入写好的主干网络
3、写配置文件来进行实验
基于自己的毕设想法,今天开始研究如何使用MMDetection构建自己的模型。
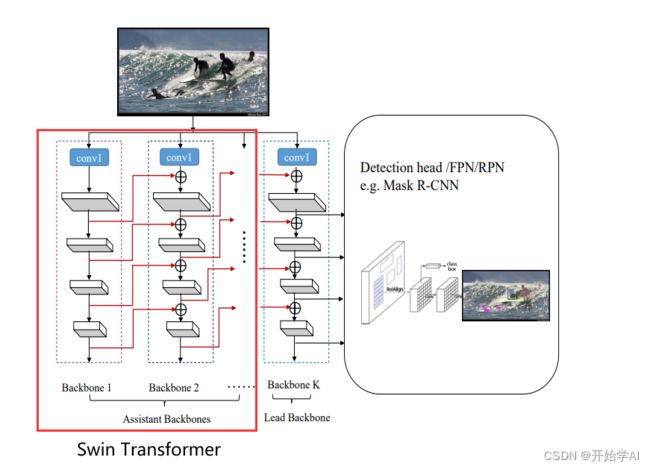
今天的想法是构建如下的双主干网络,主干网络采用Swin Transformer,直接开始记录。
1、添加自定义的主干网络
- 在 mmdet/models/backbones文件夹下新建一份模型文件,这里我新建了一个双主干swin transformer文件,命名为dswin.py。
- 然后在dswin.py文件里添加自己的内容,由于代码过长,这里贴出重要部分的前向过程
import torch.nn as nn


class DSwin(nn.Module):

    def __init__(self, arg1, arg2):
        pass

    def forward(self, x):
        """Forward function."""

        """1、做第一次的swin特征提取"""
        out1 = list(self.swin1(x))   # 将输出转换为列表 因为元组不能修改
        out1[0] = nn.Upsample(scale_factor=4, mode='bilinear', align_corners=True)(out1[0])   # 恢复到原图
        out1[1] = nn.Upsample(scale_factor=2, mode='bilinear', align_corners=True)(out1[1])
        out1[2] = nn.Upsample(scale_factor=2, mode='bilinear', align_corners=True)(out1[2])
        out1[3] = nn.Upsample(scale_factor=2, mode='bilinear', align_corners=True)(out1[3])


        '''2、得到上采样的特征后 与第二主干的特征图进行重组 过程是一边做特征提取 一边做特征融合'''
        # x = x + self.change_channels[0](out1[0])
        # print(x.shape)
        x = self.patch_embed(x)
        # print(x.shape)
        Wh, Ww = x.size(2), x.size(3)

        if self.ape:
            # interpolate the position embedding to the corresponding size
            absolute_pos_embed = F.interpolate(self.absolute_pos_embed, size=(Wh, Ww), mode='bicubic')
            x = (x + absolute_pos_embed).flatten(2).transpose(1, 2)  # B Wh*Ww C
        else:
            x = x.flatten(2).transpose(1, 2)
        x = self.pos_drop(x)
        outs = []
        for i in range(self.num_layers):
            """x = x + self.change_channels[i+1](out1[i+1]).flatten(2).transpose(1, 2) 先做特征相加"""
            # print(x.shape)
            if i<=2:
                x = x + self.change_channels[i+1](out1[i+1]).flatten(2).transpose(1, 2)
            # print(x.shape)
            layer = self.layers[i]
            """x_out, H, W, x, Wh, Ww = layer(x, Wh, Ww) 再做特征提取"""
            x_out, H, W, x, Wh, Ww = layer(x, Wh, Ww)

            if i in self.out_indices:
                norm_layer = getattr(self, f'norm{i}')
                x_out = norm_layer(x_out)

                out = x_out.view(-1, H, W, self.num_features[i]).permute(0, 3, 1, 2).contiguous()
                outs.append(out)

return outs- 新建张量 做一个简单的数据测试
if __name__ == "__main__":
    img = torch.randn(2,3,512,512)
    dswin = DSwin()
    out = dswin(img)
    for i in range(len(out)):
        print("out[%d]"%i,out[i].shape)
得到结果。验证了代码的正确性,符合逻辑,也能跑通,Nice!!!
out[0] torch.Size([2, 96, 128, 128])
out[1] torch.Size([2, 192, 64, 64])
out[2] torch.Size([2, 384, 32, 32])
out[3] torch.Size([2, 768, 16, 16])- 接下来只需要将写好的主干网络进行注册,只需要添加以下两行代码
在导入包的时候添加
from ..builder import BACKBONES在Class DSwin处的上一行添加
@BACKBONES.register_module()2、导入写好的主干网络
在mmdet/models/backbones/__init__.py中添加以下两行
from .dswin import DSwin__all__ = ['DSwin']3、写配置文件来进行实验
- 在configs文件夹下新建立dswin文件夹
- 在dswin文件夹下新建自己的config.py文件 由于涉及毕设 贴出主要与主干相关的配置文件
    type='CascadeRCNN',
    pretrained=None,
    backbone=dict(
        type='DSwin',
        embed_dim=96,
        depths=[2, 2, 6, 2],
        num_heads=[3, 6, 12, 24],
        window_size=7,
        mlp_ratio=4.0,
        qkv_bias=True,
        qk_scale=None,
        drop_rate=0.0,
        attn_drop_rate=0.0,
        drop_path_rate=0.2,
        ape=False,
        patch_norm=True,
        out_indices=(0, 1, 2, 3),
use_checkpoint=False),- 执行命令 开始训练
python tools/train.py configs/dswin/config.py未报错,大功告成!!!等待结果

