Jetson Xavier/XavierNX/TX2 CANFD 配置使用
目录
-
- TX2, Xavier NX, Xavier CAN特性
- TX2, Xavier NX, Xavier 载板引出位置
- CAN收发器
- NVIDIA CAN Driver
- Xavier CAN 引脚配置
- Jetson CAN 设置
- 设置开机运行
- 查看连接状态
- CANFD注意事项
- 查看接收
- CAN滤波器计算
- 发送
- 微信公众号
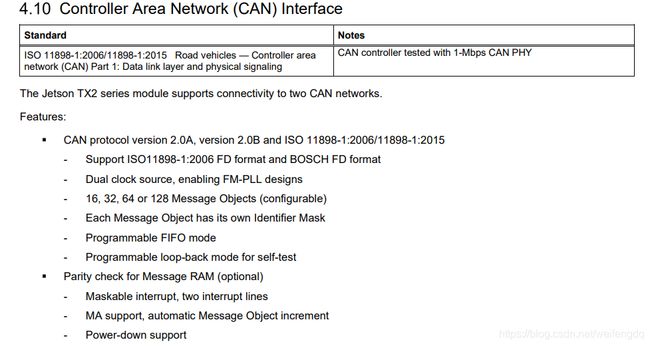
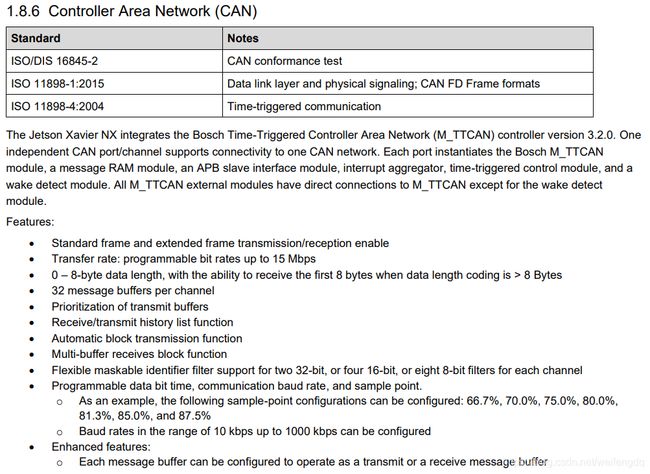
TX2, Xavier NX, Xavier CAN特性
参考 Jetson_TX2_Series_Module_DataSheet_v1.6.pdf, TX2 CAN特性:

参考 JetsonXavierNXDatasheet_v1.6.pdf, Xavier NX CAN特性:
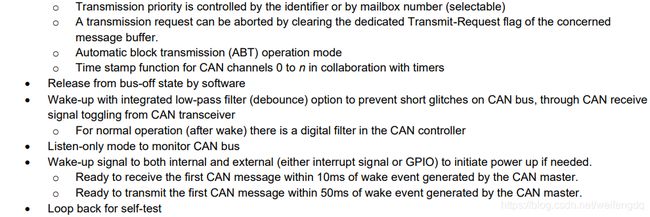
参考 Jetson_AGX_Xavier_Series_Datasheet_DS09654001_v1.2.pdf, Xavier CAN特性:

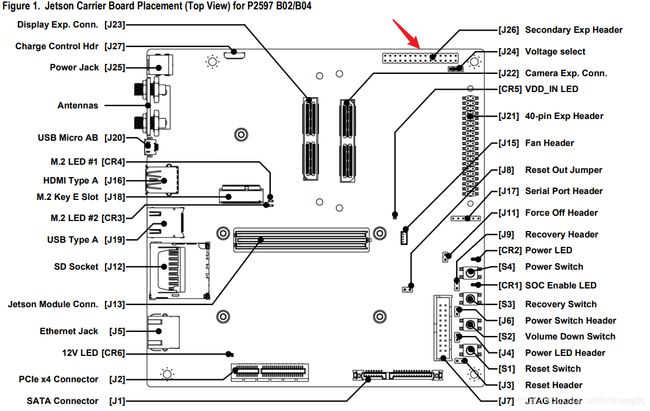
TX2, Xavier NX, Xavier 载板引出位置
参考nv_JetsonTX2_Developer_Kit_Carrier_Board_Specification.pdf
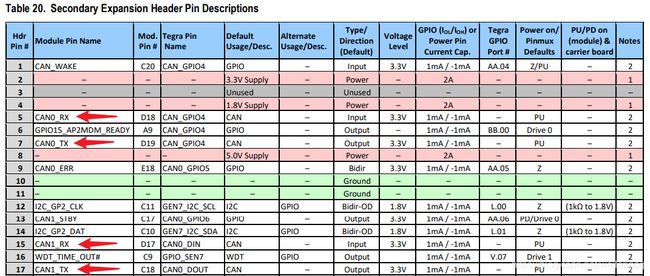
TX2, 有两路CAN, 官方载板上通过 [J26] Secondary Exp Header 引出:
参考Jetson_Xavier_NX_DevKit_Carrier_Board_Specification_v1.0.pdf
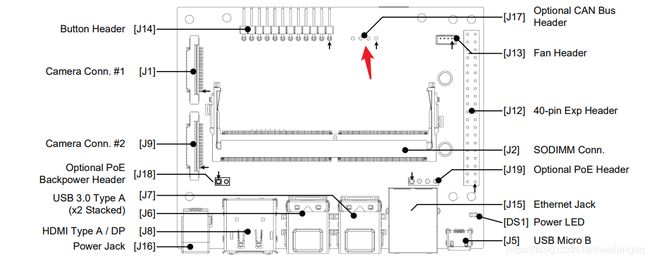
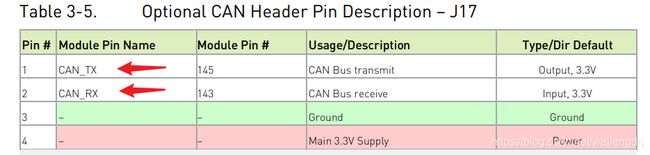
Xavier NX, 有1路CAN, 官方载板通过 [J17] Optional CAN Bus Header 引出, 需要自己拿烙铁焊出来:
参考Jetson_AGX_Xavier_Developer_Kit_Carrier_Board_Specification_SP-09778-001_v2.1.pdf
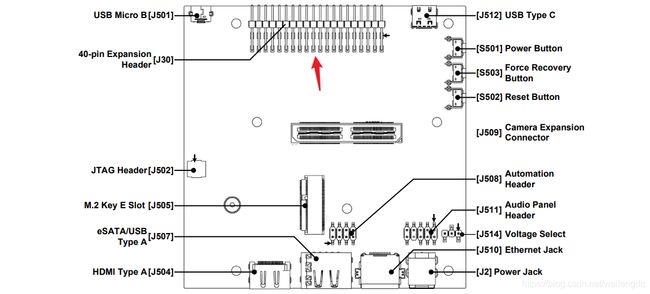
Xavier, 有两路CAN, 官方载板通过 [J30] 40-Pin Expansion Header 引出:
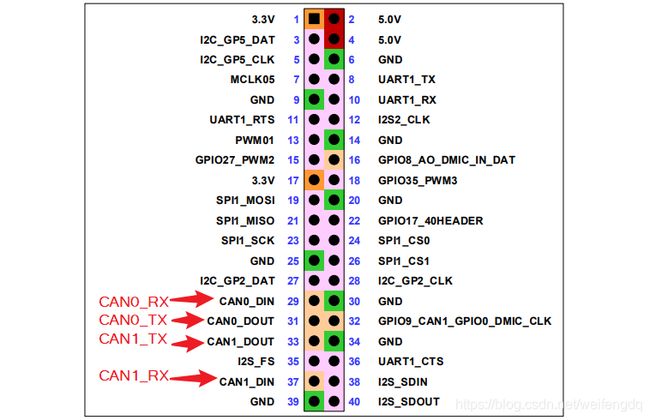
1脚位置为载板上靠近指示灯的引脚.
CAN收发器
核心板和载板出来都是3.3V CMOS电平, 需要连接相应的CAN收发器, 并且接上120Ω终端电阻.
用CANFD的话, 要注意选择支持CANFD的收发器, 如常用的NXP的TJA1044GT, 可以到5Mbit/s, 如果需要8Mbit/s, 或者更高速率, 需要更换相应的CAN收发器或者相应缩短线束长度.
NVIDIA CAN Driver
参考 NVIDIA DRIVE OS 5.1 Linux SDK – CAN Driver:
- 关于标准CAN位速率只能在 125K / 250K / 500K / 1Mbps 中4选1:
125000(125 Kbps), 250000(250 Kbps), 500000(500 Kbps) and 1000000(1Mbps) are supported bitrates for Tegra MTTCAN driver. Any other bitrate is not validated on Tegra MTTCAN driver. Only 500000 (500 Kbps) bitrate is supported for Tegra MTTCAN-IVC. Other bitrates are not enabled on Tegra MTTCAN-IVC driver out of box. Details are available in the SPE documentation. - 关于CANFD, 仲裁段位速率参考上面的4选1, 数据段位速率只能在 1M / 2Mbps中2选1, 还要CAN收发器也支持CANFD:
For dbitrate support, iproute package version 2.4.0.0 or later is required. Additionally, the maximum dbitrate support depends on PHY chip on platform. Consult the PHY datasheet to identify and obtain the maximum allowed data bitrate. dbitrate 1000000 (1 Mbps) and 2000000 (2 Mbps) are supported data bitrates. Any other dbitrate is not validated on TegraMTTCAN driver. - 文章中也说明了
MTTCAN的用法, 有兴趣一定要去看
Xavier CAN 引脚配置
如果是TX2和Xavier NX, 跳过此小节.
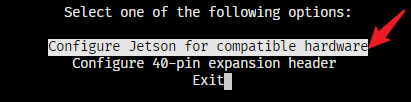
不同于TX2和Xavier NX, Xavier是个例外, 它的两路CAN刚好在40Pin扩展口上, 默认是IO, 需要先配置CAN:
sudo /opt/nvidia/jetson-io/jetson-io.py
按上下键选择 Configure 40-pin expansion header:
按上下键和回车键选择can0, can1, 然后Back:
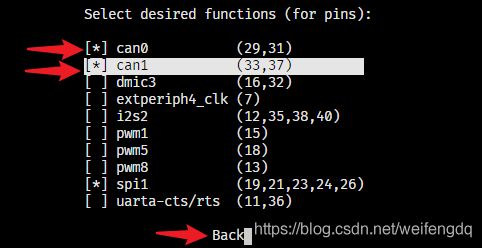
选择 Save and reboot to reconfig pins:

Jetson CAN 设置
由于CANFD的配置也能正常接收CAN, 所以直接配置成CANFD, 写个脚本 canfd.sh:
#!/bin/sh

sudo modprobe can
sudo modprobe can_raw
sudo modprobe mttcan

sudo ip link set down can0
sudo ip link set can0 type can bitrate 500000 sample-point 0.8 dbitrate 2000000 dsample-point 0.75 fd on restart-ms 100
# sudo ip link set can0 type can bitrate 500000 dbitrate 2000000 fd on
sudo ip link set up can0 mtu 72
sudo ifconfig can0 txqueuelen 1000

sudo ip link set down can1
sudo ip link set can1 type can bitrate 500000 sample-point 0.8 dbitrate 2000000 dsample-point 0.75 fd on restart-ms 100
# sudo ip link set can1 type can bitrate 500000 dbitrate 2000000 fd on
sudo ip link set up can1 mtu 72
sudo ifconfig can1 txqueuelen 1000
详细可查看 Linux内核文档can.txt:
restart-ms 100设置总线 bus-off 时延时100ms自动重启bitrate 500000 sample-point 0.8, 内核中设置CONFIG_CAN_CALC_BITTIMING=y可以自动计算位时间(bit-timing)mtu 72, MTU是数据链路层的概念, MTU限制的是数据链路层的payload,也就是上层协议的大小. CANFD默认最大就是72, 这种情况下CANFD的最大有效利用率=64/72≈88.88%, 参考以太网中的MTU 什么是MTU?为什么MTU值普遍都是1500?, Linux CAN内核文档:
  The length of the two CAN(FD) frame structures define the maximum transfer
  unit (MTU) of the CAN(FD) network interface and skbuff data length. Two
  definitions are specified for CAN specific MTUs in include/linux/can.h :

  #define CAN_MTU   (sizeof(struct can_frame))   == 16  => 'legacy' CAN frame
  #define CANFD_MTU (sizeof(struct canfd_frame)) == 72  => CAN FD frame
加权限运行:
sudo chmod 777 canfd.sh
sudo ./canfd.sh
注意Xavier NX只有1路CAN, TX2和Xavier是两路CAN.
这个设置关机或者重启就失效了, 可以用下面的方法设置开机运行.
ip link set can 的设置选项可以用 ip link set can0 type can help 查看:
$ ip link set can0 type can help
Usage: ip link set DEVICE type can
        [ bitrate BITRATE [ sample-point SAMPLE-POINT] ] |
        [ tq TQ prop-seg PROP_SEG phase-seg1 PHASE-SEG1
          phase-seg2 PHASE-SEG2 [ sjw SJW ] ]

        [ dbitrate BITRATE [ dsample-point SAMPLE-POINT] ] |
        [ dtq TQ dprop-seg PROP_SEG dphase-seg1 PHASE-SEG1
          dphase-seg2 PHASE-SEG2 [ dsjw SJW ] ]

        [ loopback { on | off } ]
        [ listen-only { on | off } ]
        [ triple-sampling { on | off } ]
        [ one-shot { on | off } ]
        [ berr-reporting { on | off } ]
        [ fd { on | off } ]
        [ fd-non-iso { on | off } ]
        [ presume-ack { on | off } ]

        [ restart-ms TIME-MS ]
        [ restart ]

        [ termination { 0..65535 } ]

        Where: BITRATE  := { 1..1000000 }
                  SAMPLE-POINT  := { 0.000..0.999 }
                  TQ            := { NUMBER }
                  PROP-SEG      := { 1..8 }
                  PHASE-SEG1    := { 1..8 }
                  PHASE-SEG2    := { 1..8 }
                  SJW           := { 1..4 }
                  RESTART-MS    := { 0 | NUMBER }
设置开机运行
以Xavier为例(TX2不一样), 把上面的canfd.sh放到指定位置:
sudo cp canfd.sh /usr/local/
编写service文件:
cd /etc/systemd/system
sudo vi canfd.service
填入以下内容:
[Unit]
Description=Canfd

[Service]
ExecStart=/usr/local/canfd.sh start

[Install]
WantedBy=multi-user.target
写入后运行:
sudo systemctl daemon-reload
sudo systemctl enable canfd.service
sudo systemctl start canfd.service
查看log:
journalctl -u canfd.service
如果报下面的错误:
2月 18 13:14:43 systemd[1]: Started Canfd.
2月 18 13:14:43 systemd[9629]: canfd.service: Failed to execute command: Exec format error
2月 18 13:14:43 systemd[9629]: canfd.service: Failed at step EXEC spawning /usr/local/canfd.sh: Exec format error
2月 18 13:14:43 systemd[1]: canfd.service: Main process exited, code=exited, status=203/EXEC
2月 18 13:14:43 systemd[1]: canfd.service: Failed with result 'exit-code'.
是因为 canfd.sh 中开头没有加入 #!/bin/sh.
log的正常情况是:
2月 18 14:27:42 systemd[1]: Started Canfd.
2月 18 14:27:42 sudo[16347]:     root : TTY=unknown ; PWD=/ ; USER=root ; COMMAND=/sbin/modprobe can
2月 18 14:27:42 sudo[16347]: pam_unix(sudo:session): session opened for user root by (uid=0)
2月 18 14:27:42 sudo[16347]: pam_unix(sudo:session): session closed for user root
查看连接状态
可以 ifconfig 查看:
$ ifconfig
can0: flags=193<UP,RUNNING,NOARP>  mtu 72
        unspec 00-00-00-00-00-00-00-00-00-00-00-00-00-00-00-00  txqueuelen 1000  (UNSPEC)
        RX packets 12411  bytes 788080 (788.0 KB)
        RX errors 0  dropped 0  overruns 0  frame 0
        TX packets 0  bytes 0 (0.0 B)
        TX errors 0  dropped 0 overruns 0  carrier 0  collisions 0
        device interrupt 68

can1: flags=193<UP,RUNNING,NOARP>  mtu 72
        unspec 00-00-00-00-00-00-00-00-00-00-00-00-00-00-00-00  txqueuelen 1000  (UNSPEC)
        RX packets 12295  bytes 786432 (786.4 KB)
        RX errors 0  dropped 0  overruns 0  frame 0
        TX packets 76  bytes 1216 (1.2 KB)
        TX errors 0  dropped 0 overruns 0  carrier 0  collisions 0
        device interrupt 69
或者用更详细的 ip -details -statistics link show 查看:
ip -details -statistics link show can0

: <<'COMMENT'
$ ip -details -statistics link show can0
5: can0:  mtu 72 qdisc pfifo_fast state UNKNOWN mode DEFAULT group default qlen 1000
    link/can  promiscuity 0
    can  state ERROR-ACTIVE (berr-counter tx 0 rx 0) restart-ms 100
          bitrate 498701 sample-point 0.792
          tq 26 prop-seg 30 phase-seg1 30 phase-seg2 16 sjw 1
          mttcan: tseg1 2..255 tseg2 0..127 sjw 1..127 brp 1..511 brp-inc 1
          dbitrate 2021052 dsample-point 0.736
          dtq 26 dprop-seg 6 dphase-seg1 7 dphase-seg2 5 dsjw 1
          mttcan: dtseg1 1..31 dtseg2 0..15 dsjw 1..15 dbrp 1..15 dbrp-inc 1
          clock 38400000
          re-started bus-errors arbit-lost error-warn error-pass bus-off
          0          0          0          4          42         0         numtxqueues 1 numrxqueues 1 gso_max_size 65536 gso_max_segs 65535
    RX: bytes  packets  errors  dropped overrun mcast
    731184     11522    0       0       0       0
    TX: bytes  packets  errors  dropped carrier collsns
    0          0        0       0       0       0
COMMENT
串口也打印出了波特率的误差:
[ 2051.260844] mttcan c310000.mttcan can0: bitrate error 0.2%
[ 2051.261015] mttcan c310000.mttcan can0: bitrate error 1.0%
[ 2051.334326] mttcan c320000.mttcan can1: bitrate error 0.2%
[ 2051.334484] mttcan c320000.mttcan can1: bitrate error 1.0%
CANFD注意事项
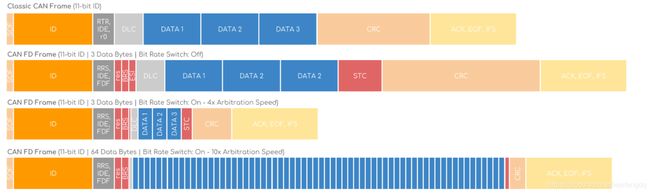
CANFD传输存在3种方式:
- 一 CAN帧: Standard CAN frame (transmit and receive)
- 二 CANFD长帧发送, 长帧和快速帧接收: CAN FD long frame in transmit and CAN FD long and fast frame in receive
- 三 CANFD长快帧收发
区别是 BRS (BitRateSwitch)位, 以 仲裁段500kbps + 数据段2Mbps 为例:
- 第一种方式就是500K, 最多8字节;
- 第二种方式
BRS位设置为Off, 发送最多64字节@500Kbps, 接收可以64字节@2Mbps - 第三种方式
BRS位设置为On发送和接收都可以 仲裁段500kbps, 数据段64字节传输在2Mbps.
可以从 CAN FD Explained - A Simple Intro (2021) 中的配图形象的看出来:
在CAN FD+BRS通讯中使用NI-XNET出现错误或不正确的帧 这篇文章指出: CANFD所有节点的采样点必须匹配,因为数据位速率通常远高于标准位速率。如果标准位速率采样点与另一个节点不匹配,则在发射机的采样点和接收机的采样点之间的重叠期间,许多数据位可能会提前发送或者错误地传输。
采样点一般设置再0.75~0.8之间.
前两种方式由于通信速率还是500Kbps, 所以影响不大, 第三种方式中存在速率的变化, 一定要确保设备的采样点一致. 如果不一致典型的就是收不到CANFD消息, 发送时调试串口报 mttcan can0: entered error warning state.
重新看下上面的:
$ ip link set can0 type can help
Usage: ip link set DEVICE type can
        [ bitrate BITRATE [ sample-point SAMPLE-POINT] ] |
        [ tq TQ prop-seg PROP_SEG phase-seg1 PHASE-SEG1
          phase-seg2 PHASE-SEG2 [ sjw SJW ] ]

        [ dbitrate BITRATE [ dsample-point SAMPLE-POINT] ] |
        [ dtq TQ dprop-seg PROP_SEG dphase-seg1 PHASE-SEG1
          dphase-seg2 PHASE-SEG2 [ dsjw SJW ] ]
我们可以设置 波特率+采样点, 或者设置 tq prop-seg phase-seg1 phase-seg2 sjw 等参数, 2选1, 上面选的是前一个 sudo ip link set can0 type can bitrate 500000 sample-point 0.8 dbitrate 2000000 dsample-point 0.75 fd on restart-ms 100, 最后自动计算的结果:
$ ip -details -statistics link show can0
5: can0: <NOARP,UP,LOWER_UP,ECHO> mtu 72 qdisc pfifo_fast state UNKNOWN mode DEFAULT group default qlen 1000
    link/can  promiscuity 0
    can <FD> state ERROR-ACTIVE (berr-counter tx 0 rx 0) restart-ms 100
          bitrate 498701 sample-point 0.792
          tq 26 prop-seg 30 phase-seg1 30 phase-seg2 16 sjw 1
          mttcan: tseg1 2..255 tseg2 0..127 sjw 1..127 brp 1..511 brp-inc 1
          dbitrate 2021052 dsample-point 0.736
          dtq 26 dprop-seg 6 dphase-seg1 7 dphase-seg2 5 dsjw 1
          mttcan: dtseg1 1..31 dtseg2 0..15 dsjw 1..15 dbrp 1..15 dbrp-inc 1
          clock 38400000
          re-started bus-errors arbit-lost error-warn error-pass bus-off
          0          0          0          4          42         0         numtxqueues 1 numrxqueues 1 gso_max_size 65536 gso_max_segs 65535
    RX: bytes  packets  errors  dropped overrun mcast
    1696048    26598    0       0       0       0
    TX: bytes  packets  errors  dropped carrier collsns
    0          0        0       0       0       0
可以看出:
- 时钟源clock 38400000Hz => 38.4MHz, 这个还是比较奇葩的, 可能时钟树没有设置好, 一般是40MHz.
sample-point = (prop-seg + phase-seg1 + 1) / (prop-seg + phase-seg1 + phase-seg2 + 1) = 61 / 77 ≈ 0.792dsample-point = (dprop-seg + dphase-seg1 + 1) / (dprop-seg + dphase-seg1 + dphase-seg2 + 1) = 14 / 19 ≈ 0.7368bitrate = clock / (prop-seg + phase-seg1 + phase-seg2 + 1) = 38400000 / 77 ≈ 498,701.2dbitrate = clock / (dprop-seg + dphase-seg1 + dphase-seg2 + 1) = 38400000 / 19 ≈ 2,021,052.6- 主时钟源可能是
tq * clock = 26 * 38.4M = 998.4M ≈ 1GHz, 未查证, 有错误请指正. sjw常用的有1或者等于phase-seg2.
查看接收
安装can-utils:
sudo apt install can-utils
先来看candump的用法:
$ candump
candump - dump CAN bus traffic.
Usage: candump [options] <CAN interface>+
(use CTRL-C to terminate candump)
Options:
-t <type> (timestamp: (a)bsolute/(d)elta/(z)ero/(A)bsolute w date)
-H (read hardware timestamps instead of system timestamps)
-c (increment color mode level)
-i (binary output - may exceed 80 chars/line)
-a (enable additional ASCII output)
-S (swap byte order in printed CAN data[] - marked with '`' )
-s <level> (silent mode - 0: off (default) 1: animation 2: silent)
-b <can> (bridge mode - send received frames to <can>)
-B <can> (bridge mode - like '-b' with disabled loopback)
-u <usecs> (delay bridge forwarding by <usecs> microseconds)
-l (log CAN-frames into file. Sets '-s 2' by default)
-L (use log file format on stdout)
-n <count> (terminate after receiption of <count> CAN frames)
-r <size> (set socket receive buffer to <size>)
-D (Don't exit if a "detected" can device goes down.
-d (monitor dropped CAN frames)
-e (dump CAN error frames in human-readable format)
-x (print extra message infos, rx/tx brs esi)
-T (terminate after without any reception)
Up to 16 CAN interfaces with optional filter sets can be specified
on the commandline in the form: [,filter]*
Filters:
Comma separated filters can be specified for each given CAN interface.
:
(matches when & mask == can_id & mask)
~
(matches when & mask != can_id & mask)
#
(set error frame filter, see include/linux/can/error.h)
[j|J]
(join the given CAN filters - logical AND semantic)
CAN IDs, masks and data content are given and expected in hexadecimal values.
When can_id and can_mask are both 8 digits, they are assumed to be 29 bit EFF.
Without any given filter all data frames are received (' 0:0' default filter).
Use interface name 'any' to receive from all CAN interfaces.
Examples:
candump -c -c -ta can0,123:7FF,400:700,#000000FF can2,400~7F0 can3 can8
candump -l any,0~0,#FFFFFFFF
(log only error frames but no(!) data frames)
candump -l any,0:0,#FFFFFFFF
(log error frames and also all data frames)
candump vcan2,92345678:DFFFFFFF
(match only for extended CAN ID 12345678)
candump vcan2,123:7FF
(matches CAN ID 123 - including EFF and RTR frames)
candump vcan2,123:C00007FF
(matches CAN ID 123 - only SFF and non-RTR frames)
使用 candump can0 查看接收, 64字节的CANFD接收正常:

或者写到文件里面: candump can0 >1.dat
添加参数指示间隔时间, BRS位(显示B或-), ESI(ErrorStateIndicator)位(显示E或-), candump -td -x can0:

CAN滤波器计算
从上面可知, candump滤波设置方法为
常见的CAN软件都附带有滤波器计算软件, 如周立功的ZCANPRO软件安装目录下的filter.exe:
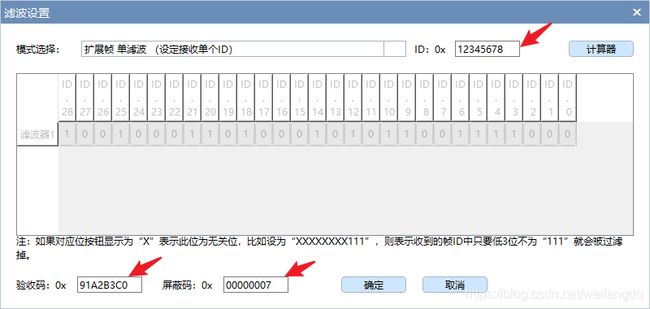
或者搜CAN滤波器计算就出来的这个软件:
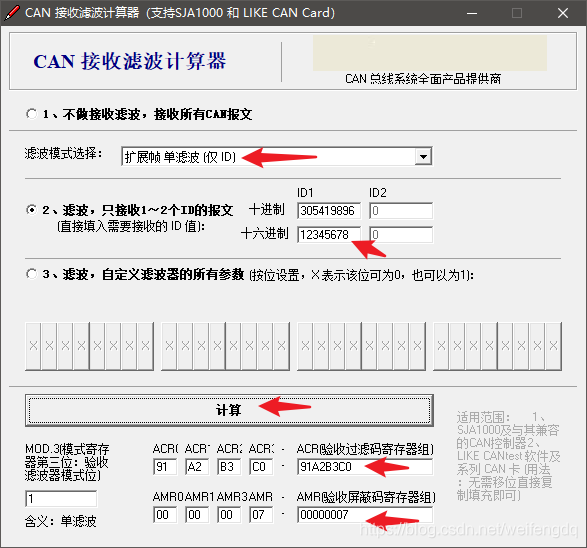
candump can0,91A2B3C0:7, 这样就能滤出来 0x12345678 这一帧.
或者更简单的, 因为掩码位为1比较, 为0忽略, 我们就全比较 candump can0,12345678:1FFFFFFF, 如果再加上一个标准帧如 0x123, 就是 candump can0,12345678:1FFFFFFF,123:7FF

发送
先来看cansend的用法:
$ cansend
Usage: cansend - simple command line tool to send CAN-frames via CAN_RAW sockets.
Usage: cansend <device> <can_frame>.
<can_frame>:
 <can_id>#{R|data}          for CAN 2.0 frames
 <can_id>##{data}    for CAN FD frames

<can_id>:
 can have 3 (SFF) or 8 (EFF) hex chars
{data}:
 has 0..8 (0..64 CAN FD) ASCII hex-values (optionally separated by '.')
<flags>:
 a single ASCII Hex value (0 .. F) which defines canfd_frame.flags

Examples:
  5A1#11.2233.44556677.88 / 123#DEADBEEF / 5AA# / 123##1 / 213##311
  1F334455#1122334455667788 / 123#R for remote transmission request.
写个CANFD发送的脚本 can_trans.sh:
#!/bin/sh

while true; do
    cansend can0 18FF0001##3.01.02.03.04.05.06.07.08.09.10.11.12.13.14.15.16.01.02.03.04.05.06.07.08.09.10.11.12.13.14.15.16.01.02.03.04.05.06.07.08.09.10.11.12.13.14.15.16.01.02.03.04.05.06.07.08.09.10.11.12.13.14.15.16
    #cansend can0 12345678##0.01.02.03.04.05.06.07.08.09.10.11.12.13.14.15.16.01.02.03.04.05.06.07.08.09.10.11.12.13.14.15.16
    #cansend can0 12345678##0.01.02.03.04.05.06.07.08.09.10.11.12.13.14.15.16.01.02.03.04.05.06.07.08.09.10.11.12.13.14.15.16.01.02.03.04.05.06.07.08.09.10.11.12.13.14.15.16
    sleep 0.1
done
其中:
- ##后跟
a single ASCII Hex value (0 .. F) which defines canfd_frame.flags - ##后跟0是上面的第二种发送方式, BRS不使能, 后面01开始才是数据, 以500Kbps传输64字节
- ##后跟3是使能BRS和SEI位, 真正的CANFD用这个, 仲裁段500Kbps, 数据段2Mbps传输64字节
加权限发送:
sudo chmod 777 can_trans.sh
sudo ./can_trans.sh
微信公众号
欢迎扫描二维码关注本人微信公众号, 及时获取或者发送给我最新消息:
