Spring boot 整合Mybatis-plus CRUD操作
1 .介绍mybatis-plus
MyBatis-Plus (opens new window)(简称 MP)是一个 MyBatis (opens new window)的增强工具,在 MyBatis 的基础上只做增强不做改变,为简化开发、提高效率而生。 但是对于联表操作还必须使用mybatis.
2 .特性
-
无侵入:只做增强不做改变,引入它不会对现有工程产生影响,如丝般顺滑
-
损耗小:启动即会自动注入基本 CURD,性能基本无损耗,直接面向对象操作
-
强大的 CRUD 操作:内置通用 Mapper、通用 Service,仅仅通过少量配置即可实现单表大部分 CRUD 操作,更有强大的条件构造器,满足各类使用需求
-
支持 Lambda 形式调用:通过 Lambda 表达式,方便的编写各类查询条件,无需再担心字段写错 JDK1.
-
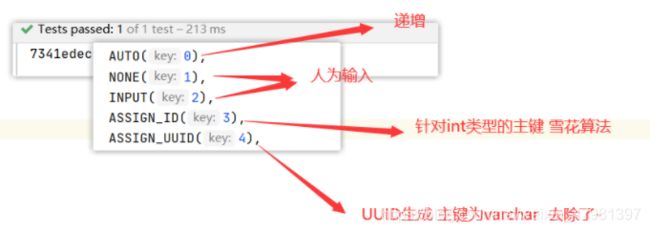
支持主键自动生成:支持多达 4 种主键策略(内含分布式唯一 ID 生成器 - Sequence),可自由配置,完美解决主键问题
-
支持 ActiveRecord 模式:支持 ActiveRecord 形式调用,实体类只需继承 Model 类即可进行强大的 CRUD 操作
-
支持自定义全局通用操作:支持全局通用方法注入( Write once, use anywhere )
-
内置代码生成器:采用代码或者 Maven 插件可快速生成 Mapper 、 Model 、 Service 、 Controller 层代码,支持模板引擎,更有超多自定义配置等您来使用
-
内置分页插件:基于 MyBatis 物理分页,开发者无需关心具体操作,配置好插件之后,写分页等同于普通 List 查询
-
分页插件支持多种数据库:支持 MySQL、MariaDB、Oracle、DB2、H2、HSQL、SQLite、Postgre、SQLServer 等多种数据库
-
内置性能分析插件:可输出 Sql 语句以及其执行时间,建议开发测试时启用该功能,能快速揪出慢查询
-
内置全局拦截插件:提供全表 delete 、 update 操作智能分析阻断,也可自定义拦截规则,预防误操作
3. 如何使用
1.创建一个springboot工程并加入相关的依赖
            com.baomidou
            mybatis-plus-boot-starter
            3.4.1
2.配置文件
spring.datasource.druid.username=root
spring.datasource.druid.password=196055
spring.datasource.druid.url=jdbc:mysql://localhost:3306/twosupper?serverTimezone=Asia/Shanghai
spring.datasource.druid.driver-class-name=com.mysql.cj.jdbc.Driver
spring.datasource.druid.max-active=5

#打印文件日志
logging.level.com.mybasicplus.mapper=debug
3.实体类
@Data
public class User {
    private Long id;
    private String name;
    private Integer age;
    private String email;
}
4.接口mapper
public interface EmpMapper extends BaseMapper {

}
5.在主启动类上mapper的扫描
@SpringBootApplication
@MapperScan("com.mybasicplus.mapper")
public class DemoApplication {

    public static void main(String[] args) {
        SpringApplication.run(DemoApplication.class, args);
    }

}
6.测试
@SpringBootTest
class DemoApplicationTests {
    @Resource
    private EmpMapper empMapper;

    @Test
    public void contextLoads() {
        //System.out.println("--------- selectAll method test -----");
        User user=empMapper.selectById(2);
        System.out.println(user);
        //Assert.assertEquals(5,userList.size());
        //userList.forEach(System.out::println);
    }
4. crud操作
(1)增加insert
entry实体
@Data
@TableName(value = "tab_user")
@NoArgsConstructor
/*@AllArgsConstructor*/
public class User {
    @TableId(value = "id",type = IdType.ASSIGN_ID )
    private Long id;
    //@TableField(value = "name")
    private String name;
    //@TableField(value = "age")
    private Integer age;
    //@TableField(value = "email")
    private String email;
测试
/**
     * 如果不想使用雪花算法产生的id,可以自己指定主键的生成策略
     */
    @Test
    public void testInsert(){
       User user=new User(null,"詹姆斯",12,"[email protected]",);//1406790199747428353:雪花算法针对的分布式id生成策略
        int row = userMapper.insert(user);
        System.out.println(row);
    }
(2) 删除 delete
逻辑删除:
说明:
只对自动注入的sql起效:
插入: 不作限制
查找: 追加where条件过滤掉已删除数据,且使用 wrapper.entity 生成的where条件会忽略该字段
更新: 追加where条件防止更新到已删除数据,且使用 wrapper.entity 生成的where条件会忽略该字段
删除: 转变为 更新
在表中增加一个逻辑字段

@Data
@TableName(value = "tab_user")
@NoArgsConstructor
/*@AllArgsConstructor*/
public class User {
    @TableId(value = "id",type = IdType.ASSIGN_ID )
    private Long id;
    //@TableField(value = "name")
    private String name;
    //@TableField(value = "age")
    private Integer age;
    //@TableField(value = "email")
    private String email;

    @TableLogic
    private Integer deleted;
测试:
  /**
     * 逻辑删除:
     */
    @Test
    public void testDelete(){
        int i = userMapper.deleteById(2);
        System.out.println(i);
    }
(3) 修改update
自动填充:
(1)在相应的属性字段上添加如下注解
 @TableField(fill = FieldFill.INSERT)
    private Date createtime;

    @TableField(fill = FieldFill.INSERT_UPDATE)
    private Date updatetime;
(2)创建一个自动配置类
@Configuration //表示该类为配置类
public class MybatisPlusConfig  implements MetaObjectHandler {
    @Override
    public void insertFill(MetaObject metaObject) {
        /**
         * 为哪个字段做自动填充
         */
        this.strictInsertFill(metaObject, "createTime", Date.class, new Date()); // 起始版本 3.3.0(推荐使用)
        this.strictInsertFill(metaObject, "updateTime", Date.class, new Date()); // 起始版本 3.3.0(推荐使用)
    }

    @Override
    public void updateFill(MetaObject metaObject) {
        this.strictUpdateFill(metaObject, "updateTime", Date.class, new Date()); // 起始版本 3.3.0(推荐)
    }
}
(3)测试
@Test
    public void testInsert(){

        User user=new User(null,"詹姆斯",12,"[email protected]",0);
        int row= empMapper.insert(user);
        System.out.println(row);
    }


    @Test
    public  void  testDelete(){
        int i = empMapper.deleteById(2);
        System.out.println(i);
    }

    @Test
    public void testUpdate(){
        /*User user=new User(2L,"wangwu",11,"[email protected]",0);*/
        User user=new User(2L,"yu",12,"yyy",0);
        int i=empMapper.updateById(user);
    }
(4) 查询---条件查询
 @Test
    public void testSelectBycondication(){
        QueryWrapper wrapper=new QueryWrapper<>();
        wrapper.between("age",10,12);
        wrapper.or();
        wrapper.like("name","詹");
        wrapper.orderByDesc("age");
        List users=empMapper.selectList(wrapper);
        System.out.println(users);
    }
(5) 分页查询
1.引入分页的插件
 @Bean
    public MybatisPlusInterceptor mybatisPlusInterceptor() {
        MybatisPlusInterceptor interceptor = new MybatisPlusInterceptor();
        interceptor.addInnerInterceptor(new PaginationInnerInterceptor(DbType.MYSQL));
        return interceptor;
    }
2.使用分页方法
 @Test
    public void testSelectByPage(){
        Page page=new Page<>(3,4);
        Page page1=empMapper.selectPage(page,null);
        System.out.println("总页码:"+page1.getPages());
        System.out.println("总条数:"+page1.getTotal());
        System.out.println("当前页记录"+page1.getRecords());
    }