大文件上传
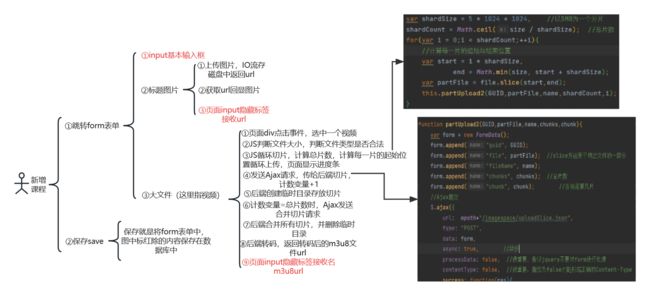
上图就是大致的流程
一、标题图片
上传课程的标题图片
Ajax发送请求到后端
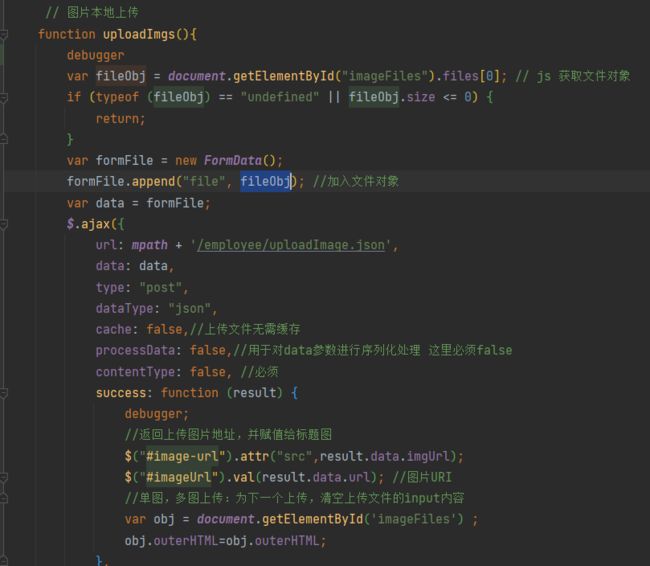
后端接收到图片使用IO流去保存图片,返回图片的信息对象
JS回调函数接收对象通过$("元素id").val(值),方式给页面form表达img标签src属性值,达到上传图片并回显
二、大文件上传(流媒体、音频、.zip文件等)
页面div点击事件,选中一个视频文件

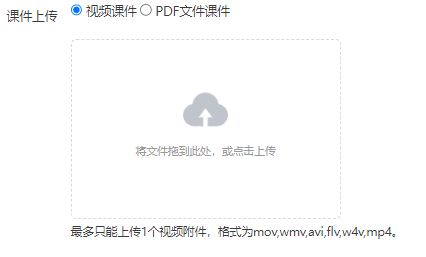
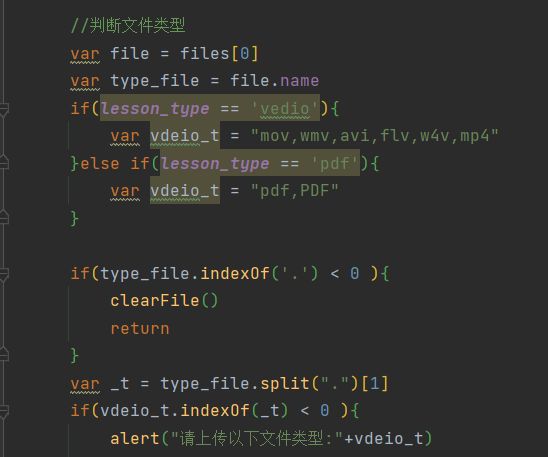
JS判断文件大小,判断文件类型是否合法
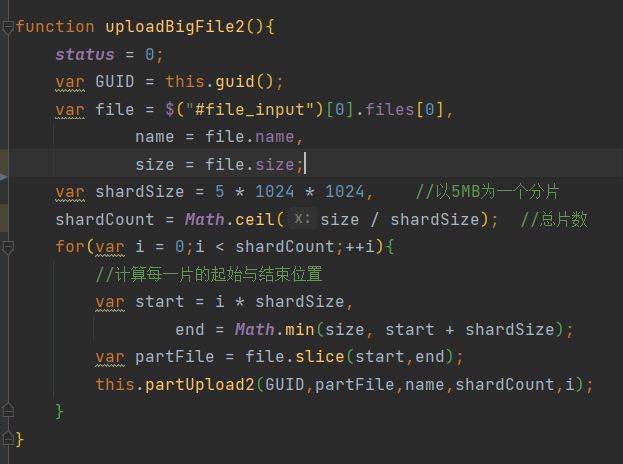
3.JS循环切片,计算总片数,计算每一片的起始位置,循环上传
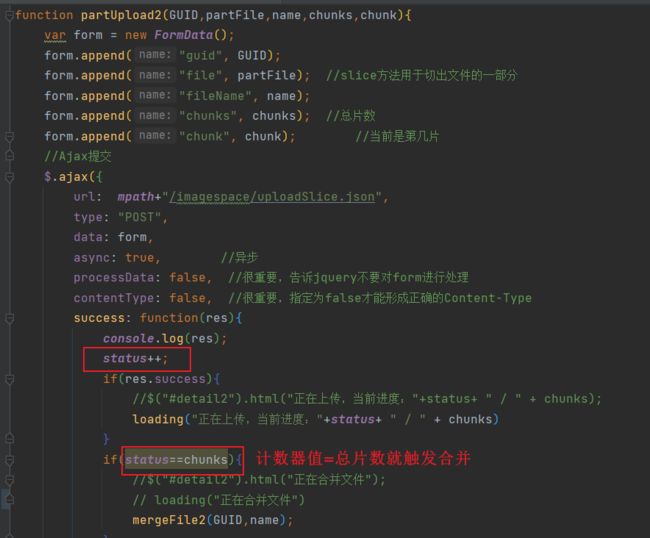
4.发送Ajax转给后端切片
5.后端接收并创建临时目录存放
/**
* 分片上传,前端调用此方法
* @param request
* @param guid
* @param chunk
* @param file
* @return
*/
@PostMapping("/uploadSlice")
@ResponseBody
public ResponseResult uploadSlice2(HttpServletRequest request, @RequestParam("guid") String guid,
@RequestParam("chunk") Integer chunk,
@RequestParam("file") MultipartFile file) {
if (this.uploadSlice(request, guid, chunk, file)){
return ResponseResultUtils.genResult("上传成功","");
}else{
return ResponseResultUtils.genErrorResult("上传失败");
}
}
/**
* 分片上传的具体方法
* @param request
* @param guid
* @param chunk
* @param file
* @return
*/
private boolean uploadSlice(HttpServletRequest request, String guid, Integer chunk, MultipartFile file) {
try {
boolean isMultipart = ServletFileUpload.isMultipartContent(request);
logger.info("isMultipart = {}",isMultipart);
if (isMultipart) {
if (chunk == null){
chunk = 0;
}
// 临时目录用来存放所有分片文件
String tempFileDir = rootFilePath + bigPath + guid;
File parentFileDir = new File(tempFileDir);
if (!parentFileDir.exists()) {
parentFileDir.mkdirs();
}
logger.info("接到上传的分片文件,{},{},{}",guid,chunk,tempFileDir);
// 分片处理时,前台会多次调用上传接口,每次都会上传文件的一部分到后台
File tempPartFile = new File(parentFileDir, guid + "_" + chunk + ".part");
FileUtils.copyInputStreamToFile(file.getInputStream(), tempPartFile);
}
} catch (Exception e) {
return false;
}
return true;
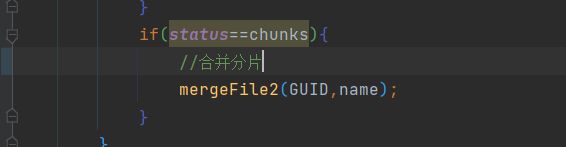
}6.计数器变量值=总片数时,发送合并请求
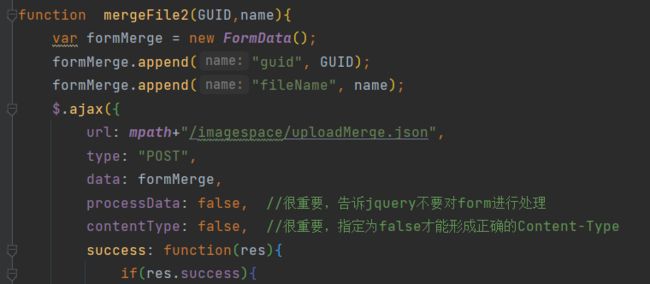
7.后端合并
/**
* 分片文件合并,前端调用此方法
* @param guid
* @param fileName
* @return
*/
@RequestMapping("/uploadMerge")
@ResponseBody
public ResponseResult uploadMerge2(@RequestParam("guid") String guid, @RequestParam("fileName") String fileName) {
// 得到 destTempFile 就是最终的文件
SpaceImage image = this.uploadMerge(guid, fileName);
if(null != imageSpaceImage){
return ResponseResultUtils.genResult(imageSpaceImage,"合并成功");
}else{
return ResponseResultUtils.genErrorResult("合并文件失败");
}
}
private ImageSpaceImage uploadMerge(String guid, String fileName){
SpaceImage image = mergeFile(guid, fileName);
//此处需要注意,OSS需要再次切片上传,但minIO是不用得,它默认5M超过就会自动切片
String path = "";
//移除文件
poolTaskExecutor.execute(() -> {
com.eyang.ecpp.utils.FileUtils.deleteFile(rootFilePath+bigPath);
});
return imageSpaceImage;
}
private ImageSpaceImage mergeFile(String guid, String fileName) {
logger.info("接到上传的分片文件合并请求,{},{}",guid,fileName);
try {
String sName = fileName.substring(fileName.lastIndexOf("."));
//时间格式化格式
Date currentTime = new Date();
SimpleDateFormat simpleDateFormat = new SimpleDateFormat("yyyyMMddHHmmssSSS");
//获取当前时间并作为时间戳
String timeStamp = simpleDateFormat.format(currentTime);
//拼接新的文件名
String newName = timeStamp + sName;
simpleDateFormat = new SimpleDateFormat("yyyyMM");
String tempPath = rootFilePath + bigPath+guid;
String margePath = rootFilePath + bigPath+simpleDateFormat.format(currentTime);
File parentFileDir = new File(tempPath);
if (parentFileDir.isDirectory()) {
File destTempFile = new File(margePath, newName);
if (!destTempFile.exists()) {
//先得到文件的上级目录,并创建上级目录,在创建文件
destTempFile.getParentFile().mkdir();
destTempFile.createNewFile();
}
for (int i = 0; i < Objects.requireNonNull(parentFileDir.listFiles()).length; i++) {
File partFile = new File(parentFileDir, guid + "_" + i + ".part");
FileOutputStream destTempfos = new FileOutputStream(destTempFile, true);
//遍历"所有分片文件"到"最终文件"中
FileUtils.copyFile(partFile, destTempfos);
destTempfos.close();
}
// 删除临时目录中的分片文件
FileUtils.deleteDirectory(parentFileDir);
String[] resultArr = FileStorageUtils.saveBigFile(Files.readAllBytes(Paths.get(destTempFile.getPath())), com.eyang.ecpp.utils.FileUtils.getExtension(destTempFile.getName()));
ImageSpaceImage imageSpaceImage = new ImageSpaceImage();
//第一个是组名 第二个是改后的文件名
imageSpaceImage.setImgUrl(margePath+"/"+newName);
//imageSpaceImage.setName(destTempFile.getName());
imageSpaceImage.setName(fileName);
return imageSpaceImage;//destTempFile.getAbsolutePath();
}
} catch (Exception e) {
logger.error("切片文件合并,失败原因e:{}", e.getMessage());
}
return null;
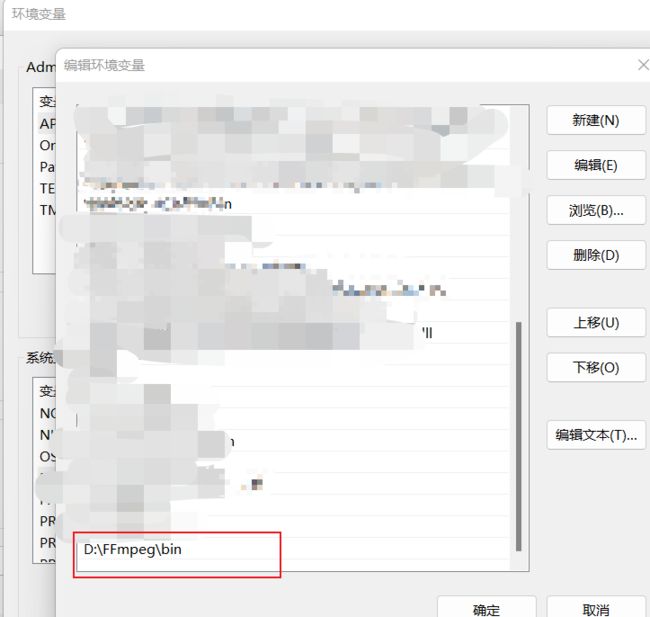
}8.合并成功后进行转码
转码需要下载一个ffmpeg,下载完解压打开bin目录,打开电脑的环境变量往path中添加上bin的目录即可。
还需要引入依赖
com.google.code.gson
gson
2.8.6
9.转码发送请求
10.后端转码
/**
     * 视频编码
     *
     * @param absolutePath 绝对路径
     * @return {@link ResponseResult}<{@link ?}>
     */
    @RequiresPermissions("cms:article:edit")
    @RequestMapping(value = "video/coding")
    @ResponseBody
    public ResponseResult videoCoding(@RequestParam String absolutePath) {

        TranscodeConfig transcodeConfig = new TranscodeConfig();
        //设置视频封面
        transcodeConfig.setPoster("1");
        transcodeConfig.setTsSeconds("60");
        ResponseResult transResult = TranscodeFileUtils.transCodeFile(absolutePath, transcodeConfig);
        String retUrl = "";
        if (null != transResult) {
            Map data = (Map) transResult.getData();
            if (null != data) {
                Map videoInfo = (Map) data.get("data");
                if (null != videoInfo) {
                    retUrl = (String) videoInfo.get("m3u8");
                }
            }
        }
        return ResponseResultUtils.genResult(retUrl,"转码成功");
    }
视频转码配置实体类
package com.utils;

public class TranscodeConfig {

    private String poster; // 截取封面的时间

    private String tsSeconds; // ts分片大小,单位是秒

    private String cutStart; // 视频裁剪,开始时间

    private String cutEnd; // 视频裁剪,结束时间


    public String getPoster() {
        return poster;
    }

    public void setPoster(String poster) {
        this.poster = poster;
    }

    public String getTsSeconds() {
        return tsSeconds;
    }

    public void setTsSeconds(String tsSeconds) {
        this.tsSeconds = tsSeconds;
    }

    public String getCutStart() {
        return cutStart;
    }

    public void setCutStart(String cutStart) {
        this.cutStart = cutStart;
    }

    public String getCutEnd() {
        return cutEnd;
    }

    public void setCutEnd(String cutEnd) {
        this.cutEnd = cutEnd;
    }

    public TranscodeConfig() {
    }

    public TranscodeConfig(String poster, String tsSeconds, String cutStart, String cutEnd) {
        this.poster = poster;
        this.tsSeconds = tsSeconds;
        this.cutStart = cutStart;
        this.cutEnd = cutEnd;
    }
}
转码工具类
public class TranscodeFileUtils {


    /**
     * 视频根路径
     */
    private static String videoFolder= Global.getConfig("video.folder");

    private static final Logger LOGGER = LoggerFactory.getLogger(TranscodeFileUtils.class);

    public static ResponseResult> transCodeFile(String filePath, TranscodeConfig transcodeConfig){
        try {

            // 按照日期生成子目录
            String today = DateTimeFormatter.ofPattern("yyyyMMdd").format(LocalDate.now());
            String s = Identities.uuid2();
            Path targetFolder = Paths.get(videoFolder, today, s);

            // 执行转码操作
            LOGGER.info("开始转码");

            FFmpegUtils.transcodeToM3u8(filePath, targetFolder.toString(), transcodeConfig);

            // 封装结果
            Map videoInfo = new HashMap<>();
            videoInfo.put("m3u8", String.join("\\", targetFolder.toString(), "index.m3u8"));
            videoInfo.put("poster", String.join("\\", targetFolder.toString(), "poster.jpg"));

            Map result = new HashMap<>();
            result.put("success", true);
            result.put("data", videoInfo);
            return ResponseResultUtils.genResult(result,"转码成功!");
        } catch (Exception e) {
            e.printStackTrace();
        }
        return null;
    }


    public static void main(String[] args){

        System.out.println(TranscodeFileUtils.transCodeFile("E:\\录屏\\shipin\\test.mp4", new TranscodeConfig("00:00:00.001","15","","")));

    }

}
转码工具类
public class FFmpegUtils {

    private static final Logger LOGGER = LoggerFactory.getLogger(FFmpegUtils.class);

    // 跨平台换行符
    private static final String LINE_SEPARATOR = System.getProperty("line.separator");

    /**
     * 生成随机16个字节的AESKEY
     * @return
     */
    private static byte[] genAesKey ()  {
        try {
            KeyGenerator keyGenerator = KeyGenerator.getInstance("AES");
            keyGenerator.init(128);
            return keyGenerator.generateKey().getEncoded();
        } catch (NoSuchAlgorithmException e) {
            return null;
        }
    }

    /**
     * 在指定的目录下生成key_info, key文件,返回key_info文件
     * @param folder
     * @throws IOException
     */
    private static Path genKeyInfo(String folder) throws IOException {
        // AES 密钥
        byte[] aesKey = genAesKey();
        // AES 向量
        String iv = Hex.encodeHexString(genAesKey());

        // key 文件写入
        Path keyFile = Paths.get(folder, "key");
        Files.write(keyFile, aesKey, StandardOpenOption.CREATE, StandardOpenOption.TRUNCATE_EXISTING);

        // key_info 文件写入
        StringBuilder stringBuilder = new StringBuilder();
        stringBuilder.append("key").append(LINE_SEPARATOR);                    // m3u8加载key文件网络路径
        stringBuilder.append(keyFile.toString()).append(LINE_SEPARATOR);    // FFmeg加载key_info文件路径
        stringBuilder.append(iv);                                            // ASE 向量

        Path keyInfo = Paths.get(folder, "key_info");

        Files.write(keyInfo, stringBuilder.toString().getBytes(), StandardOpenOption.CREATE, StandardOpenOption.TRUNCATE_EXISTING);

        return keyInfo;
    }

    /**
     * 指定的目录下生成 master index.m3u8 文件
     * @param file            master m3u8文件地址
     * @param indexPath            访问子index.m3u8的路径
     * @param bandWidth            流码率
     * @throws IOException
     */
    private static void genIndex(String file, String indexPath, String bandWidth) throws IOException {
        StringBuilder stringBuilder = new StringBuilder();
        stringBuilder.append("#EXTM3U").append(LINE_SEPARATOR);
        stringBuilder.append("#EXT-X-STREAM-INF:BANDWIDTH=" + bandWidth).append(LINE_SEPARATOR);  // 码率
        stringBuilder.append(indexPath);
        Files.write(Paths.get(file), stringBuilder.toString().getBytes(StandardCharsets.UTF_8), StandardOpenOption.CREATE, StandardOpenOption.TRUNCATE_EXISTING);
    }

    /**
     * 转码视频为m3u8
     * @param source                源视频
     * @param destFolder            目标文件夹
     * @param config                配置信息
     * @throws IOException
     * @throws InterruptedException
     */
    public static void transcodeToM3u8(String source, String destFolder, TranscodeConfig config) throws IOException, InterruptedException {

        // 判断源视频是否存在
        if (!Files.exists(Paths.get(source))) {
            throw new IllegalArgumentException("文件不存在:" + source);
        }

        // 创建工作目录
        Path workDir = Paths.get(destFolder, "ts");
        Files.createDirectories(workDir);

        // 在工作目录生成KeyInfo文件
        Path keyInfo = genKeyInfo(workDir.toString());

        // 构建命令
        List commands = new ArrayList<>();
        commands.add("ffmpeg");
        commands.add("-i");
        commands.add(source);                    // 源文件
        commands.add("-c:v");
        commands.add("libx264");                // 视频编码为H264
        commands.add("-c:a");
        commands.add("copy");                    // 音频直接copy
        commands.add("-hls_key_info_file");
        commands.add(keyInfo.toString());        // 指定密钥文件路径
        commands.add("-hls_time");
        commands.add(config.getTsSeconds());    // ts切片大小
        commands.add("-hls_playlist_type");
        commands.add("vod");                    // 点播模式
        commands.add("-hls_segment_filename");
        commands.add("%06d.ts");                // ts切片文件名称

        if (StringUtils.hasText(config.getCutStart())) {
            commands.add("-ss");
            commands.add(config.getCutStart());    // 开始时间
        }
        if (StringUtils.hasText(config.getCutEnd())) {
            commands.add("-to");
            commands.add(config.getCutEnd());        // 结束时间
        }
        commands.add("index.m3u8");                                                        // 生成m3u8文件

        // 构建进程
        Process process = new ProcessBuilder()
                .command(commands)
                .directory(workDir.toFile())
                .start();

        // 读取进程标准输出
        new Thread(() -> {
            try (BufferedReader bufferedReader = new BufferedReader(new InputStreamReader(process.getInputStream()))) {
                String line = null;
                while ((line = bufferedReader.readLine()) != null) {
                    LOGGER.info(line);
                }
            } catch (IOException e) {
            }
        }).start();

        // 读取进程异常输出
        new Thread(() -> {
            try (BufferedReader bufferedReader = new BufferedReader(new InputStreamReader(process.getErrorStream()))) {
                String line = null;
                while ((line = bufferedReader.readLine()) != null) {
                    LOGGER.info(line);
                }
            } catch (IOException e) {
            }
        }).start();


        // 阻塞直到任务结束
        if (process.waitFor() != 0) {
            throw new RuntimeException("视频切片异常");
        }

        // 切出封面
        if (!screenShots(source, String.join(File.separator, destFolder, "poster.jpg"), config.getPoster())) {
            throw new RuntimeException("封面截取异常");
        }

        // 获取视频信息
        MediaInfo mediaInfo = getMediaInfo(source);
        if (mediaInfo == null) {
            throw new RuntimeException("获取媒体信息异常");
        }

        // 生成index.m3u8文件
        genIndex(String.join(File.separator, destFolder, "index.m3u8"), "ts/index.m3u8", mediaInfo.getFormat().getBitRate());

        // 删除keyInfo文件
        Files.delete(keyInfo);
    }

    /**
     * 获取视频文件的媒体信息
     * @param source
     * @return
     * @throws IOException
     * @throws InterruptedException
     */
    public static MediaInfo getMediaInfo(String source) throws IOException, InterruptedException {
        List commands = new ArrayList<>();
        commands.add("ffprobe");
        commands.add("-i");
        commands.add(source);
        commands.add("-show_format");
        commands.add("-show_streams");
        commands.add("-print_format");
        commands.add("json");

        Process process = new ProcessBuilder(commands)
                .start();

        MediaInfo mediaInfo = null;

        try (BufferedReader bufferedReader = new BufferedReader(new InputStreamReader(process.getInputStream()))) {
            mediaInfo = new Gson().fromJson(bufferedReader, MediaInfo.class);
        } catch (IOException e) {
            e.printStackTrace();
        }

        if (process.waitFor() != 0) {
            return null;
        }

        return mediaInfo;
    }

    /**
     * 截取视频的指定时间帧,生成图片文件
     * @param source        源文件
     * @param file            图片文件
     * @param time            截图时间 HH:mm:ss.[SSS]
     * @throws IOException
     * @throws InterruptedException
     */
    public static boolean screenShots(String source, String file, String time) throws IOException, InterruptedException {

        List commands = new ArrayList<>();
        commands.add("ffmpeg");
        commands.add("-i");
        commands.add(source);
        commands.add("-ss");
        commands.add(time);
        commands.add("-y");
        commands.add("-q:v");
        commands.add("1");
        commands.add("-frames:v");
        commands.add("1");
        commands.add("-f");
        commands.add("image2");
        commands.add(file);

        Process process = new ProcessBuilder(commands)
                .start();

        // 读取进程标准输出
        new Thread(() -> {
            try (BufferedReader bufferedReader = new BufferedReader(new InputStreamReader(process.getInputStream()))) {
                String line = null;
                while ((line = bufferedReader.readLine()) != null) {
                    LOGGER.info(line);
                }
            } catch (IOException e) {
            }
        }).start();

        // 读取进程异常输出
        new Thread(() -> {
            try (BufferedReader bufferedReader = new BufferedReader(new InputStreamReader(process.getErrorStream()))) {
                String line = null;
                while ((line = bufferedReader.readLine()) != null) {
                    LOGGER.error(line);
                }
            } catch (IOException e) {
            }
        }).start();

        return process.waitFor() == 0;
    }

}
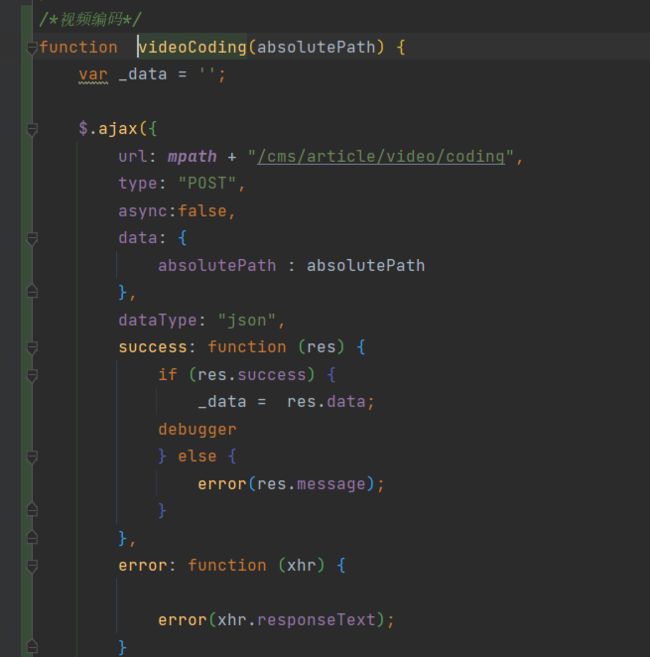
11.转码成功返回m3u8文件的路径,放到页面input隐藏标签中
编码成功后执行回调函数,m3u8文件赋给_data变量如下图

使用$(#页面元素id).val(值),下图是把m3u8赋值给页面的input

12.最后页面form提交,保存视频转码后m3u8的路径。
前段页面使用
引入video.js,否则.m3u8视频无法播放
多亏了fastlyfastly的 awesome 人, video.js 有了一个免费的 CDN 托管版本,任何人都可以使用。将这些标记添加到文档的
: