SpringSecurity - 简单前后端分离 - 自定义认证篇
SpringSecurity 学习指南大全
SpringSecurity - 前后端分离简单实战 - 环境准备
文章目录
- SpringSecurity - 简单前后端分离 - 自定义认证篇
-
- 前提条件
- 架构简单介绍
-
- 整体架构
- Servlet 认证架构
-
- 自定义认证类
- 安全上下文持有者
- 认证管理器
- 自定义认证提供类
- 自定义认证过滤器
- 配置认证
- token 的处理过滤器
SpringSecurity - 简单前后端分离 - 自定义认证篇
终于到了我们关心的第一个问题,认证篇。此篇我们将结合前面的认证架构来详细讲解如何实现自定义认证处理,会简单的讲解一些原理,不会太过深入。
前提条件
已经根据环境准备篇,完成了环境准备。
架构简单介绍
要想玩转 SpringSecurity 的认证,就必须先看懂其认证架构。
整体架构
在看认证架构之前,我们需要先看懂整体架构。其实 SpringSecurity 的整体就是过滤器链。
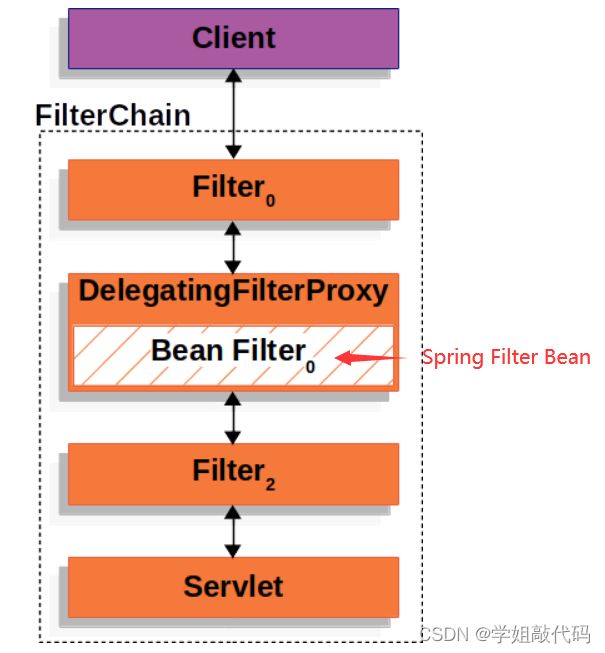
客户端请求到来,再到达具体的 Servlet 前,会经过很多过滤器。
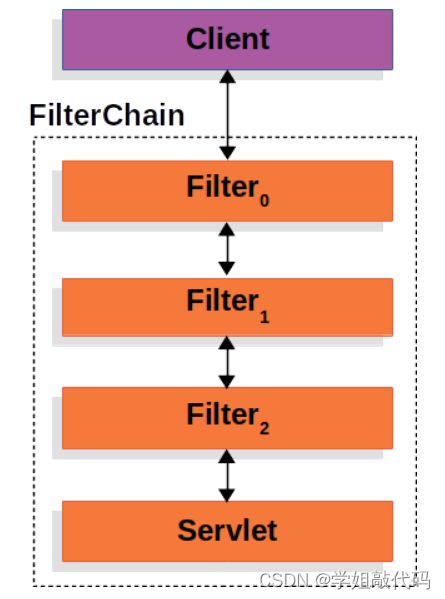
然后在过滤器链中,提供了一个代理过滤器,来执行注册到 Spring 容器中的过滤器类。这样我们自己写的过滤器就能被执行。
执行代理的具体过滤器为FilterChainProxy,此过滤器为 SpringSecurity 提供,用来执行 SecurityFilterChain 过滤器链。SecurityFilterChain 就是我们后面需要配置的安全过滤器链。新版的 SpringSecurity 和旧版配置已经发生改变,只需要配置像这样的 SecurityFilterChain 过滤器链即可,FilterChainProxy 会执行不同的 SecurityFilterChain ,老版方法是去继承 WebSecurityConfigurerAdapter 进行配置,在新版中已经被标注为过时类。
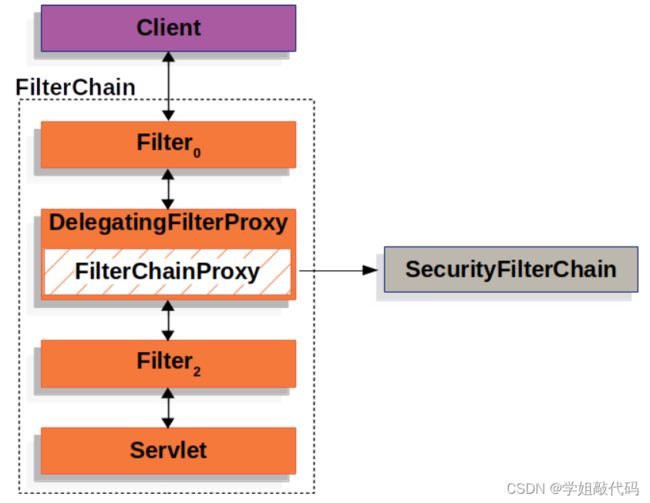
可以说 FilterChainProxy 是安全过滤的起点,在此类中打断点可以让我们清楚的看清不同过滤器的执行过程。
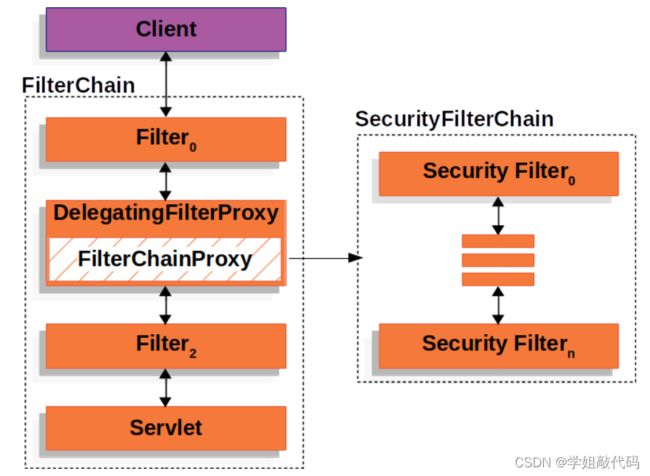
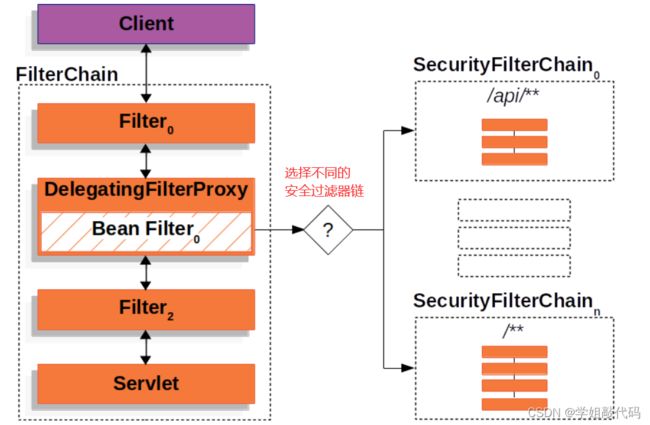
如果我们需要为不同的请求接口配置不同的安全过滤,只需要配置不同的 SecurityFilterChain 安全过滤器链即可,SecurityFilterChain 可以配置多个。
在执行中,会优先使用第一个配置的 SecurityFilterChain 。
默认 SpringSecurity 提供了很多的过滤器,可以查看我的其它文章有详细说明。
在自定义过滤器时,我们需要了解它默认的过滤器执行顺序。
Servlet 认证架构
在介绍架构前,我们必须要先了解一些类。
认证:认证就是确定当前用户是否是合法的或者受信任的用户,可以是任意资源
- Authentication:认证对象,用于保存认证的凭借,可以是任何数据。
此类是一个接口,认证对象的抽象,它是 SpringSecurity 抽象的认证对象,它有一些默认的方法,下面是其源码
public interface Authentication extends Principal, Serializable {

	// 获取认证对象的权限集合 GrantedAuthority 抽象权限类
	Collection<? extends GrantedAuthority> getAuthorities();
	// 证明身份的凭借,比如用户密码
	Object getCredentials();
	// 其它信息
	Object getDetails();
	// 要认证的信息,比如用户名
	Object getPrincipal();
	// 是否授信,也就是是否认证通过
	boolean isAuthenticated();
	// 设置是否受信任
	void setAuthenticated(boolean isAuthenticated) throws IllegalArgumentException;

}
默认返回 Object,所以可以是任意数据,不只局限于用户名和密码,可以是具体对象或者任意的数据。
抽象认证提供了一个抽象的认证实现类,也就是认证的基类AbstractAuthenticationToken,此类主要对抽象认证的简单实现
其源码如下:
public abstract class AbstractAuthenticationToken implements Authentication, CredentialsContainer {

	// 提供了权限属性
	private final Collection<GrantedAuthority> authorities;
	// 其它信息属性
	private Object details;
	// 是否认证成功属性
	private boolean authenticated = false;

	// 构造,通过注入权限集合进行创建
	public AbstractAuthenticationToken(Collection<? extends GrantedAuthority> authorities) {
		if (authorities == null) {
			this.authorities = AuthorityUtils.NO_AUTHORITIES;
			return;
		}
		for (GrantedAuthority a : authorities) {
			Assert.notNull(a, "Authorities collection cannot contain any null elements");
		}
		this.authorities = Collections.unmodifiableList(new ArrayList<>(authorities));
	}

	// 一些其它方法
	...

	// 实现抽象认证的方法
	// 获取权限
	@Override
	public Collection<GrantedAuthority> getAuthorities() {
		return this.authorities;
	}
	// 是否认证成功
	@Override
	public boolean isAuthenticated() {
		return this.authenticated;
	}
	// 设置认证
	@Override
	public void setAuthenticated(boolean authenticated) {
		this.authenticated = authenticated;
	}
	// 获取其它信息
	@Override
	public Object getDetails() {
		return this.details;
	}
	// 设置其它信息
	public void setDetails(Object details) {
		this.details = details;
	}


}
其它方法如果感兴趣可以自行详细查看。
我们可以发现抽象实现,帮我们提供了三个公共属性,而在此类的具体子类,就是我们需要提供的自定义认证对象。
我们要想自定义认证,就需要先自定义认证对象,当然 SpringSecurity 提供了一些默认实现,比如我们常见的 UsernamePasswordAuthenticationToken,包括记住我认证RememberMeAuthenticationToken,注解支持等等

一个简单的用户密码认证实现,这个应该是大家配置常用的。我们等会就会去自定义一个认证实现,比如上面的JsonAuthenticationToken。
我们查看下UsernamePasswordAuthenticationToken 的源码,看看它是如果实现的。
public class UsernamePasswordAuthenticationToken extends AbstractAuthenticationToken {

	private static final long serialVersionUID = SpringSecurityCoreVersion.SERIAL_VERSION_UID;
	// 用户名
	private final Object principal;
	// 密码
	private Object credentials;

	// 构造方法,返回未认证的认证
	public UsernamePasswordAuthenticationToken(Object principal, Object credentials) {
		super(null);
		this.principal = principal;
		this.credentials = credentials;
		setAuthenticated(false);//是否授信为false
	}
	// 返回授信的认证
	public UsernamePasswordAuthenticationToken(Object principal, Object credentials,
			Collection<? extends GrantedAuthority> authorities) {
		super(authorities);
		this.principal = principal;
		this.credentials = credentials;
		super.setAuthenticated(true); // 认证为true
	}
	// 提供了静态工厂方法来使用构造
	// 返回未授信的认证
	public static UsernamePasswordAuthenticationToken unauthenticated(Object principal, Object credentials) {
		return new UsernamePasswordAuthenticationToken(principal, credentials);
	}
	// 返回授信的认证
	public static UsernamePasswordAuthenticationToken authenticated(Object principal, Object credentials,
			Collection<? extends GrantedAuthority> authorities) {
		return new UsernamePasswordAuthenticationToken(principal, credentials, authorities);
	}
	// 实现认证接口的其它方法
	@Override
	public Object getCredentials() {
		return this.credentials;
	}

	@Override
	public Object getPrincipal() {
		return this.principal;
	}

	// 覆盖认证抽象基类的方法
	@Override
	public void setAuthenticated(boolean isAuthenticated) throws IllegalArgumentException {
		Assert.isTrue(!isAuthenticated,
				"Cannot set this token to trusted - use constructor which takes a GrantedAuthority list instead");
		super.setAuthenticated(false);
	}

}
是不是很简单,认证对象就是我们用户访问系统进行认证需要使用的对象。
自定义认证类
我们要自定义认证类,只需要继承其抽象认证基类AbstractAuthenticationToken即可,完全可以根据其它的默认实现进行复制粘贴。
我们知道在前后端交互中,都是JSON交互,所以我们自定义一个JSON的认证类。
项目包路径可以自定义,我的关于Security的都在security包下,自定义token放在token包下。
自定义认证类JsonAuthenticationToken
public class JsonAuthenticationToken extends AbstractAuthenticationToken {

	private static final long serialVersionUID = SpringSecurityCoreVersion.SERIAL_VERSION_UID;

    private final Object principal; // 用户

    private Object credentials; // 密码

	// 其它方法可以完全一样
	/**
     * 此构造函数用来初始化未授信凭据.
     * @param principal
     * @param credentials
     */
    public JsonAuthenticationToken(Object principal, Object credentials) {
        super(null);
        this.principal = principal;
        this.credentials = credentials;
        setAuthenticated(false);
    }

    /**
     * 此构造函数用来初始化授信凭据.
     * @param authorities
     * @param principal
     * @param credentials
     */
    public JsonAuthenticationToken(Object principal, Object credentials,
                                   Collection<? extends GrantedAuthority> authorities) {
        super(authorities);
        this.principal = principal;
        this.credentials = credentials;
        super.setAuthenticated(true); // 必须使用父类的setAuthenticated,子类此方法已被重写
    }

    /**
     * 未授信凭据的静态工厂方法
     * @param principal
     * @param credentials
     * @return
     */
    public static JsonAuthenticationToken noAuthenticated(Object principal, Object credentials) {
        return new JsonAuthenticationToken(principal, credentials);
    }

    /**
     * 初始化授信凭据的静态工厂方法
     * @param principal
     * @param credentials
     * @param authorities
     * @return
     */
    public static JsonAuthenticationToken authenticated(Object principal, Object credentials,
                                                        Collection<? extends GrantedAuthority> authorities) {
        return new JsonAuthenticationToken(principal, credentials, authorities);
    }

    @Override
    public Object getCredentials() {
        return this.credentials;
    }

    @Override
    public Object getPrincipal() {
        return this.principal;
    }

    @Override
    public void setAuthenticated(boolean isAuthenticated) throws IllegalArgumentException {
        Assert.isTrue(!isAuthenticated,
                "不能设置为授信认证,请调用父类授信方法!");
        super.setAuthenticated(false);
    }

    @Override
    public void eraseCredentials() {
        super.eraseCredentials();
        this.credentials = null;
    }

}
安全上下文持有者
SecurityContextHolder:此类就是安全上下文持有者,也是认证的核心
它包含了SecurityContext 安全上下文类,安全上下文类包含了我们的认证对象。

如果我们想快速认证成功,可以直接设置安全上下文对象
// 创建安全上下文
SecurityContext context = SecurityContextHolder.createEmptyContext();
// 封装认证
Authentication authentication = new TestingAuthenticationToken("username", "password", "ROLE_USER");
// 放入安全上下文
context.setAuthentication(authentication);
// 安全上下文交由SecurityContextHolder
SecurityContextHolder.setContext(context);
我们认证成功后,获取登录信息,也是通过此类来获取
SecurityContext context = SecurityContextHolder.getContext(); // 获得 SecurityContext
Authentication authentication = context.getAuthentication(); // 获得当前认证对象
String username = authentication.getName();
Object principal = authentication.getPrincipal();
Collection<? extends GrantedAuthority> authorities = authentication.getAuthorities();	// 获得认证对象的权限集合
认证管理器
AuthenticationManager 类,就是我们的认证管理器,我们的所有认证就是它的子类,此类是我们实现自定义认证逻辑的处理类。
它是一个接口,提供了一个认证方法。源码如下:
public interface AuthenticationManager {
	// 就一个方法,传入认证对象,返回认证处理后的认证对象
	Authentication authenticate(Authentication authentication) throws AuthenticationException;
}
前面我们已经自定义了认证对象,当我们在认证处理时,就是要把认证对象交由认证管理器来进行认证处理。
ProviderManager 就是认证管理的默认实现,由 SpringSecurity 默认提供,一般情况下我们不要自定义认证管理器,用它默认的实现即可,当然也可以自定义实现。上图加深理解
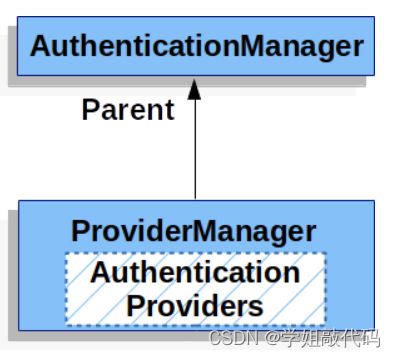
而在 ProviderManager 类中,维护了一个认证提供者AuthenticationProvider 集合,当进行认证时会遍历集合进行认证,只要有一个通过就结束遍历。一个认证管理器可以有多个实现

我们自定义认证时可以自定义一个认证提供者AuthenticationProvider,再注入ProviderManager中来进行自定义配置,AuthenticationProvider是一个接口类,提供了认证的抽象方法。
public interface AuthenticationProvider {

	// 认证方法
	Authentication authenticate(Authentication authentication) throws AuthenticationException;
	// 支持的认证对象
	boolean supports(Class<?> authentication);
}
SpringSecurity提供了很多认证提供者,如果和业务相符可以不用自定义实现

我们实现此认证接口来自定义认证逻辑。
用户名密码认证的认证提供类是AbstractUserDetailsAuthenticationProvider抽象的认证提供者,其子类DaoAuthenticationProvider提供了具体认证逻辑。具体源码感兴趣可自行查看
自定义认证提供类
JsonCodeAuthenticationProvider
认证提供类在实现具体的认证逻辑时,需要认证对象,而认证对象是通过配置自定义认证过滤器来进行封装的。
这里还需要简单介绍两个类,此类也是 SpringSecurity 提供的,一个是用于查询用户的抽象类,一个是用户的抽象类
- UserDetailsService:根据用户名查询用户,我们可实现也可以不实现
- UserDetails:用户抽象类,提供了用户的一些基本信息类
这两个类,我们可实现也可以不实现,我这里选择实现。
UserDetailsService类用于根据用户名从数据库查询用户,UserDetails 用户的基类。当然这些类 SpringSecurity也提供了一些默认实现。
UserDetailsService
@Service
public class UserDetailServiceImpl implements UserDetailsService {

    @Autowired
    UserServiceImpl userService;

    @Override
    public UserDetails loadUserByUsername(String username) throws UsernameNotFoundException {
        if(StringUtils.isBlank(username)){
            throw new UsernameNotFoundException("用户名为空!");
        }
        User user = userService.getOne(new LambdaQueryWrapper<User>().eq(User::getUsername,username));
        //TODO 处理用户权限存入redis

        if(ObjectUtils.isEmpty(user)){
            throw new UsernameNotFoundException("用户不存在!");
        }
        return new UserDetail(user, AuthorityUtils.NO_AUTHORITIES);
    }

}
UserDetails
@ToString
@Getter
public class UserDetail extends User{

    // 系统用户实体
    private com.sty.system.pojo.User user;

    public UserDetail(com.sty.system.pojo.User user, Collection<? extends GrantedAuthority> authorities) {
        super(user.getUsername(), user.getPassword(), authorities);
        this.user = user;
    }

}
继承的 User 类是 SpringSecurity 提供的实现 UserDetails 接口的基础实现,系统用户实体是我们系统的用户,我们可以创建一个 UserDetail 类来封装 Security 使用的用户对象,来和我们系统用户分离。
有了前期准备工作,我们就可以实现我们自定义的认证提供类了,完全可以对比着默认的实现,复制粘贴。
@Slf4j
@SuppressWarnings("all")
public class JsonCodeAuthenticationProvider implements AuthenticationProvider, InitializingBean, MessageSourceAware {

	private final GrantedAuthoritiesMapper authoritiesMapper = new NullAuthoritiesMapper();
	// 用户提供类
    private final UserDetailsService userDetailsService;
	// 消息,比如国际化处理
    private MessageSourceAccessor messages = SpringSecurityMessageSource.getAccessor();
	// 密码加密规则
    private PasswordEncoder passwordEncoder;
	// 系统配置属性,定义了保存 Redis 的前缀
    @Autowired
    SysProperties sysProperties;
	// 注入Redis工具类
    @Autowired
    RedisClient redisClient;

	/**
     * 实例化Json验证码提供者
     * @param userDetailsService
     */
    public JsonCodeAuthenticationProvider(UserDetailsService userDetailsService,PasswordEncoder passwordEncoder) {
        this.userDetailsService = userDetailsService;
        this.passwordEncoder = passwordEncoder;
    }

    /**
     * 认证逻辑,会传入认证对象,返回认证后的对象
     * @param authentication
     * @return
     * @throws AuthenticationException
     */
    @Override
    public Authentication authenticate(Authentication authentication) throws AuthenticationException {
        Assert.isInstanceOf(JsonAuthenticationToken.class, authentication,
                () -> this.messages.getMessage("JsonCodeAuthenticationProvider.onlySupports",
                        "仅支持 JsonAuthenticationToken"));

        //未授信认证
        JsonAuthenticationToken noAuthenticationToken = (JsonAuthenticationToken) authentication;
		// 抽象认证父类提供的getName()方法
        String username = noAuthenticationToken.getName();
        String password = (String) noAuthenticationToken.getCredentials();

        // 根据用户名查询user对象
        UserDetail userDetail = (UserDetail) userDetailsService.loadUserByUsername(username);
        if (Objects.isNull(userDetail)) {
            throw new BadCredentialsException("查询认证用户为空!");
        }

        // 密码校验
        if (this.passwordEncoder.matches(password, userDetail.getPassword())) {
        // 认证成功,返回认证成功对象
            return createSuccessAuthentication(authentication,userDetail);
        }else{
            log.info(username+":JsonCode - 认证失败,密码错误!");
            throw new BadCredentialsException(this.messages
                    .getMessage("JsonCodeAuthenticationProvider.badCredentials", "认证失败!"));
        }
    }

    /**
     * 认证成功,返回授信对象
     * @param authentication
     * @param user
     * @return
     */


    protected Authentication createSuccessAuthentication(Authentication authentication, UserDetail user) {
        // 权限处理
        Collection<? extends GrantedAuthority> authorities = authoritiesMapper.mapAuthorities(user.getAuthorities());

        // 用户存入redis,生成token
        String token = TokenUtils.getToken();
        HashMap<String, Object> map = new HashMap<>();
        String tokenKey = StringUtils.join("JSON-",TokenUtils.getToken());
        String key = RedisKeyUtils.getTokenKey(sysProperties.getRedisProject(), user.getUsername(),tokenKey);
        redisClient.set(key,token,(60*15));

        //去掉密码
        user.getUser().setPassword("");
        redisClient.set(RedisKeyUtils.getKey(sysProperties.getRedisProject(),user.getUsername()),
                            user.getUser());

        // 存入用户数据、清空密码、封装权限
        JsonAuthenticationToken authenticationToken = JsonAuthenticationToken.authenticated(StringUtils.join(key,",",user.getUsername(),",",tokenKey), null, authorities);
        authenticationToken.setDetails(authentication.getDetails());
        log.info(user.getUsername()+":认证成功!");
        return authenticationToken;
    }

    @Override
    public void afterPropertiesSet() throws Exception {
        Assert.notNull(userDetailsService, "userDetailsService 不能为空");
        Assert.notNull(passwordEncoder, "passwordEncoder 不能为空");
    }

    @Override
    public void setMessageSource(MessageSource messageSource) {
        this.messages = new MessageSourceAccessor(messageSource);
    }

    @Override
    public boolean supports(Class<?> authentication) {
        return JsonAuthenticationToken.class.isAssignableFrom(authentication);
    }

}
现在我们认证对象有了,认证提供者也有了,还差最后的认证过滤器了。
自定义认证过滤器
我们前面说了,SpringSecurity 的认证处理,就是基于过滤器链的,默认提供了很多发认证过滤器。直接上图
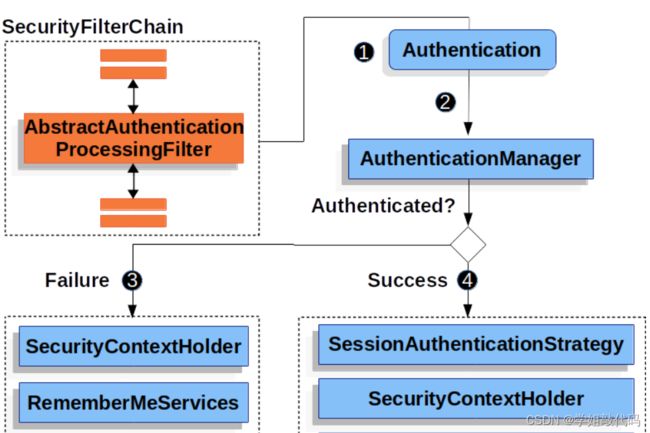
最主要的就是这个抽象认证处理过滤器AbstractAuthenticationProcessingFilter
AbstractAuthenticationProcessingFilter 抽象认证过滤器可以处理提交给它的任何认证请求,具体的认证看其子类过滤器。默认 SpringSecurity 也提供了许多过滤器。
执行流程:
- 比如你们熟悉的
UsernamePasswordAuthenticationFilter,用户名和密码认证过滤器从请求中获取用户名和密码,并创建UsernamePasswordAuthenticationToken认证对象。 - 然后将此认证对象交由 AuthenticationManager 认证管理器进行身份认证,支持用户名密码认证的认证管理器前面已经提到是
AbstractUserDetailsAuthenticationProvider认证提供者和具体的DaoAuthenticationProvider - 如果认证失败
- SecurityContextHolder 会被清除
- 认证失败处理器 AuthenticationFailureHandler 被调用。
- 如果认证成功
- SessionAuthenticationStrategy 收到新登录通知。Authentication 在 SecurityContextHolder 上设置。
- 稍后 SecurityContextPersistenceFilter 将 SecurityContext 保存到 HttpSession。
- ApplicationEventPublisher 发布一个 InteractiveAuthenticationSuccessEvent。
- AuthenticationSuccessHandler 被调用。
我们可以参考UsernamePasswordAuthenticationFilter 来自定义自己的认证过滤器,因为默认的 UsernamePasswordAuthenticationFilter 只能支持Parameter 的用户名和密码,而我们需要的是JSON登录。
自定义认证过滤器
JsonAuthenticationFilter
@Slf4j
@SuppressWarnings("all")
public class JsonAuthenticationFilter extends AbstractAuthenticationProcessingFilter {

	public static final String SPRING_SECURITY_FORM_USERNAME_KEY = "username";

    public static final String SPRING_SECURITY_FORM_PASSWORD_KEY = "password";
    // 登录接口
    private static final AntPathRequestMatcher DEFAULT_ANT_PATH_REQUEST_MATCHER = new AntPathRequestMatcher("/login",
            "POST");
    // 用户参数名
    private String usernameParameter = SPRING_SECURITY_FORM_USERNAME_KEY;
    // 密码参数名
    private String passwordParameter = SPRING_SECURITY_FORM_PASSWORD_KEY;

    public JsonAuthenticationFilter() {
        super(DEFAULT_ANT_PATH_REQUEST_MATCHER);
    }
	@Override
    public Authentication attemptAuthentication(HttpServletRequest request, HttpServletResponse response) throws AuthenticationException, IOException, ServletException {
        if (!request.getMethod().equals("POST")) {
            throw new AuthenticationServiceException("Authentication 方法不支持: " + request.getMethod());
        }
        if (request.getContentType() != null && request.getContentType().contains(MediaType.APPLICATION_JSON_VALUE)) {
            ObjectMapper mapper = new ObjectMapper();
            Map<String,String> map = mapper.readValue(request.getInputStream(), Map.class);

            String username = map.get(this.usernameParameter);
            String password = map.get(this.passwordParameter);
            username = (username != null) ? username.trim() : "";
            password = (password != null) ? password : "";

            JsonAuthenticationToken authRequest = JsonAuthenticationToken.noAuthenticated(username,
                    password);
            // 允许子类设置“详细信息”属性
            setDetails(request, authRequest);
            // 调用认证管理执行认证方法
            return this.getAuthenticationManager().authenticate(authRequest);
        }else{
            throw new AuthenticationServiceException("身份认证方法只支持 json 认证: " + request.getMethod());
        }
    }

    protected void setDetails(HttpServletRequest request, JsonAuthenticationToken authRequest) {
        authRequest.setDetails(this.authenticationDetailsSource.buildDetails(request));
    }

    public void setUsernameParameter(String usernameParameter) {
        Assert.hasText(usernameParameter, "Username parameter 不能为空");
        this.usernameParameter = usernameParameter;
    }

    public void setPasswordParameter(String passwordParameter) {
        Assert.hasText(passwordParameter, "Password parameter 不能为空");
        this.passwordParameter = passwordParameter;
    }

}
过滤器的调用都在AbstractAuthenticationProcessingFilter类中,在具体认证的时候此类调用的抽象方法,具体实现交由子类实现。所有我们只需要实现其认证方法attemptAuthentication()即可。感兴趣可以查看AbstractAuthenticationProcessingFilter 抽象类的 doFilter() 方法。
配置认证
在配置认证前,我们还需要添加,认证成功和认证失败处理器,还有一个未认证的处理器。这些处理器会处理认证后的响应。它们都是抽象接口需要我们具体去实现。SpringSecurity 也提供了默认实现。
认证成功处理器
JsonAuthenticationSuccessHandler
@Slf4j
@Component
public class JsonAuthenticationSuccessHandler implements AuthenticationSuccessHandler {

    @Autowired
    RedisClient redisClient;
    @Autowired
    SysProperties sysProperties;
    @Autowired
    SecurityUtils securityUtils;


    @Override
    public void onAuthenticationSuccess(HttpServletRequest request, HttpServletResponse response,
                                        Authentication authentication) throws IOException, ServletException {
        Authentication auth = SecurityContextHolder.getContext().getAuthentication();
        // AssertUtil是自定义的断言类,不仅抛出异常还会执行一个函数
        AssertUtil.notNull(auth.getPrincipal(),"key 为空!",log::info);
        String principal = String.valueOf(auth.getPrincipal());

        String[] split = principal.split(",");
        String token = (String) redisClient.get(split[0]);
        long expire = redisClient.getExpire(split[0]);// 获取token的过期时间
        AssertUtil.notNull(token,"token 不存在!", log::info);

        String userK = RedisKeyUtils.getKey(sysProperties.getRedisProject(), split[1]);
        User user = (User) redisClient.get(userK);
        AssertUtil.notNull(user,"User 不存在!",log::info);

        System.err.println(securityUtils.getRedisUser());

        // 封装返回结果
        HashMap<String,Object> map = new HashMap();
        map.put("token",token);
        map.put("tokenKey",split[2]);
        map.put("expire",expire);
        map.put("user", user);
        //返回Json格式
        response.setHeader("Content-Type","application/json;charset=utf-8");
        PrintWriter writer = response.getWriter();
        writer.write(JsonUtil.objectToJson(JsonResult.result(true, ResultCode.SUCCESS,map)));
        writer.flush();
        writer.close();

    }

}
这里主要从缓存中获取用户信息,并返回给前端。
认证失败处理器
JsonAuthenticationFailureHandler
@Component
public class JsonAuthenticationFailureHandler implements AuthenticationFailureHandler {

    @Override
    public void onAuthenticationFailure(HttpServletRequest request, HttpServletResponse response,
                                        AuthenticationException exception) throws IOException, ServletException {
        //响应状态
        response.setStatus(HttpServletResponse.SC_FORBIDDEN);
        //返回Json格式
        response.setHeader("Content-Type","application/json;charset=utf-8");
        PrintWriter writer = response.getWriter();
        if(exception instanceof NonceExpiredException){
            writer.write(JsonUtil.objectToJson(JsonResult.result(false,
                    ResultCode.ERROR_NOT_EXISTS_USER,exception.getMessage())));
        }else{
            writer.write(JsonUtil.objectToJson(JsonResult.result(false,
                    ResultCode.ERROR_LOGIN,exception.getMessage())));
        }
        writer.flush();
        writer.close();
    }

}
未认证处理器
SecurityAuthenticationEntryPoint
@Component
public class SecurityAuthenticationEntryPoint implements AuthenticationEntryPoint {

    @Override
    public void commence(HttpServletRequest request, HttpServletResponse response, AuthenticationException authException) throws IOException, ServletException {
        //响应状态
        response.setStatus(HttpServletResponse.SC_UNAUTHORIZED);
        //返回Json格式
        response.setHeader("Content-Type","application/json;charset=utf-8");
        PrintWriter writer = response.getWriter();
        writer.print(JsonUtil.objectToJson(JsonResult.result(false, ResultCode.SC_UNAUTHORIZED,authException.getMessage())));
        writer.flush();
        writer.close();
    }

}
写了这么多现在终于可以去配置我们的Security了。
我们先配置我们的认证过滤器,我这里直接单独创建的配置类,好区分不同的认证过滤器。
JsonAuthenticationConfig
@Slf4j
@Configuration
public class JsonAuthenticationConfig {

    @Autowired
    UserDetailServiceImpl userDetailService;

    @Autowired
    JsonAuthenticationSuccessHandler authenticationSuccessHandler;

    @Autowired
    JsonAuthenticationFailureHandler authenticationFailureHandler;

    @Bean
    public PasswordEncoder passwordEncoder(){
        return new BCryptPasswordEncoder();
    }

    /**
     * 配置 JSON 认证器
     * @return
     */
    @Bean
    public JsonCodeAuthenticationProvider jsonCodeAuthenticationProvider(){
        return new JsonCodeAuthenticationProvider(userDetailService,passwordEncoder());
    }

	// ---配置认证过滤器----
    @Bean
    public JsonAuthenticationFilter jsonAuthenticationFilter(){
        JsonAuthenticationFilter jsonFilter = new JsonAuthenticationFilter();
        // 配置认证管理器,并指定认证器
        ProviderManager providerManager = new ProviderManager(jsonCodeAuthenticationProvider());
        jsonFilter.setAuthenticationManager(providerManager);
        // 认证成功处理器
        jsonFilter.setAuthenticationSuccessHandler(authenticationSuccessHandler);
        // 认证失败处理器
        jsonFilter.setAuthenticationFailureHandler(authenticationFailureHandler);
        return jsonFilter;
    }

}
配置Security
@EnableWebSecurity
public class WebSecurityConfig {

    @Autowired
    JsonAuthenticationFilter jsonAuthenticationFilter;
    @Autowired
    SecurityAuthenticationEntryPoint authenticationEntryPoint;

    // 核心配置
    @Bean
    SecurityFilterChain filterChain(HttpSecurity http) throws Exception{
    	// 由于前后端分离,csrf和session都可以关闭
        http.csrf().disable();
        http.sessionManagement().sessionCreationPolicy(SessionCreationPolicy.STATELESS);

        //token登录,放在UsernamePasswordAuthenticationFilter过滤器之前
        http.addFilterBefore(jsonAuthenticationFilter, UsernamePasswordAuthenticationFilter.class);

		// 新版的基于authorizeHttpRequests进行配置
        http.authorizeHttpRequests()
                .antMatchers(HttpMethod.POST,"/login").permitAll()
                .anyRequest().authenticated();// 除了login其它都需要认证

        http.exceptionHandling()
                .authenticationEntryPoint(authenticationEntryPoint);


        return http.build();
    }

}
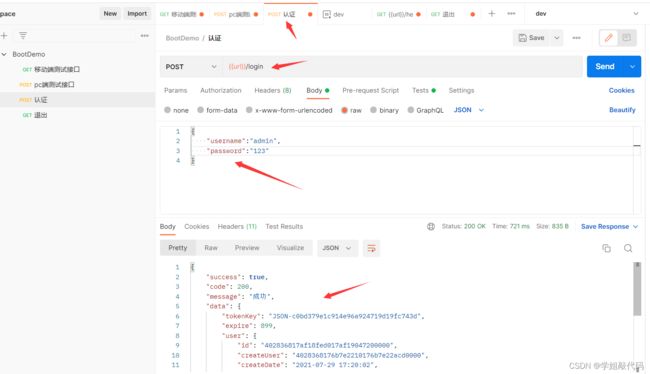
我们现在可以编辑测试接口进行测试了。
token 的处理过滤器
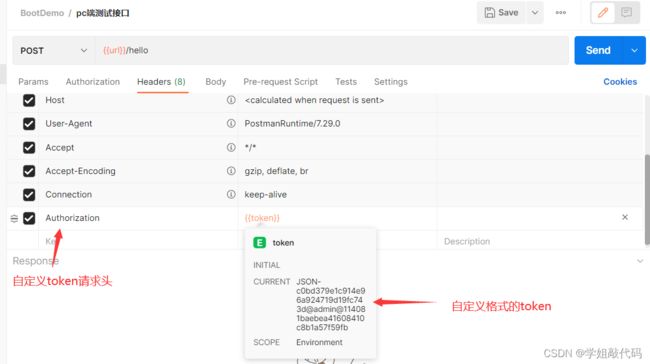
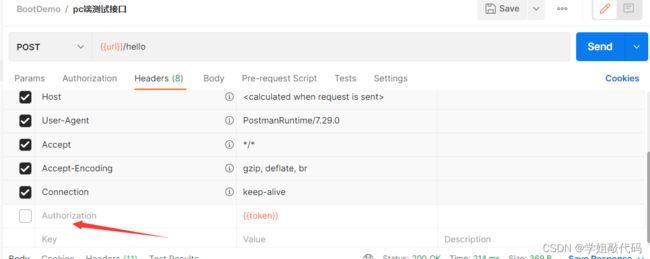
为什么我可以直接成功呢,因为我们要处理 token 还需要自定义一个 token 处理过滤器,来处理 token。
token 验证成功,设置认证成功操作。
JsonTokenAuthenticationFilter
@Component
public class JsonTokenAuthenticationFilter extends OncePerRequestFilter{

    @Autowired
    JsonAuthenticationFailureHandler failureHandler;
    @Autowired
    SysProperties sysProperties;
    @Autowired
    RedisClient redisClient;

    @Override
    protected void doFilterInternal(HttpServletRequest request, HttpServletResponse response, FilterChain filterChain) throws ServletException, IOException {
        // TODO 后续添加签名认证过滤
        //简单验证token登录,并刷新token时间
        //获取请求头
        String headerToken = request.getHeader(HttpHeaders.AUTHORIZATION);
        if(StringUtils.isNoneBlank(headerToken)){
            String[] split = headerToken.split("@");
            if(split.length != 3){
                unsuccessfulAuthentication(request,response,new NonceExpiredException("token错误!"));
                return;
            }
            // 从缓存中获取token
            String key = RedisKeyUtils.getTokenKey(sysProperties.getRedisProject(), split[1],split[0]);
            // 判断key是否存在
            if(!redisClient.hasKey(key)){
                unsuccessfulAuthentication(request,response,new NonceExpiredException("token已过期!"));
                return;
            }
            String token = (String) redisClient.get(key);
            // 比对token值
            if(!split[2].equals(token)){
                unsuccessfulAuthentication(request,response,new NonceExpiredException("token无效!"));
                return;
            }
            // 刷新token
            if(redisClient.getExpire(key) <= 120){
                redisClient.expire(key,60*15);
            }
            // 构建用户认证
            // TODO 需要优化用户查询
            // 查询用户
            String userK = RedisKeyUtils.getKey(sysProperties.getRedisProject(), split[1]);
            User user = (User) redisClient.get(userK);
            // 封装
            JsonAuthenticationToken authenticationToken = JsonAuthenticationToken.authenticated(StringUtils.join(key,",",split[1],",",split[0]),
                    null,  AuthorityUtils.commaSeparatedStringToAuthorityList(""));
            authenticationToken.setDetails(new WebAuthenticationDetailsSource().buildDetails(request));
            // 放入安全上下文中
            SecurityContextHolder.getContext().setAuthentication(authenticationToken);

        }
        filterChain.doFilter(request, response);
    }

    /**
     * 验证失败处理
     * @param request
     * @param response
     * @param failed
     * @throws IOException
     * @throws ServletException
     */
    protected void unsuccessfulAuthentication(HttpServletRequest request, HttpServletResponse response,
                                              AuthenticationException failed) throws IOException, ServletException {
        SecurityContextHolder.clearContext();
        this.logger.error(failed.getMessage());
        this.failureHandler.onAuthenticationFailure(request, response, failed);
    }

}
我们再把此过滤器配置到配置文件中
// 先注入
@Autowired
JsonTokenAuthenticationFilter jsonTokenAuthenticationFilter;

//在 SecurityFilterChain 过滤器链中添加
//token简单验证
http.addFilterBefore(jsonTokenAuthenticationFilter,UsernamePasswordAuthenticationFilter.class);
这样只要请求带有我们指定的token格式,并且没有过期,我们才认证成功,不然就会提示认证失败。
签名认证,就是前端用 token+时间戳+随机字符串+请求参数拼接的字符串通过一定算法进行加密后,再传给后端。并且把加密需要的参数一起传入后端。
后端获取到参数后,根据前端一样的步骤,先获取字符串拼接的参数进行字符串拼接,然后通过相同的算法进行加密,再比对前端传入的加密后的字符串是否和后端加密后的字符串一样,不一样则表示请求被拦截修改过,一样则放行。
这就是简单的签名认证。
至此我们的自定义前后端分离JSON认证处理就完成了,东西还是挺多的。后面我会更新授权处理篇。提供类AuthorizationManager授权处理器,新版的玩法和老版的也不一样。
如果前面的都没问题,我相信以大家的技术自定义其它的认证都没啥问题了
