基于 Docker 的 ELK 高可用集群架构
目录
-
- 一、规划
-
- 1.1 主机规划
- 1.2 整体架构
- 二、部署
-
- 2.1 ES 集群
- 2.2 Logstash 分流
- 2.3 Kibana 前端展示
- 2.4 Nginx 反向代理
- 2.5 Zookeeper 集群
- 2.6 Kafka 集群
- 2.7 Filebeat 轻量级数据收集引擎
-
- 2.7.1 架构图
- 2.7.2 部署及应用
- 三、总结
- FAQ
一、规划
1.1 主机规划
| Service | Version | 角色 |
|---|---|---|
| 192.168.56.133 - 2C/2G 30G - es-1 | 6.8.23 | ES集群 |
| 192.168.56.134 - 2C/2G 30G - es-2 | - | - |
| 192.168.56.135 - 2C/2G 30G - es-3 | - | - |
| 192.168.56.137 - 2C/2G 30G - kafka-1 zookeeper-1 | 3.7.1 | 消息队列 |
| 192.168.56.138 - 2C/2G 30G - kafka-2 zookeeper-2 | - | - |
| 192.168.56.139 - 2C/2G 30G - kafka-3 zookeeper-3 | - | - |
| 192.168.56.140 - 1C/2G 30G - logstash-1 | 6.8.23 | logstash分流 |
| 192.168.56.141 - 1C/2G 30G - logstash-2 | - | - |
| 192.168.56.136 - 2C/2G 30G - kabana - head - nginx | 6.8.23 | web前端展示 |
| 192.168.56.136 - 2C/2G 30G - kabana | - | - |
整体思路:
1、三台服务器做 ES 集群;
2、三台服务器做 Kafka 集群;
3、两台或多台服务器做 Logstash 分流;
4、两台 Kibana 做负载均衡。
1.2 整体架构
应用场景:适用于高并发场景。
二、部署
2.1 ES 集群
1、安装docker
执行安装脚本,有需要安装脚本的朋友可私我。
2、创建 ES 相关目录
mkdir -p /data/elasticsearch/data
mkdir -p /data/elasticsearch/logs
mkdir -p /data/elasticsearch/plugins
mkdir -p /data/elasticsearch/config/
3、任意一个 ES 节点运行一个es临时容器,拷贝配置文件
docker run -itd \
--name=tmp \
-e ES_JAVA_OPTS="-Xms512m -Xmx512m" \
-e "discovery.type=single-node" \
elasticsearch:6.8.20
docker cp tmp:/usr/share/elasticsearch /data/

# 直接复制ES的工作目录到本地进行持久化,后面运行容器时就使用该目录来做映射。
4、修改 ES 配置文件
-
es-1
elasticsearch.yml
# cluster.name 三者需相同
cluster.name: es-cluster
# node.name 节点名,设置与主机名一致即可
node.name: es-1
# node.master 符合成为主节点的条件
node.master: true
# node.data 符合成为数据节点的条件
node.data: true
# path.data 数据存储路径(下面会进行创建)
path.data: /data/elasticsearch/data
# path.logs 日志存储路径(下面会进行创建)
path.logs: /data/elasticsearch/logs
# bootstrap.memory_lock 锁住内存,即只使用内存,不使用交换分区
bootstrap.memory_lock: true
# network.host 允许所有IP访问
network.host: 0.0.0.0
# network.publish_host 集群节点交互IP(docker方式的部署填写公网IP)
# docker 方式部署的需指定 network.publish_host,否则无法访问集群
network.publish_host: 192.168.56.133
# http.port web访问端口
http.port: 9200
# discovery.zen.ping.unicast.hosts 关闭单播
discovery.zen.ping.unicast.hosts: ["192.168.56.133", "192.168.56.134", "192.168.56.135"]
# discovery.zen.minimum_master_nodes 指定master备选数(N/2+1)取整,N为集群节点数
discovery.zen.minimum_master_nodes: 2
# discovery.zen.ping_timeout 节点在发现过程中的等待超时时间
#discovery.zen.ping_timeout: 120s
# discovery.zen.fd.ping_retries 节点发现重试次数
#discovery.zen.fd.ping_retries: 10
# client.transport.ping_timeout  ping命令的响应超时时间
#client.transport.ping_timeout: 60s
# 解决跨域问题
http.cors.enabled: true
http.cors.allow-origin: "*"
jvm.options(这里主要配置一下 JVM 堆大小)
## JVM configuration ################################################################ ## IMPORTANT: JVM heap size ################################################################ ## ## You should always set the min and max JVM heap ## size to the same value. For example, to set ## the heap to 4 GB, set: ## ## -Xms4g ## -Xmx4g ## ## See https://www.elastic.co/guide/en/elasticsearch/reference/current/heap-size.html ## for more information ## ################################################################ # Xms represents the initial size of total heap space # Xmx represents the maximum size of total heap space -Xms512m -Xmx512m ################################################################ ## Expert settings ################################################################ ## ## All settings below this section are considered ## expert settings. Don't tamper with them unless ## you understand what you are doing ## ################################################################ ## GC configuration 8-13:-XX:+UseConcMarkSweepGC 8-13:-XX:CMSInitiatingOccupancyFraction=75 8-13:-XX:+UseCMSInitiatingOccupancyOnly ## G1GC Configuration # NOTE: G1 GC is only supported on JDK version 10 or later # to use G1GC, uncomment the next two lines and update the version on the # following three lines to your version of the JDK # 10-13:-XX:-UseConcMarkSweepGC # 10-13:-XX:-UseCMSInitiatingOccupancyOnly 14-:-XX:+UseG1GC 14-:-XX:G1ReservePercent=25 14-:-XX:InitiatingHeapOccupancyPercent=30 ## DNS cache policy # cache ttl in seconds for positive DNS lookups noting that this overrides the # JDK security property networkaddress.cache.ttl; set to -1 to cache forever -Des.networkaddress.cache.ttl=60 # cache ttl in seconds for negative DNS lookups noting that this overrides the # JDK security property networkaddress.cache.negative ttl; set to -1 to cache # forever -Des.networkaddress.cache.negative.ttl=10 ## optimizations # pre-touch memory pages used by the JVM during initialization -XX:+AlwaysPreTouch ## basic # explicitly set the stack size -Xss1m # set to headless, just in case -Djava.awt.headless=true # ensure UTF-8 encoding by default (e.g. filenames) -Dfile.encoding=UTF-8 # use our provided JNA always versus the system one -Djna.nosys=true # turn off a JDK optimization that throws away stack traces for common # exceptions because stack traces are important for debugging -XX:-OmitStackTraceInFastThrow # enable helpful NullPointerExceptions (https://openjdk.java.net/jeps/358), if # they are supported 14-:-XX:+ShowCodeDetailsInExceptionMessages # flags to configure Netty -Dio.netty.noUnsafe=true -Dio.netty.noKeySetOptimization=true -Dio.netty.recycler.maxCapacityPerThread=0 # log4j 2 -Dlog4j.shutdownHookEnabled=false -Dlog4j2.disable.jmx=true -Dlog4j2.formatMsgNoLookups=true -Djava.io.tmpdir=${ES_TMPDIR} ## heap dumps # generate a heap dump when an allocation from the Java heap fails # heap dumps are created in the working directory of the JVM -XX:+HeapDumpOnOutOfMemoryError # specify an alternative path for heap dumps; ensure the directory exists and # has sufficient space -XX:HeapDumpPath=data # specify an alternative path for JVM fatal error logs -XX:ErrorFile=logs/hs_err_pid%p.log ## JDK 8 GC logging 8:-XX:+PrintGCDetails 8:-XX:+PrintGCDateStamps 8:-XX:+PrintTenuringDistribution 8:-XX:+PrintGCApplicationStoppedTime 8:-Xloggc:logs/gc.log 8:-XX:+UseGCLogFileRotation 8:-XX:NumberOfGCLogFiles=32 8:-XX:GCLogFileSize=64m # JDK 9+ GC logging 9-:-Xlog:gc*,gc+age=trace,safepoint:file=logs/gc.log:utctime,pid,tags:filecount=32,filesize=64m # due to internationalization enhancements in JDK 9 Elasticsearch need to set the provider to COMPAT otherwise # time/date parsing will break in an incompatible way for some date patterns and locals 9-:-Djava.locale.providers=COMPAT # temporary workaround for C2 bug with JDK 10 on hardware with AVX-512 10-:-XX:UseAVX=2 -
es-2
同es-1,唯一不同的是 node.name 和 network.publish_host node.name: es-2 network.publish_host: 192.168.56.134 -
es-3
同es-1,唯一不同的是 node.name 和 network.publish_host
node.name: es-3
network.publish_host: 192.168.56.135
5、运行容器
-
es-1
docker run -it \ --name=es-1 \ --privileged=true \ --restart=always \ --net=host \ -v /etc/localtime:/etc/localtime \ -v /data/elasticsearch:/usr/share/elasticsearch \ -d elasticsearch:6.8.23 -
es-2
docker run -it \ --name=es-2 \ --privileged=true \ --restart=always \ --net=host \ -v /etc/localtime:/etc/localtime \ -v /data/elasticsearch:/usr/share/elasticsearch \ -d elasticsearch:6.8.23 -
es-3
docker run -it \
--name=es-3 \
--privileged=true \
--restart=always \
--net=host \
-v /etc/localtime:/etc/localtime \
-v /data/elasticsearch:/usr/share/elasticsearch \
-d elasticsearch:6.8.23
es-head 插件安装看 2.8 小节
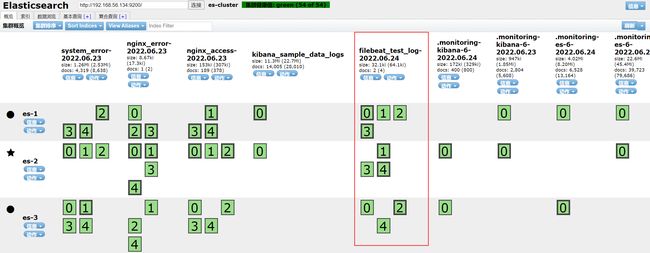
通过 head 插件查看集群状态:
通过 URL 查看集群状态:
浏览器输入 URL 查看集群状态:http://192.168.56.133:9200/_cat/nodes?pretty
标 * 的代表 master(下图与上图不一致,是因为这张图是在我做模拟故障转移时截的)
6、配置 ES 集群证书
先保证在没有使用证书的情况下,ES 集群是正常运行的,然后再配置 ES 集群证书;
在任意 ES 集群节点上生成集群证书(本次我在 es-1 节点);
证书生成完毕之后,再将对应证书 copy 到其他节点的 config 目录下;
重启 ES 集群,此时保证集群正常运行,如果此时集群正常,说明集群间已经通过密钥方式通信;
然后创建 ES 集群的用户名/密码(在任意 ES 集群节点上执行即可,因为集群会同步状态);
启用 ES 集群证书的目:数据安全、防止其他 ES 节点恶意并入集群。
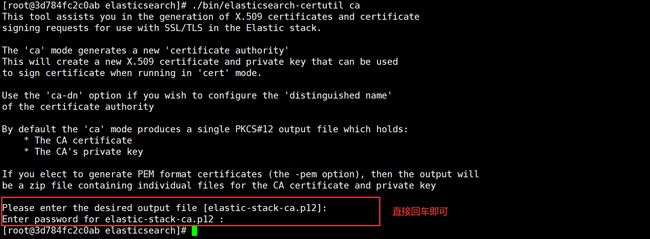
docker exec -it es-1 bash
./bin/elasticsearch-certutil ca

# 会在当前目录生产elastic-stack-ca.p12证书文件
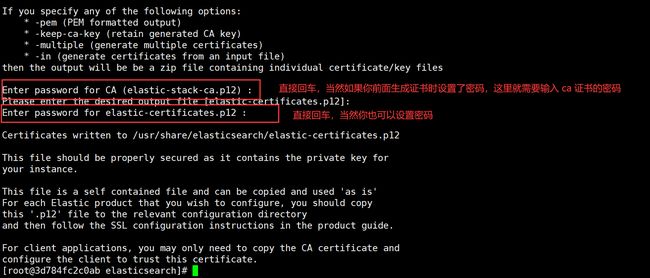
为集群中的每个节点生成证书和私钥:
./bin/elasticsearch-certutil cert --ca elastic-stack-ca.p12
复制证书文件到其他节点:
scp elastic-* es-2:/data/elasticsearch/config/
scp elastic-* es-3:/data/elasticsearch/config/
接着修改 ES 集群配置文件:
# cluster.name 三者需相同
cluster.name: es-cluster
# node.name 节点名,设置与主机名一致即可
node.name: es-1
# node.master 符合成为主节点的条件
node.master: true
# node.data 符合成为数据节点的条件
node.data: true
# path.data 数据存储路径(下面会进行创建)
path.data: /data/elasticsearch/data
# path.logs 日志存储路径(下面会进行创建)
path.logs: /data/elasticsearch/logs
# bootstrap.memory_lock 锁住内存,即只使用内存,不使用交换分区
bootstrap.memory_lock: true
# network.host 允许所有IP访问
network.host: 0.0.0.0
# network.publish_host 集群节点交互IP(docker方式的部署填写公网IP)
# docker 方式部署的需指定 network.publish_host,否则无法访问集群
network.publish_host: 192.168.56.133
# http.port web访问端口
http.port: 9200
# discovery.zen.ping.unicast.hosts 关闭单播
discovery.zen.ping.unicast.hosts: ["192.168.56.133", "192.168.56.134", "192.168.56.135"]
# discovery.zen.minimum_master_nodes 指定master备选数(N/2+1)取整,N为集群节点数
discovery.zen.minimum_master_nodes: 2
# discovery.zen.ping_timeout 节点在发现过程中的等待超时时间
#discovery.zen.ping_timeout: 120s
# discovery.zen.fd.ping_retries 节点发现重试次数
#discovery.zen.fd.ping_retries: 10
# client.transport.ping_timeout  ping命令的响应超时时间
#client.transport.ping_timeout: 60s
# 解决跨域问题
http.cors.enabled: true
http.cors.allow-origin: "*"
# Auth
xpack.security.transport.ssl.enabled: true
xpack.security.enabled: true
xpack.security.transport.ssl.verification_mode: certificate
xpack.security.transport.ssl.keystore.path: elastic-certificates.p12
xpack.security.transport.ssl.truststore.path: elastic-certificates.p12
重启 ES 集群:
docker restart es-1
docker restart es-2
docker restart es-3
新增用户名、密码:
任意一台 ES 集群节点上执行即可,执行结果会同步到整个 ES 集群
./bin/elasticsearch-setup-passwords interactive

# 我的密码为123456
Changed password for user [apm_system]
Changed password for user [kibana]
Changed password for user [logstash_system]
Changed password for user [beats_system]
Changed password for user [remote_monitoring_user]
Changed password for user [elastic]
上面的用户名密码在任意一台 ES 集群服务器上执行就行,密码会被更新到集群中,就算你在其他节点设置密码也是会报错的,而且会提示你,强一致性密码已经更新至集群,如下所示:
2.2 Logstash 分流
Logstash 作为插件,二进制安装即可,因为容器运行,每次在数据采集的时候都要删除容器,在运行容器,很麻烦。
1、下载镜像
docker pull logstash:6.8.23
2、运行临时容器,并拷贝配置文件
docker run -d --name=tmp ogstash:6.8.23
docker cp tmp:/usr/share/logstash /data/
3、创建配置文件并授权
mkdir /data/logstash/config/conf.d
chmod 777 -R /data/logstash
4、启动容器
docker run -d \
  --name=logstash \
  --privileged=true \
  --restart=always \
  -p 5044:5044 \
  -v /etc/localtime:/etc/localtime \
  -v /data/logstash:/usr/share/logstash \
  -v /data/nginx/logs/access.log:/data/nginx/logs/access.log \
  logstash:6.8.23
二进制安装
1、JDK 环境
上面有安装步骤
2、解压
tar xzf logstash-6.8.23.tar.gz -C /data/
mv /data/logstash-6.8.23/ /data/logstash
3、创建配置文件目录
mkdir /data/logstash/config/conf.d
4、编写配置文件
vim /data/logstash/config/conf.d/all.conf

input{
    file{
        path => ["/data/nginx/logs/access.log"]
        type => "nginx_access"
        start_position => "beginning"
    }
}
input{
    file{
        path => ["/var/log/messages"]
        type => "system_error"
        start_position => "beginning"
    }
}
output{
    if [type] ==  "nginx_access" {
        elasticsearch {
            hosts => ["192.168.56.133:9200","192.168.56.134:9200","192.168.56.135:9200"]
            index => ["%{type}-%{+YYYY.MM.dd}"]
        }
    }
    if [type] ==  "system_error" {
        elasticsearch {
            hosts => ["192.168.56.133:9200","192.168.56.134:9200","192.168.56.135:9200"]
            index => ["%{type}-%{+YYYY.MM.dd}"]
        }
    }
}
# 前台启动
/data/logstash/bin/logstash -f /data/logstash/config/conf.d/ --config.reload.automatic

# 后台启动
nohup /data/logstash/bin/logstash -f /data/logstash/config/conf.d/ --config.reload.automatic &

# --config.reload.automatic:可以加载conf.d 目录下的所有.conf文件
# 想要单独加载的话,则去掉--config.reload.automatic参数,并指定具体的 .conf 文件
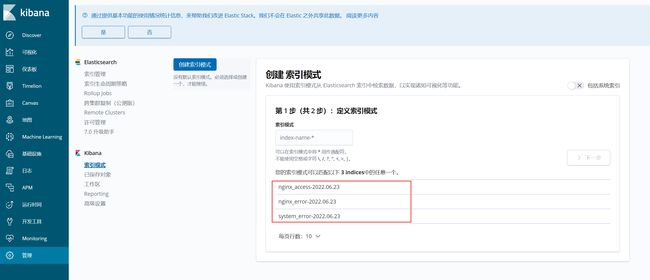
5、集群验证
2.3 Kibana 前端展示
1、安装 es-head 插件
docker run -d \
  --name=es-head \
  --privileged=true \
  --restart=always \
  -v /etc/localtime:/etc/localtime \
  -p 9100:9100 \
  docker.io/mobz/elasticsearch-head:5-alpine
2、安装 Kibana
# 运行临时容器
docker run -itd --name=tmp kibana:6.8.23

# 拷贝相关目录
docker cp tmp:/usr/share/kibana /data/

# 授权
chmod 777 -R /data/kibana/*
3、修改配置文件
# Default Kibana configuration for docker target
server.name: kibana
server.host: "0"
elasticsearch.hosts: [ "http://192.168.56.133:9200","http://192.168.56.134:9200","http://192.168.56.135:9200" ]
xpack.monitoring.ui.container.elasticsearch.enabled: true
#kibana.index: ".kibana"
i18n.locale: "zh-CN"
elasticsearch.username: "kibana"
elasticsearch.password: "123456"
#xpack.reporting.encryptionKey: "a_random_string"
#xpack.security.encryptionKey: "something_at_least_32_characters"
4、启动新容器
docker run -d \
    --restart=always \
    --privileged=true \
    --name=kibana \
	-p 5601:5601 \
	-v "/data/kibana:/usr/share/kibana" \
	-v /etc/localtime:/etc/localtime \
	kibana:6.8.23
5、访问验证
http://192.168.56.136:5601/
输入账号密码:
然后就会进入登录页面。
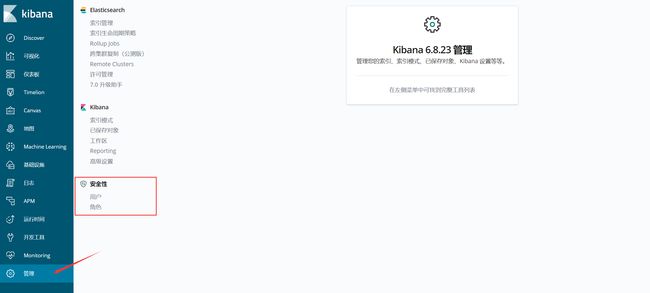
上图是我之前截的图,当时没有设置 ES 集群密码强一致性验证,设置之后你会发现管理菜单下会多出一个安全性,用户/角色
2.4 Nginx 反向代理
1、安装 Nginx
# 看6.2.4
docker run -itd \
    --name=nginx \
    --privileged=true \
    --restart=always \
    --net=host \
    -v /etc/localtime:/etc/localtime \
    -v /data/nginx/conf/nginx.conf:/etc/nginx/nginx.conf \
    -v /data/nginx/conf/conf.d:/etc/nginx/conf.d \
    -v /data/nginx/html:/usr/share/nginx/html \
    -v /data/nginx/logs:/var/log/nginx nginx:1.20.2
2、反向代理
server {
    listen       80;
    server_name  192.168.56.136;

    # kibana前端展示
    location / {
        root  html;
        proxy_pass http://192.168.56.136:5601/;
    }

    # es-head插件
    location /head/ {
        proxy_pass http://192.168.56.136:9100/;
    }

    # Kafka-Manager可视化管理
    location /manager/ {
        proxy_redirect off;
        proxy_set_header Host $host;
        proxy_set_header X-Real-IP $remote_addr;
        proxy_set_header X-Forwarded-For $proxy_add_x_forwarded_for;
        proxy_pass http://192.168.56.136:9000/;
    }
}
2.5 Zookeeper 集群
1、pull 镜像
docker pull zookeeper:3.7.1
2、创建对应目录
mkdir -p /data/zookeeper/conf
mkdir -p /data/zookeeper/data
mkdir -p /data/zookeeper/datalog
mkdir -p /data/zookeeper/logs

# 配置文件路径:/data/zookeeper/conf
# 数据存储路径:/data/zookeeper/data
# 数据日志存储路径:/data/zookeeper/datalog
# 日志存储路径:/data/zookeeper/logs
3、创建配置文件
三个节点均添加
dataDir=/data
dataLogDir=/datalog
quorumListenOnAllIPs=true
clientPort=2181
tickTime=2000
initLimit=20
syncLimit=10
server.1=192.168.56.137:2888:3888;2181
server.2=192.168.56.138:2888:3888;2181
server.3=192.168.56.139:2888:3888;2181

# 端口说明:
# 2181:对Client端提供服务的端口(可自定义)
# 2888:选举Leader的端口(可自定义)
# 3888:集群内部通信端口(可自定义)
4、启动 ZK 集群
zk-1 部署于 kafka-1 服务器上
zk-2 部署于 kafka-2 服务器上
zk-3 部署于 kafka-3 服务器上
# zk-1
docker run -d \
   --restart=always \
   --name=zk-1 \
   --privileged=true \
   --net=host \
   -e ZOO_MY_ID=1 \
   -v /data/zookeeper/conf/zoo.cfg:/conf/zoo.cfg \
   -v /data/zookeeper/data:/data \
   -v /data/zookeeper/datalog:/datalog \
   -v /data/zookeeper/logs:/logs \
   -v /etc/localtime:/etc/localtime \
   zookeeper:3.7.1

# zk-2
docker run -d \
   --restart=always \
   --name zk-2 \
   --privileged=true \
   --net=host \
   -e ZOO_MY_ID=2 \
   -v /data/zookeeper/conf/zoo.cfg:/conf/zoo.cfg \
   -v /data/zookeeper/data:/data \
   -v /data/zookeeper/datalog:/datalog \
   -v /data/zookeeper/logs:/logs \
   -v /etc/localtime:/etc/localtime \
   zookeeper:3.7.1

# zk-3
docker run -d \
   --restart=always \
   --name zk-3 \
   --privileged=true \
   --net=host \
   -e ZOO_MY_ID=3 \
   -v /data/zookeeper/conf/zoo.cfg:/conf/zoo.cfg \
   -v /data/zookeeper/data:/data \
   -v /data/zookeeper/datalog:/datalog \
   -v /data/zookeeper/logs:/logs \
   -v /etc/localtime:/etc/localtime \
   zookeeper:3.7.1
5、查看集群选举情况
看到 leader 为 zk-2,只要其中某一台服务器挂了,剩余两者会进行 leader 选举。
[root@kafka-1 ~]# docker exec -it zk-1 bash
root@kafka-1:/apache-zookeeper-3.7.1-bin# bin/zkServer.sh status
ZooKeeper JMX enabled by default
Using config: /conf/zoo.cfg
Client port found: 2181. Client address: localhost. Client SSL: false.
Mode: follower

[root@kafka-2 ~]# docker exec -it zk-2 bash
root@kafka-2:/apache-zookeeper-3.7.1-bin# bin/zkServer.sh status
ZooKeeper JMX enabled by default
Using config: /conf/zoo.cfg
Client port found: 2181. Client address: localhost. Client SSL: false.
Mode: leader

[root@kafka-3 ~]# docker exec -it zk-3 bash
root@kafka-3:/apache-zookeeper-3.7.1-bin# bin/zkServer.sh status
ZooKeeper JMX enabled by default
Using config: /conf/zoo.cfg
Client port found: 2181. Client address: localhost. Client SSL: false.
Mode: follower
至此,ZK 集群部署完毕!
2.6 Kafka 集群
1、pull 镜像
docker pull bitnami/kafka:3.1.1
2、运行容器
# kafka-1
docker run -d \
    --name=kafka-1 \
    --restart=always \
    --privileged=true \
    --net=host \
    -e KAFKA_BROKER_ID=1 \
    -e KAFKA_ZOOKEEPER_CONNECT="192.168.56.137:2181,192.168.56.138:2181,192.168.56.139:2181" \
    -e KAFKA_ADVERTISED_LISTENERS=PLAINTEXT://192.168.56.137:9092 \
    -e KAFKA_LISTENERS=PLAINTEXT://0.0.0.0:9092 \
    -e ALLOW_PLAINTEXT_LISTENER=yes \
    -v /etc/localtime:/etc/localtime \
    -t bitnami/kafka:3.1.1

# kafka-2
docker run -d \
    --name=kafka-2 \
    --restart=always \
    --privileged=true \
    --net=host \
    -e KAFKA_BROKER_ID=2 \
    -e KAFKA_ZOOKEEPER_CONNECT="192.168.56.137:2181,192.168.56.138:2181,192.168.56.139:2181" \
    -e KAFKA_ADVERTISED_LISTENERS=PLAINTEXT://192.168.56.138:9092 \
    -e KAFKA_LISTENERS=PLAINTEXT://0.0.0.0:9092 \
    -e ALLOW_PLAINTEXT_LISTENER=yes \
    -v /etc/localtime:/etc/localtime \
    -t bitnami/kafka:3.1.1

# kafka-3
docker run -d \
    --name=kafka-3 \
    --restart=always \
    --privileged=true \
    --net=host \
    -e KAFKA_BROKER_ID=3 \
    -e KAFKA_ZOOKEEPER_CONNECT="192.168.56.137:2181,192.168.56.138:2181,192.168.56.139:2181" \
    -e KAFKA_ADVERTISED_LISTENERS=PLAINTEXT://192.168.56.139:9092 \
    -e KAFKA_LISTENERS=PLAINTEXT://0.0.0.0:9092 \
    -e ALLOW_PLAINTEXT_LISTENER=yes \
    -v /etc/localtime:/etc/localtime \
    -t bitnami/kafka:3.1.1
3、安装 kafka-manager 管理工具
我们在 kibana 上部署
docker pull sheepkiller/kafka-manager:stable
运行容器
docker run -d \
    --name=kafka-manager \
    --restart=always \
    --privileged=true \
    -p 9000:9000 \
    -e ZK_HOSTS="192.168.56.137:2181,192.168.56.138:2181,192.168.56.139:2181" \
    sheepkiller/kafka-manager:stable
浏览器访问:http://192.168.56.136:9000/
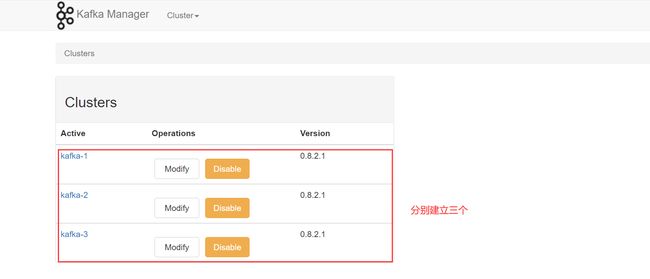
创建 Kafka 集群节点,来查看当前集群状态:
依次建立即可:
看看集群状态:
进入 Brokers 查看,每一个 Brokers 代表一个 Kafka 实例,这里显示为 3 ,所以我们的集群实例为三个:
至此,Kafka集群部署完毕!
2.7 Filebeat 轻量级数据收集引擎
2.7.1 架构图
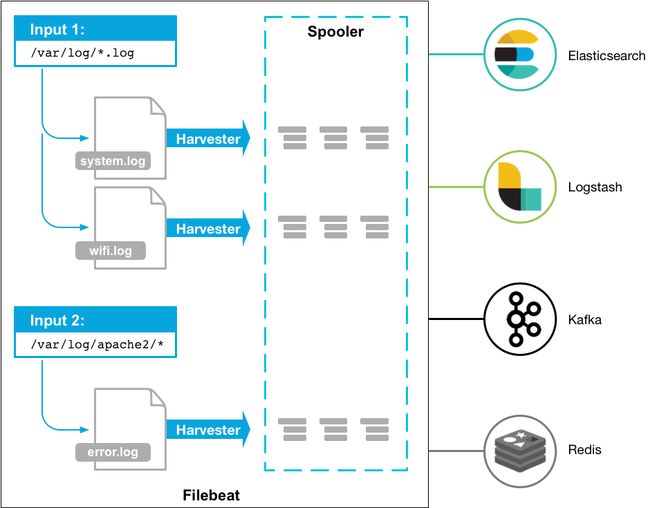
Filebeat 隶属于Beats,一款轻量级的数据收集引擎,那它如何工作于 ELK 集群中呢?
Filebeat 安装在要收集日志的应用服务器中,Filebeat收集到日志之后传输到kafka中,logstash通过kafka拿到日志,在由logstash传给后面的es,es将日志传给后面的kibana,最后通过kibana展示出来。
2.7.2 部署及应用
1、安装
# 在要收集的日志的服务器上部署该插件
tar xzf filebeat-6.8.23-linux-x86_64.tar.gz -C /data/
mv /data/filebeat-6.8.23-linux-x86_64/ /data/filebeat
2、配置
cd /data/filebeat/
cp filebeat.yml filebeat.yml.bak
cat filebeat.yml

#=========================== Filebeat inputs =============================
filebeat.inputs:
- type: log
  enabled: true
  json.keys_under_root: true
  json.add_error_key: true
  json.message_key: log
  paths:
    - /data/nginx/logs/access.log

#============================= Kafka outputs =============================
output.kafka:
  enabled: true
  hosts: ["192.168.56.137:9092","192.168.56.138:9092","192.168.56.139:9092"]
  topic: filebeat_test
运行 filebeat
# 前台启动
/data/filebeat/filebeat -e -c filebeat.yml

# 后台启动
nohup /data/filebeat/filebeat -e -c filebeat.yml &
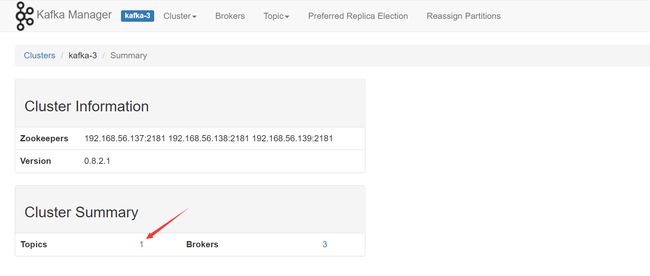
3、查看 kafka 集群状态
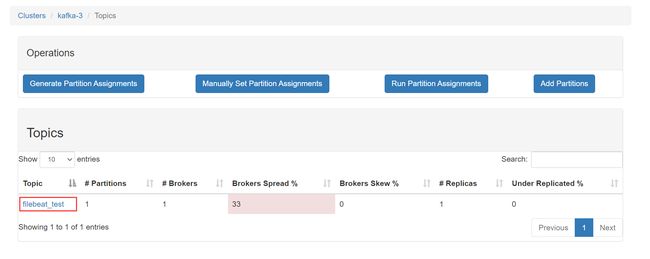
可以看到新增了一个 Topics,说明 filebeat 采集的数据成功输出到了 Kafka 集群中了。
点击进去看看是否是我们上面定义的 Topic: filebeat_test
4、这个时候就需要消费者来消费我这条数据了
从 ELK 集群架构上看,消费者是我们的 ES 集群,那 ES 集群如何消费 Kafka 集群的消息呢?答案是通过 Logstash,为什么这里还要使用 logstash?原因是其具备 input —> filter —> output 的流功能,当然,filebeat 可以将数据直接发送到 ES 集群。
-
配置 logstash
input { kafka { type => "filebeat_test_log" codec => "json" topics => "filebeat_test" decorate_events => true bootstrap_servers => "192.168.56.137:9092, 192.168.56.138:9092, 192.168.56.139:9092" } } output{ elasticsearch { hosts => ["192.168.56.133:9200","192.168.56.134:9200","192.168.56.135:9200"] index => ["%{type}-%{+YYYY.MM.dd}"] } } -
运行 logstash
/data/logstash/bin/logstash -f /data/logstash/config/conf.d/filebeat_test.conf -
ES 集群查看是否收到了该消息
可看到,ES 集群已经成功消费了 Kafka 集群的消息了。
-
我们再去 Kibana 看看,进行相关检索
三、总结
其实你会发现,ELK 这一套日志解决方案就是一个完整的工程项目,前端 Kibana 展示、后端 ES 集群(做数据存储)、中间件 Kafka 做流量削峰和异步解耦等。整个搭建过程并不难,主要是搞清楚不同架构应用的场景,以及 ELK 的整个工作流程(原理)。至于上图架构中 Kibana 为什么要做负载均衡,主要是考虑到在高并发的情况下(这里的高并发指的是 Client 的高并发),比如公司有上百人同时访问 Kibana,那 Kibana 肯定是存在瓶颈的,可做多个 Kibana 实现负载均衡(其实就类似我们平时项目中前端项目做的负载均衡技术)。
FAQ
es-head 插件访问不了 ES 集群
1、详情如下图所示:
2、解决方案
修改 ES 集群配置文件:
...
...
# 解决跨域问题
http.cors.enabled: true
http.cors.allow-origin: "*"
# 新增以下内容
http.cors.allow-headers: Authorization,X-Requested-With,Content-Length,Content-Type
...
# 重启 ES 集群
docker restart es-1
docker restart es-2
docker restart es-3
3、es-head 插件访问
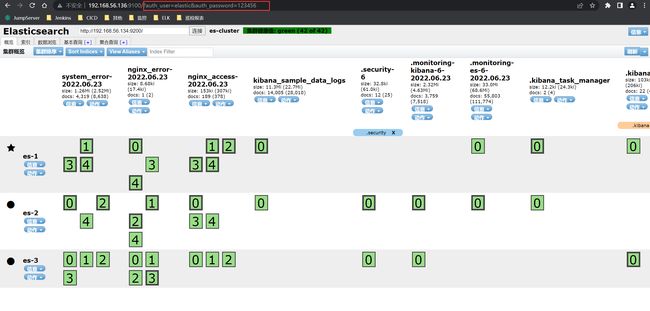
http://192.168.56.136:9100/?auth_user=elastic&auth_password=123456

# 说明:
# auth_user:你在ES集群设置的用户名(其实是内置用户)
# auth_password:你当时设置的内置用户名密码
<点击跳转至开头>


