yolov3网络结构_【从零开始学习YOLOv3】5. 网络模型的构建
【从零开始学习YOLOv3】5. 网络模型的构建
前言:之前几篇讲了cfg文件的理解、数据集的构建、数据加载机制和超参数进化机制,本文将讲解YOLOv3如何从cfg文件构造模型。本文涉及到一个比较有用的部分就是bias的设置,可以提升mAP、F1、P、R等指标,还能让训练过程更加平滑。
1. cfg文件
在YOLOv3中,修改网络结构很容易,只需要修改cfg文件即可。目前,cfg文件支持convolutional, maxpool, unsample, route, shortcut, yolo这几个层。
而且作者也提供了多个cfg文件来进行网络构建,比如:yolov3.cfg、yolov3-tiny.cfg、yolov3-spp.cfg、csresnext50-panet-spp.cfg文件(提供的yolov3-spp-pan-scale.cfg文件,在代码级别还没有提供支持)。
如果想要添加自定义的模块也很方便,比如说注意力机制模块、空洞卷积等,都可以简单地得到添加或者修改。
为了更加方便的理解cfg文件网络是如何构建的,在这里推荐一个Github上的网络结构可视化软件:Netron,下图是可视化yolov3-tiny的结果:
2. 网络模型构建
从train.py文件入手,其中涉及的网络构建的代码为:
# Initialize model
model = Darknet(cfg, arc=opt.arc).to(device)
然后沿着Darknet实现进行讲解:
class Darknet(nn.Module):
    # YOLOv3 object detection model
    def __init__(self, cfg, img_size=(416, 416), arc='default'):
        super(Darknet, self).__init__()
        self.module_defs = parse_model_cfg(cfg)
        self.module_list, self.routs = create_modules(self.module_defs, img_size, arc)
        self.yolo_layers = get_yolo_layers(self)

        # Darknet Header
        self.version = np.array([0, 2, 5], dtype=np.int32)
        # (int32) version info: major, minor, revision
        self.seen = np.array([0], dtype=np.int64)
# (int64) number of images seen during training以上文件中,比较关键的就是成员函变量module_defs、module_list、routs、yolo_layers四个成员函数,先对这几个参数的意义进行解释:
2.1 module_defs
调用了parse_model_cfg函数,得到了module_defs对象。实际上该函数是通过解析cfg文件,得到一个list,list中包含多个字典,每个字典保存的内容就是一个模块内容,比如说:
[convolutional]
batch_normalize=1
filters=128
size=3
stride=2
pad=1
activation=leaky
函数代码如下:
def parse_model_cfg(path):
    # path参数为: cfg/yolov3-tiny.cfg
    if not path.endswith('.cfg'):
        path += '.cfg'
    if not os.path.exists(path) and os.path.exists('cfg' + os.sep + path):
        path = 'cfg' + os.sep + path

    with open(path, 'r') as f:
        lines = f.read().split('n')

    # 去除以#开头的,属于注释部分的内容
    lines = [x for x in lines if x and not x.startswith('#')]
    lines = [x.rstrip().lstrip() for x in lines]
    mdefs = []  # 模块的定义
    for line in lines:
        if line.startswith('['):  # 标志着一个模块的开始
            '''
            比如:
            [shortcut]
            from=-3
            activation=linear
            '''
            mdefs.append({})
            mdefs[-1]['type'] = line[1:-1].rstrip()
            if mdefs[-1]['type'] == 'convolutional':
                mdefs[-1]['batch_normalize'] = 0
                # pre-populate with zeros (may be overwritten later)
        else:
            # 将键和键值放入字典
            key, val = line.split("=")
            key = key.rstrip()

            if 'anchors' in key:
                mdefs[-1][key] = np.array([float(x) for x in val.split(',')]).reshape((-1, 2))  # np anchors
            else:
                mdefs[-1][key] = val.strip()

    # 支持的参数类型
    supported = ['type', 'batch_normalize', 'filters', 'size',
                 'stride', 'pad', 'activation', 'layers', 'groups',
                 'from', 'mask', 'anchors', 'classes', 'num', 'jitter',
                 'ignore_thresh', 'truth_thresh', 'random',
                 'stride_x', 'stride_y']

    # 判断所有参数中是否有不符合要求的key
    f = []
    for x in mdefs[1:]:
        [f.append(k) for k in x if k not in f]
    u = [x for x in f if x not in supported]  # unsupported fields
    assert not any(u), "Unsupported fields %s in %s. See https://github.com/ultralytics/yolov3/issues/631" % (u, path)

    return mdefs
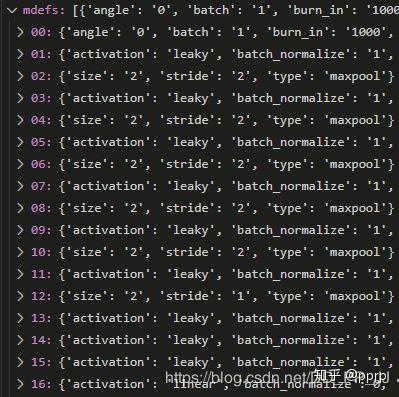
返回的内容通过debug模式进行查看:
其中需要关注的就是anchor的组织:
可以看出,anchor是按照每两个一对进行组织的,与我们的理解一致。
2.2 module_list&routs
这个部分是本文的核心,也是理解模型构建的关键。
在pytorch中,构建模型常见的有通过Sequential或者ModuleList进行构建。
通过Sequential构建
model=nn.Sequential()
model.add_module('conv',nn.Conv2d(3,3,3))
model.add_module('batchnorm',nn.BatchNorm2d(3))
model.add_module('activation_layer',nn.ReLU())
或者
model=nn.Sequential(
    nn.Conv2d(3,3,3),
    nn.BatchNorm2d(3),
    nn.ReLU()
    )
或者
from collections import OrderedDict
model=nn.Sequential(OrderedDict([
    ('conv',nn.Conv2d(3,3,3)),
    ('batchnorm',nn.BatchNorm2d(3)),
    ('activation_layer',nn.ReLU())
]))通过sequential构建的模块内部实现了forward函数,可以直接传入参数,进行调用。
通过ModuleList构建
model=nn.ModuleList([nn.Linear(3,4),
						 nn.ReLU(),
nn.Linear(4,2)])ModuleList类似list,内部没有实现forward函数,使用的时候需要构建forward函数,构建自己模型常用ModuleList函数建立子模型,建立forward函数实现前向传播。
在YOLOv3中,灵活地结合了两种使用方式,通过解析以上得到的module_defs,进行构建一个ModuleList,然后再通过构建forward函数进行前向传播即可。
具体代码如下:
def create_modules(module_defs, img_size, arc):
    # 通过module_defs进行构建模型
    hyperparams = module_defs.pop(0)
    output_filters = [int(hyperparams['channels'])]
    module_list = nn.ModuleList()
    routs = []  # 存储了所有的层,在route、shortcut会使用到。
    yolo_index = -1

    for i, mdef in enumerate(module_defs):
        modules = nn.Sequential()
        '''
        通过type字样不同的类型,来进行模型构建
        '''
        if mdef['type'] == 'convolutional':
            bn = int(mdef['batch_normalize'])
            filters = int(mdef['filters'])
            size = int(mdef['size'])
            stride = int(mdef['stride']) if 'stride' in mdef else (int(
                mdef['stride_y']), int(mdef['stride_x']))
            pad = (size - 1) // 2 if int(mdef['pad']) else 0
            modules.add_module(
                'Conv2d',
                nn.Conv2d(
                    in_channels=output_filters[-1],
                    out_channels=filters,
                    kernel_size=size,
                    stride=stride,
                    padding=pad,
                    groups=int(mdef['groups']) if 'groups' in mdef else 1,
                    bias=not bn))
            if bn:
                modules.add_module('BatchNorm2d',
                                   nn.BatchNorm2d(filters, momentum=0.1))
            if mdef['activation'] == 'leaky':  # TODO: activation study https://github.com/ultralytics/yolov3/issues/441
                modules.add_module('activation', nn.LeakyReLU(0.1,
                                                              inplace=True))
            elif mdef['activation'] == 'swish':
                modules.add_module('activation', Swish())
            # 在此处可以添加新的激活函数

        elif mdef['type'] == 'maxpool':
            # 最大池化操作
            size = int(mdef['size'])
            stride = int(mdef['stride'])
            maxpool = nn.MaxPool2d(kernel_size=size,
                                   stride=stride,
                                   padding=int((size - 1) // 2))
            if size == 2 and stride == 1:  # yolov3-tiny
                modules.add_module('ZeroPad2d', nn.ZeroPad2d((0, 1, 0, 1)))
                modules.add_module('MaxPool2d', maxpool)
            else:
                modules = maxpool

        elif mdef['type'] == 'upsample':
            # 通过近邻插值完成上采样
            modules = nn.Upsample(scale_factor=int(mdef['stride']),
                                  mode='nearest')

        elif mdef['type'] == 'route':
            # nn.Sequential() placeholder for 'route' layer
            layers = [int(x) for x in mdef['layers'].split(',')]
            filters = sum(
                [output_filters[i + 1 if i > 0 else i] for i in layers])
            # extend表示添加一系列对象
            routs.extend([l if l > 0 else l + i for l in layers])

        elif mdef['type'] == 'shortcut':
            # nn.Sequential() placeholder for 'shortcut' layer
            filters = output_filters[int(mdef['from'])]
            layer = int(mdef['from'])
            routs.extend([i + layer if layer < 0 else layer])

        elif mdef['type'] == 'yolo':
            yolo_index += 1
            mask = [int(x) for x in mdef['mask'].split(',')]  # anchor mask
            modules = YOLOLayer(
                anchors=mdef['anchors'][mask],  # anchor list
                nc=int(mdef['classes']),  # number of classes
                img_size=img_size,  # (416, 416)
                yolo_index=yolo_index,  # 0, 1 or 2
                arc=arc)  # yolo architecture

            # 这是在focal loss文章中提到的为卷积层添加bias
            # 主要用于解决样本不平衡问题
            # (论文地址 https://arxiv.org/pdf/1708.02002.pdf section 3.3)
            # 具体讲解见下方
            try:
                if arc == 'defaultpw' or arc == 'Fdefaultpw':
                    # default with positive weights
                    b = [-5.0, -5.0]  # obj, cls
                elif arc == 'default':
                    # default no pw (40 cls, 80 obj)
                    b = [-5.0, -5.0]
                elif arc == 'uBCE':
                    # unified BCE (80 classes)
                    b = [0, -9.0]
                elif arc == 'uCE':
                    # unified CE (1 background + 80 classes)
                    b = [10, -0.1]
                elif arc == 'Fdefault':
                    # Focal default no pw (28 cls, 21 obj, no pw)
                    b = [-2.1, -1.8]
                elif arc == 'uFBCE' or arc == 'uFBCEpw':
                    # unified FocalBCE (5120 obj, 80 classes)
                    b = [0, -6.5]
                elif arc == 'uFCE':
                    # unified FocalCE (64 cls, 1 background + 80 classes)
                    b = [7.7, -1.1]

                bias = module_list[-1][0].bias.view(len(mask), -1)
                # 255 to 3x85
                bias[:, 4] += b[0] - bias[:, 4].mean()  # obj
                bias[:, 5:] += b[1] - bias[:, 5:].mean()  # cls

                # 将新的偏移量赋值回模型中
                module_list[-1][0].bias = torch.nn.Parameter(bias.view(-1))

            except:
                print('WARNING: smart bias initialization failure.')

        else:
            print('Warning: Unrecognized Layer Type: ' + mdef['type'])

        # 将module内容保存在module_list中。
        module_list.append(modules)
        # 保存所有的filter个数
        output_filters.append(filters)

    return module_list, routs
bias部分讲解
其中在YOLO Layer部分涉及到一个初始化的trick,来自Focal Loss中关于模型初始化的讨论,具体内容请阅读论文,https://arxiv.org/pdf/1708.02002.pdf 的第3.3节。
这里涉及到一个非常insight的点,笔者与BBuf讨论了很长时间,才理解这样做的原因。
我们在第一篇中介绍了,YOLO层前一个卷积的filter个数计算公式如下:
5代表x,y,w,h, score,score代表该格子中是否存在目标,3代表这个格子中会分配3个anchor进行匹配。在YOLOLayer中的forward函数中,有以下代码,需要通过sigmoid激活函数:
if 'default' in self.arc:  # seperate obj and cls
	torch.sigmoid_(io[..., 4])
elif 'BCE' in self.arc:  # unified BCE (80 classes)
	torch.sigmoid_(io[..., 5:])
	io[..., 4] = 1
elif 'CE' in self.arc:  # unified CE (1 background + 80 classes)
	io[..., 4:] = F.softmax(io[..., 4:], dim=4)
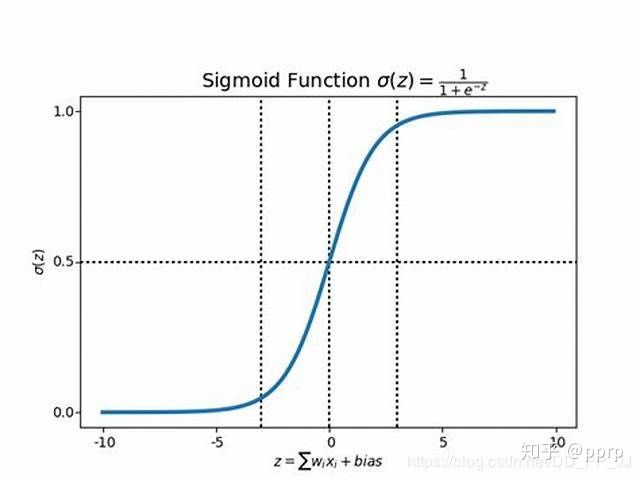
io[..., 4] = 1可以观察到,Sigmoid梯度是有限的,大致在[-10,10]之间。
在pytorch中的卷积层默认的初始化是以0为中心点的正态分布,这样进行的初始化会导致很多gird中大约一半得到了激活,在计算loss的时候就会计算上所有的激活的点对应的坐标信息,这样计算loss就会变得很大。
根据这个现象,作者选择在YOLOLayer的前一个卷积层添加bias,来避免这种情况,实际操作就是在原有的bias上减去5,这样通过卷积得到的数值就不会被激活,可以防止在初始阶段的第一个batch中就进行过拟合。通过以上操作,能够让所有的神经元在前几个batch中输出空的检测。
经过作者的实验,通过使用bias的trick,可以提升mAP、F1、P、R等指标,还能让训练过程更加平滑。
2.3 yolo_layers
代码如下:
def get_yolo_layers(model):
    return [i for i, x in enumerate(model.module_defs) if x['type'] == 'yolo']
    # [82, 94, 106] for yolov3
yolo layer的获取是通过解析module_defs这个存储cfg文件中的信息的变量得到的。以yolov3.cfg为例,最终返回的是yolo层在整个module的序号。比如:第83,94,106个层是YOLO层。
3. forward函数
在YOLO中,如果能理解前向传播的过程,那整个网络的构建也就很清楚明了了。
def forward(self, x, var=None):
        img_size = x.shape[-2:]
        layer_outputs = []
        output = []

        for i, (mdef,
                module) in enumerate(zip(self.module_defs, self.module_list)):
            mtype = mdef['type']
            if mtype in ['convolutional', 'upsample', 'maxpool']:
                # 卷积层,上采样,池化层只需要经过即可
                x = module(x)
            elif mtype == 'route':
                # route操作就是将几个层的内容拼接起来,具体可以看cfg文件解析
                layers = [int(x) for x in mdef['layers'].split(',')]
                if len(layers) == 1:
                    x = layer_outputs[layers[0]]
                else:
                    try:
                        x = torch.cat([layer_outputs[i] for i in layers], 1)
                    except:
                        # apply stride 2 for darknet reorg layer
                        layer_outputs[layers[1]] = F.interpolate(
                            layer_outputs[layers[1]], scale_factor=[0.5, 0.5])
                        x = torch.cat([layer_outputs[i] for i in layers], 1)

            elif mtype == 'shortcut':
                x = x + layer_outputs[int(mdef['from'])]
            elif mtype == 'yolo':
                output.append(module(x, img_size))
            #记录route对应的层
            layer_outputs.append(x if i in self.routs else [])

        if self.training:
            # 如果训练,直接输出YOLO要求的Tensor
            # 3*(class+5)
            return output

        elif ONNX_EXPORT:# 这个是对应的onnx导出的内容
            x = [torch.cat(x, 0) for x in zip(*output)]
            return x[0], torch.cat(x[1:3], 1)  # scores, boxes: 3780x80, 3780x4
        else:
            # 对应测试阶段
            io, p = list(zip(*output))  # inference output, training output
            return torch.cat(io, 1), p
forward的过程也比较简单,通过得到的module_defs和module_list变量,通过for循环将整个module_list中的内容进行一遍串联,需要得到的最终结果是YOLO层的输出。(ps:下一篇文章再进行YOLOLayer的代码解析)
参考资料
sequential用法
CSDN-专业IT技术社区-登录blog.csdn.net https://arxiv.org/pdf/1708.02002.pdfarxiv.org


