python绘图代码大全_python绘图代码总结
经常重复使用的绘图代码
使用SciencePlots画论文配图可见:传送门
折线图
import matplotlib.pyplot as plt
import matplotlib as mpl
# 中文和负号的正常显示
mpl.rcParams['font.sans-serif'] = ['Times New Roman']
mpl.rcParams['font.sans-serif'] = [u'SimHei']
mpl.rcParams['axes.unicode_minus'] = False
#自定义刻度和标签
times=data1['start_time_noday'].tolist()
# 分时间区间,保证最后一位纳入标签
ticks=list(range(0,len(times),2))
if ticks[-1]!=len(times)-1:
ticks.append(len(times)-1)
labels=[times[i] for i in ticks]
##绘图
fig= plt.figure(figsize=(8, 4),dpi=100)
# 设置图形的显示风格
plt.style.use('ggplot')
ax1 = fig.add_subplot(111)
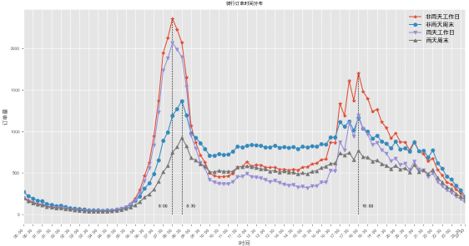
ax1.plot(data1['order_id'],'-*',linewidth=1.5,label='非雨天工作日')
ax1.plot(data2['order_id'],'-o',linewidth=1.5,label='非雨天周末')
ax1.plot(data3['order_id'],'-v',linewidth=1.5,label='雨天工作日')
ax1.plot(data4['order_id'],'-^',linewidth=1.5,label='雨天周末')
ax1.legend(loc='upper right', frameon=False,fontsize = 10)
ax1.set_xlabel('时间',fontsize =10)
ax1.set_ylabel('订单量',fontsize =10)
ax1.set(xlim=[0,len(times)-1])
ax1.set_xticks(ticks)
ax1.set_xticklabels(labels, rotation=45, horizontalalignment='right')
ax1.tick_params(labelsize=8)
ax1.set_title('骑行订单时间分布',fontsize =8)
plt.vlines(32, 0, 2358, colors = "black", linestyles = "dashed",linewidth=0.8)
plt.vlines(34, 0, 1366, colors = "black", linestyles = "dashed",linewidth=0.8)
plt.vlines(72, 0, 1702, colors = "black", linestyles = "dashed",linewidth=0.8)
bbox_props=dict(boxstyle="round",fc="w",ec="0.5",alpha=0)
ax1.text(30,100,'8:00',ha='center',va='center',size=8,bbox=bbox_props,horizontalalignment='left')
ax1.text(36,100,'8:30',ha='center',va='center',size=8,bbox=bbox_props,horizontalalignment='left')
ax1.text(74,100,'18:00',ha='center',va='center',size=8,bbox=bbox_props,horizontalalignment='left')
ax1.legend(loc='upper right', frameon=False,fontsize = 10)
#vlines(x, ymin, ymax)画竖直线,前三个参数分别是:横坐标,minof纵坐标,max纵坐标
#hlines(y, xmin, xmax)画水平线
# ax1.vlines(0, 0, 0.5, colors = "c", linestyles = "dashed")
plt.savefig('./time_distribute_15min_israin_isweekday.png',format='png', dpi=300)
plt.show()
times=data1['start_time_noday'].tolist()
# 分时间区间,保证最后一位纳入标签
ticks=list(range(0,len(times),2))
if ticks[-1]!=len(times)-1:
ticks.append(len(times)-1)
labels=[times[i] for i in ticks]
ax1.set_xticks(ticks)
ax1.set_xticklabels(labels, rotation=45, horizontalalignment='right')
是自定义横轴的刻度显示间隔及显示标签
柱状图
import matplotlib.pyplot as plt
from matplotlib.ticker import FuncFormatter
name_list = ["< 100k","100k-200k","200k-300k","300k-400k","400k-500k","> 500k"]
num_list = [0.2626,0.3717,0.2061,0.0788,0.0343,0.0465]
def auto_text(rects,ax):
for rect in rects:
ax.text(rect.get_x()+rect.get_width()/2, rect.get_height(), '%.2f%%'%(rect.get_height()*100), ha='center', va='bottom')
def to_percent(temp,position):
return '%1.0f'%(100*temp) + '%'
with plt.style.context(['science','no-latex']):
fig= plt.figure(figsize=(8, 4),dpi=200)
# 设置图形的显示风格
# plt.style.use('ggplot')
ax1 = fig.add_subplot(111)
rect=ax1.bar(range(len(num_list)), num_list,tick_label=name_list)
ax1.yaxis.set_major_formatter(FuncFormatter(to_percent))
ax1.set_ylabel('User Percentage',fontsize =10)
ax1.set_xlabel('Income',fontsize =10)
auto_text(rect,ax1)
# ax1.set_xticks(ticks)
# ax1.set_xticklabels(labels, rotation=45, horizontalalignment='right')
ax1.tick_params(labelsize=8)
plt.savefig('income_percentage.jpg',dpi=300,)
plt.show()
ax1.yaxis.set_major_formatter(FuncFormatter(to_percent))
作用是设置纵轴为百分比格式,可以换做,省去自定义函数 to_percent的麻烦
import matplotlib.ticker as mtick
ax1.yaxis.set_major_formatter(mtick.PercentFormatter())
多柱状图
import pandas as pd
import matplotlib.pyplot as plt
import matplotlib as mpl
# 中文和负号的正常显示
mpl.rcParams['font.sans-serif'] = ['Times New Roman']
mpl.rcParams['font.sans-serif'] = [u'SimHei']
mpl.rcParams['axes.unicode_minus'] = False
from matplotlib.ticker import FuncFormatter
def to_percent(temp,position):
return '%1.0f'%(100*temp) + '%'
data=pd.read_excel(r"C:\Users\fff507\Desktop\周内各天时变比例.xlsx")
value_list=data['order_id'].tolist()
x=list(range(len(value_list)))
total_width,n=1,1.5
width=total_width/n
with plt.style.context(['science','no-latex']):
fig= plt.figure(figsize=(12, 4),dpi=200)
# 设置图形的显示风格
# plt.style.use('ggplot')
ax1 = fig.add_subplot(111)
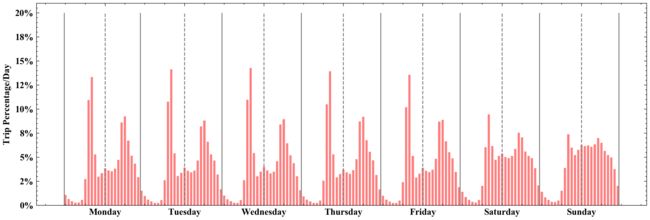
ax1.bar(x,value_list,width=width,fc='red',alpha=0.5)
# 设置刻度和标签
ticks=list(range(12,len(value_list),24))
labels=['Monday','Tuesday','Wednesday','Thursday','Friday','Saturday','Sunday']
ax1.set_xticks(ticks)
ax1.set_xticklabels(labels, rotation=0, horizontalalignment='center')
ax1.tick_params(labelsize=10)
# ax1.set_title('骑行订单时间分布',fontsize =10)
ax1.yaxis.set_major_formatter(FuncFormatter(to_percent))
x1=0-width/2
plt.vlines(x1, 0, 0.2, colors = "grey", linestyles = "-",linewidth=1)
plt.vlines(23-width/2, 0, 0.2, colors = "grey", linestyles = "-",linewidth=1)
plt.vlines(47+width/2, 0, 0.2, colors = "grey", linestyles = "-",linewidth=1)
plt.vlines(71+width/2, 0, 0.2, colors = "grey", linestyles = "-",linewidth=1)
plt.vlines(95+width/2, 0, 0.2, colors = "grey", linestyles = "-",linewidth=1)
plt.vlines(119+width/2, 0, 0.2, colors = "grey", linestyles = "-",linewidth=1)
plt.vlines(143+width/2, 0, 0.2, colors = "grey", linestyles = "-",linewidth=1)
plt.vlines(167+width/2, 0, 0.2, colors = "grey", linestyles = "-",linewidth=1)
list2=list(range(12,157,24))
for i in list2:
plt.vlines(i, 0, 0.2, colors = "grey", linestyles = "--",linewidth=1)
ax1.set_ylabel('Trip Percentage/Day',fontsize =10)
# plt.savefig('周内各天时变比例.png',format='png',bbox_inches='tight', pad_inches = 0,dpi=300)
plt.savefig('周内各天时变比例.png',format='png',dpi=300)
plt.show()
上面用到了SciencePlots绘图,传送门,会自动去掉绘图时的白边,不用这个的话,下面这样也可以去掉白边
plt.savefig('周内各天时变比例.png',format='png',bbox_inches='tight', pad_inches = 0,dpi=300)
概率分布直方图&累计概率分布
def cum_prob_curve(data,bins,title,xlabel,pic_path):
'''
绘制概率分布直方图和累计概率分布曲线
'''
import matplotlib.pyplot as plt
import matplotlib as mpl
from matplotlib.ticker import FuncFormatter
#从pyplot导入MultipleLocator类,这个类用于设置刻度间隔
from matplotlib.pyplot import MultipleLocator
fig= plt.figure(figsize=(8, 4),dpi=100)
# 设置图形的显示风格
plt.style.use('ggplot')
# 中文和负号的正常显示
mpl.rcParams['font.sans-serif'] = ['Times New Roman']
mpl.rcParams['font.sans-serif'] = [u'SimHei']
mpl.rcParams['axes.unicode_minus'] = False
ax1 = fig.add_subplot(111)
##概率分布直方图
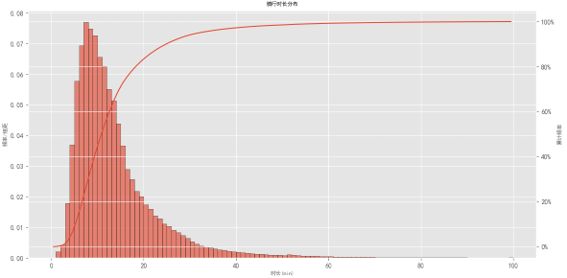
a1,a2,a3=ax1.hist(data,bins =bins, alpha = 0.65,density=0.7,edgecolor='k')
##累计概率曲线
#生成累计概率曲线的横坐标
indexs=[]
a2=a2.tolist()
for i,value in enumerate(a2):
if i<=len(a2)-2:
index=(a2[i]+a2[i+1])/2
indexs.append(index)
#生成累计概率曲线的纵坐标
def to_percent(temp,position):
return '%1.0f'%(100*temp) + '%'
dis=a2[1]-a2[0]
freq=[f*dis for f in a1]
acc_freq=[]
for i in range(0,len(freq)):
if i==0:
temp=freq[0]
else:
temp=sum(freq[:i+1])
acc_freq.append(temp)
#这是双坐标关键一步
ax2=ax1.twinx()
#绘制累计概率曲线
ax2.plot(indexs,acc_freq)
#设置累计概率曲线纵轴为百分比格式
ax2.yaxis.set_major_formatter(FuncFormatter(to_percent))
ax1.set_xlabel(xlabel,fontsize=8)
ax1.set_title(title,fontsize =8)
#把x轴的刻度间隔设置为1,并存在变量里
# x_major_locator=MultipleLocator(xlocator)
# ax1.xaxis.set_major_locator(x_major_locator)
ax1.set_ylabel('频率/组距',fontsize=8)
ax2.set_ylabel("累计频率",fontsize=8)
plt.savefig(pic_path,format='png', dpi=300)
plt.show()
本文地址:https://blog.csdn.net/qq_38412868/article/details/107470587
如您对本文有疑问或者有任何想说的,请点击进行留言回复,万千网友为您解惑!


