Vue3 + TS 搭建组件库
开始
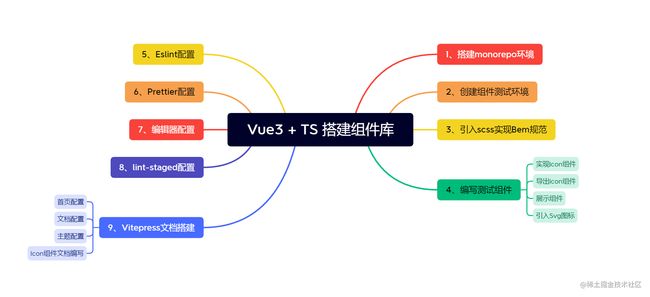
在编写组件库之前,我们首先要对整个代码项目的解构有一个清晰的划分,以及用到的大多数规范,和代码风格有一个约定,这篇文章主要就围绕着下面图中的几个问题展开描述一下。
1、搭建monorepo环境
我们使用pnpm当做包管理工具,用pnpm workspace来实现monorepo。可以看下面参考文章里面的介绍,结合官网有个基础的了解。下面我们正式开始搭建。
新建一个文件夹z-vue3-ui
npm install pnpm -g # 全局安装pnpm
pnpm init # 初始化package.json配置⽂件 私有库
pnpm install vue typescript -D # 全局下添加依赖
添加.npmrc文件,
shamefully-hoist = true// 作用依赖包都扁平化的安装在node_modules下面
创建tsconfig.json文件
{"compilerOptions": {"module": "ESNext", // 打包模块类型ESNext"declaration": false, // 默认不要声明⽂件"noImplicitAny": false, // ⽀持类型不标注可以默认any"removeComments": true, // 删除注释"moduleResolution": "node", // 按照node模块来解析"esModuleInterop": true, // ⽀持es6,commonjs模块"jsx": "preserve", // jsx 不转"noLib": false, // 不处理类库"target": "es6", // 遵循es6版本"sourceMap": true,"lib": [// 编译时⽤的库"ESNext","DOM"],"allowSyntheticDefaultImports": true, // 允许没有导出的模块中导⼊"experimentalDecorators": true, // 装饰器语法"forceConsistentCasingInFileNames": true, // 强制区分⼤⼩写"resolveJsonModule": true, // 解析json模块"strict": true, // 是否启动严格模式"skipLibCheck": true, // 跳过类库检测"types": ["unplugin-vue-define-options"] // sfc 添加 name属性的包需要的},"exclude": [// 排除掉哪些类库"node_modules","**/__tests__","dist/**"]
}
在项目根目录下面创建pnpm-workspace.yaml配置文件。
packages:- "packages/**" # 存放所有组件- docs # 文档- play # 测试组件
2、创建组件测试环境
pnpm create vite play --template vue-ts
cd play
pnpm install
在根目录新建一个typings目录,用来存放项目中通用的自定义的类型,然后把用vite创建的play/src下面的vite-env.d.ts移动到typings下面去。
启动测试项目, 在根目录下面的package.json下面添加scripts脚本。
"scripts": {"dev": "pnpm -C play dev"}
测试环境搭建完成,下面开始搭建packages下面的文件目录了。

3、引入scss,并式实现Bem
先手动在根目录下面创建如下目录
packages ├─components # 存放所有的组件 ├─utils # 存放⼯具⽅法 └─theme-chalk # 存放对应的样式
在执行下面的命令,在各自的根目录下面创建package.json文件。
cd components && pnpm init
cd theme-chalk && pnpm init
cd utils && pnpm init
这个时候需要手动修改每个包的名字,让其属于z-vue3-ui的子包,我们分别进行以下的修改,在对应package.json文件中修改其name属性的值。
@z-vue3-ui/components
@z-vue3-ui/theme-thalk
@z-vue3-ui/utils
然后执行一下命令,将这三个包安装在根目录下面,注意名字哦。
pnpm i @z-vue3-ui/components -w
pnpm i @z-vue3-ui/theme-chalk -w
pnpm i @z-vue3-ui/utils -w
下面我们就开始实现Bem规范了。
1. Bem Js 实现部分
先来实现在js中创建class的几个函数。
utils/create.ts
// block 代码块
// element 元素
// modifier 装饰

// z-button
// z-button__element--disable

/**
 *
 * @param prefixName 前缀名
 * @param blockName 代码块名
 * @param elementName 元素名
 * @param modifierName 装饰符名
 * @returns说白了 ,就是提供一个函数,用来拼接三个字符串,并用不同的符号进行分隔开来
 */
function _bem(prefixName, blockName, elementName, modifierName) {if (blockName) {prefixName += `-${blockName}`;}if (elementName) {prefixName += `__${elementName}`;}if (modifierName) {prefixName += `--${modifierName}`;}return prefixName;
}

/**
 *
 * @param prefixName 前缀
 * @returns
 */
function createBEM(prefixName: string) {const b = (blockName?) => _bem(prefixName, blockName, "", "");const e = (elementName) =>elementName ? _bem(prefixName, "", elementName, "") : "";const m = (modifierName) =>modifierName ? _bem(prefixName, "", "", modifierName) : "";const be = (blockName, elementName) =>blockName && elementName? _bem(prefixName, blockName, elementName, ""): "";const bm = (blockName, modifierName) =>blockName && modifierName? _bem(prefixName, blockName, "", modifierName): "";const em = (elementName, modifierName) =>elementName && modifierName? _bem(prefixName, "", elementName, modifierName): "";const bem = (blockName, elementName, modifierName) =>blockName && elementName && modifierName? _bem(prefixName, blockName, elementName, modifierName): "";const is = (name, state?) => (state ? `is-${name}` : "");return {b,e,m,be,bm,em,bem,is,};
}

export function createNamespace(name: string) {const prefixName = `z-${name}`;return createBEM(prefixName);
}
下面我们找个地方,说一下上面的bem怎么使用。因为现在我们的代码都是ems的,在node环境中跑起来不方便,所以就在play测试的小模块中演示了。
const bem = createNamespace("icon");

console.log(bem.b());
console.log(bem.e("wrapper"));
console.log(bem.m("disabled"));
console.log(bem.is("checked", true));
console.log(bem.bem("box", "element", "disabled"));

2. Bem scss 部分
theme-chalk
├── package.json
└── src├── icon.scss├── index.scss├── mixins│ ├── config.scss│ └── mixins.scss
config.scss
$namespace: 'z';
$element-separator: '__'; // 元素连接符
$modifier-separator: '--'; // 修饰符连接符
$state-prefix: 'is-'; // 状态连接符

* {box-sizing: border-box;
}
mixins.scss
@use 'config' as *;
@forward 'config';

// z-icon
@mixin b($block) {$B: $namespace + '-' + $block;.#{$B} {@content;}
}

// z-icon.is-xxx
@mixin when($state) {@at-root {&.#{$state-prefix + $state} {@content;}}
}

// .z-icon--primary

@mixin m($modifier) {@at-root {#{& + $modifier-separator + $modifier} {@content;}}
}

// z-icon__header
@mixin e($element) {@at-root {#{& + $element-separator + $element} {@content;}}
}
index.scss
@use './icon.scss';
icon.scss
@use './mixins/mixins.scss' as *;

@keyframes transform {from {transform: rotate(0deg);}to {transform: rotate(360deg);}
}

@include b(icon) {width: 1em;height: 1em;line-height: 1em;display: inline-flex;vertical-align: middle;svg.loading {animation: transform 1s linear infinite;}
}
4. 编写Icon组件
目录结构如下:
components
├── icon
│ ├── index.ts
│ └── src
│ ├── icon.ts
│ └── icon.vue
└── package.json
icon.vue
icon.ts
import { ExtractPropTypes, PropType } from "vue";

export const iconProps = {size: [Number, String] as PropType,color: String,
} as const;

export type IconProps = ExtractPropTypes;
index.ts
import _Icon from "./src/icon.vue";
import { withInstall } from "@z-vue3-ui/utils/withInstall";

const Icon = withInstall(_Icon); // 生成带有 install 方法的组件

export default Icon; // 导出组件
export type { IconProps } from "./src/icon"; // 导出组件 props 的类型

// 这里为了给 volar 用的,具体可以看下面的文档
declare module "vue" {export interface GlobalComponents {ZIcon: typeof Icon;}
}
文档链接

编写一个方法用来把我们自己编写的组件包装成一个插件,方便后序导入使用,直接可以用Vue.use()
utils下面的目录结构
utils
├── create.ts
├── package.json
└── withInstall.ts
import { Plugin } from "vue";

export type withInstallSFC = T & Plugin;

// 给传入的组件添加一个 install 方法
export function withInstall(comp: T) {(comp as withInstallSFC).install = function (app) {const { name } = comp as unknown as { name: string };app.component(name, comp);// 这一块的类型还有点问题,还在研究中。};return comp as withInstallSFC;
}
play
├── README.md
├── index.html
├── package.json
├── pnpm-lock.yaml
├── public
│ └── vite.svg
├── src
│ ├── App.vue
│ ├── assets
│ └── main.ts
├── tsconfig.json
├── tsconfig.node.json
└── vite.config.ts
并且在main.ts中引入样式文件,并安装sass包
mian.ts
import { createApp } from "vue";

import "@z-vue3-ui/theme-chalk/src/index.scss";
import App from "./App.vue";

createApp(App).mount("#app");
我们的icon内容并不由本库提供,需要安装另一个库,这个组件只是将其进行了整合
pnpm add @vicons/ionicons5 -w
App.vue
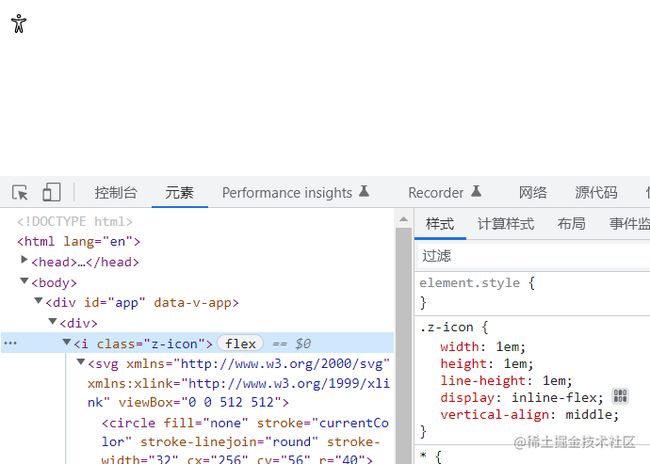
不出意外的话,现在已经可以看见下面的icon组建了
还有更详细的关于BEM和Element实现主题的文章请参考下面这一篇,ElementUI 组件库样式与自动化设计。
5、Eslint 配置
npx eslint --init
检验语法并提示错误行数
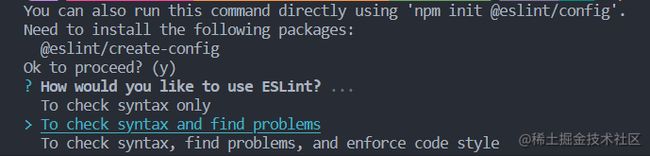
使用js-module

项目采用语法
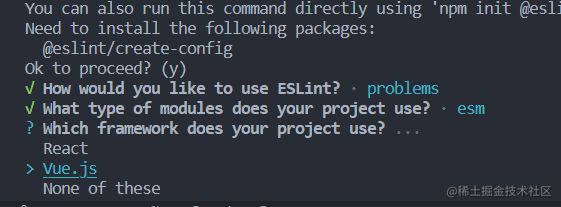
是否使用ts

代码跑在哪里

这里需要我们手动使用pnpm进行包的安装

pnpm i eslint-plugin-vue@latest @typescript-eslint/eslint-plugin@latest @typescript-eslint/parser@latest eslint@latest -D -w
pnpm i @vue/eslint-config-typescript -D -w
module.exports = {env: {browser: true,es2021: true,node: true},extends: ['eslint:recommended','plugin:vue/vue3-recommended', // vue3解析 https://eslint.vuejs.org/'plugin:@typescript-eslint/recommended','@vue/typescript/recommended'],parserOptions: {ecmaVersion: 'latest',parser: '@typescript-eslint/parser',sourceType: 'module'},plugins: ['vue', '@typescript-eslint'],rules: {'vue/html-self-closing': 'off','vue/singleline-html-element-content-newline': 'off','vue/multi-word-component-names': 'off','vue/prefer-import-from-vue': 'off'},globals: {defineOptions: 'readonly'}
}
6、Prettier配置
安装插件,并添加给vscode添加配置文件
.prettierrc.js
// 此处的规则供参考,其中多半其实都是默认值,可以根据个人习惯改写
module.exports = {printWidth: 80, // 单行长度tabWidth: 2, // 缩进长度useTabs: false, // 使用空格代替tab缩进semi: true, // 句末使用分号singleQuote: true, // 使用单引号quoteProps: 'as-needed', // 仅在必需时为对象的key添加引号jsxSingleQuote: true, // jsx中使用单引号trailingComma: 'all', // 多行时尽可能打印尾随逗号bracketSpacing: true, // 在对象前后添加空格-eg: { foo: bar }jsxBracketSameLine: true, // 多属性html标签的‘>’折行放置arrowParens: 'always', // 单参数箭头函数参数周围使用圆括号-eg: (x) => xrequirePragma: false, // 无需顶部注释即可格式化insertPragma: false, // 在已被preitter格式化的文件顶部加上标注proseWrap: 'preserve', // 不知道怎么翻译htmlWhitespaceSensitivity: 'ignore', // 对HTML全局空白不敏感vueIndentScriptAndStyle: false, // 不对vue中的script及style标签缩进endOfLine: 'lf', // 结束行形式embeddedLanguageFormatting: 'auto' // 对引用代码进行格式化
}
.prettierignore
node_modules
dist
编辑器配置文件
{"editor.defaultFormatter": "esbenp.prettier-vscode","editor.formatOnSave": true
}
7、编辑器配置
.editorconfig
# http://editorconfig.org

root = true

[*] # 表示所有文件适用
charset = utf-8# 设置文件字符集为 utf-8
indent_style = space # 缩进风格(tab | space)
indent_size = 2# 缩进大小
end_of_line = lf # 控制换行类型(lf | cr | crlf)
trim_trailing_whitespace = true# 去除行首的任意空白字符
insert_final_newline = true# 始终在文件末尾插入一个新行

[*.md] # 表示仅 md 文件适用以下规则
max_line_length = off
trim_trailing_whitespace = false
并安装EditorConfig for VS Code插件即可
8、lint-staged配置
git init
pnpm install mrm husky lint-staged -w -D
npx mrm lint-staged
强制执行常规提交的可共享commitlint配置。与@commitlint/cli和@commitlint/prompt-cli 一起使用。
pnpm install @commitlint/cli @commitlint/config-conventional -D -w
npx husky add .husky/commit-msg "npx --no-install commitlint --edit $1"
commitlint.config.js
module.exports = {extends: ["@commitlint/config-conventional"],rules: {"type-enum": [2,"always",["build", // 编译相关的修改,例如发布版本、对项⽬构建或者依赖的改动"chore", // 其他修改, ⽐如改变构建流程、或者增加依赖库、⼯具等"ci", // 持续集成修改"docs", // ⽂档修改"feat", //新特性、新功能"fix", // 修改 bug"perf", // 优化相关,⽐如提升性能、体验"refactor", // 代码重构"revert", // 回滚到上⼀个版本"style", // 代码格式修改"test" // 测试⽤例修改]]}
}
git commit -m"feat: 初始化⼯程"
9、Vitepress编写组件文档
在根目录下面创建docs文件夹,用来存放文档。
1. 安装vitepress
cd docs
pnpm init
pnpm install vitepress -D # 在doc⽬录下安装
package.json
"scripts": {"dev": "vitepress dev ."},
然后在根目录下面的添加脚本
"scripts": {"docs:dev": "pnpm -C docs dev",},
2. 创建第一篇文章
---
layout: home

hero:name: z-ui 组件库text: 基于 Vue 3 的组件库.tagline: 掌握 vue3 组件编写actions:
 - theme: brand
 text: 快速开始link: /guide/quickStart
features:
 - icon: ️
 title: 组件库构建流程details: Vue3 组件库构建...- icon: ⚙️title: 组件库单元测试details: Vue3 组件库测试...
---
启动docs目录
pnpm run docs:dev
下面我们就可以看见这个页面了

3. 文档配置文件
.vitepress/config.js
module.exports = {title: 'Z-UI',description: 'zi-shui UI',themeConfig: {lastUpdated: '最后更新时间',docsDir: 'docs',editLinks: true,editLinkText: '编辑此⽹站',repo: 'https://gitee.com/login',footer: {message: 'Released under the MIT License.',copyright: 'Copyright © 2022-present Zi Shui'},nav: [{ text: '指南', link: '/guide/installation', activeMatch: '/guide/' },{ text: '组件', link: '/component/icon', activeMatch: '/component/' }],sidebar: {'/guide/': [{text: '指南',items: [{ text: '安装', link: '/guide/installation' },{ text: '快速开始', link: '/guide/quickStart' }]}],'/component/': [{text: '基础组件',items: [{ text: 'Icon', link: '/component/icon' }]}]}}
}
4. 主题配置
.vitepress/theme/index.ts
import DefaultTheme from 'vitepress/theme';
import '@z-vue3-ui/theme-chalk/src/index.scss';
import ZIcon from '@z-vue3-ui/components/icon';

export default {...DefaultTheme,enhanceApp({ app }) {app.use(ZIcon); // 注册组件},
};
添加vite.config.ts让vite也可以支持defineOptions。
vite.config.ts
import { defineConfig } from 'vite';
import DefineOptions from 'unplugin-vue-define-options/vite';

// https://vitejs.dev/config/
export default defineConfig({plugins: [DefineOptions()],
});
5. 编写Icon组件文档
component/icon.md
# Icon 图标
z-ui 推荐使用 xicons 作为图标库。
$ pnpm install @vicons/ionicons5
## 使用图标
- 如果你想像用例一样直接使用,你需要全局注册组件,才能够直接在项目里使用。
10. 展望
现在已经写了四个组件了,希望可以坚持写更多的组件,从简单的开始,才能解决更复杂的问题,奥利给。
components
├── checkbox
├── icon
├── package.json
├── tree
└── virtual-list
最后
整理了一套《前端大厂面试宝典》,包含了HTML、CSS、JavaScript、HTTP、TCP协议、浏览器、VUE、React、数据结构和算法,一共201道面试题,并对每个问题作出了回答和解析。

有需要的小伙伴,可以点击文末卡片领取这份文档,无偿分享
部分文档展示:


文章篇幅有限,后面的内容就不一一展示了
有需要的小伙伴,可以点下方卡片免费领取