Vue.js 3.0 API之computed计算属性、watch侦听器
本文目录
- computed 计算属性
-
- 作用
- 创建方法
-
- `computed函数`创建计算属性方式
- watch侦听器
-
- 作用
- 创建方法
-
- watch函数
- watchEffect Vue3中新增的函数
-
-
- watchEffect 使用演示
- TodoLists 案例
-
- 功能介绍
- 自定义指令
-
computed 计算属性
作用
计算属性的作用是简化模版中的代码,可以缓存计算的结果,当数据变化后它会重新计算。
创建方法
在Vue.js 3.0中,我们依然可以像vue2.x的那样,在创建组件的时候传入computed选项,来创建计算属性。 在Vue.js 3.0中也可以在setup中通过computed函数来创建计算属性。
computed函数创建计算属性方式
- 第一种用法:
computed函数中传入一个获取值的函数,函数内部依赖响应式的数据;当依赖的数据发生变化后, 会重新执行该函数获取数据。computed函数返回一个不可变的响应式对象。类似于使用ref创建的对象。具有一个value属性,获取计算属性的值要通过value属性来获取。模版中使用计算属性可以省略.value。computed(() => count.value + 1) - 第二种用法:
computed函数中传入一个对象,这个对象具有getter和setter,返回一个不可变的响应式对象。例如:const count = ref(1) const plusOne = computed({ set: () => count.value + 1, get: val => { count.value = val - 1 } })
【在线案例演示地址】
<!DOCTYPE html>
<html lang="en">
  <head>
    <meta charset="UTF-8" />
    <link rel="icon" type="image/svg+xml" href="/vite.svg" />
    <meta name="viewport" content="width=device-width, initial-scale=1.0" />
    <title>Vite App</title>
  </head>
  <body>
    <div id="app">
      <button @click="push">按钮 </button>
      未完成: {{ activeCount }}
    </div>
    <script type="module">
      import {
        createApp,
        computed,
        reactive,
      } from './node_modules/vue/dist/vue.esm-browser.js';
      const data = [
        { text: '看书', completed: false },
        { text: '写代码', completed: false },
        { text: '约会', completed: true },
      ];

      createApp({
        setup() {
          const todos = reactive(data);
          const activeCount = computed(
            () => todos.filter((item) => !item.completed).length
          );

          return {
            activeCount,
            push: () => {
              todos.push({
                text: '开会',
                completed: false,
              });
            },
          };
        },
      }).mount('#app');
    </script>
  </body>
</html>
watch侦听器
作用
计算属性的作用是监听响应式数据的变化,然后执行一个相应的回调函数。可以获取到监听数据的新值和旧值。
创建方法
与computed类似,在Vue.js 3.0中,我们依然可以像vue2.x的那样,在创建组件的时候传入watch选项,来创建一个侦听器。 在Vue.js 3.0中也可以在setup中通过watch函数来创建一个侦听器。它的使用方式和之前使用的this.$watch(),或者选项中的watch作用是一样的:监听响应式数据的变化,然后执行一个相应的回调函数。可以获取到监听数据的新值和旧值。
watch函数
- watch函数的三个参数
- 第一个参数:要监听的数据,可以是一个获取值的函数,监听这个函数返回值的变化;或者直接是一个ref或者reactive返回的响应式对象。还可以是数组。
- 第二个参数:监听到数据变化之后执行的回调函数,这个函数有两个参数,分别是新值和旧值。
- 第三个参数:选项对象,可以传入两个选项:深度监听
deep和立即执行immediate。
- watch函数的返回值:用来取消监听的函数
<!DOCTYPE html>
<html lang="en">
  <head>
    <meta charset="UTF-8" />
    <link rel="icon" type="image/svg+xml" href="/vite.svg" />
    <meta name="viewport" content="width=device-width, initial-scale=1.0" />
    <title>Vite App</title>
  </head>
  <body>
    <div id="app">
      <p>
        请问一个回答yes/no的问题:
        <input v-model="question" type="text" />
      </p>
      <p>{{ answer.answer }}</p>
      <img :src="answer.image" :alt="answer.answer" />
    </div>
    <script type="module">
      import {
        createApp,
        ref,
        watch,
      } from './node_modules/vue/dist/vue.esm-browser.js';

      createApp({
        setup() {
          // apiurl : https://www.yesno.wtf/api
          const question = ref('are u ok?');
          const answer = ref({});

          watch(question, async (newVal, oldVal) => {
            const response = await fetch('https://www.yesno.wtf/api');
            answer.value = await response.json();
          });

          return {
            question,
            answer,
          };
        },
        async mounted() {
          const response = await fetch('https://www.yesno.wtf/api');
          this.answer = await response.json();
        },
      }).mount('#app');
    </script>
  </body>
</html>
【在线案例演示地址】
watchEffect Vue3中新增的函数
- 是watch函数的简化版本,也用来监视数据的变化;内部实现适合watch调用的同一个函数。不同的是watchEffect没有第二个回调函数的参数。
- 接收一个函数作为参数,监听函数内响应式数据的变化。当数据变化之后会重新运行该函数。
- 它也返回一个取消监听的函数。
watchEffect初始时会立即执行一次
watchEffect 使用演示
案例代码:
<!DOCTYPE html>
<html lang="en">
  <head>
    <meta charset="UTF-8" />
    <link rel="icon" type="image/svg+xml" href="/vite.svg" />
    <meta name="viewport" content="width=device-width, initial-scale=1.0" />
    <title>Vite App</title>
  </head>
  <body>
    <div id="app">
      <button @click="increase">Increase</button>
      <button @click="stop">Stop</button>
      <br />
      {{ count }}
    </div>
    <script type="module">
      import {
        createApp,
        ref,
        watchEffect,
      } from './node_modules/vue/dist/vue.esm-browser.js';

      createApp({
        setup() {
          const count = ref(0);
          const stop = watchEffect(() => {
            // 当stop按钮点击过后,count.value再改变的时候,这里的函数就不再被触发了
            console.log('watchEffect: ', count.value);
          });
          return {
            count,
            increase: () => {
              console.log('increase:', count.value);
              count.value++;
            },
            stop,
          };
        },
      }).mount('#app');
    </script>
  </body>
</html>
【在线案例演示地址】
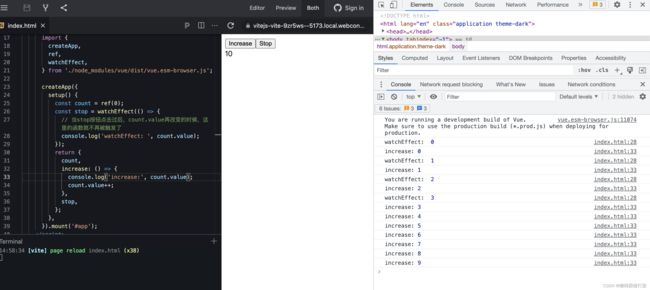
结果:

我们可以看到,当stop被点击过后,就取消了watchEffect的监听函数,再次点击increase按钮就不会再触发watchEffect中的函数了。
后续案例中,我们会使用watchEffect监听数据的的变化,当数据变化后,把变化的数据存储到localStorage,这个时候使用watchEffect会非常方便。
到此,我们常用的Composition API就基本介绍完了。
希望这些能够加深大家对Vue.js 3.0中的数据响应式处理方式有更深入的认识。
TodoLists 案例
通过此案例,我们可以加深和巩固前面所学的知识内容,快速应用到实际开发场景中。
功能介绍
-
添加代办事项
// 1. 添加待办事项 const useAdd = (todos) => { const input = ref(''); const addTodo = () => { const text = input.value && input.value.trim(); if (text.length === 0) return; todos.value.unshift({ text, completed: false, }); input.value = ''; }; return { input, addTodo, }; }; -
删除代办事项
// 2. 删除待办事项 const useRemove = (todos) => { const remove = (todo) => { const index = todos.value.indexOf(todo); todos.value.splice(index, 1); }; const removeCompleted = () => { todos.value = todos.value.filter((todo) => !todo.completed); }; return { remove, removeCompleted, }; }; -
编辑代办事项
// 3. 编辑待办项 const useEdit = (remove) => { let beforeEditingText = ''; const editingTodo = ref(null); const editTodo = (todo) => { beforeEditingText = todo.text; editingTodo.value = todo; }; const doneEdit = (todo) => { if (!editingTodo.value) return; todo.text = todo.text.trim(); todo.text || remove(todo); editingTodo.value = null; }; const cancelEdit = (todo) => { editingTodo.value = null; todo.text = beforeEditingText; }; return { editingTodo, editTodo, doneEdit, cancelEdit, }; }; -
展示代办事项列表
-
展示已完成/未完成事项的统计
-
全选/反选事项列表中的事项
// 该位置代码放在const useFilter = (todos) => {...}中 const allDone = computed({ get() { return !todos.value.filter((todo) => !todo.completed).length; }, set(value) { todos.value.forEach((todo) => { todo.completed = value; }); }, }); -
更改(标记/撤销)代办事项状态
-
切换展示不同状态的代办事项
// 4. 切换待办项完成状态
const useFilter = (todos) => {
  const allDone = computed({
    get() {
      return !todos.value.filter((todo) => !todo.completed).length;
    },
    set(value) {
      todos.value.forEach((todo) => {
        todo.completed = value;
      });
    },
  });

  const filter = {
    all: (list) => list,
    active: (list) => list.filter((todo) => !todo.completed),
    completed: (list) => list.filter((todo) => todo.completed),
  };
  const type = ref('all');
  const filteredTodos = computed(() => filter[type.value](todos.value));
  const remainingCount = computed(() => filter.active(todos.value).length);
  const count = computed(() => todos.value.length);

  const onHashChange = () => {
    const hash = window.location.hash.replace('#/', '');
    if (filter[hash]) {
      type.value = hash;
    } else {
      type.value = 'all';
      window.location.hash = '';
    }
  };

  onMounted(() => {
    window.addEventListener('hashchange', onHashChange);
    onHashChange();
  });

  onUnmounted(() => {
    window.removeEventListener('hashchange', onHashChange);
  });

  return {
    allDone,
    count,
    filteredTodos,
    remainingCount,
  };
};
使用自定义指令让文本框双击编辑是自动聚焦:
directives: {
   editingFocus: (el, binding) => {
     binding.value && el.focus();
   },
 },
- 存储代办事项,使用localStorage缓存浏览器数据,刷新页面还原到刷新前的状态,数据不会消失
我们可以把操作本地存储的模块抽取到一个单独模块中,./src/utils/useLocalStorage.js。function parse(str) { let value; try { value = JSON.parse(str); } catch (err) { console.log(err); value = null; } return value; } function stringify(obj) { let value; try { value = JSON.stringify(obj); } catch (err) { console.log(err); value = null; } return value; } function setItem(key, value) { window.localStorage.setItem(key, stringify(value)); } function getItem(key) { let value = window.localStorage.getItem(key); value && (value = parse(value)); return value; } export default function useLocalStorage() { return { setItem, getItem, }; } - 清除所有已完成的代办事项
// 2. 删除待办事项
const useRemove = (todos) => {
  // 删除指定代办事项
  const remove = (todo) => {
    const index = todos.value.indexOf(todo);
    todos.value.splice(index, 1);
  };
  // 清除所有已完成的代办事项
  const removeCompleted = () => {
    todos.value = todos.value.filter((todo) => !todo.completed);
  };
  return {
    remove,
    removeCompleted,
  };
};
在组件中使用:
// App.vue setup()
// 5. 存储待办事项
const useStorage = () => {
  const KEY = 'TODOKEYS';
  const todos = ref(storage.getItem(KEY) || []);
  // 当todos列表发生变化时,存储到localStorage
  watchEffect(() => {
    storage.setItem(KEY, todos.value);
  });
  return todos;
};
【在线案例演示地址】
自定义指令
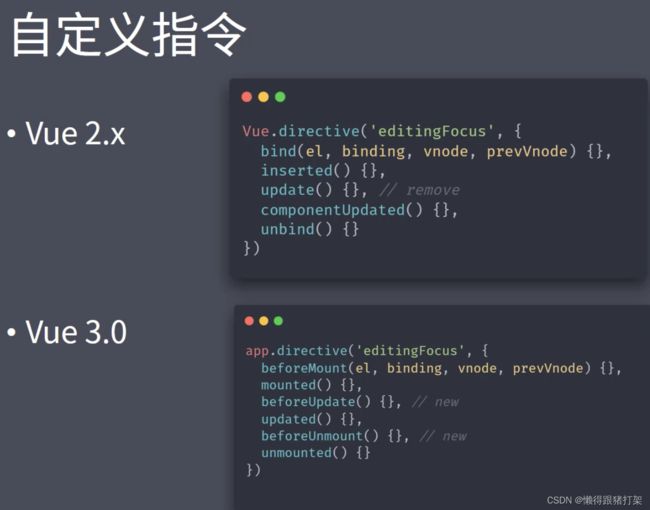
vue2.x和vue3.0的指令主要差别在于自定义指令的钩子函数被重命名,如下图示:vue3.0中的钩子函数和组件中的钩子函数保持一致,这样很容易理解。但是只定义指令的钩子函数和组件钩子函数的执行方式是不一样的。

这是自定义指令的第一种方式,
创建自定义指令的时候还可以传函数,这种方式更简洁,比较常用一些。如下图示:


