Spring cloud学习笔记11-服务链路追踪Sleuth
服务链路追踪Sleuth
-
- 1. 概述
- 2. 步骤
-
- 2.1 安装ZipKin
- 2.2 新建工程spring-service-hi
-
- 新建工程
- Pom引入
- 配置文件
- 启动类
- 2.3 新建工程spring-service-hello
-
- 新建工程
- Pom引入
- 配置文件
- 启动类
- 2.4 调用测试
1. 概述
Spring Cloud Sleuth为Spring Cloud实现分布式跟踪解决方案。微服务架构上通过业务来划分服务的,通过REST调用,对外暴露的一个接口,可能需要很多个服务协同才能完成这个接口功能,如果链路上任何一个服务出现问题或者网络超时,都会形成导致接口调用失败。随着业务的不断扩张,服务之间互相调用会越来越复杂,在项目中引入sleuth可以方便程序进行调试。

2. 步骤
2.1 安装ZipKin
在spring Cloud为F版本的时候,已经不需要自己构建Zipkin Server了,只需要下载jar即可,下载zipkin-server-2.10.1-exec.jar,需要在jdk1.8及以上版本运行。
运行服务:java –jar zipkin-server-2.10.1-exec.jar
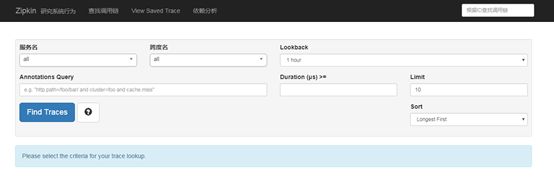
打开网页:http://localhost:9411
如果显示如下表示服务已经启动:
2.2 新建工程spring-service-hi
新建工程
新建一个maven的module工程,名称为spring-service-hi,父亲pom为springcloud。需要引入zipkin、starter-web的jar包。
Pom引入
Pom配置文件引入如下内容:
			org.springframework.boot
			spring-boot-starter-web


			org.springframework.cloud
			spring-cloud-starter-zipkin
配置文件
建立一个resources文件夹,在其下面新建一个application.properties文件,使用zuul做一个路由,配置如下:
server.port=8988
spring.zipkin.base-url=http://localhost:9411
spring.application.name=spring-service-hi
启动类
编写一个启动类SpringServiceHiApplication.java(提供hi和info服务,其中hi调用spring-service-hello中的hello服务)。代码如下:
package org.spring.service.hi;
import java.util.logging.Level;
import java.util.logging.Logger;
import org.springframework.beans.factory.annotation.Autowired;
import org.springframework.boot.SpringApplication;
import org.springframework.boot.autoconfigure.SpringBootApplication;
import org.springframework.context.annotation.Bean;
import org.springframework.web.bind.annotation.RequestMapping;
import org.springframework.web.bind.annotation.RestController;
import org.springframework.web.client.RestTemplate;
import brave.sampler.Sampler;
@SpringBootApplication
@RestController
public class SpringServiceHiApplication {

    public static void main(String[] args) {
        SpringApplication.run(SpringServiceHiApplication.class, args);
    }
    private static final Logger LOG = Logger.getLogger(SpringServiceHiApplication.class.getName());
    @Autowired
    private RestTemplate restTemplate;
    @Bean
    public RestTemplate getRestTemplate(){
        return new RestTemplate();
    }
    /*调用service-hello的hello,而service-hello的hello调用service-hi的info,所以hi最终调用本身的hello*/
    @RequestMapping("/hi")
    public String callHome(){
        LOG.log(Level.INFO, "calling trace spring-service-hi  ");
        return restTemplate.getForObject("http://localhost:8989/hello", String.class);
    }
    @RequestMapping("/info")
    public String info(){
        LOG.log(Level.INFO, "calling trace spring-service-info ");
        return "i'm spring-service-hi";
    }
    @Bean
    public Sampler defaultSampler() {
        return Sampler.ALWAYS_SAMPLE;
    }
}
2.3 新建工程spring-service-hello
新建工程
新建一个maven的module工程,名称为spring-service-hello,父亲pom为springcloud。需要引入zipkin、starter-web的jar包。
Pom引入
Pom配置文件引入如下内容:
			org.springframework.boot
			spring-boot-starter-web


			org.springframework.cloud
			spring-cloud-starter-zipkin
配置文件
建立一个resources文件夹,在其下面新建一个application.properties文件,使用zuul做一个路由,配置如下:
server.port=8989
spring.zipkin.base-url=http://localhost:9411
spring.application.name=spring-service-hello
启动类
编写一个启动类ServiceHelloApplication.java(提供hi和hello服务,其中hello调用spring-service-hi中的info服务)。代码如下:
package org.spring.service.hello;
import java.util.logging.Level;
import java.util.logging.Logger;
import org.springframework.beans.factory.annotation.Autowired;
import org.springframework.boot.SpringApplication;
import org.springframework.boot.autoconfigure.SpringBootApplication;
import org.springframework.context.annotation.Bean;
import org.springframework.web.bind.annotation.RequestMapping;
import org.springframework.web.bind.annotation.RestController;
import org.springframework.web.client.RestTemplate;
import brave.sampler.Sampler;
@SpringBootApplication
@RestController
public class ServiceHelloApplication {
    public static void main(String[] args) {
        SpringApplication.run(ServiceHelloApplication.class, args);
    }
    private static final Logger LOG = Logger.getLogger(ServiceHelloApplication.class.getName());
    @RequestMapping("/hi")
    public String home(){
        LOG.log(Level.INFO, "hi is being called");
        return "hi i'm spring-service-hello!";
    }
    /*service-hello的hello调用service-hi的info,所以hi最终调用本身的hello*/
    @RequestMapping("/hello")
    public String info(){
        LOG.log(Level.INFO, "info is being called");
        return restTemplate.getForObject("http://localhost:8988/info",String.class);
    }
    @Autowired
    private RestTemplate restTemplate;
    @Bean
    public RestTemplate getRestTemplate(){
        return new RestTemplate();
    }
    @Bean
    public Sampler defaultSampler() {
        return Sampler.ALWAYS_SAMPLE;
    }
}
2.4 调用测试
1) 运行http://localhost:8989/hello
显示结果如下:
![]()
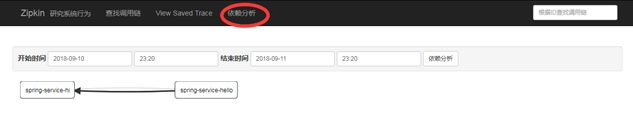
打开网页http://localhost:9411/,点击“依赖关系”,可以看到如下:

点击“查找调用链”,选择刚才调用的span链,可以看到如下:

我们可以看到2层调用关系如下:

2) 运行http://localhost:8988/hi
显示结果如下:
![]()
打开网页http://localhost:9411/,点击“依赖关系”,可以看到如下:
点击“查找调用链”,选择刚才调用的span链,可以看到如下:
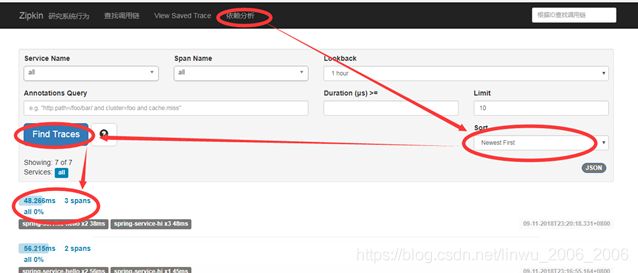
我们可以看到3层调用关系如下:

本文参考文献:https://blog.csdn.net/forezp/article/details/70148833/