移动应用开发之路 03 Android Studio 6种布局介绍、实战详解
学校开了一门移动应用开发课程,我一开始兴趣盎然,但是看到使用的环境是 Java 8 的时候心就凉了一半,在询问老师的意见之后决定使用现在比较常用的Android Studio完成学习,特此记录自学之路。
目录
- 1. 布局分类
-
- 1.1. 线性布局(linearlayout)
- 1.2. 相对布局(relativelayout)
- 1.3. 帧布局(framlayout)
- 1.4. 表格布局(tablelayout)
- 1.5. 网格布局(gridlayout)
- 1.6. 约束布局(absolutelayout)
- 2. 添加布局
-
- 2.1. 线性布局
-
- 2.1.1. 线性布局功能介绍
- 2.1.2. 线性布局实战演示
- 2.2. 相对布局
-
- 2.2.1. 相对布局特性
1. 布局分类
安卓的布局一般分为这几类:
- 线性布局
- 相对布局
- 帧布局
- 表格布局
- 网格布局
- 约束布局
在Android Studio中,创建布局文件时可以直接选布局类型。

1.1. 线性布局(linearlayout)
一般会按照从上到下(垂直布局)或者从左到右(水平布局)的顺序把组件排列至窗口。
1.2. 相对布局(relativelayout)
设置一个参照物,其他的几个组件都是按照跟参照物的相对位置决定自己的位置。
1.3. 帧布局(framlayout)
就一层一层叠到一起,有点像PS里的图层。
1.4. 表格布局(tablelayout)
表格布局适用于那种行列比较有规律性的东西,这个类似于html中的表格布局。
1.5. 网格布局(gridlayout)
类似表格布局,但是不完全一样,更加灵活。
1.6. 约束布局(absolutelayout)
这个是特别特别常用的一种布局,可以用很少量的代码完成比较复杂的功能。
2. 添加布局
我们开发的时候一般使用xml文件设计布局,当然也可用java完成。但是java一般不常用,因为特别麻烦,我们举一个例子,现在我要做下面这个图的效果。
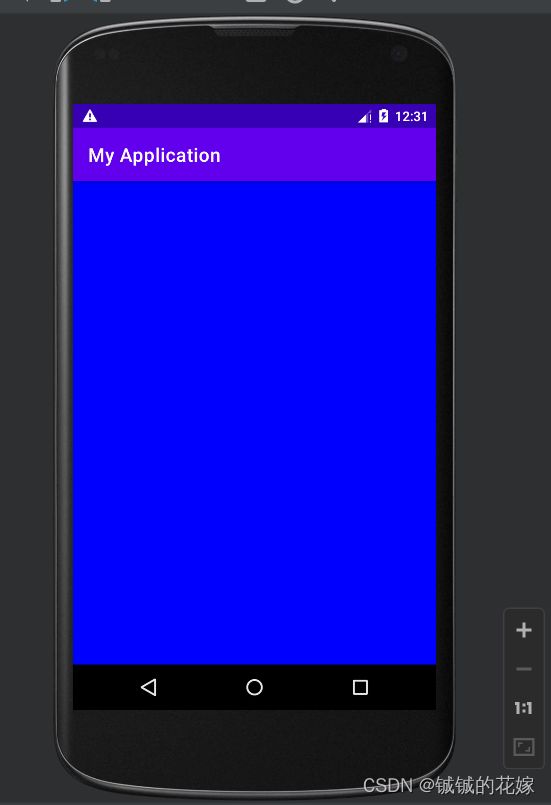
java代码如下,我们发现,每次都要创建一个新布局,写一大堆东西。而且界面代码何逻辑代码一般不放一起。
package com.example.myapplication;

import androidx.appcompat.app.AppCompatActivity;

import android.graphics.Color;
import android.os.Bundle;
import android.view.CollapsibleActionView;
import android.view.ViewGroup;
import android.widget.LinearLayout;

public class MainActivity extends AppCompatActivity {
    // Activity: 是一个类,AppCompatActivity也是算是Activity类。类似于一个可视化界面
    @Override   // 表示这个是重写,只要打开窗口,指定先执行它,所以有点类似于初始化代码
    public void onCreate(Bundle savedInstanceState) {
        super.onCreate(savedInstanceState);
        // 创建根布局
        LinearLayout ll = new LinearLayout(this);
        // 设置宽高
        ll.setLayoutParams(new LinearLayout.LayoutParams(ViewGroup.LayoutParams.MATCH_PARENT,
                ViewGroup.LayoutParams.MATCH_PARENT));
        // 设置背景
        ll.setBackgroundColor(Color.BLUE);
        // 应用根部局
        setContentView(ll);
    }
}
我们可以这么操作:
- 创建线性布局文件
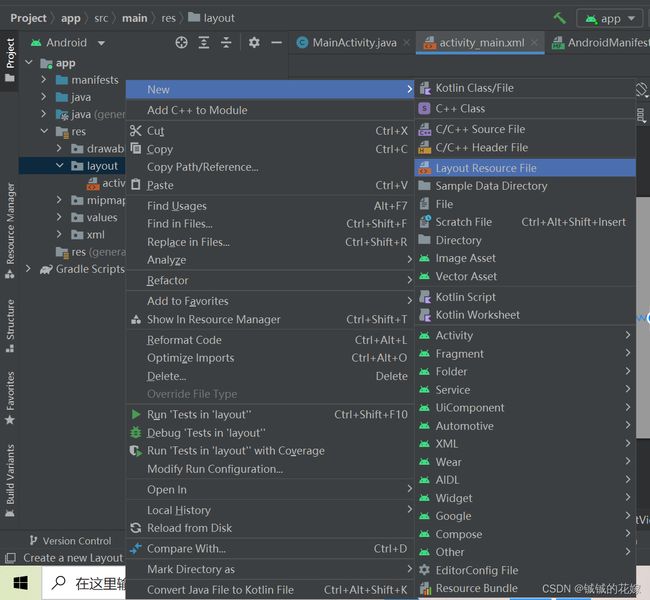
- 创建一个线性布局
2.1. 线性布局
2.1.1. 线性布局功能介绍
我们使用一个线性布局,主要是为了验证几个效果。
<LinearLayout xmlns:android="http://schemas.android.com/apk/res/android"
    android:orientation="vertical"
    android:layout_width="match_parent"
    android:layout_height="match_parent"
    android:layout_margin="20dp"
    android:padding="100dp">


    <TextView
        android:layout_width="wrap_content"
        android:layout_height="0dp"
        android:text="hello world   hello world   hello world   hello world"
        android:background="#123456"
        android:textSize="30sp"
        android:textColor="#ffffff"
        android:layout_weight="4"/>
    <TextView
        android:layout_width="wrap_content"
        android:layout_height="0dp"
        android:text="world hello"
        android:background="#654321"
        android:textSize="20sp"
        android:textColor="#ffffff"
        android:layout_weight="1"
        android:gravity="center"/>

    <TextView
        android:layout_width="wrap_content"
        android:layout_height="0dp"
        android:text="world hello"
        android:background="#123321"
        android:textSize="20sp"
        android:textColor="#ffffff"
        android:layout_weight="1"
        android:layout_gravity="center"/>


LinearLayout>
设计效果如下:

2.1.2. 线性布局实战演示
因为没有导入相关图标,效果跟想象中还是有差距的,不过图片换了效果应该还是可以的。
chatting_layout.xml
<LinearLayout xmlns:android="http://schemas.android.com/apk/res/android"
    android:orientation="vertical"
    android:layout_width="match_parent"
    android:layout_height="match_parent">

    <LinearLayout
        android:layout_width="match_parent"
        android:layout_height="60dp"
        android:orientation="horizontal"
        android:background="#333333"
        android:paddingLeft="20dp">

        <TextView
            android:layout_width="wrap_content"
            android:layout_height="wrap_content"
            android:text="<  "
            android:textColor="#ffffff"
            android:textSize="30dp"
            android:layout_gravity="center_vertical"
            />
        <TextView
            android:layout_width="wrap_content"
            android:layout_height="wrap_content"
            android:text="学生管理系统"
            android:textColor="#ffffff"
            android:textSize="30dp"
            android:layout_gravity="center_vertical"
            />
        <ImageView
            android:layout_width="wrap_content"
            android:layout_height="wrap_content"
            android:src="@mipmap/ic_launcher"
            android:layout_weight="0.5"/>
    LinearLayout>

    <LinearLayout
        android:layout_width="match_parent"
        android:layout_height="match_parent"
        android:orientation="horizontal"
        android:layout_weight="1"/>

    <LinearLayout
        android:layout_width="match_parent"
        android:layout_height="60dp"
        android:orientation="horizontal"
        android:background="#cccccc">

        <ImageView
            android:layout_width="0dp"
            android:layout_height="wrap_content"
            android:src="@mipmap/ic_launcher"
            android:layout_weight="0.5"/>
        <ImageView
            android:layout_width="0dp"
            android:layout_height="wrap_content"
            android:src="@mipmap/ic_launcher"
            android:layout_weight="0.5"/>
        <TextView
            android:layout_width="wrap_content"
            android:layout_height="wrap_content"
            android:layout_weight="2"/>
        <ImageView
            android:layout_width="0dp"
            android:layout_height="wrap_content"
            android:src="@mipmap/ic_launcher_round"
            android:layout_weight="0.5"/>
    LinearLayout>


LinearLayout>
效果如下

2.2. 相对布局
2.2.1. 相对布局特性
使用相对布局的时候注意参照物,有父容器和其他控件(id控制)等选择。
创建一个相对布局xml文件。

relativelayout_test.xml
<RelativeLayout xmlns:android="http://schemas.android.com/apk/res/android"
    android:layout_width="match_parent"
    android:layout_height="match_parent">
    <TextView
        android:id="@+id/center0"
        android:layout_width="100dp"
        android:layout_height="100dp"
        android:background="#123456"
        android:textSize="20dp"
        android:textColor="#ffffff"
        android:gravity="center"
        android:text="中间"
        android:layout_centerInParent="true"/>
    <TextView
        android:layout_width="100dp"
        android:layout_height="100dp"
        android:background="#123456"
        android:textSize="20dp"
        android:textColor="#ffffff"
        android:gravity="center"
        android:text="左下"
        android:layout_alignParentLeft="true"
        android:layout_alignParentBottom="true"/>

    <TextView
        android:layout_width="100dp"
        android:layout_height="100dp"
        android:background="#123456"
        android:textSize="20dp"
        android:textColor="#ffffff"
        android:gravity="center"
        android:text="水平居中"
        android:layout_centerHorizontal="true"/>

    <TextView
        android:layout_width="100dp"
        android:layout_height="100dp"
        android:background="#123456"
        android:textSize="20dp"
        android:textColor="#ffffff"
        android:gravity="center"
        android:text="垂直居中"
        android:layout_centerVertical="true"/>


    <TextView
        android:layout_width="100dp"
        android:layout_height="100dp"
        android:background="#098765"
        android:textSize="20dp"
        android:textColor="#ffffff"
        android:gravity="center"
        android:text="相对右边"
        android:layout_toRightOf="@+id/center0"
        android:layout_centerVertical="true"/>

    <TextView
        android:layout_width="100dp"
        android:layout_height="100dp"
        android:background="#098765"
        android:textSize="20dp"
        android:textColor="#ffffff"
        android:gravity="center"
        android:text="相对左上"
        android:layout_toLeftOf="@+id/center0"
        android:layout_above="@+id/center0"/>


    <TextView
        android:layout_width="150dp"
        android:layout_height="30dp"
        android:layout_alignBottom="@+id/center0"
        android:background="#abcd12"
        android:gravity="center"
        android:text="相对下边线对齐"
        android:textColor="#ffffff"
        android:textSize="20dp" />
RelativeLayout>
效果如下:
