React 基础文档
一、React 的特点
- 声明式编程
只需要维护自己的状态,当状态改变时,根据最新的状态去渲染UI界面 - 组件化开发
- 多平台适配
- 2013年,React发布之初主要是开发Web页面;
- 2015年,Facebook推出了ReactNative,用于开发移动端跨平台;(虽然目前Flutter非常火爆,但是还是有很多公司在使用ReactNative);
- 2017年,Facebook推出ReactVR,用于开发虚拟现实Web应用程序;(随着5G的普及,VR也会是一个火爆的应用场景);
在线生成代码片段
二、React 的基本使用
- ReactDOM.render(vDom, dDom) // 挂载组件,第一个参数为虚拟dom节点,第二个参数为要挂载的真实dom
- ReactDOM.unmountComponentAtNode(dDom) // 卸载真实Dom下的组件
- React.createElement(tag, props, node) // 创建虚拟dom,第一个参数为标签名,第二个参数名为属性值,第三个参数为文本内容
const msg = 'i like you!'
const myId = 'atguigu'

const vDom1 = React.createElement('h2', {
  id: myId.toLowerCase(),
  className: myId.toLowerCase()
}, msg.toLowerCase())
2.1 相关js库
- react.development.js:React核心库。
- react-dom.development.js:提供操作DOM的react扩展库。
- babel.min.js:解析JSX语法代码转为JS代码的库。
2.2 简单 Demo
2.3 JSX(JavaScript XML)
react 定义的一种类似于XML的JS扩展语法: JS + XML 本质是React.createElement(component, props, …children)方法的语法糖 (标签名, 属性, 文本内容)
2.3.1 作用
用来简化创建虚拟DOM
注意点:
- 不是字符串, 也不是HTML/XML标签
- 最终产生的就是一个JS对象。本质是Object类型的对象(一般对象),比较"轻",没有真实DOM那么多属性
语法规则:
- 定义虚拟DOM时,不要写引号
- 标签中混入JS表达式时要用{}
- 绑定事件用小驼峰;如 onClick
- 样式的类名指定不要用class,用className
- 内联样式用
style={{key: value}}的形式去写 - 只有一个根标签
- 标签必须闭合
- 标签首字母以小写字母开头,则将该标签转为html同名元素,没有则报错;以大写字母开头就去渲染对应的组件,若未定义则报错
嵌入变量
- 当变量是Number、String、Array类型时,可以直接显示
- 当变量是null、undefined、Boolean类型时,内容为空; 原因是需要用这些类型做判断显示
- 如果希望可以显示null、undefined、Boolean,那么需要转成字符串;
- 转换的方式有很多,比如toString方法、和空字符串拼接,String(变量)等方式;
- 对象类型不能作为子元素(not valid as a React child)
2.3.2 本质
实际上,jsx 仅仅只是 React.createElement(component, props, …children) 函数的语法糖
createElement需要传递三个参数:
- 参数一:type (标签)
如果是标签元素,那么就使用字符串表示 “div”;如果是组件元素,那么就直接使用组件的名称; - 参数二:config (属性)
所有jsx中的属性都在config中以对象的属性和值的形式存储 - 参数三:children
存放在标签中的内容,以children数组的方式进行存储
babel 代码转换
2.3.3 虚拟DOM
创建过程
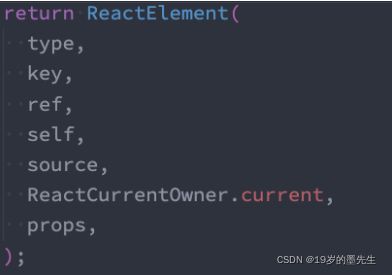
通过 React.createElement 最终创建出来一个 ReactElement 对象(JavaScript 的对象树)

JavaScript的对象树就是大名鼎鼎的虚拟DOM(Virtual DOM),最后通过 render 函数将虚拟DOM编译成真实DOM
为什么使用虚拟DOM,而不是直接修改真实的DOM呢?
- 很难跟踪状态发生的改变:原有的开发模式,很难跟踪到状态发生的改变,不方便针对应用程序进行调试;
- 操作真实DOM性能较低:传统的开发模式会进行频繁的DOM操作,而这一的做法性能非常的低;
声明式编程
虚拟DOM帮助我们从命令式编程转到了声明式编程的模式
React官方的说法:Virtual DOM 是一种编程理念。
- 在这个理念中,UI以一种理想化或者说虚拟化的方式保存在内存中,并且它是一个相对简单的JavaScript对象
- 我们可以通过ReactDOM.render让 虚拟DOM 和 真实DOM同步起来,这个过程中叫做协调(Reconciliation);
这种编程的方式赋予了React声明式的API:
- 只需要告诉React希望让UI是什么状态;
- React来确保DOM和这些状态是匹配的;
- 不需要直接进行DOM操作,只可以从手动更改DOM、属性操作、事件处理中解放出来;
2.4 模拟 v-for
2.5 模拟 v-if、v-show
const falg = true

return (
  { falg && <h2>模拟 v-if</h2>}
  <h2 style={{ display: falg ? 'block' : 'none' }}>模拟 v-show</h2>
)
三、组件化开发
函数组件
- 没有生命周期,也会被更新并挂载,但是没有生命周期函数
- 没有this(组件实例)
- 没有内部状态(state)
3.1 render 函数的返回值
- React 元素
- 通常通过 JSX 创建
- 例如, 会被 React 渲染为 DOM 节点,
会被 React 渲染为自定义组件 - 无论是 还是
均为 React 元素
- 数组或 fragments:使得 render 方法可以返回多个元素
/** * 方式一:函数组件 */ function MyComponent1() { return [ <div>Hello world</div>, <div>Hello React</div> ] } /** * 方式二:类组件 */ class MyComponent2 extends React.Component { render() { return [ <div>Hello world</div>, <div>Hello React</div> ] } } - Portals:可以渲染子节点到不同的 DOM 子树中
- 字符串或数值类型:它们在 DOM 中会被渲染为文本节点
- 布尔类型或 null、undefined:什么都不渲染
3.2 组件三大属性
3.2.1 state
- state是组件对象最重要的属性, 值是对象(可以包含多个key-value的组合)
- 组件被称为"状态机", 通过更新组件的state来更新对应的页面显示(重新渲染组件)
3.2.2 props
通过标签属性从组件外向组件内传递变化的数据
注意: 组件内部不要修改props数据
编码操作:
-
内部读取某个属性值
this.props.name -
对props中的属性值进行类型限制和必要性限制
第一种方式(React v15.5 开始已弃用):Person.propTypes = { name: React.PropTypes.string.isRequired, age: React.PropTypes.number }第二种方式(新):使用prop-types库进限制(需要引入prop-types库)
 Person.propTypes = {
   name: PropTypes.string.isRequired, // 必填,string 类型
   age: PropTypes.number.
}
详细参考
-
默认 Prop 值
 Person.defaultProps = {
   age: 18,
   sex:'男'
 }
工厂函数构建
组件类构建
3.2.3 refs
类组件内的标签可以定义 ref 属性来标识自己(函数组件不能使用 ref,因为没有实例)
注意:因为 react 设计的事件处理方式都是通过事件委托的方式进行,所以不要过度使用 ref
- 字符串形式的ref
// 注意:String 类型的 Refs 已过时并可能会在未来的版本被移除 // 通过 refs 获取dom const input1 = this.refs.input1 - 回调形式的ref
// 1. 内联函数的方式定义。更新过程中它会被执行两次,第一次传入参数 null,然后第二次会传入参数 DOM 元素 this.input1 = c } /> // 通过 this.xxx 获取dom console.log(this.input1) // 2. 定义绑定函数的方式。不会执行两次 createRef(c, name) { this[name] = c console.log(this[name]) } this.createRef(c, 'input1') } /> - createRef 创建 ref 容器(新版本)
class CustomTextInput extends React.Component { constructor(props) { super(props) // 创建一个 ref 来存储 textInput 的 DOM 元素 this.textInput = React.createRef() } focusTextInput() { // 注意:我们通过 "current" 来访问 DOM 节点 this.textInput.current.focus() } render() { // 告诉 React 我们想把 ref 关联到 // 构造器里创建的 `textInput` 上 return (this.focusTextInput()} />) } }
3.3 组件间通信
PropTypes 进行类型检查
3.3.1 通过props传递
import React, { Component } from 'react'
import PropTypes  from 'prop-types'

// 子组件
class Cmp extends Component {
  static propTypes = { //  类型限制
    name: PropTypes.string.isRequired,
    changeIndex: PropTypes.func.isRequired
  }

  static defaultProps = { // prop 默认值
    name: 'lisi'
  }

  render() {
    const {name, changeIndex} = this.props
    return (
      <div onClick={() => { changeIndex(1) }}>{name}</div>
    )
  }
}

// 父组件
export default class App extends Component {
  state = {
    name: 'zs'
  }

  changeIndex(index) {
    console.log(index)
  }

  render() {
    return (
      <Cmp name={this.state.name} changeIndex={(index) => this.changeIndex(index)} />
    )
  }
}
3.3.2 Context 跨组件通信
-
创建 context 容器对象(必须所有组件都能访问到,可以封装个 js 文件暴露出去)
// context.js export const XxxContext = React.createContext() // 配置默认值 // export const XxxContext = React.createContext({ name: 'ls', age: 20 }) // 祖组件 // 1. 导入 context 容器 import { XxxContext } from './context.js' // 2. 子组件用 XxxContext.Provider 标签包裹,配置 value 属性传递 <XxxContext.Provider value={{ name: 'zs', age: 18 }}> <Cmp /> </XxxContext.Provider> // ----------------------------------------- // 后代组件(类组件) // 3. 导入 context 容器 import { XxxContext } from './context.js' // 4. 声明接收 context static contextType = XxxContext // 5. 使用 this.context // { name: 'zs', age: 18 } // 后代组件(类组件、函数组件) // 3. 导入 context 容器 import { XxxContext } from './context.js' // 4. 通过 XxxContext.Consumer 接收 return ( <UserContext.Consumer> { value => { // value: { name: 'zs', age: 18 } return <div>后代组件</div> } } </UserContext.Consumer> ) -
通过 childContextTypes (已过时)
// 祖组件
// 1. 添加 childContextTypes 和 getChildContext 向下传递信息
static childContextTypes = {
  color: PropTypes.string
}

getChildContext() {
  return { color: 'red' }
}

// 后代组件
// 2. 声明 contextTypes 接收,如果 contextTypes 没有被定义,context 就会是个空对象
static contextTypes = {
  color: PropTypes.string
}

// 3. 使用
this.context // { color: 'red' }
3.3.3 使用消息订阅(subscribe)-发布(publish)机制
-
装包
npm install pubsub-js --save -
使用:
import PubSub from 'pubsub-js'// 引入PubSub.subscribe('delete', (msg, data) => {})// 订阅,delete 为事件名,data 为数据PubSub.publish('delete', data)// 发布消息
// A组件
PubSub.publish('delete', data) // 发布消息

// B组件
componentDidMount() {
  this.delete = PubSub.subscribe('delete', (msg, data) => { // 订阅消息
    console.log(data)
  })
}

componentWillUnmount() { // 取消订阅
  PubSub.unsubscribe(this.delete)
}
3.4 实现类似 solt 功能
3.4.1 props.children
父组件包含的标签,子组件里都会通过 this.props.children 接收(此方式顺序不可打乱,不推荐)
// 父组件
<Cmp>
  <Fragment>left</Fragment>
  <Fragment>mid</Fragment>
  <Fragment>right</Fragment>
</Cmp>

// 子组件
<Fragment>
  <div className="left">{this.props.children[0]}</div>
  <div className="mid">{this.props.children[1]}</div>
  <div className="right">{this.props.children[2]}</div>
</Fragment>
3.4.2 通过 prop 属性
// 父组件
<Cmp
  leftSolt={<Fragment>left</Fragment>}
  midSolt={<Fragment>mid</Fragment>}
  rightSolt={<Fragment>right</Fragment>}
/>

// 子组件
<Fragment>
  <div className="left">{this.props.leftSolt}</div>
  <div className="mid">{this.props.midSolt}</div>
  <div className="right">{this.props.rightSolt}</div>
</Fragment>
3.5 高阶组件
3.5.1 高阶组件的定义
高阶函数定义(满足其中一个)
- 接受一个或多个函数作为输入(参数)
- 输出一个函数
JavaScript中比较常见的filter、map、reduce都是高阶函数
高阶组件定义
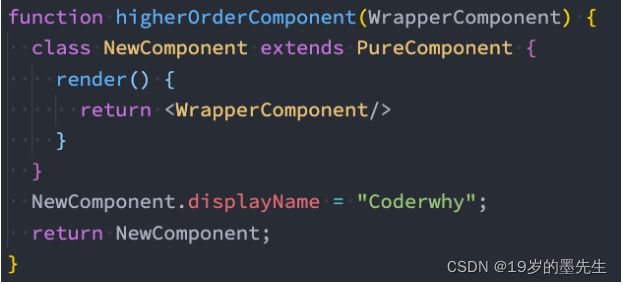
- 高阶组件 本身不是一个组件,而是一个函数
- 这个函数的参数是一个组件,返回值也是一个组件
组件的名称问题:
- 在ES6中,类表达式中类名是可以省略的
- 组件的名称都可以通过displayName来修改
3.5.2 高阶组件的应用
一、增强props
有些公用数据多个子组件都会用到,就可以使用高阶组件
// 1. 定义高阶组件,公用数据放 return 返回的组件上
function enhanceComponent(Component) {
  return props => {
    return <Component {...props} region="中国" />
  }
}

// 2. 定义组件,使用数据
class Home extends PureComponent {
  render() {
    return <div>Home 姓名:{this.props.name} 地区:{this.props.region}</div>
  }
}

class About extends PureComponent {
  render() {
    return <div>About 姓名:{this.props.name} 地区:{this.props.region}</div>
  }
}

// 3. 使用高阶组件,返回新组件
const EnhanceHome = enhanceComponent(Home)
const EnhanceAbout = enhanceComponent(About)

// 4. 父组件只需要传不一样的数据,公用的 region 已经放到 enhanceComponent 中
export default class App extends PureComponent {
  render() {
    return (
      <Fragment>
        <EnhanceHome name="zs" />
        <EnhanceAbout name="ls" />
      </Fragment>
    )
  }
}
二、登录鉴权
// 1. 定义高阶组件,根据传入 isLogin 判断返回哪个组件
function withAuth(WrappedComponent) {
  return props => {
    const { isLogin } = props
    if (isLogin) {
      return <WrappedComponent {...props} />
    }
    return <LoginPage />
  }
}

// 2. 定义未登录要展示的组件
function LoginPage() {
  return <button>请先登录</button>
}

// 3. 定义需要登录的组件
function UserPage() {
  return <h2>用户中心</h2>
}

// 4. 使用高阶组件,返回新组件
const AuthUserPage = withAuth(UserPage)

// 5. isLogin 传入 true,显示 UserPage 组件
export default class App extends PureComponent {
  render() {
    return (
      <AuthUserPage isLogin={true} />
    )
  }
}
四、生命周期
4.1 挂载阶段
/*
 * constructor 中通常只做两件事情
 * 1. 通过给 this.state 赋值对象来初始化内部的 state
 * 2. 为事件绑定实例(this)
 */
constructor()

/*
 * 初始化渲染或更新渲染调用
 * state 的值在任何时候都取决于 props
 */
static getDerivedStateFromProps(nextProps, prevState) { // 不常用
  const { type } = nextProps
  // 当传入的 type 发生变化的时候,更新 state
  if (type !== prevState.type) {
    return { type }
  }
  // 否则,对于state不进行任何操作
  return null
}

/*
 * 初始化渲染或更新渲染调用
 */
render()

/*
 * 组件挂载完成后,开启监听, 发送ajax请求
 */
componentDidMount()
注意:
此生命周期方法即将过时
- componentWillMount() – (旧)
- UNSAFE_componentWillMount() – (新)
4.2 更新阶段
static getDerivedStateFromProps(nextProps, prevState) // 不常用

/*
 * 控制组件是否更新界面
 * 返回 true 更新,false 不更新
 */
shouldComponentUpdate(nextProps, nextState) // 不常用

render()

/*
 * 最近一次渲染输出(提交到 DOM 节点)之前调用
 * 能在发生更改之前从 DOM 中捕获一些信息(例如,滚动位置)
 * 此生命周期的任何返回值将作为参数传递给 componentDidUpdate()
 */
getSnapshotBeforeUpdate(prevProps, prevState) // 不常用

/*
 * 更新后会被立即调用
 * snapshot 是 getSnapshotBeforeUpdate 生命周期返回的值
 */
componentDidUpdate(prevProps, prevState, snapshot)
注意:
此生命周期方法即将过时
- componentWillUpdate() – (旧),UNSAFE_componentWillUpdate() – (新)
- componentWillReceiveProps(nextProps),UNSAFE_componentWillReceiveProps() – (新) // 组件接收到新的 props 属性时回调
4.3 卸载阶段
/*
 * 组件销毁前调用
 * 做一些收尾工作, 如: 清理定时器
 */
componentWillUnmount()
4.4 错误处理
// 当渲染过程,生命周期,或子组件的构造函数中抛出错误时,会调用如下方法:
/*
 * 后代组件抛出错误后被调用
 * 抛出的错误作为参数,并返回一个值以更新 state
 */
class ErrorBoundary extends React.Component {
  constructor(props) {
    super(props)
    this.state = { hasError: false }
  }

  static getDerivedStateFromError(error) {
    // 更新 state 使下一次渲染可以显降级 UI
    return { hasError: true }
  }

  render() {
    if (this.state.hasError) {
      // 你可以渲染任何自定义的降级  UI
      return <h1>Something went wrong.</h1>
    }

    return this.props.children
  }
}

/*
 * error —— 抛出的错误
 * info —— 带有 componentStack key 的对象,其中包含有关组件引发错误的栈信息
 */
componentDidCatch(error, info)
注意:
getDerivedStateFromError() 会在渲染阶段调用,因此不允许出现副作用。 如遇此类情况,请改用 componentDidCatch()。
五.、常用 API
5.1 setState(stateChange, [callback])
setState 在组件生命周期或React合成事件中更新数据是异步的,在setTimeout或者原生dom事件中更新数据是同步的,[callback] 是一个可选的回调函数参数
对象写法
此方式有合并问题,多次执行指挥执行最后一次,内部进行了合并处理
state = { count: 1 }

handleClick = () => {
  this.setState({ count: 2 }) /* 这里为异步操作,会先执行下面的同步代码 */
  console.log('更新后:', this.state.count) // 更新后:1
}
传入 callback
state = { count: 1 }

handleClick = () => {
  this.setState({ count: 2 }, () => {
    console.log('更新后:', this.state.count) // 更新后:2
  })
}
函数写法
此方式可以解决 setState 本身的合并问题,内部会立即调用并把新的 state 返回出去
state = { count: 0 }

handleClick = () => {
  /*
   * prevState 为上次的 state 对象
   * props 为接收的 props 对象
   */
  this.setState((prevState, props) => {
    return { count: prevState.count + 1 }
  })
   this.setState((prevState, props) => {
    return { count: prevState.count + 1 }
  })
   this.setState((prevState, props) => {
    return { count: prevState.count + 1 }
  })
}
// 此时 count 是 +3,而不是合并后 +1
使用原则:
- 新状态不依赖原状态,使用对象写法
- 新状态依赖原状态,使用函数写法
- 如果需要在 setStaste 执行后获取最新的状态数据,要在第二个 callback 函数中读取
5.2 lazy
路由懒加载
import React, { Component, lazy, Suspense } from 'react'
import { Route, Switch } from 'react-router-dom'
const Register = lazy(() => import('./components/register/register')) // 懒加载路由
const Login = lazy(() => import('./components/login/login'))
import Loading from './components/loading/loading'
class App extends Component {
render() {
return (
)
}
}
5.3 Fragment
忽略组件根标签,编译出来的 DOM 结构不会有根标签,与 <> 效果一样,唯一区别就是 Fragment 可以传 key 属性(只能传 key),<> 不能传任何属性
5.4 StrictMode
严格模式检查
- 识别不安全的生命周期。如:componentWillMount、UNSAFE_componentWillMount…
- 使用过时的 ref API。如:ref=“title”
- 使用废弃的findDOMNode方法
在之前的React API中,可以通过findDOMNode来获取DOM,不过已经不推荐使用了 - 检查意外的副作用
- 这个组件的constructor会被调用两次
- 这是严格模式下故意进行的操作,让你来查看在这里写的一些逻辑代码被调用多次时,是否会产生一些副作用
- 在生产环境中,是不会被调用两次的
- 检测过时的 context API
早期的Context是通过static属性声明Context对象属性,通过getChildContext返回Context对象等方式来使用Context的。目前这种方式已经不推荐使用
5.5 PureComponent
内部对 state 跟 props 进行浅层比较(深层比较非常消耗性能),发生改变才调用 render 函数
注意:只能使用在类组件
import React, { PureComponent } from 'react'
export default class App extends PureComponent {}
5.6 memo
内部对 props 进行浅层比较(深层比较非常消耗性能),发生改变才调用 render 函数
注意:只能使用在函数组件
import React, { memo } from 'react'
const MemoHeader = memo(function() {
  return <div>Header</div>
})
5.7 forwardRef
获取函数式组件中某个元素的DOM。JSX 里ref属性不会通过props传递
import React, { forwardRef } from 'react'
const Home = forwardRef(function Home(props, ref) {
  return <h2 ref={ref}>Home</h2>
})

<Home ref={c => this.homeRef = c} />
this.homeRef // Home
5.8 Portals
将子节点渲染到存在于父组件以外的 DOM 节点的优秀的方案(默认都是挂载到id为root的DOM元素上的)。
ReactDOM.createPortal(child, container)
类似于 Vue3 的 Teleport。
- 第一个参数(child)是任何可渲染的 React 子元素,例如一个元素,字符串或 fragment
- 第二个参数(container)是一个真实 DOM 元素
// Modal 组件渲染到 body 标签下
import ReactDOM from 'react-dom'
function Modal() {
  return ReactDOM.createPortal(
    <div>Modal</div>,
    document.querySelector('body')
  )
}
六. Hooks
注意:
- 只能在函数最外层调用 Hook。不要在循环、条件判断中调用。
- 只能在 React 的函数组件中调用 Hook。不要在其他 JavaScript 函数中调用。
6.1 useState
为函数式组件创建 state,返回一个数组(包含两个元素),第一个为初始值,第二个为修改方法。只接受一个参数作为初始值。
import React from 'react'

function Demo() {
  const [count, setCount] = React.useState(0) // 定义一个 count ,初始值为 0
  const [friends, setFriends] = React.useState(['Tom', 'Bob'])

  return (
    <div>
      <h2>计数:{ count }</h2>
      <button onClick={e => setCount(count + 1)}>+1</button>
      <button onClick={e => setFriends([...friends, 'Jack'])}>+朋友</button>
    </div>
  )
}
第一种写法:
const [count, setCount] = React.useState(0)

function add() { // 调用三次,但会合并只执行一次
  setCount(count + 10)
  setCount(count + 10)
  setCount(count + 10)
}
第二种写法:
const [count, setCount] = React.useState(0)

function add() { // 调用三次,执行三次
  setCount(prevCount => count + 10)
  setCount(prevCount => count + 10)
  setCount(prevCount => count + 10)
}
6.2 useEffect
函数式组件模拟生命周期钩子
/*
 * 第一个参数为回调函数
 * 第二个为监听 state
 *   传一个 [],表示第一个参数的回调函数只执行一次,  return 的回调函数相当于 componentWillUnmount
 *   传谁就监听谁, 先执行 return 返回的回调函数,再执行外面的回调函数
 *   不传则只要 state 的值发生变化就先执行 return 返回的回调函数, 再执行外面的回调函数
 */
const [count, setCount] = React.useState(0) // 定义一个 count ,初始值为 0

React.useEffect(() => {
  // 此处相当于 componentDidMount or componentDidUpdate,初始化会执行一次
  return () => {
    // 此处初始化时不会调用
  }
}, [count])
6.3 useRef
6.3.1 引入DOM(或者组件,但是需要是class组件)元素
function App() {
  const myRef = React.useRef()

  function focusTextInput() {
    // 注意:我们通过 "current" 来访问 DOM 节点
    myRef.current.focus()
  }

  return (
    <>
      <input type="text" ref={ myRef } />
      <input type="button" onClick={ focusTextInput } value="点击" />
    </>
  )
}
注意:函数组件不能绑定 ref(需通过 forwardRef 使用),只有 class 组件可以
class CmpOne extends PureComponent {
  ...
}

const CmpTwo = forwardRef(function CmpTwo(props, ref) {
  return <h2 ref={ ref }>CmpTwo</h2>
})

function App() {
  const cmpOneRef = React.useRef()
  const cmpTwoRef = React.useRef()

  function btnClick() {
    console.log(cmpOneRef.current)
    console.log(cmpTwoRef.current)
  }

  return (
    <>
      <CmpOne ref={ cmpOneRef } />
      <CmpTwo ref={ cmpTwoRef } />
      <input type="button" onClick={ btnClick } value="点击" />
    </>
  )
}
6.3.2 保存一个数据,这个对象在整个生命周期中可以保存不变
function App() {
  const [count, setCount] = React.useState(0)
  const prevCount = React.useRef(count)

  React.useEffect(() => {
    // 记录上一次
    prevCount.current = count
  }, [count])
}
6.4 useContext
跨组件共享数据
// context.js
export const XxxContext = React.createContext()

// 配置默认值
// export const XxxContext = React.createContext({ name: 'ls', age: 20 })

// 祖组件
// 1. 导入 context 容器
import { XxxContext } from './context.js'

// 2.  子组件用 XxxContext.Provider 标签包裹,配置 value 属性传递
<XxxContext.Provider value={{ name: 'zs', age: 18 }}>
  <Cmp />
</XxxContext.Provider>

// -----------------------------------------
// 后代组件
// 3. 导入 context 容器
import { XxxContext } from './context.js'

// 4. 声明接收 context
const user = React.useContext(XxxContext)

user // { name: 'zs', age: 18 }
6.5 useReducer
如果state的处理逻辑比较复杂,可以通过useReducer来对其进行拆分
/*
 * 第一个参数为关联的一个 reducer 函数
 * 第二个为 state 初始值
 */
function reducer(state, action) {
  switch (action.type) {
    case: 'increment':
      return {...state, count: state.count + 1}
    case: 'decrement':
      return {...state, count: state.count - 1}
    default:
      return state
  }
}

function App() {
  const [state, dispatch] = React.useReducer(reducer, {count: 0})

  return (
    <div>
      <h2>count 值: {state.count}</h2>
      <button onClick={e => dispatch({type: 'increment'})}>+1</button>
      <button onClick={e => dispatch({type: 'decrement'})}>-1</button>
    </div>
  )
}
注意:useReducer 并不是 redux 的替代品,并不能多个组件使用同一个 reducer
6.6 useCallback
将一个组件的函数传给子组件使用时,进行性能优化
- 默认情况下,只要调用 setState ,组件就会重新渲染,同理组件中定义的方法也会重新定义
- 有些情况父组件给子组件传了一些方法。只要父组件重新渲染,因为方法重新定义了,所使用的子组件也会重新渲染(消耗性能)
- useCallback会返回一个函数的 memoized(记忆的) 值
/*
 * 第一个参数为要执行的回调函数
 * 第二个为监听 state
 *   传一个 [],表示回调函数只定义一次
 *   传谁就监听谁, 只要依赖的值发生变化就会重新定义
 *   不传则跟没写没区别
 */
const HYButton = React.memo(function(props) {
  return <button onClick={props.increment}>+1</button>
})

function App() {
  const [state, setState] = React.useState(0)
  const [show, setShow] = React.useState(true) // show 发生改变时不会引起 HYButton 重新渲染

  const increment = React.useCallback(() => {
    // state 发生改变时重新定义
    setState(state + 1)
  }, [state])

  return (
    <div>
      <h2>state 值: {state}</h2>
      <HYButton increment={increment} />
    </div>
  )
}
6.7 useMemo
给子组件传递数据进行性能优化。跟 useCallback 功能一样
/*
 * 第一个参数为要返回值的回调函数
 * 第二个为监听 state
 *   传一个 [],表示回调函数只定义一次
 *   传谁就监听谁, 只要依赖的值发生变化就会重新定义
 *   不传则跟没写没区别
 */
const HYInfo = React.memo(function(props) {
  // 当父组件重新渲染时,这里不会重新渲染。因为接收的
  return <div>名字:{props.info.name} 年龄:{props.info.age}</div>
})

function App() {
  const [show, setShow] = React.useState(true)

  const info = React.useMemo(() => {
    return {name: 'zs', age: 18}
  }, [])

  return (
    <div>
      <button onClick={e => setShow(!show)}>切换</button>
      <HYInfo info={info} />
    </div>
  )
}
6.8 useImperativeHandle
限制父组件通过 ref 拿到子组件后做操作
/*
 * 第一个参数为 ref
 * 第二个参数为回调函数,返回一个对象。父组件通过 ref 调用的方法就是调用这里面定义的
 * 第三个参数为监听依赖值(一般不传)
 */
import React, { useRef, forwardRef, useImperativeHandle } from 'react'

const HYInput = forwardRef((props, ref) => {
  const inputRef = useRef()

  useImperativeHandle(ref, () => ({
    {/* 父组件调用 focus 方法就是执行这里的回调 */}
    focus: () => {
      inputRef.current.focus()
    }
  }), [inputRef])

  return <input ref={inputRef} type="text"/>
})

export default function UseImperativeHandleHookDemo() {
  const inputRef = useRef()

  return (
    <div>
      <HYInput ref={inputRef}/>
      <button onClick={e => inputRef.current.focus()}>聚焦</button>
    </div>
  )
}
6.9 useLayoutEffect
- useEffect会在渲染的内容更新到DOM上后执行,不会阻塞DOM的更新
- useLayoutEffect会在渲染的内容更新到DOM上之前执行,会阻塞DOM的更新
import React, { useState, useEffect, useLayoutEffect } from 'react'

export default function LayoutEffectCounterDemo() {
  const [count, setCount] = useState(10)
  {/* 如果这里用 useEffect, 点按钮界面会先变 0, 在变一个随机数(有闪烁现象,不友好) */}
  useLayoutEffect(() => {
    if (count === 0) {
      setCount(Math.random())
    }
  }, [count])

  return (
    <div>
      <h2>数字: {count}</h2>
      <button onClick={e => setCount(0)}>修改数字</button>
    </div>
  )
}
6.10 自定义Hook
将多个组件需要使用的方法抽离成一个函数(函数名必须以 use 开头),类似于混入
简单使用:
function useCustomHook(name) {
  useEffect(() => {
    console.log(`${name}组件创建了`)
    return () => {
      console.log(`${name}组件销毁了`)
    }
  }, [name])
}

function About() {
  useCustomHook('About')
  return <div>About</div>
}
6.10.1 Context 共享
// App.js
import React, { createContext } from 'react'
import './App.css'

import CustomHooks from '@/views/CustomHooks'

export const UserContext = createContext()
export const TokenContext = createContext()

const App = () => (
  <div className="App">
    <UserContext.Provider value={{ name: 'zs', age: 18 }}>
      <TokenContext.Provider value="fafa">
        <CustomHooks />
      </TokenContext.Provider>
    </UserContext.Provider>
  </div>
)
// hooks -> user-hook.js
import { useContext } from "react"

import { UserContext, TokenContext } from '@/App'

function useUserCustomHook() {
  const user = useContext(UserContext)
  const token = useContext(TokenContext)

  return [user, token]
}

export default useUserCustomHook
// views -> CustomHooks.js
import React from 'react'
import UserContext from '@/hooks/user-hook'

function CustomHooks() {
  const [user, token] = UserContext()
  console.log(user, token) // {name: 'zs', age: 18} 'fafa'
  return (
    <>
      <div>CustomHooks</div>
    </>
  )
}

export default CustomHooks
七、样式
7.1 内联样式
内联样式是官方推荐的一种css样式的写法:
- style 接受一个采用小驼峰命名属性的 JavaScript 对象,,而不是 CSS 字符串
- 可以引用state中的状态来设置相关的样式;
内联样式的优点:
- 内联样式, 样式之间不会有冲突
- 可以动态获取当前state中的状态
内联样式的缺点:
- 写法上都需要使用驼峰标识
- 某些样式没有提示
- 大量的样式, 代码混乱
- 某些样式无法编写(比如伪类/伪元素)
7.2 普通CSS
通常会编写到一个单独的文件,之后再进行引入
// index.js
import './style.css'

// style.css
.app {
  ...
}
最大的问题是样式之间会相互层叠掉
7.3 css modules
- 命名:index.module.css
- 引入: import xxx from ‘index.module.css’
- 使用:className={xxx.class}
全局与局部写法
.btn {}

// 等同于(局部),className={xxx.class}
:local() {
  .btn {}
}

// 全局,webpack 不会做任何处理,直接写类名就好
:global() {
  .btn {}
}
缺陷:
- 引用的类名,不能使用连接符(.home-title),在JavaScript中是不识别的
- 样式表所有的类名都必须使用className(驼峰)的形式来编写;
7.4 CSS in JS
“CSS-in-JS” 是指一种模式,其中 CSS 由 JavaScript 生成而不是在外部文件中定义。通过JavaScript来为CSS赋予一些能力,包括类似于CSS预处理器一样的样式嵌套、函数定义、逻辑复用、动态修
改状态等等
目前比较流行的CSS-in-JS的库
- styled-components
- emotion
- glamorous
styled-components 基本使用
# 1. 安装
npm i styled-components
// 2. 引入
import styled from 'styled-components'

// 3. 创建带有样式的 div 元素
const AppWrap = styled.div`
  color: red;
  &:hover {
    color: blue;
  }
`

// 4. 使用
function App() {
  return <AppWrap>App</AppWrap>
}
styled-components 属性使用
// 动态样式
import styled from 'styled-components'

const StyledInput = styled.input.attrs({
  placeholder: '请输入',
  bgColor: 'blue'
})`
  color: ${props => props.color};
  background-color: ${props => props.bgColor};
`

class App extends PureComponent {
  state = {
    color: 'red'
  }
  render() {
    return <StyledInput type="text" color={this.state.color} />
  }
}
styled-components 高级特性
import styled, { ThemeProvider } from 'styled-components'
// 1. 继承
const CommonButton = styled.button`
  font-size: 24px;
`

const AppButton = styled(CommonButton)`
  color: 'red';
`

// 2. 共享数据
class App extends PureComponent {
  render() {
    return (
      {/* 后续所有 style 组件都可以通过 props.theme[prop] 访问传入的属性 */}
      <ThemeProvider theme={{ color: 'blue', fontSize: '24px' }}>
        <AppButton>按钮</AppButton>
      </ThemeProvider>
    )
  }
}
八、react-transition-group
方便的实现组件的 入场 和 离场 动画。官方文档
安装
npm install react-transition-group
8.1 主要组件
- Transition
- 该组件是一个和平台无关的组件(不一定要结合CSS)
- 在前端开发中,我们一般是结合CSS来完成样式,所以比较常用的是CSSTransition
- CSSTransition
在前端开发中,通常使用CSSTransition来完成过渡动画效果 - SwitchTransition
两个组件显示和隐藏切换时,使用该组件 - TransitionGroup
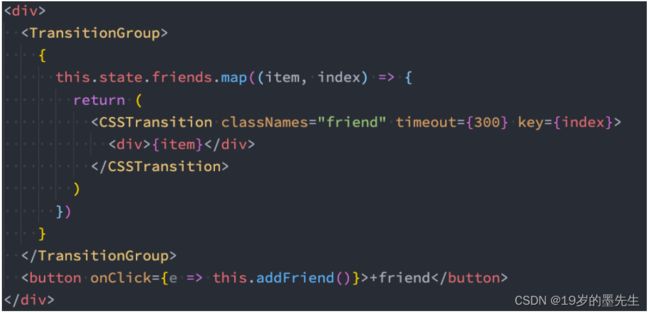
将多个动画组件包裹在其中,一般用于列表中元素的动画
8.2 CSSTransition
基于Transition组件构建,执行过程中,有三个状态:appear、enter、exit
8.2.1 状态
- 开始状态:
对应的类名是 -appear、-enter、-exit - 执行动画:
对应的类名是 -appear-active、-enter-active、-exit-active - 执行结束:
对应的类名是 -appear-done、-enter-done、-exit-done
8.2.2 属性
- in:触发进入或者退出状态
- 如果添加了unmountOnExit={true},那么该组件会在执行退出动画结束后被移除掉
- 当in为true时,触发进入状态,会添加 -enter、-enter-acitve 的class开始执行动画,当动画执行结束后,会移除两个class,并且添加 -enter-done的class
- 当in为false时,触发退出状态,会添加-exit、-exit-active的class开始执行动画,当动画执行结束后,会移除两个class,并且添加-enter-done的class
- classNames:动画class的名称
决定了在编写css时对应的class名称:比如classNames="card",对应的类名就是 card-enter、card-enter-active、card-enter-done - timeout:控制类名及unmountOnExit的转换时间(动画的时间还是CSS控制)
- appear:是否在初次进入添加动画(需要和in同时为true)
- unmountOnExit:设置为 true,退出后卸载组件
钩子函数
- onEnter:在进入动画之前被触发
- onEntering:在进入动画时被触发
- onEntered:在进入动画结束后被触发
- onExit: 在退出动画之前被触发
- onExiting: 在退出动画时被触发
- onExited: 在退出动画结束后被触发
简单例子
export default class CSSTransitionDemo extends PureComponent {
  state = {
    show: true
  }
  render() {
    const { show } = this.state
    return (
      <>
        <button
          onClick={() => this.setState({show: !show})}
        >Button</button>
        <CSSTransition in={show} timeout={1000} appear classNames="text">
          <p>文本</p>
        </CSSTransition>
      </>
    )
  }
}
.text-enter,
.text-appear {
  opacity: 0;
}

.text-enter-active,
.text-appear-active {
  opacity: 1;
  transition: opacity 300ms;
}

.text-exit {
  opacity: 1;
}

.text-exit-active {
  opacity: 0;
  transition: opacity 300ms;
}
8.3 SwitchTransition
完成两个组件之间切换的炫酷动画
8.3.1 属性
只有一个属性 mode
- in-out:表示新组件先进入,旧组件再移除
- out-in:表示就组件先移除,新组建再进入(默认)
8.3.2 使用
- SwitchTransition组件里面要有CSSTransition或者Transition组件,不能直接包裹你想要切换的组件
- SwitchTransition里面的CSSTransition或Transition组件不再像以前那样接受in属性来判断元素是何种状态,取而代之的是key属性
export default class SwitchTransitionDemo extends PureComponent {
  state = {
    show: true
  }
  render() {
    const { show } = this.state
    return (
      <>
        <SwitchTransition>
          <CSSTransition
            key={show ? 'on' : 'off'}
            timeout={1000}
            classNames="animate"
          >
            <button
              onClick={() => this.setState({show: !show})}
            >
              {show ? 'on' : 'off'}
            </button>
          </CSSTransition>
        </SwitchTransition>
      </>
    )
  }
}
.animate-enter {
  opacity: 0;
  transform: translateX(100%);
}

.animate-enter-active {
  opacity: 1;
  transform: translateX(0);
  transition: opacity 1s, transform 1s;
}

.animate-exit {
  opacity: 1;
}

.animate-exit-active {
  opacity: 0;
  transform: translateX(-100%);
  transition: opacity 1s, transform 1s;
}


