nuxt 学习笔记
这里写目录标题
- 路由
-
- 跳转NuxtLink
- query参数
- params参数
- 嵌套路由
-
- tab切换效果
- 路由中间件
-
- middleware/目录中间件
- layouts 文件夹强制约定放置所有布局文件,并以插槽的形式作用在页面中
-
- 1.在app.vue里面
- 2.
- component 组件
-
- 使用Vue < component :is="">
- Vuex
- 生命周期
- 数据请求
-
- useFetch
- useAsyncData
- useAsyncData
- useLazyAsyncData
- 生命周期
- pinia
-
- 1.下载
- 2.nuxt.config.js 文件的 modules 中添加
- 3.在根目录创建文件夹store
- SEO设置
-
- useHead
- public和assets文件夹
-
- public
- assets
- 全局环境变量
-
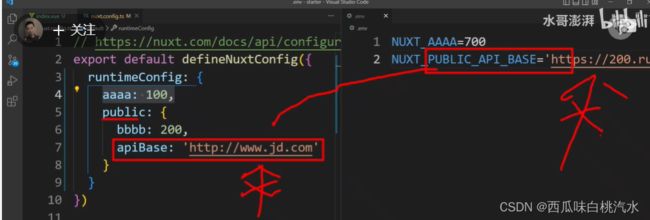
- runtimeConfig nuxt.config.ts设置
-
- .env设置
- app.config 设置
- composables全局数据共享
- 数据交互
-
- useFetch
-
- refresh()
- useLazyFetch
- useAsyncData
- useLazyAsyncData
- 获取请求头的cookie信息
- scss的引入
-
- 引入全局变量scss
- 小问题
-
- window is not defined
- element-plugs el-dialog弹出层不出现问题
- 使用百度地图问题,fetch
- plugins 插件引入nuxt3
- 添加自定义指令

路由
app.vue项目根组件
< NuxtPage/>用来显示区域

修改完注意重启
Nuxt3路由的实现需要在根路径下创建pages文件夹,默认加载index.vue作为/路径入口文件
- 摒弃了 vue 中的路由表,改为文件结构自动生成的路由
一级路由写法 < Nuxt />
嵌套路由写法 < nuxt-child />
跳转NuxtLink
query参数
<NuxtLink to="/left/newLeft?id=456"> <button>点我跳转</button> </NuxtLink>
this.$router.push('/project?id=123')

// query方式
this.$router.push({ path:'/project', query: { id: 123 } })

//
    const router = useRouter()
    const goVideo = (id) => {
      router.push({ name: "video",
        query:{
          id:id
          name?:'wo'//参数个数根据自己需要处理
        }
      })
    }

//接收参数
 {{ $route.query.id }}
  const route = useRoute()
    const id = route.query.id //拿到传递参数
    const name = route.query.name//拿到传递参数
params参数
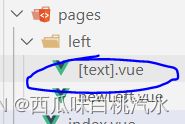
//【text】.vue页面
 <NuxtLink to="/left/123"> <button>点我跳转</button> </NuxtLink>
 // params方式,注意:name是指nuxt生成后的name
const router = useRouter();  router.push("/HouseDetailed/123");
 //接收参数
 <script setup>
const route = useRoute();
console.log("iddddddddd", route.params);
</script>
嵌套路由
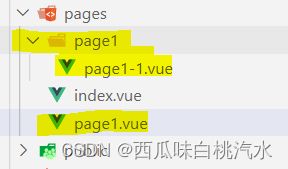
//page1.vue页面
<div>
    <h1>我是第1个页面</h1>
    <NuxtLink to="/page1/page1-1"> <button>点我跳转</button></NuxtLink>
    <NuxtPage></NuxtPage>
</div>
//嵌套传递query参数
 <NuxtLink to="/page1/page1-1?id=99"> <button>点我跳转</button></NuxtLink>
//嵌套传递params参数
 <NuxtLink to="/page1/index"> <button>点我跳转</button></NuxtLink>
tab切换效果
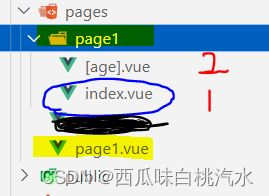
tab切换效果,需要用到嵌套路由,默认展示第一个路由页面
这个时候需要设置一个index.vue
<NuxtLink to="/page1"> tab1 </NuxtLink>
<NuxtLink to="/page1/tab2"> tab2 </NuxtLink>
<NuxtLink to="/page1/tab3"> tab3 </NuxtLink>
<NuxtPage></NuxtPage>//嵌套路由
路由中间件
- 匿名(或内联)路由中间件,直接在使用它们的页面中定义。
- 命名路由中间件,放置在middleware/目录中,在页面上使用时会通过异步导入自动加载。(注意:路由中间件名称被规范化为串串形式,因此someMiddleware 变成 some-middleware。)
- 全局路由中间件,放置在middleware/目录中(带有.global后缀),并将在每次路由更改时自动运行
middleware/目录中间件
//middleware/auth.ts
export default defineNuxtRouteMiddleware((to, from) => {
  if (isAuthenticated() === false) {//isAuthenticated()是一个方法
    return navigateTo('/login') }})
//pages/page1.vue
<script setup>
definePageMeta({
  middleware: 'auth'
})
</script>
layouts 文件夹强制约定放置所有布局文件,并以插槽的形式作用在页面中
只要用户在layouts/下编写布局页面,它将会被自动导入进应用程序。默认的情况下如果用户编写的布局文件的文件名是default.vue,那么它将会被默认应用到全局中,布局通常与< slot/>一同使用,nuxt在加载布局文件后,< slot/>将会默认加载pages目录下的页面
- 在Layouts中创建的default.vue会作为一个全局默认的布局模板
- 使用标签时需要将当前页面的layout设置为false,使用这种方式同时需要使用,setup时则需要额外创建一个< script setup>
- 当程序只有一种布局时,甚至可以直接在app.vue中创建布局
1.在app.vue里面
//app.vue
<template>
  <NuxtLayout>
    <NuxtPage />
  </NuxtLayout>
</template>
2.
//index.vue 用的custom.vue的头部
<template>
  <div>
    <NuxtLayout name="custom">
      <template #header> Some header template content. </template>
             The rest of the page
    </NuxtLayout>
  </div>
</template>
<script setup>
definePageMeta({
  layout: false,
});
</script>
//custom.vue
<template>
  <div>
    <h1>第一种头部布局</h1>
    <slot name="header" />
    <slot/>//要加slot
  </div>
</template>
component 组件
根目录创建components文件夹
| components/
–| TheHeader.vue //页面引入 < TheHeader/>
–| TheFooter.vue //页面引入 < TheFooter/>| components/
–| base/
----| foo/
------| Button.vue //页面引入 < BaseFooButton />
使用Vue < component :is=“”>
<template>
  <component :is="clickable ? MyButton : 'div'" />
</template>
<script setup>
const MyButton = resolveComponent('MyButton')
</script>
Vuex
生命周期
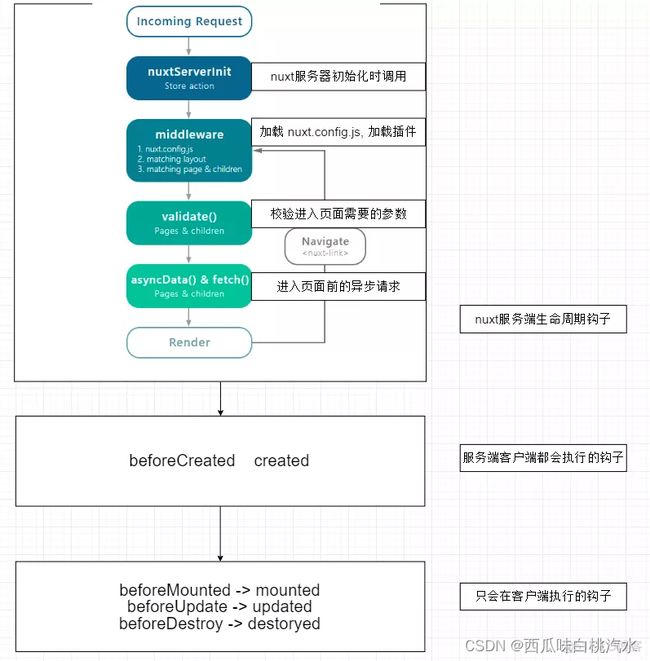
nuxtServerInit 服务端初始化
middleware 中间件运行
validate()·校验参数
asyncData() & fetch() 异步数据处理
Render 客户端开始渲染
数据请求
useFetch
useAsyncData
useAsyncData
useLazyAsyncData
生命周期
pinia
1.下载
npm install @pinia/nuxt
2.nuxt.config.js 文件的 modules 中添加
// nuxt.config.js
export default defineNuxtConfig({
  // ... 其他配置
  modules: [
    // ...
    '@pinia/nuxt',
  ],
})
3.在根目录创建文件夹store
//store/shopcar.ts
import { defineStore } from "pinia";
export const useCounterStore = defineStore("counter", {
  state: () => {
    return { count: 0 };
  },
  actions: {
    increment() {
      this.count++;
    },
  },
});
//页面获取
<script setup>
import { storeToRefs } from "pinia";
import { useCounterStore } from "../store/shopcar";
const useCounterStore1 = useCounterStore();
const { count } = storeToRefs(useCounterStore1);
//需要.value 来获取count.value
const addshop = () => {//是count++
  count.value++;
};
</script>
SEO设置
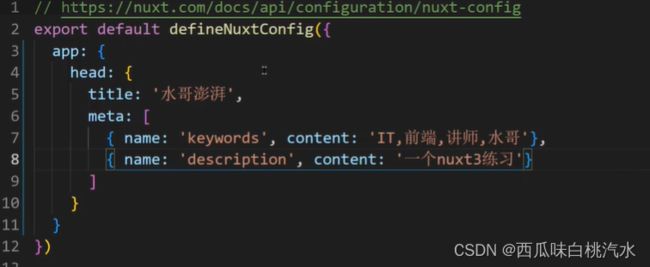
可以在nuxt.config.ts里面(不能是响应式数据)写也可以在app.vue里面写,app.vue会覆盖掉外面的,也可以在单独一个文件里面写useHead
//nuxt.config.ts

//任意一个页面.vue

useHead
设置页面标题,可以使用响应式数据
public和assets文件夹
public
//放在public下的用/img/1.jpg访问
assets
//放在asets下的需要~/assets/2.jpg访问
全局环境变量
runtimeConfig nuxt.config.ts设置
设置token 等,全局公用数据
//nuxt.config.ts
//配置固定接口路径
export default defineNuxtConfig({
  modules: ["@pinia/nuxt"],
  runtimeConfig: {
    aaa: 100, //只能在服务端访问到,客户端是undefined
    isServer:true,//可以通过设置一个值,来区分是客户端还是服务端,因为代码会执行两边,如果只想执行一遍就可以通过这个值判断,看下面
    public: {
      //两边都可以访问到
      apiBase: "http://www.jd.com",
    },
  },
});
//页面访问apiBase
<script setup>
const appConfig = useAppConfig()
console.log(appConfig.public.apiBase)//public里面的会在双端显示
console.log(appConfig.isServer)//通过判断是否有值,如果不为undefined就是客户端
if(appConfig.isServer){
//在服务器端执行
执行程序
}
if(!appConfig.isServer){//在浏览器端执行}
</script>
.env设置
app.config 设置
runtimeConfig和app.config 都是用来向应用程序的其他部分公开变量的。为了决定你是应该使用其中一种还是另一种,这里有一些指导方针:
runtimeConfig:需要在使用环境变量构建后指定的私有或公共令牌。
app.config:在构建时确定的公共令牌,网站配置,如主题变量,标题和任何不敏感的项目配置。
//app.config.ts
export default defineAppConfig({
  title: 'Hello Nuxt',
  theme: {
    dark: true,
    colors: {
      primary: '#ff0000'
    }
  }
})
//pages/index.vue
<script setup>
const appConfig = useAppConfig()
</script>
composables全局数据共享
//这个下面的文件可以自动引入
//useFoo.ts
export const useFoo = () => {
  return useState("foo", () => "bar");
};
//文件访问
{{foo}}
<div @click="foo++">foo++</div>
<script setup>
const foo=useFoo()
</script>
数据交互
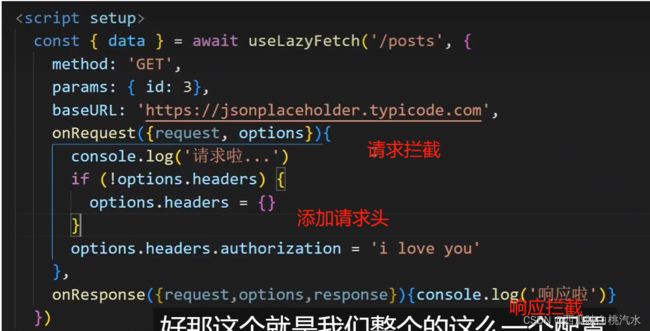
useFetch
const {data}=await useFetch('/posts',{
	method:'GET',
	params:{id:3},
	baseURL:'http://'
})
useFetch('/posts',{//路径
	method:'GET',
	baseURL:'https://json****'//基础路径
}).then(res=>{console.log(res)})
refresh()
当分页有一些分页逻辑的时候,数据发生改变的时候,可以调用refresh()再发送一次请求,会取消之前的请求。
const page=ref(1)
const {data:user,pending,refresh,error}=await usefetch(()=>``)
useLazyFetch
lazy的作用就是,不等数据请求回来先渲染静态内容,没有lazy 的就是等数据请求回来再一起渲染
useAsyncData
useAsyncData('获取文章',//多了一个请求描述信息()=>$fetch('/posts',{
	method:'GET',
	baseURL:'https://json****',//基础路径
})).then(res=>{
console.log(res.data)})
useLazyAsyncData
获取请求头的cookie信息
const headers=useRequestHeaders(['cookie'])
const {data}=await useFetch('/api/me',{headers})
scss的引入
npm install sass --save-dev
<style lang="scss">
// $bgColor: pink;
@import "~/assets/styles/default.scss";
body {
background-color: $bgColor;
}
</style>
引入全局变量scss
export default defineNuxtConfig({
  css: ["@/assets/css/normalize.css", "@/assets/font/font.css"],
  vite: {
    css: {
      preprocessorOptions: {
        scss: {
          additionalData: '@import "assets/css/baseColor.scss";',
        },
      },
    },
  },
});
小问题
window is not defined
import { onMounted } from "vue";
//放到onMounted里面
onMounted(() => {
  getLocalHistory();
});
element-plugs el-dialog弹出层不出现问题
//使用标签包裹
//解决:nuxt是服务端渲染框架,使用client-only标签使该组件仅在客户端渲染
<template>
  <div>
    <client-only>
      <el-dialog v-model="dialogVisible" title="详情" width="60%" draggable>
      </el-dialog>
    </client-only>
  </div>
</template>
<script setup>
const dialogVisible = ref(false);
</script>
<style lang="scss" scoped></style>
使用百度地图问题,fetch
//1.nuxt.config.ts里面
 app: {
    head: {
      script: [
        {
          src: "https://api.map.baidu.com/api?v=2.0&&type=webgl&ak=*******",
        },
      ],
    },
  },
会存在跨域问题,使用fetch 的插件fetchJsonp
npm install …下载fetch
<template><div id="container"></div></template>
<script setup>
import fetchJsonp from "fetch-jsonp";
import { onMounted } from "vue";
const getLocation = () => {
  fetchJsonp(
    " https://api.map.baidu.com/place/v2/search?query=银行&location=39.915,116.404&radius=2000&output=json&ak=***allback=showLocation",
    {
      headers: { Accept: "application/json" },
      jsonCallbackFunction: "showLocation",
    }
  )
    .then(function (response) {
      return response.json();
    })
    .then(function (json) {
      that.list = json;
    })
    .catch(function (ex) {
      console.log("parsing failed", ex);
    });
};
onMounted(() => {
  var map = new BMapGL.Map("container");
  var point = new BMapGL.Point(116.404, 39.915);
  map.centerAndZoom(point, 15);
});
</script>
<style lang="scss">
#container {
  width: 500px;
  height: 500px;
  background-color: pink;
}

</style>
plugins 插件引入nuxt3
//vue-masonry.client.js
import {
    VueMasonryPlugin
} from 'vue-masonry'
export default defineNuxtPlugin((nuxtApp) => {
    nuxtApp.vueApp.use(VueMasonryPlugin);
});
== 一开始老报错 window is not defined==
Nuxt会自动读取你的插件目录中的文件并加载它们。你可以在文件名中使用.server或.client后缀来只在服务器端或客户端加载插件。
例如:
plugins/apexcharts.client.ts
一切都是如此简单!这就是为什么我们喜欢nuxt️
nuxt 2的解决方案(显示差异):
nuxt.config.ts

plugins: [
    {src: '~/plugins/apexcharts', mode: 'client'}
  ],
这只适用于nuxt 2,因为您的nuxt 3 plugins/目录中的所有插件都是 * 自动注册的 *,所以您不应该将它们单独添加到您的nuxt.config中。
添加自定义指令
添加链接描述
