Java网络编程——NIO编程
目录
第一部分:NIO介绍
1.NIO三大核心部分
2.NIO的工作机制
3.Java NIO的非阻塞模式
第二部分:NIO和BIO的比较
第三部分:NIO三大核心原理
第四部分:缓冲区(Buffer)
1.缓冲区基本介绍
2.Buffer常用的API
1.Buffer类以及它的子类
2.缓冲区对象创建
3.demo:创建缓冲区
4. 缓冲区对象添加数据
5.demo:练习缓冲区对象添加数据的常用方法
6.缓冲区对象读取数据
7.demo:缓冲区对象读取数据常用方法练习
第五部分:通道(Channel)
1.通道(Channel)的介绍
2.Channel常用类
1.Channel接口
2.文件通道
1.FileChannel的创建
2.FileChannel的常用方法
3.demo: FileChannel
4. demp:transferFrom()
5.transferTo()
6.demo: 向本地文件写数据
7.demo: 从本地文件读数据
8.demo: 文件拷贝
3.Socket通道
1.常用的Socket通道
4.ServerSocketChannel
1.ServerSocketChannel常用的API
2. 服务端实现步骤:
3.小demo
5.SocketChannel
1.SocketChannel常用的API
2.客户端实现步骤
3.小demo
第六部分:Selector(选择器)
1.Selector基本介绍
1.没有选择器的情况
2.有选择器的情况
2.Selector常用API介绍
1.Selector常用方法:
2. SelectionKey常用方法:
3.SelectionKey中定义的4种事件:
3.Selector服务端实现步骤
4.DEMO :服务器—选择器
第一部分:NIO介绍
Java NIO 全称java non-blocking IO ,是指 JDK 提供的新 API。从 JDK1.4 开始,Java 提供了一系列改进的输入/输出的新特性,被统称为 NIO(即 New IO),是同步非阻塞的.
1.NIO三大核心部分
Channel(通道)
Buffer(缓冲区)
Selector(选择器)
2.NIO的工作机制
NIO是 面向缓冲区编程的。
数据读取到一个缓冲区中,需要时可在缓冲区中前后移动,这就增加了处理过程中的灵活性,使用它可以提供非阻塞式的高伸缩性网络。
3.Java NIO的非阻塞模式
Java NIO 的非阻塞模式,使一个线程从某通道发送请求或者读取数据,但是它仅能得到目前可用的数据,如果目前没有数据可用时,就什么都不会获取,而不是保持线程阻塞,所以直至数据变的可以读取之前,该线程可以继续做其他的事情。
非阻塞写也是如此,一个线程请求写入一些数据到某通道,但不需要等待它完全写入, 这个线程同时可以去做别的事情。
通俗理解:NIO 是可以做到用一个线程来处理多个操作的。
假设有 10000 个请求过来,根据实际情况,可以分配50 或者 100 个线程来处理。不像之前的阻塞 IO 那样,非得分配 10000 个。
第二部分:NIO和BIO的比较
1. BIO 以流的方式处理数据,而 NIO 以缓冲区的方式处理数据,缓冲区 I/O 的效率比流 I/O 高很多。
2. BIO 是阻塞的,NIO则是非阻塞的。
3. BIO 基于字节流和字符流进行操作,而 NIO 基于 Channel(通道)和 Buffer(缓冲区)进行操作,数据总是从通道读取到缓冲区中,或者从缓冲区写入到通道中。Selector(选择器)用于监听多个通道的事件(比如:连接请求, 数据到达等),因此使用单个线程就可以监听多个客户端通道。
第三部分:NIO三大核心原理
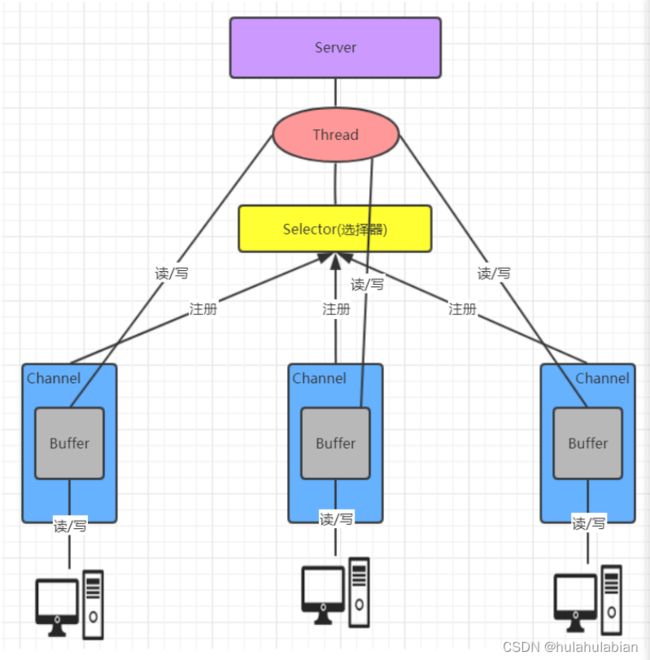
看一张图就明白啦
1. 每个 channel 都会对应一个 Buffer;
2. Selector 对应一个线程, 一个线程对应多个 channel(连接);
3. 每个 channel 都注册到 Selector选择器上;
4. Selector不断轮询查看Channel上的事件, 事件是通道Channel非常重要的概念;
5. Selector 会根据不同的事件,完成不同的处理操作;
6. Buffer 就是一个内存块 , 底层是有一个数组;
7. 数据的读取写入是通过 Buffer, 这个和 BIO , BIO 中要么是输入流,或者是输出流, 不能双向,但是NIO 的 Buffer 是可以读也可以写 , channel 是双向的.
第四部分:缓冲区(Buffer)
1.缓冲区基本介绍
缓冲区(Buffer):缓冲区本质上是一个可以读写数据的内存块,可以理解成是一个数组,该对象
提供了一组方法,可以更轻松地使用内存块,缓冲区对象内置了一些机制,能够跟踪和记录缓冲区的状态变化情况。Channel 提供从网络读取数据的渠道,但是读取或写入的数据都必须经由Buffer.
2.Buffer常用的API
1.Buffer类以及它的子类
在 NIO 中,Buffer是一个顶层父类,它是一个抽象类, 。
常用的缓冲区
ByteBuffer,ShortBuffer,IntBuffer,LongBuffer,FloatBuffer,DoubleBuffer,CharBuffer
分别对应byte,short, int, long,float,double,char 7种.
2.缓冲区对象创建
| 方法名 | 说明 |
| static ByteBuffer allocate(长度) | 创建byte类型的指定长度的缓冲区 |
| static ByteBuffer wrap(byte[] array) | 创建一个有内容的byte类型缓冲区 |
3.demo:创建缓冲区
package java2.buffer.temp.temp1;

import java.nio.ByteBuffer;

//创建缓冲区
public class CreateBufferDemo {
    public static void main(String[] args) {

        //1.创建一个指定长度的缓冲区,以ByteBuffer为例
        //什么内容都没有存,会初始化为0
        ByteBuffer byteBuffer =ByteBuffer.allocate(5);
        for(int i=0;i<5;i++){
            System.out.println(byteBuffer.get());
        }

        //在这里调用会报错——等到后面再读缓冲区的时候我们来了解
        //System.out.println(byteBuffer.get());

        //2.创建一个有内容的缓冲区
        ByteBuffer wrap =ByteBuffer.wrap("lagou".getBytes());
        for (int i = 0; i <5; i++) {
            System.out.println(wrap.get());
        }
    }
}
//输出:
//        0
//        0
//        0
//        0
//        0
//        108
//        97
//        103
//        111
//        117
4. 缓冲区对象添加数据
| 方法名 | 说明 |
| int position() | 获得当前要操作的索引 |
| int position(int newPosition) | 修改当前要操作的索引位置 |
| int limit() | 最多能操作到哪个索引 |
| int limit(int newLimit) | 修改最多能操作的索引位置 |
| int capacity() | 返回缓冲区的总长度 |
| int remaining() | 还有多少能操作索引个数 |
| boolean hasRemaining() | 是否还有能操作 |
| put(byte b) | 添加一个字节 |
| put(byte[] src) | 添加字节数组 |
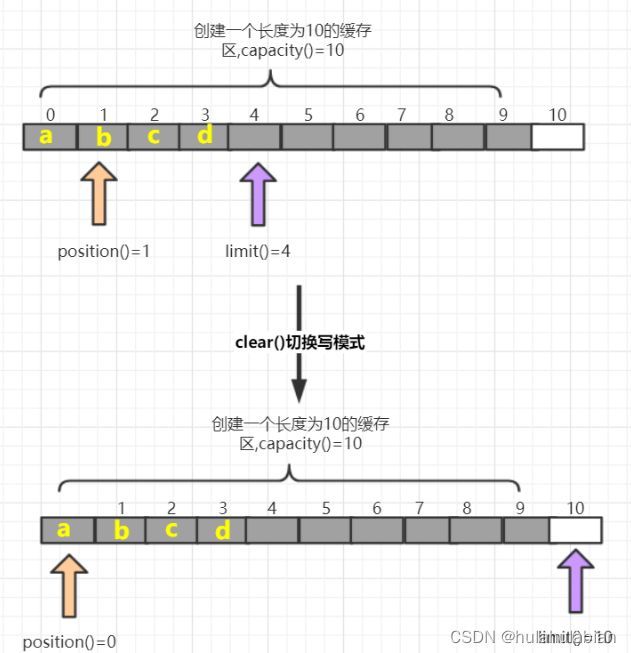
看张图了解一下叭
5.demo:练习缓冲区对象添加数据的常用方法
package java2.buffer.temp.temp2;

import java.nio.ByteBuffer;

public class PutBufferDemo {
    public static void main(String[] args){
        //1.创建一个指定长度的缓冲区,比如:ByteBuffer
        ByteBuffer byteBuffer =ByteBuffer.allocate(10);

        //1.获取当前索引所在位置
        System.out.println("当前索引所在位置  " +
                byteBuffer.position());

        //2.最多能操作到哪个索引
        System.out.println("最多能操作到哪个索引  " +
                byteBuffer.limit());

        //3.返回缓冲区总长度
        System.out.println("返回缓冲区总长度  " +
                byteBuffer.capacity());

        //4.还有多少个能操作
        System.out.println("还有多少个能操作  " +
                byteBuffer.remaining());


//      修改当前索引位置
//      byteBuffer.position(1);
//      修改最多能操作到哪个索引位置
//      byteBuffer.limit(9);
//      System.out.println(byteBuffer.position());//1 获取当前索引所在位置
//      System.out.println(byteBuffer.limit());//9 最多能操作到哪个索引
//      System.out.println(byteBuffer.capacity());//10 返回缓冲区总长度
//      System.out.println(byteBuffer.remaining());//8 还有多少个能操作

        //添加一个字节
        byteBuffer.put((byte) 97);
        byteBuffer.put((byte) 97);
        System.out.println(byteBuffer.position());//1 获取当前索引所在位置
        System.out.println(byteBuffer.limit());//10 最多能操作到哪个索引
        System.out.println(byteBuffer.capacity());//10 返回缓冲区总长度
        System.out.println(byteBuffer.remaining());//9 还有多少个能操作


//添加一个字节数组
        byteBuffer.put("abc".getBytes());
        System.out.println(byteBuffer.position());//4 获取当前索引所在位置
        System.out.println(byteBuffer.limit());//10 最多能操作到哪个索引
        System.out.println(byteBuffer.capacity());//10 返回缓冲区总长度
        System.out.println(byteBuffer.remaining());//6 还有多少个能操作


//当添加超过缓冲区的长度时会报错
        byteBuffer.put("123456".getBytes());
        System.out.println(byteBuffer.position());//10 获取当前索引所在位置
        System.out.println(byteBuffer.limit());//10 最多能操作到哪个索引
        System.out.println(byteBuffer.capacity());//10 返回缓冲区总长度
        System.out.println(byteBuffer.remaining());//0 还有多少个能操作
        System.out.println(byteBuffer.hasRemaining());// false 是否还能有操作的数组


// 如果缓存区存满后, 可以调整position位置可以重复写,这样会覆盖之前存入索引的对应的值
        byteBuffer.position(0);
        byteBuffer.put("123456".getBytes());
    }
}
6.缓冲区对象读取数据
| 方法名 | 介绍 |
| flip() | 写切换读模式; limit设置为position位置, position设置0 |
| get() | 读一个字节 |
| get(byte[] dst) | 读多个字节 |
| get(int index) | 读指定索引的字节 |
| rewind() | 将position设置为0,可以重复读 |
| clear() | 切换写模式 ;position设置为0 , limit 设置为 capacity的位置 |
| array() | 将缓冲区转换成字节数组返回 |
flip()方法:切换读模式
clear()方法:切换写模式
!!!!这两种方法其实就是重新设置position()和limit()的位置
7.demo:缓冲区对象读取数据常用方法练习
package java2.buffer.temp.temp3;

import java.nio.ByteBuffer;

public class GetBufferDemo {
    public static void main(String[] args) {
        //1.创建一个指定长度的缓冲区
        ByteBuffer allocate = ByteBuffer.allocate(10);
        allocate.put("0123".getBytes());
        System.out.println("position:" + allocate.position());
        System.out.println("limit:" + allocate.limit());
        System.out.println("capacity:" + allocate.capacity());
        System.out.println("remaining:" + allocate.remaining());

        //切换读模式
        System.out.println("读取数据--------");
        allocate.flip();//获取缓冲区的数据之前要调用flip方法
        System.out.println("position:" + allocate.position());
        System.out.println("limit:" + allocate.limit());
        System.out.println("capacity:" + allocate.capacity());
        System.out.println("remaining:" + allocate.remaining());
        for(int i=0;i
  注意!!!!

   1. capacity:容量(长度)
       limit: 界限(最多能读/写到哪里)
       posotion:位置(读/写哪个索引)
 2. 获取缓冲区里面数据之前,需要调用flip方法
 3. 再次写数据之前,需要调用clear方法,但是数据还未消失,等再次写入数据,被覆盖了
 才会消失。

  第五部分:通道(Channel)
  1.通道(Channel)的介绍
  通常来说NIO中的所有IO都是从 Channel(通道) 开始的。

   NIO 的通道类似于流,但有些区别如下:
   1. 通道可以读也可以写,流一般来说是单向的(只能读或者写,所以之前我们用流进行IO操作的时候,需要分别创建一个输入流和一个输出流);
 2. 通道可以异步读写;
 3. 通道总是基于缓冲区Buffer来读写.

  2.Channel常用类
  1.Channel接口
  常 用 的Channel实现类有 :FileChannel , DatagramChannel ,ServerSocketChannel和
 SocketChannel 。
  FileChannel 用于文件的数据读写;
  DatagramChannel 用于 UDP 的数据读写;
  ServerSocketChannel 和SocketChannel 用于 TCP 的数据读写。
  2.文件通道
    文件通道的主要实现是FileChannel。文件通道总是阻塞的,因此不能被置于非阻塞模式。
  1.FileChannel的创建

   FileChannel对象不能直接创建。
   一个FileChannel实例只能通过一个打开的file对象(RandomAccessFil、FileInputStraem、FileOutputStream等)上调用getChannel()方法获取。
   调用getChannel()方法返回一个连接到相同文件的FileChannel对象且该FileChannel对象具有于file对象相同的访问权限。

    //创建一个RandomAccessFile(随机访问文件)对象,
  RandomAccessFile raf=new RandomAccessFile("/home/shizhanli/szl/luck", "rw");

  //通过RandomAccessFile对象的getChannel()方法。FileChannel是抽象类。
  FileChannel inChannel=raf.getChannel();
   2.FileChannel的常用方法

           注意哦!!   // This is a partial API listing
                             // All methods listed here can throw java.io.IOException

       1.  //从FileChannel读取数据
         public abstract int read(ByteBuffer dst)
         public abstract int read (ByteBuffer dst, long position);

        2.//向FileChannel写数据
         public abstract int write(ByteBuffer src)
         public abstract int write (ByteBuffer src, long position);

        3.//获取文件大小
         public abstract long size();

         4.//获取位置
         public abstract long position();

        5.//设置位置
         public abstract void position (long newPosition);

         6.//用于文件截取
         public abstract void truncate (long size);

         7.//将通道里尚未写入磁盘的数据强制写到磁盘上
         public abstract void force (boolean metaData);

         8.//文件锁定,position-开始位置,size-锁定区域的大小,shared-表示锁是否共享(false为独占),lock()锁定整个文件
         public final FileLock lock();
         public abstract FileLock lock (long position, long size, boolean shared);
         public final FileLock tryLock();
         public abstract FileLock tryLock (long position, long size, boolean shared);

        9. //内存映射文件
         public abstract MappedByteBuffer map (MapMode mode, long position, long size);
         public static class MapMode;
         public static final MapMode READ_ONLY;
         public static final MapMode READ_WRITE;
         public static final MapMode PRIVATE;

        10. //用于通道之间的数据传输
         public abstract long transferTo (long position, long count, WritableByteChannel target);
         public abstract long transferFrom (ReadableByteChannel src, long position, long count);


  3.demo: FileChannel
  package java2.buffer.temp.temp4;

//FileChannel示例

import java.io.IOException;
import java.io.RandomAccessFile;
import java.nio.ByteBuffer;
import java.nio.channels.FileChannel;

public class FileChannelTest {

    public static void main(String[] args) throws IOException {
        RandomAccessFile aFile = new RandomAccessFile("/home/shizhanli/szl/happy.txt", "rw");
        FileChannel inChannel = aFile.getChannel();
        ByteBuffer buf = ByteBuffer.allocate(48);
        int bytesRead = inChannel.read(buf);
        while (bytesRead != -1) {
            System.out.println("Read " + bytesRead);
            buf.flip();
            while (buf.hasRemaining()) {
                System.out.print((char) buf.get());
            }


            buf.clear();
            bytesRead = inChannel.read(buf);
        }
        aFile.close();
        System.out.println("读完啦");
    }
}
//输出:
//Read 12
//12345678910(这是我文件中的内容)
//读完啦

    *~*public abstract MappedByteBuffer map (MapMode mode, long position, long size)

   该map()方法可以在一个打开的文件和一个特殊类型的ByteBuffer之间建立虚拟内存映射。
   通过内存映射机制来访问一个文件会比使用常规方法读写高效得多,甚至比使用通道的效率都高。

   transferTo()
   将数据从FileChannel传输到其他的Channel中。
   transferFrom()
   从其他Channel获取数据

   transferTo()和transferFrom()方法允许将一个通道交叉连接到另一个通道,而不需要通过一个中间缓存来传递数据。只有FileChannel类有这两个方法。

  4. demp:transferFrom()
  package java2.buffer.temp.temp4;

//transferFrom()示例:transferFrom()从其他Channel获取数据
import java.io.IOException;
import java.io.RandomAccessFile;
import java.nio.channels.FileChannel;


public class FileChannelTest2 {
    public static void main(String[] args) throws IOException {
        RandomAccessFile aFile = new RandomAccessFile("/home/shizhanli/szl/happy.txt", "rw");
        FileChannel fromChannel = aFile.getChannel();

        RandomAccessFile bFile = new RandomAccessFile("/home/shizhanli/szl/happy222.txt", "rw");
        FileChannel toChannel = bFile.getChannel();
        long position = 0;
        long count = fromChannel.size();
        toChannel.transferFrom(fromChannel, position, count);
        aFile.close();
        bFile.close();
        System.out.println("over!");
    }
}

   5.transferTo()
  package java2.buffer.temp.temp4;

//transferTo()将数据从FileChannel传输到其他的Channel中。
import java.io.IOException;
import java.io.RandomAccessFile;
import java.nio.channels.FileChannel;

public class FileChannelTest3 {
    public static void main(String[] args) throws IOException {
        RandomAccessFile aFile = new RandomAccessFile("/home/shizhanli/szl/happy.txt", "rw");
        FileChannel fromChannel = aFile.getChannel();

        RandomAccessFile bFile = new RandomAccessFile("/home/shizhanli/szl/happy333.txt", "rw");
        FileChannel toChannel = bFile.getChannel();
        long position = 0;
        long count = fromChannel.size();
        fromChannel.transferTo(position, count, toChannel);
        aFile.close();
        bFile.close();
        System.out.println("over!");
    }

}
  6.demo: 向本地文件写数据
  package java2.buffer.temp.temp5;
//向本地文件写数据
import java.io.FileNotFoundException;
import java.io.FileOutputStream;
import java.io.IOException;
import java.nio.ByteBuffer;
import java.nio.channels.FileChannel;

public class FileWrite {
    public static void main(String[] args)  throws IOException{
        FileOutputStream out = new FileOutputStream("/home/shizhanli/szl/happy.txt");
        FileChannel channel = out.getChannel();

        ByteBuffer buffer = ByteBuffer.allocate(1024);
        buffer.put("aurora123456789".getBytes());

// 需要切换为读模式,因为下面调用write方法时相当于从buffer里面读数据
        buffer.flip();

// 向channel写数据
        int len = channel.write(buffer);
        System.out.println("字节数:"+len);

        out.close();


    }
}

  7.demo: 从本地文件读数据
  package java2.buffer.temp.temp5;

//从本地文件读数据

import java.io.FileInputStream;
import java.io.IOException;
import java.nio.ByteBuffer;
import java.nio.channels.FileChannel;
import java.util.ArrayList;
import java.util.List;

public class FileRead {
    public static void main(String[] args)  throws IOException {
        FileInputStream in = new FileInputStream("/home/shizhanli/szl/happy.txt");
        FileChannel channel = in.getChannel();
        ByteBuffer buffer = ByteBuffer.allocate(8);

        int len = -1;
        List list = new ArrayList<>();
        byte[] bytes = new byte[8];

        // 循环读取数据
        while ((len=channel.read(buffer))!=-1){

            // 下面要从buffer中读数据,因此切换为读模式
            buffer.flip();

            buffer.get(bytes,0,len);
            for (int i = 0; i < len; i++) {
                list.add(bytes[i]);
            }

            // 下一个循环需要先向buffer写数据,因此切换为写模式
            buffer.clear();
        }
        in.close();

      // 转为byte数组
        byte[] resBytes = new byte[list.size()];
        for (int i = 0; i < list.size(); i++) {
            resBytes[i] = list.get(i);
        }

        // 以字符串形式打印
        System.out.println(new String(resBytes));

    }
}

  8.demo: 文件拷贝
  package java2.buffer.temp.temp5;

//文件拷贝

import java.io.FileInputStream;
import java.io.FileOutputStream;
import java.io.IOException;
import java.nio.channels.FileChannel;

public class FileCopy {
    public static void main(String[] args) throws IOException {
        FileInputStream in = new FileInputStream("/home/shizhanli/szl/happy.txt");
        FileOutputStream out = new FileOutputStream("/home/shizhanli/szl/happycopy.txt");
        FileChannel src = in.getChannel();
        FileChannel dst = out.getChannel();

        src.transferTo(0,src.size(),dst);
        // 或dst.transferFrom(src,0,src.size());

        in.close();
        out.close();

    }
}

  3.Socket通道
  1.常用的Socket通道
  DatagramChannel:用于UDP的数据读写;
  SocketChannel: 用于TCP的数据读写,一般是客户端实现;
  ServerSocketChannel: 允许我们监听TCP连接请求,每个请求会创建会一个SocketChannel,一般是服务器实现。


   上面的Channel都继承AbstractSelectableChannel,于是这三个Channel都是可以设置成非阻塞模式的。
   Socket通道(DatagramChannel、SocketChannel和ServerSocketChannel)在被实例化时都会创建一个对等的socket对象,即我们熟悉的java.net的类型(Socket、ServerSocket和DatagramSocket)。

  4.ServerSocketChannel
   ServerSocketChannel用于监听TCP连接请求。
  1.ServerSocketChannel常用的API

   //静态方法,用于创建一个新的ServerSocketChannel对象,后续还需要跟ServerSocket进行绑定操作
public static ServerSocketChannel open()

 //获取关联该ServerSocketChannel的server socket
public abstract ServerSocket socket()

 //当创建ServerSocketChannel对象并绑定一个ServerSocket关联的通道之后,
 //调用该方法可以监听客户端的连接请求
public abstract SocketChannel accept()

 //并绑定指定端口的ServerSocket,(jdk1.7以上才有)
public final ServerSocketChannel bind(SocketAddress local)

 //同选择器一起使用,获取感兴趣的操作
public final int validOps()

  2. 服务端实现步骤:

   1. 打开一个服务端通道
2. 绑定对应的端口号
3. 通道默认是阻塞的,需要设置为非阻塞
4. 检查是否有客户端连接 有客户端连接会返回对应的通道
5. 获取客户端传递过来的数据,并把数据放在byteBuffer这个缓冲区中
6. 给客户端回写数据
7. 释放资源

  3.小demo
  package java2.buffer.temp.temp6;

import java.io.IOException;
import java.net.InetSocketAddress;
import java.nio.ByteBuffer;
import java.nio.channels.ServerSocketChannel;
import java.nio.channels.SocketChannel;
import java.nio.charset.StandardCharsets;

public class NIOServer {
    public static void main(String[] args) throws IOException,InterruptedException{
        //1.打开一个服务端通道
        ServerSocketChannel serverSocketChannel = ServerSocketChannel.open();

        //2.绑定对应的端口号
        serverSocketChannel.bind(new InetSocketAddress(9999));

        //3.通道默认是阻塞的,需要设置为非阻塞
        // true:通道阻塞   false:通道非阻塞
        serverSocketChannel.configureBlocking(false);
        System.out.println("服务器启动成功.......");
        while(true){
            //4.检查是否有客户端连接,有客户连接会返回对应的通道,否则的话返回Null;
            SocketChannel socketChannel =serverSocketChannel.accept();
            if(socketChannel==null){
                System.out.println("没有客户端连接...我去做别的事");
                Thread.sleep(3000);
                continue;
            }

            //5.获取客户端传递过来的数据,并且把数据放在byteBuffer这个缓冲区中
            ByteBuffer byteBuffer=ByteBuffer.allocate(1024);
            //返回值:
            //正数:表示本次读到的有效字节的个数
            //0  :表示本次没有读到有效字节
            //-1 :表示读到了末尾

            int read =socketChannel.read(byteBuffer);
            System.out.println("客户端消息:"+
                    new String(byteBuffer.array(),0,read, StandardCharsets.UTF_8));

            //6.给客户端回写数据
            socketChannel.write(ByteBuffer.wrap("没钱".getBytes(StandardCharsets.UTF_8)));

            //7.释放资源
            socketChannel.close();
        }

    }
}

  5.SocketChannel
  1.SocketChannel常用的API

    //静态方法,打开套接字通道(创建SocketChannel实例)
         public static SocketChannel open()

         //静态方法,打开套接字通道并将其连接到远程地址
         public static SocketChannel open(SocketAddress remote)

         //返回一个操作集,标识此通道所支持的操作
         public final int validOps()

         //用于将Socket绑定到一个端口
         public abstract SocketChannel bind(SocketAddress local)

         //获取该SocketChannel关联的Socket(套接字)
         public abstract Socket socket()

         //判断是否已连接此通道的网络套接字
         public abstract boolean isConnected()

         //判断此通道上是否正在进行连接操作。
         public abstract boolean isConnectionPending()

         //用于SocketChannel连接到远程地址
         public abstract boolean connect(SocketAddress remote)

         //从通道中读取数据到缓冲区中
         public abstract int read(ByteBuffer dst)
         public abstract long read(ByteBuffer[] dsts, int offset, int length)

         //将缓冲区的数据写入到通道中
         public abstract int write(ByteBuffer src)
         public abstract long write(ByteBuffer[] srcs, int offset, int length)


   创建SocketChannel对象并连接到远程地址
          SocketChannel  sc = SocketChannel.open(new InetSocketAddress(ip,port));
   等价于
         SocketChannel sc = SocketChannel.open();
          sc.connect(new InetSocketAddress(ip,port));
          线程在连接建立好或超时之前都保持阻塞。


  2.客户端实现步骤

   1. 打开通道
2. 设置连接IP和端口号
3. 写出数据
4. 读取服务器写回的数据
   5. 释放资源

  3.小demo
  package java2.buffer.temp.temp6;

import java.io.IOException;
import java.net.InetSocketAddress;
import java.nio.ByteBuffer;
import java.nio.channels.SocketChannel;
import java.nio.charset.StandardCharsets;

public class NIOClient {
    public static void main(String[] args) throws IOException {
        //1.打开通道
        SocketChannel socketChannel =SocketChannel.open();

        //2.设置连接IP和端口号
        socketChannel.connect(new InetSocketAddress("127.0.0.1",9999));

        //3.写数据
        socketChannel.write(ByteBuffer.wrap("老板,该还钱了".getBytes(StandardCharsets.UTF_8)));

        //4.读取服务器写回的数据
        ByteBuffer readBuffer =ByteBuffer.allocate(1024);
        int read =socketChannel.read(readBuffer);
        System.out.println("服务端消息:" + new String(readBuffer.array(),0,read,StandardCharsets.UTF_8));

        //5.释放资源
        socketChannel.close();


    }
}

  第六部分:Selector(选择器)
  1.Selector基本介绍
  可以用一个线程,处理多个的客户端连接,就会使用到NIO的Selector(选择器).
  Selector 能够检测多个注册的服务端通道上是否有事件发生,如果有事件发生,便获取事件然后针对每个事件进行相应的处理。这样就可以只用一个单线程去管理多个通道,也就是管理多个连接和请求。
  1.没有选择器的情况
  在这种没有选择器的情况下,对应每个连接对应一个处理线程. 但是连接并不能马上就会发送信息,所以还会产生资源浪费。

  2.有选择器的情况
  只有在通道真正有读写事件发生时,才会进行读写,就大大地减少了系统开销,并且不必为每个连接都创建一个线程,不用去维护多个线程, 避免了多线程之间的上下文切换导致的开销。

  2.Selector常用API介绍
  Selector是一个抽象类。
  1.Selector常用方法:

   Selector.open()
   得到一个选择器对象;
selector.select()
   阻塞 监控所有注册的通道,当有对应的事件操作时, 会将SelectionKey放入集合内部并返回事件数量;
selector.select(1000)
   阻塞 1000 毫秒,监控所有注册的通道,当有对应的事件操作时, 会将SelectionKey放入集合内部并返回;
   selector.selectedKeys()
   返回存有SelectionKey的集合

   2. SelectionKey常用方法:

   SelectionKey.isAcceptable()
   是否是连接继续事件
SelectionKey.isConnectable()
   是否是连接就绪事件
SelectionKey.isReadable()
   是否是读就绪事件
SelectionKey.isWritable()
   是否是写就绪事件

  3.SelectionKey中定义的4种事件:

   SelectionKey.OP_ACCEPT
   —— 接收连接继续事件,表示服务器监听到了客户连接,服务器可以接收这个连接了
SelectionKey.OP_CONNECT
   —— 连接就绪事件,表示客户端与服务器的连接已经建立成功
SelectionKey.OP_READ
   —— 读就绪事件,表示通道中已经有了可读的数据,可以执行读操作了(通道目前有数据,可以进行读操作了)
SelectionKey.OP_WRITE
   —— 写就绪事件,表示已经可以向通道写数据了(通道目前可以用于写操作)

  3.Selector服务端实现步骤

   1. 打开一个服务端通道
2. 绑定对应的端口号
3. 通道默认是阻塞的,需要设置为非阻塞
4. 创建选择器
5. 将服务端通道注册到选择器上,并指定注册监听的事件为OP_ACCEPT
6. 检查选择器是否有事件
7. 获取事件集合
8. 判断事件是否是客户端连接事件SelectionKey.isAcceptable()
9. 得到客户端通道,并将通道注册到选择器上, 并指定监听事件为OP_READ
10. 判断是否是客户端读就绪事件SelectionKey.isReadable()
11. 得到客户端通道,读取数据到缓冲区
12. 给客户端回写数据
13. 从集合中删除对应的事件, 因为防止二次处理.

  4.DEMO :服务器——选择器
  package java2.buffer.temp.temp7;

import java.io.IOException;
import java.net.InetSocketAddress;
import java.nio.ByteBuffer;
import java.nio.channels.SelectionKey;
import java.nio.channels.Selector;
import java.nio.channels.ServerSocketChannel;
import java.nio.channels.SocketChannel;
import java.nio.charset.StandardCharsets;
import java.util.Iterator;
import java.util.Set;

public class NIOSelectorServer {
    public static void main(String[] args) throws IOException,InterruptedException {

        //1.打开一个服务器通道
        ServerSocketChannel serverSocketChannel = ServerSocketChannel.open();

        //2.绑定对应的端口号
        serverSocketChannel.bind(new InetSocketAddress(9999));

        //3.通道默认是阻塞的,需要设置为非阻塞
        serverSocketChannel.configureBlocking(false);

        //4.创建选择器
        Selector selector=Selector.open();

        //5.将服务器通道注册到选择器上,并且指定注册监听事件为OP_ACCEPT
        serverSocketChannel.register(selector, SelectionKey.OP_ACCEPT);
        System.out.println("服务器启动成功......");

        while(true){
            //6.检查选择器是否有事件
            int select =selector.select(2000);
            if(select==0){
                continue;
            }

            //7.获取事件集合
            Set selectionKeys =selector.selectedKeys();
            Iterator iterator =selectionKeys.iterator();
            while(iterator.hasNext()){
                //8.判断事件是否是客户端连接事件SelectionKey.isAcceptable()
                SelectionKey key =iterator.next();

                //9.得到客户端通道,并将通道注册到选择器上,并且指定监听事件为OP_READ
                if(key.isAcceptable()){
                    SocketChannel socketChannel = serverSocketChannel.accept();
                    System.out.println("客户端已连接......" + socketChannel);

                    //必须设置通道为非阻塞, 因为selector需要轮询监听每个通道的事件
                    socketChannel.configureBlocking(false);

                    //并指定监听事件为OP_READ
                    socketChannel.register(selector, SelectionKey.OP_READ);
                }

                //10.判断是否是客户端读就绪事件SelectionKey.isReadable()
                if (key.isReadable()) {

                //11.得到客户端通道,读取数据到缓冲区
                    SocketChannel socketChannel = (SocketChannel) key.channel();
                    ByteBuffer byteBuffer = ByteBuffer.allocate(1024);
                    int read = socketChannel.read(byteBuffer);
                    if (read > 0) {System.out.println("客户端消息:" +
                            new String(byteBuffer.array(), 0, read,
                                    StandardCharsets.UTF_8));

                    //12.给客户端回写数据
                        socketChannel.write(ByteBuffer.wrap("没钱".getBytes(StandardCharsets.UTF_8)));
                                socketChannel.close();
                    }
                }

                    //13.从集合中删除对应的事件, 因为防止二次处理.
                   iterator.remove();
            }
            }
        }
    }


