Spring入门(B站狂神说Spring的笔记)
Spring(狂神说笔记)
初始spring
1.简介
- Spring是一个开源的免费的框架(容器)
- Spring是一个轻量级的,非入侵的框架
- 控制反转(IOC),面向切面编程(AOP)
- 支持事务处理,对框架整合的支持
Spring就是一个轻量级的控制反转(IOC)和面向切面编程(AOP)的框架
2.组成

3.扩展
- SpringBoot
- 一个快速开发的脚手架
- 基于Springboot可以快速开发单个微服务
- 约定大于配置
- SpringCloud
- SpringCloud是基于SpringBoot实现的
IOC的理解
可以参考前面的springboot第七节课笔记对IOC的理解
下面简单看一下spring中对IOC代码实现
1.简单例子
pojo类的编写
@Data
@AllArgsConstructor
@NoArgsConstructor
public class Hello {
    private String str;
}
bean的注册
id相当于变量名,class是new的对象,property代表属性,name是具体的属性,value是属性的值,ref是已经创建好的bean的id
<beans xmlns="http://www.springframework.org/schema/beans"
       xmlns:xsi="http://www.w3.org/2001/XMLSchema-instance"
       xsi:schemaLocation="http://www.springframework.org/schema/beans
        http://www.springframework.org/schema/beans/spring-beans.xsd">

    <bean id="hello" class="com.hznu.ch.pojo.Hello">
        <property name="str" value="hello world"/>
    bean>
beans>
测试
public class MyTest {
    public static void main(String[] args) {
        ClassPathXmlApplicationContext ctx = new ClassPathXmlApplicationContext("beans.xml");
        Hello bean = (Hello) ctx.getBean("hello");
        System.out.println(bean);
    }
}
以上这个过程就叫控制反转
控制:谁来控制对象的创建,传统应用程序的对象是由程序本身控制创建,使用spring后,对象是由spring来创建的
反转:程序本身不创建对象,而变成被动的接收对象
IOC更是一种编程思想,由主动的编程变成被动的接收
为了更加深刻的了解IOC,我们接下来来一个更加复杂的例子
2.复杂例子
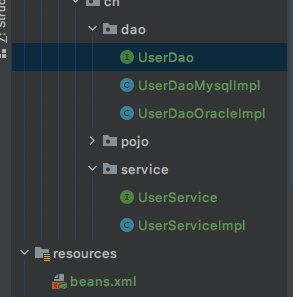
dao层
public interface UserDao {
    void test();
}

public class UserDaoMysqlImpl implements UserDao{
    public void test() {
        System.out.println("mysql");
    }
}

public class UserDaoOracleImpl implements UserDao {
    public void test() {
        System.out.println("oracle");
    }
}
service层
public interface UserService {
    void testService();
}

public class UserServiceImpl implements UserService {

    private UserDao userDao;

    public void testService() {
        userDao.test();
    }

    public void setUserDao(UserDao userDao) {
        this.userDao = userDao;
    }
}
配置文件
<beans xmlns="http://www.springframework.org/schema/beans"
       xmlns:xsi="http://www.w3.org/2001/XMLSchema-instance"
       xsi:schemaLocation="http://www.springframework.org/schema/beans
        http://www.springframework.org/schema/beans/spring-beans.xsd">

    <bean id="userDaoMysql" class="com.hznu.ch.dao.UserDaoMysqlImpl"/>
    <bean id="userDaoOracle" class="com.hznu.ch.dao.UserDaoOracleImpl"/>


    <bean id="userServiceImpl" class="com.hznu.ch.service.UserServiceImpl">
        <property name="userDao" ref="userDaoOracle"/>
    bean>
beans>
测试
public class MyTest {

    public static void main(String[] args) {
        ClassPathXmlApplicationContext ctx = new ClassPathXmlApplicationContext("beans.xml");
        UserService userServiceImpl = (UserService) ctx.getBean("userServiceImpl");
        userServiceImpl.testService();
    }
}
我们主要看一下配置文件,我们发现我们如果想把数据库改成mysql只需要把ref的值改成userDaoMysql即可,不在像以前一样去修改代码里的东西了
到了现在,我们彻底不用在程序中去改动了,要实现不同的操作,只需要在xml配置文件中进行修改,所谓的IOC,一句话搞定:对象由spring创建,管理,装配!
3.IOC创建对象的方式
1.构造器注入
- 使用无参构造创建
- 通过调用有参构造函数
<bean id="hello" class="com.hznu.ch.pojo.Hello">
    <constructor-arg index="0" value="chenheng"/>
    <constructor-arg index="1" value="123"/>
bean>
- 通过调用有参构造函数(另一种方法)
<bean id="hello" class="com.hznu.ch.pojo.Hello">
    <constructor-arg type="java.lang.String" value="chendan"/>
    <constructor-arg type="int" value="321"/>
bean>
2.set注入
- 这种方法是通过无参构造初始化的,再通过set来完成参数的注入的
<bean id="hello" class="com.hznu.ch.pojo.Hello">
    <property name="str" value="ch"/>
    <property name="age" value="116"/>
bean>
小结:在配置文件加载的时候,容器中管理的对象就已经被初始化了
- 扩展IOC的使用
public class Address {

}
@Data
public class Student {
    private String name;
    private Address address;
    private String[] books;
    private List<String> hobbies;
    private Map<String, String> card;
    private Set<String> games;
    private String wife;
    private Properties info;
}
<bean id="student" class="com.hznu.ch.pojo.Student">

    <property name="name" value="ch"/>


    <property name="address" ref="address"/>


    <property name="books">
        <array>
          <value>红楼梦value>
          <value>三国演义value>
          <value>水浒传value>
          <value>西游记value>
        array>
    property>


    <property name="hobbies">
        <list>
          <value>打代码value>
          <value>吃零食value>
          <value>玩三国杀value>
        list>
    property>


    <property name="card">
        <map>
          <entry key="46" value="dd"/>
          <entry key="30" value="cd"/>
        map>
    property>


    <property name="games">
        <set>
          <value>三国杀value>
        set>
    property>


    <property name="wife">
      	<null/>
    property>


    <property name="info">
        <props>
          <prop key="性格">很傻很天真prop>
        props>
    property>
bean>
3.其他注入
命名空间的注入,需添加对应的约束
xmlns:p="http://www.springframework.org/schema/p"
xmlns:c="http://www.springframework.org/schema/c"
- p命名空间注入(通过set注入)
<bean id="teacher" class="com.hznu.ch.pojo.Teacher">
    <property name="name" value="ch"/>
    <property name="age" value="21"/>
bean>

<bean id="teacher" class="com.hznu.ch.pojo.Teacher" p:age="22" p:name="ch"/>
- c命名空间注入(通过构造器注入)
<bean id="teacher" class="com.hznu.ch.pojo.Teacher">
    <constructor-arg name="age" value="21"/>
    <constructor-arg name="name" value="陈恒"/>
bean>
<bean id="teacher" class="com.hznu.ch.pojo.Teacher" c:age="21" c:name="陈恒"/>
Bean的作用域
| Scope | Description |
|---|---|
| singleton | (Default) Scopes a single bean definition to a single object instance for each Spring IoC container. |
| prototype | Scopes a single bean definition to any number of object instances. |
| request | Scopes a single bean definition to the lifecycle of a single HTTP request. That is, each HTTP request has its own instance of a bean created off the back of a single bean definition. Only valid in the context of a web-aware Spring ApplicationContext. |
| session | Scopes a single bean definition to the lifecycle of an HTTP Session. Only valid in the context of a web-aware Spring ApplicationContext. |
| application | Scopes a single bean definition to the lifecycle of a ServletContext. Only valid in the context of a web-aware Spring ApplicationContext. |
| websocket | Scopes a single bean definition to the lifecycle of a WebSocket. Only valid in the context of a web-aware Spring ApplicationContext. |
- 默认是单例模式

- 原型模式
[外链图片转存失败,源站可能有防盗链机制,建议将图片保存下来直接上传(img-Xkkc8WXZ-1612510156650)(https://docs.spring.io/spring-framework/docs/5.3.x/reference/html/images/prototype.png)]
- 其余的request,session,application都是在web开发中使用到的
session和application的区别:
- 所有用户共享一个Application对象,session和用户则是一一对应关系
- application它类似于系统的全局变量,用于保存所有程序中的公有数据。它在服务器启动时自动创建,在服务器停止时销毁。当application对象没有被销毁的时候,所有用户都可以享用该application对象。它的生命周期可以说是最长的
- session是会话变量,只要同一个浏览器没有被关闭,session对象就会存在。因此在同一个浏览器窗口中,无论向服务器发送多少请求,session对象只有一个。但是如果在一个会话中,客户端长时间不向服务器发出请求,session对象就会自动消失。这个时间取决于服务器,但是我们可以通过编写程序进行修改这个session的生命周期的时间
Bean自动装配
《spring实战》中给装配下了一个定义:创建应用对象之间协作关系的行为称为装配。也就是说当一个对象的属性是另一个对象时,实例化时,需要为这个对象属性进行实例化。这就是装配
依赖注入的本质就是装配,装配是依赖注入的具体行为
依赖注入有两种形式:构造器注入和setter注入。也就是我们在xml中写的一堆
为此Spring使用自动装配解决这个问题,开发人员不用关心具体装配哪个bean的引用,识别工作由Spring来完成,因此一般配有自动监测来和自动装配配合完成。自动装配其实就是将依赖注入“自动化”的一个简化配置的操作
- 自动装配是Spring满足依赖的一种方式
- Spring会在上下文自动寻找,并自动给bean装配属性
Spring三种实现自动装配的方法
- xml中显式配置(上面一直在使用)
- java中显式配置
- 隐式的自动装配bean
测试环境
@Data
public class People {
    private String name;
    private Dog dog;
    private Cat cat;
}

public class Cat {

    public void shout(){
        System.out.println("miao");
    }
}

public class Dog {
    public void shout(){
        System.out.println("wang");
    }
}
1.自动装配的形式
1.1.byName自动装配
<bean id="dog" class="com.hznu.ch.pojo.Dog"/>
<bean id="cat" class="com.hznu.ch.pojo.Cat"/>


<bean id="people" class="com.hznu.ch.pojo.People" autowire="byName">
  	<property name="name" value="ch"/>
bean>
1.2.byType自动装配
<bean class="com.hznu.ch.pojo.Dog"/>
<bean class="com.hznu.ch.pojo.Cat"/>


<bean id="people" class="com.hznu.ch.pojo.People" autowire="byType">
    <property name="name" value="ch"/>
bean>
总结:byName需要bean的id唯一,byType需要bean的class唯一
2.注解实现自动装配
2.1.导入约束
<beans xmlns="http://www.springframework.org/schema/beans"
    xmlns:xsi="http://www.w3.org/2001/XMLSchema-instance"
    xmlns:context="http://www.springframework.org/schema/context"
    xsi:schemaLocation="http://www.springframework.org/schema/beans
        https://www.springframework.org/schema/beans/spring-beans.xsd
        http://www.springframework.org/schema/context
        https://www.springframework.org/schema/context/spring-context.xsd">

    <context:annotation-config/>
  	<bean id="cat" class="com.hznu.ch.pojo.Cat"/>
    <bean id="cat1" class="com.hznu.ch.pojo.Cat"/>
    <bean id="dog" class="com.hznu.ch.pojo.Dog"/>
    <bean id="people" class="com.hznu.ch.pojo.People"/>
beans>
2.2.使用@Autowired
可以作用在属性,方法,构造,方法参数和注解上
@Target({ElementType.CONSTRUCTOR, ElementType.METHOD, ElementType.PARAMETER, ElementType.FIELD, ElementType.ANNOTATION_TYPE})
@Retention(RetentionPolicy.RUNTIME)
@Documented
public @interface Autowired {
    boolean required() default true;
}
使用@Autowired可以实现自动装配,@Autowired先采用byType的寻找bean,再通过byName寻找
如下这段代码,id和class不相符,但测试还是可以通过;class同一种的多个,但id唯一,测试通过;所以想法得到验证
@Autowired
private Dog dog;

@Autowired
private Cat cat;
<bean id="dog" class="com.hznu.ch.pojo.Cat"/>
<bean id="cat" class="com.hznu.ch.pojo.Dog"/>
@Autowired
private Cat cat;
<bean id="cat" class="com.hznu.ch.pojo.Cat"/>
<bean id="cat1" class="com.hznu.ch.pojo.Cat"/>
使用@Qualifier可以指定注入cat对象是哪个bean
如下这段代码指定的就是cat1这个bean
@Autowired
@Qualifier("cat1")
private Cat cat;
小技巧:@Autowired可以指定参数,false|true,以此来允许指定注入的bean是否可以为null,true——不能;false——能
@Autowired(false)
2.3.使用@Resource
作用在方法,属性,(类,接口,注解和集合)上
@Target({TYPE, FIELD, METHOD})
@Retention(RUNTIME)
public @interface Resource {
  	......
}
@Resouce是javaee的注解,是一个组合注解,可以达到@Autowired和@Qualifier一起的效果
@Resource(name = "cat1")
private Cat cat;
@Resource先采用byName,再通过byType
如下这段代码,如果byType先的话,那么测试应该通过,但是测试报错:cat对应的是Dog类,所以可以知道@Resource先通过byName再通过byType
<bean id="cat1" class="com.hznu.ch.pojo.Cat"/>
<bean id="cat" class="com.hznu.ch.pojo.Dog"/>
@Resource
private Cat cat;
![]()
使用注解开发
在Spring3之后,要使用注解开发,必须要保证aop的包导入

1.添加约束
<beans xmlns="http://www.springframework.org/schema/beans"
    xmlns:xsi="http://www.w3.org/2001/XMLSchema-instance"
    xmlns:context="http://www.springframework.org/schema/context"
    xsi:schemaLocation="http://www.springframework.org/schema/beans
        https://www.springframework.org/schema/beans/spring-beans.xsd
        http://www.springframework.org/schema/context
        https://www.springframework.org/schema/context/spring-context.xsd">

    <context:annotation-config/>

  	<context:component-scan base-package="com.hznu.ch"/>

beans>
2.类注入
Bean的id为类名,首字母小写
@Component
public class User {

    private String name;

    @Value("ch")
    public void setName(String name) {
        this.name = name;
    }

    @Override
    public String toString() {
        return "User{" +
                "name='" + name + '\'' +
                '}';
    }
}
public class MyTest {
    @Test
    public void test() {
        ClassPathXmlApplicationContext ctx = new ClassPathXmlApplicationContext("bean.xml");
        User user = (User) ctx.getBean("user");
        System.out.println(user);
    }
}
3.属性如何注入
@Value("ch")
public void setName(String name) {
  	this.name = name;
}

@Value("ch")
private String name;
4.衍生的注解
@Component有几个衍生的注解,我们在web开发中,会按照MVC三层架构分层
- dao(@Repository)
- service(@Service)
- controller(@Controller)
这四个注解功能一致,都是代表将某个类注册到spring中,装配Bean
5.作用域
单例与原型注解配置
@Scope("singleton")
@Scope("prototype")
使用javaConfig实现自动装配
1.基本的使用
使用@Configuration 和 @Bean 配置,通过AnnotationConfigApplicationContext实例化spring容器
@Data
@AllArgsConstructor
@NoArgsConstructor
public class User {
    private String name;
    private int age;

    public void program() {
        System.out.println("敲代码");
    }
}
@Configuration
public class MyConfig {

    @Bean
    public User myUser() {
        return new User("ch", 20);
    }
  	/* @Bean相当于如下的xml配置


     */
}
public class MyTest {
    @Test
    public void test() {
        ApplicationContext ctx = new AnnotationConfigApplicationContext(MyConfig.class);
        User user = (User) ctx.getBean("myUser");
        user.program();
    }
}
2.@ComponentScan的使用
注意加了一个@Component注解
@Data
@AllArgsConstructor
@NoArgsConstructor
@Component
public class User {
    private String name;
    private int age;

    public void program() {
        System.out.println("敲代码");
    }
}
这个会显式的扫描com.hznu.ch.pojo下的@Component ,所以无需在Config中显式注册
相当于
@Configuration
@ComponentScan(basePackages = "com.hznu.ch.pojo")
public class MyConfig {

//    @Bean
//    public User myUser() {
//        return new User("ch", 20);
//    }
}
注册的bean的id是类名的,首字母小写
public class MyTest {
    @Test
    public void test() {
        ApplicationContext ctx = new AnnotationConfigApplicationContext(MyConfig.class);
        User user = (User) ctx.getBean("user");
        user.program();
    }
}
3.@Import的使用
导入合并另一个配置类
@Configuration
public class ConfigA {

    @Bean
    public A a() {
        return new A();
    }
}

@Configuration
@Import(ConfigA.class)
public class ConfigB {

    @Bean
    public B b() {
        return new B();
    }
}
ConfigB导入ConfigA后,在ConfigB中也就可以使用ConfigA中的Bean了!
public static void main(String[] args) {
    ApplicationContext ctx = new AnnotationConfigApplicationContext(ConfigB.class);

    // now both beans A and B will be available...
    A a = ctx.getBean(A.class);
    B b = ctx.getBean(B.class);
}
IOC小结
1.@Bean 和 @Autowired 的区别:
@Bean告诉Spring,“这是此类的一个实例,请保留该类,并在我询问时将其还给”。@Autowired说,“请给我一个该类的实例,例如,我之前用@Bean注释创建的一个实例”。
2.复习
Spring三种实现自动装配的方法
- xml中显式配置(上面一直在使用)
<bean id="cat" class="com.hznu.ch.pojo.Cat"/>
- java中显式配置
要通过@Configuration与@Bean搭配来完成
@Configuration
public class MyConfig {

    @Bean
    public User myUser() {
        return new User("ch", 20);
    }
}
- 隐式的自动装配bean
- 组件扫描
- 自动装配
1.组件扫描可以通过xml或javaConfig两种方法启动
xml
<context:component-scan base-package="com.hznu.ch.pojo"/>
小彩蛋:< context:component-scan/>包含了< context:annotation-config/> 的功能,两则同时存在,后则将被覆盖,所以当两个同时出现时,也不会出现重复注入的情况
javaConfig
@ComponentScan(basePackages = "com.hznu.ch.pojo")
2.自动装配
通过 @Autowired 自动装配
@Data
@Component
public class Boy {
    @Autowired
    private User user;
}
AOP
1.AOP的理解及其作用
可以看SpringBoot第七节课的笔记,这里不再赘述
2.使用Spring实现AOP
2.1.使用Spring的API实现
2.1.1.导入依赖
<dependency>
    <groupId>org.aspectjgroupId>
    <artifactId>aspectjweaverartifactId>
    <version>1.9.6version>
dependency>
2.1.2.服务类和日志类的编写
public interface UserService {
    void query();

    void add();

    void remove();

    void update();
}
public class UserServiceImpl implements UserService {
    public void query() {
        System.out.println("query");
    }

    public void add() {
        System.out.println("add");
    }

    public void remove() {
        System.out.println("remove");
    }

    public void update() {
        System.out.println("update");
    }
}
public class BeforeLog implements MethodBeforeAdvice {
    /**
     * Callback before a given method is invoked.
     *
     * @param method the method being invoked
     * @param args   the arguments to the method
     * @param target the target of the method invocation. May be {@code null}.
     * @throws Throwable if this object wishes to abort the call.
     *                   Any exception thrown will be returned to the caller if it's
     *                   allowed by the method signature. Otherwise the exception
     *                   will be wrapped as a runtime exception.
     */
    public void before(Method method, Object[] args, Object target) throws Throwable {
        System.out.println(target.getClass().getName() + "的" + method.getName() + "被执行了!");
    }
}
public class AfterLog implements AfterReturningAdvice {
    /**
     * Callback after a given method successfully returned.
     *
     * @param returnValue the value returned by the method, if any
     * @param method      the method being invoked
     * @param args        the arguments to the method
     * @param target      the target of the method invocation. May be {@code null}.
     * @throws Throwable if this object wishes to abort the call.
     *                   Any exception thrown will be returned to the caller if it's
     *                   allowed by the method signature. Otherwise the exception
     *                   will be wrapped as a runtime exception.
     */
    public void afterReturning(Object returnValue, Method method, Object[] args, Object target) throws Throwable {
        System.out.println(target.getClass().getName() + "的" + method.getName() + "被执行了!" + "返回结果为" + returnValue);
    }
}
2.1.3.配置文件
千万别导错约束,不要问我怎么知道的
<beans xmlns="http://www.springframework.org/schema/beans"
       xmlns:xsi="http://www.w3.org/2001/XMLSchema-instance"
       xmlns:aop="http://www.springframework.org/schema/aop"
       xsi:schemaLocation="http://www.springframework.org/schema/beans
        https://www.springframework.org/schema/beans/spring-beans.xsd
        http://www.springframework.org/schema/aop
        https://www.springframework.org/schema/aop/spring-aop.xsd">


    <bean id="userService" class="com.hznu.ch.service.UserServiceImpl"/>
    <bean id="beforeLog" class="com.hznu.ch.aspect.BeforeLog"/>
    <bean id="afterLog" class="com.hznu.ch.aspect.AfterLog"/>


    <aop:config>


        <aop:pointcut id="pointcut" expression="execution(* com.hznu.ch.service.UserService.*())"/>


        <aop:advisor advice-ref="beforeLog" pointcut-ref="pointcut"/>
        <aop:advisor advice-ref="afterLog" pointcut-ref="pointcut"/>
    aop:config>
beans>
2.1.4.测试
public class MyTest {

    public static void main(String[] args) {
        ApplicationContext ctx = new ClassPathXmlApplicationContext("bean.xml");
        UserService userService = ctx.getBean("userService", UserService.class);
        userService.add();
    }
}

2.2.自定义来实现AOP
2.2.1.编写自定义切面
public class DiyLog {

    public void m_before(){
        System.out.println("调用前");
    }

    public void m_after(){
        System.out.println("调用后");
    }
}
2.2.2.配置文件
省略了一部分
<bean id="diy" class="com.hznu.ch.aspect.DiyLog"/>

<aop:config>

    <aop:aspect ref="diy">

        <aop:pointcut id="point" expression="execution(* com.hznu.ch.service.UserServiceImpl.*(..))"/>

        <aop:before method="m_before" pointcut-ref="point"/>
        <aop:after method="m_after" pointcut-ref="point"/>
    aop:aspect>
aop:config>
2.2.3.测试

2.3.注解实现AOP
2.3.1.编写切面
@Aspect
public class AnnotationPointCut {
@Before("execution(* com.hznu.ch.service.UserServiceImpl.*(..))")
public void before() {
System.out.println("前!");
}
@After("execution(* com.hznu.ch.service.UserServiceImpl.*(..))")
public void after() {
System.out.println("后!");
}
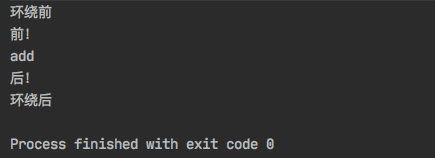
@Around("execution(* com.hznu.ch.service.UserServiceImpl.*(..))")
public void around(ProceedingJoinPoint jp) throws Throwable {
System.out.println("环绕前");
Object o = jp.proceed();
System.out.println("环绕后");
}
}
2.3.2.配置文件
<bean id="annotationPointCut" class="com.hznu.ch.aspect.AnnotationPointCut"/>
<aop:aspectj-autoproxy/>
2.3.3.测试
顺便还可以看出来这个切面的执行周期
Around前—— 》Before——》方法执行——》After——》 Around后
Spring整合Mybatis
需要导入的依赖
<dependencies>
    <dependency>

        <groupId>org.springframeworkgroupId>
        <artifactId>spring-webmvcartifactId>
        <version>5.2.9.RELEASEversion>
    dependency>


    <dependency>
        <groupId>junitgroupId>
        <artifactId>junitartifactId>
        <version>4.13version>
    dependency>


    <dependency>
        <groupId>org.mybatisgroupId>
        <artifactId>mybatisartifactId>
        <version>3.5.4version>
    dependency>


    <dependency>
        <groupId>mysqlgroupId>
        <artifactId>mysql-connector-javaartifactId>
        <version>8.0.16version>
    dependency>


    <dependency>
        <groupId>org.springframeworkgroupId>
        <artifactId>spring-jdbcartifactId>
        <version>5.2.9.RELEASEversion>
    dependency>


    <dependency>
        <groupId>org.aspectjgroupId>
        <artifactId>aspectjweaverartifactId>
        <version>1.9.6version>
    dependency>


    <dependency>
        <groupId>org.mybatisgroupId>
        <artifactId>mybatis-springartifactId>
        <version>2.0.2version>
    dependency>
dependencies>
1.方法一
1.1.编写数据源配置
1.2.sqlSessionFactory
1.3.sqlSessionTemplate
文件名:spring-dao.xml
<beans xmlns="http://www.springframework.org/schema/beans"
       xmlns:xsi="http://www.w3.org/2001/XMLSchema-instance"
       xmlns:aop="http://www.springframework.org/schema/aop"
       xsi:schemaLocation="http://www.springframework.org/schema/beans
        https://www.springframework.org/schema/beans/spring-beans.xsd
        http://www.springframework.org/schema/aop
        https://www.springframework.org/schema/aop/spring-aop.xsd">


    <bean id="dataSource" class="org.springframework.jdbc.datasource.DriverManagerDataSource">
        <property name="driverClassName" value="com.mysql.cj.jdbc.Driver"/>
        <property name="url"
                  value="jdbc:mysql://127.0.0.1:3306/m_test?useUnicode=true&characterEncoding=utf-8&useSSL=false"/>
        <property name="username" value="root"/>
        <property name="password" value="XXXXX"/>
    bean>

    <bean id="sqlSessionFactory" class="org.mybatis.spring.SqlSessionFactoryBean">
        <property name="dataSource" ref="dataSource"/>
        <property name="configLocation" value="mybatis-config.xml"/>
        <property name="mapperLocations" value="mapper/*.xml"/>
    bean>

    <bean id="sqlSession" class="org.mybatis.spring.SqlSessionTemplate">
        <constructor-arg index="0" ref="sqlSessionFactory"/>
    bean>
beans>
1.4.需要给实现类加接口
public class UserMapperImpl implements UserMapper {

    private SqlSessionTemplate sqlSession;

    public void setSqlSession(SqlSessionTemplate sqlSession) {
        this.sqlSession = sqlSession;
    }

    public User queryUser(int id) {
        UserMapper userMapper = sqlSession.getMapper(UserMapper.class);
        return userMapper.queryUser(id);
    }
}
1.5.实现类注入到Spring中
<beans xmlns="http://www.springframework.org/schema/beans"
       xmlns:xsi="http://www.w3.org/2001/XMLSchema-instance"
       xmlns:aop="http://www.springframework.org/schema/aop"
       xsi:schemaLocation="http://www.springframework.org/schema/beans
        https://www.springframework.org/schema/beans/spring-beans.xsd
        http://www.springframework.org/schema/aop
        https://www.springframework.org/schema/aop/spring-aop.xsd">

    <import resource="spring-dao.xml"/>

    <bean id="userMapper" class="com.hznu.ch.mapper.UserMapperImpl">
        <property name="sqlSession" ref="sqlSession"/>
    bean>
beans>
1.6.测试
public class MyTest {
    @Test
    public void test() {
        ApplicationContext ctx = new ClassPathXmlApplicationContext("applicationContext.xml");
        UserMapper userMapper = ctx.getBean("userMapper", UserMapper.class);
        User user = userMapper.queryUser(1);
        System.out.println(user);
    }
}
2.方法二(了解即可)
SqlSessionDaoSupport 是一个抽象的支持类,用来为你提供 SqlSession。调用 getSqlSession() 方法你会得到一个 SqlSessionTemplate
public class UserMapperImpl2 extends SqlSessionDaoSupport implements UserMapper {
    public User queryUser(int id) {
        return getSqlSession().getMapper(UserMapper.class).queryUser(id);
    }
}
<bean id="userMapper2" class="com.hznu.ch.mapper.UserMapperImpl2">
    <property name="sqlSessionFactory" ref="sqlSessionFactory"/>
bean>
相对比于第一种方法,我们可以看到,它少了一个SqlSessionTemplate的注册
声明式事务
其实就下面这一段内容,重点在结合AOP实现事务的织入和配置事务切入这两段,如需修改execution后面的参数即可
<beans xmlns="http://www.springframework.org/schema/beans"
       xmlns:xsi="http://www.w3.org/2001/XMLSchema-instance"
       xmlns:aop="http://www.springframework.org/schema/aop"
       xmlns:tx="http://www.springframework.org/schema/tx"
       xsi:schemaLocation="http://www.springframework.org/schema/beans
        https://www.springframework.org/schema/beans/spring-beans.xsd
        http://www.springframework.org/schema/aop
        https://www.springframework.org/schema/aop/spring-aop.xsd
        http://www.springframework.org/schema/tx
        https://www.springframework.org/schema/tx/spring-tx.xsd">


    <bean id="dataSource" class="org.springframework.jdbc.datasource.DriverManagerDataSource">
        <property name="driverClassName" value="com.mysql.cj.jdbc.Driver"/>
        <property name="url"
                  value="jdbc:mysql://127.0.0.1:3306/m_test?useUnicode=true&characterEncoding=utf-8&useSSL=false"/>
        <property name="username" value="root"/>
        <property name="password" value="11480357chen"/>
    bean>

    <bean id="sqlSessionFactory" class="org.mybatis.spring.SqlSessionFactoryBean">
        <property name="dataSource" ref="dataSource"/>
        <property name="configLocation" value="mybatis-config.xml"/>
        <property name="mapperLocations" value="mapper/*.xml"/>
    bean>

    <bean id="sqlSession" class="org.mybatis.spring.SqlSessionTemplate">
        <constructor-arg index="0" ref="sqlSessionFactory"/>
    bean>


    <bean id="transactionManager" class="org.springframework.jdbc.datasource.DataSourceTransactionManager">
        <constructor-arg ref="dataSource"/>
    bean>


    <tx:advice id="txAdvice" transaction-manager="transactionManager">
        <tx:attributes>
            <tx:method name="*" propagation="REQUIRED"/>
        tx:attributes>
    tx:advice>


    <aop:config>
        <aop:pointcut id="txPointCut" expression="execution(* com.hznu.ch.mapper.*.*(..))"/>
        <aop:advisor advice-ref="txAdvice" pointcut-ref="txPointCut"/>
    aop:config>


beans>
Spring MVC(狂神说笔记)
构建Hello Spring MVC
1.导入Spring MVC的依赖
在pom.xml中导入依赖
<dependencies>
    <dependency>
        <groupId>org.springframeworkgroupId>
        <artifactId>spring-webmvcartifactId>
        <version>5.2.9.RELEASEversion>
    dependency>

    <dependency>
        <groupId>junitgroupId>
        <artifactId>junitartifactId>
        <version>4.13version>
        <scope>testscope>
    dependency>

    <dependency>
        <groupId>javax.servletgroupId>
        <artifactId>servlet-apiartifactId>
        <version>2.5version>
    dependency>

    <dependency>
        <groupId>javax.servlet.jspgroupId>
        <artifactId>jsp-apiartifactId>
        <version>2.2version>
    dependency>

    <dependency>
        <groupId>javax.servlet.jsp.jstlgroupId>
        <artifactId>jstl-apiartifactId>
        <version>1.2version>
    dependency>
dependencies>
确保依赖导入,注意这是一个很坑的点,就你可能代码写好了,但是说没找到DispatcherServlet这个类,那很大一部分原因就是你发布的web项目中没有添加进这些依赖,详见第二幅图,手动添加lib目录,并导入刚才导入的那些的依赖


2.Controller控制器的编写
解释一下:根据HTTP的请求再处理业务,设置视图名,然后返回
public class HelloController implements Controller {
    public ModelAndView handleRequest(HttpServletRequest httpServletRequest, HttpServletResponse httpServletResponse) throws Exception {
        ModelAndView mv = new ModelAndView();
        mv.addObject("msg", "这个一个SpringMVC Hello");
        mv.setViewName("hello");

        //返回给视图解析器
        return mv;
    }
}
3.配置SpringMVC文件
springmvc-config.xml
<beans xmlns="http://www.springframework.org/schema/beans"
       xmlns:xsi="http://www.w3.org/2001/XMLSchema-instance"
       xsi:schemaLocation="http://www.springframework.org/schema/beans
        http://www.springframework.org/schema/beans/spring-beans.xsd">


    <bean class="org.springframework.web.servlet.handler.BeanNameUrlHandlerMapping"/>


    <bean class="org.springframework.web.servlet.mvc.SimpleControllerHandlerAdapter"/>


    <bean id="InternalResourceViewResolver" class="org.springframework.web.servlet.view.InternalResourceViewResolver">

        <property name="prefix" value="/WEB-INF/jsp/"/>

        <property name="suffix" value=".jsp"/>
    bean>


    <bean id="/hello" class="com.hznu.controller.HelloController"/>
beans>
4.配置web.xml文件
<web-app xmlns="http://xmlns.jcp.org/xml/ns/javaee"
         xmlns:xsi="http://www.w3.org/2001/XMLSchema-instance"
         xsi:schemaLocation="http://xmlns.jcp.org/xml/ns/javaee http://xmlns.jcp.org/xml/ns/javaee/web-app_4_0.xsd"
         version="4.0">


    <servlet>
        <servlet-name>springmvcservlet-name>
        <servlet-class>org.springframework.web.servlet.DispatcherServletservlet-class>

        <init-param>
            <param-name>contextConfigLocationparam-name>
            <param-value>classpath:springmvc-config.xmlparam-value>
        init-param>
        <load-on-startup>1load-on-startup>
    servlet>

    <servlet-mapping>
        <servlet-name>springmvcservlet-name>
        <url-pattern>/url-pattern>
    servlet-mapping>

web-app>
5.编写视图层
hello.jsp
<%@ page contentType="text/html;charset=UTF-8" language="java" %>


    Title


    ${msg}
6.测试结果展示

7.Spring MVC结构图

可以对应上面的代码比对执行过程,有助于理解原理
注解构建Hello Spring MVC
1.导入依赖,并检查web项目是否导入
不重复写,就会上面的那一段
2.Controller的编写
@Controller
public class HelloController {
    @RequestMapping("/hello")
    public String hello(Model model) {
        model.addAttribute("msg", "这又是一个spring mvc测试");
        return "hello";
    }
}
3.SpringMVC配置文件的编写
<beans xmlns="http://www.springframework.org/schema/beans"
       xmlns:xsi="http://www.w3.org/2001/XMLSchema-instance"
       xmlns:context="http://www.springframework.org/schema/context"
       xmlns:mvc="http://www.springframework.org/schema/mvc"
       xsi:schemaLocation="http://www.springframework.org/schema/beans
        http://www.springframework.org/schema/beans/spring-beans.xsd
        http://www.springframework.org/schema/context
        https://www.springframework.org/schema/context/spring-context.xsd
        http://www.springframework.org/schema/mvc
        https://www.springframework.org/schema/mvc/spring-mvc.xsd">


    <context:component-scan base-package="com.hznu.controller"/>

    <mvc:default-servlet-handler/>

    <mvc:annotation-driven/>

    <bean id="InternalResourceViewResolver" class="org.springframework.web.servlet.view.InternalResourceViewResolver">
        <property name="prefix" value="/WEB-INF/jsp/"/>
        <property name="suffix" value=".jsp"/>
    bean>

beans>
4.配置web.xml文件&视图层的编写
还是和之前的一样,没差,就不放出来了
5.测试结果展示

注解开发真的能省很多事情哈哈哈
Spring MVC扩展
@Controller
public class HelloController {
    @RequestMapping("/hello")
    public String hello(Model model) {
        model.addAttribute("msg", "这又是一个spring mvc测试");
        //转发
        //return "hello";

        //重定向
        return "redirect:/test.jsp";//需要注意这个是在web的目录下的,但无法访问WEB-INF下面的
    }
}