重学Java设计模式-结构型模式-外观模式
重学Java设计模式-结构型模式-外观模式
内容摘自:https://bugstack.cn/md/develop/design-pattern/2020-06-11-重学 Java 设计模式《实战外观模式》.html#重学-java-设计模式-实战外观模式「基于springboot开发门面模式中间件-统一控制接口白名单场景」
外观模式介绍
- 图片来自:https://refactoringguru.cn/design-patterns/facade(opens new window)
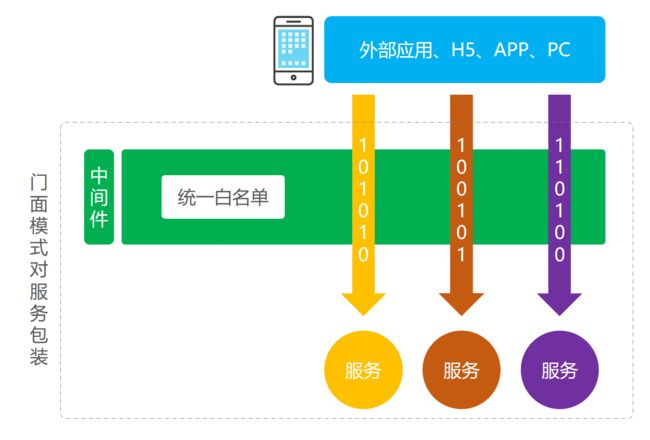
外观模式也叫门面模式,主要解决的是降低调用方的使用接口的复杂逻辑组合。这样调用方与实际的接口提供方提供方提供了一个中间层,用于包装逻辑提供API接口。有些时候外观模式也被用在中间件层,对服务中的通用性复杂逻辑进行中间件层包装,让使用方可以只关心业务开发。
那么这样的模式在我们的所见产品功能中也经常遇到,就像几年前我们注册一个网站时候往往要添加很多信息,包括;姓名、昵称、手机号、QQ、邮箱、住址、单身等等,但现在注册成为一个网站的用户只需要一步即可,无论是手机号还是微信也都提供了这样的登录服务。而对于服务端应用开发来说以前是提供了一个整套的接口,现在注册的时候并没有这些信息,那么服务端就需要进行接口包装,在前端调用注册的时候服务端获取相应的用户信息(从各个渠道),如果获取不到会让用户后续进行补全(营销补全信息给奖励),以此来拉动用户的注册量和活跃度。
案例场景模拟
在本案例中我们模拟一个将所有服务接口添加白名单的场景
在项目不断壮大发展的路上,每一次发版上线都需要进行测试,而这部分测试验证一般会进行白名单开量或者切量的方式进行验证。那么如果在每一个接口中都添加这样的逻辑,就会非常麻烦且不易维护。另外这是一类具备通用逻辑的共性需求,非常适合开发成组件,以此来治理服务,让研发人员更多的关心业务功能开发。
一般情况下对于外观模式的使用通常是用在复杂或多个接口进行包装统一对外提供服务上,此种使用方式也相对简单在我们平常的业务开发中也是最常用的。你可能经常听到把这两个接口包装一下,但在本例子中我们把这种设计思路放到中间件层,让服务变得可以统一控制。
1. 场景模拟工程
itstack-demo-design-10-00
└── src
    ├── main
    │   ├── java
    │   │   └── org.itstack.demo.design
    │   │       ├── domain
    │   │       │	└── UserInfo.java
    │   │       ├── web
    │   │       │	└── HelloWorldController.java
    │   │       └── HelloWorldApplication.java
    │   └── resources
    │       └── application.yml
    └── test
        └── java
            └── org.itstack.demo.test
                └── ApiTest.java
- 这是一个
SpringBoot的HelloWorld工程,在工程中提供了查询用户信息的接口HelloWorldController.queryUserInfo,为后续扩展此接口的白名单过滤做准备。
2. 场景简述
2.1 定义基础查询接口
@RestController
public class HelloWorldController {

    @Value("${server.port}")
    private int port;

    /**
     * key:需要从入参取值的属性字段,如果是对象则从对象中取值,如果是单个值则直接使用
     * returnJson:预设拦截时返回值,是返回对象的Json
     *
     * http://localhost:8080/api/queryUserInfo?userId=1001
     * http://localhost:8080/api/queryUserInfo?userId=小团团
     */
    @RequestMapping(path = "/api/queryUserInfo", method = RequestMethod.GET)
    public UserInfo queryUserInfo(@RequestParam String userId) {
        return new UserInfo("虫虫:" + userId, 19, "天津市南开区旮旯胡同100号");
    }

}
- 这里提供了一个基本的查询服务,通过入参
userId,查询用户信息。后续就需要在这里扩展白名单,只有指定用户才可以查询,其他用户不能查询。
2.2 设置Application启动类
@SpringBootApplication
@Configuration
public class HelloWorldApplication {

    public static void main(String[] args) {
        SpringApplication.run(HelloWorldApplication.class, args);
    }

}
- 这里是通用的
SpringBoot启动类。需要添加的是一个配置注解@Configuration,为了后续可以读取白名单配置。
外观模式重构代码
接下来使用外观器模式来进行代码优化,也算是一次很小的重构。
这次重构的核心是使用外观模式也可以说门面模式,结合SpringBoot中的自定义starter中间件开发的方式,统一处理所有需要白名单的地方。
后续接下来的实现中,会涉及的知识;
- SpringBoot的starter中间件开发方式。
- 面向切面编程和自定义注解的使用。
- 外部自定义配置信息的透传,SpringBoot与Spring不同,对于此类方式获取白名单配置存在差异。
1. 工程结构
itstack-demo-design-10-02
└── src
    ├── main
    │   ├── java
    │   │   └── org.itstack.demo.design.door
    │   │       ├── annotation
    │   │       │	└── DoDoor.java
    │   │       ├── config
    │   │       │	├── StarterAutoConfigure.java
    │   │       │	├── StarterService.java
    │   │       │	└── StarterServiceProperties.java
    │   │       └── DoJoinPoint.java
    │   └── resources
    │       └── META_INF
    │           └── spring.factories
    └── test
        └── java
            └── org.itstack.demo.test
                └── ApiTest.java
门面模式模型结构
- 以上是外观模式的中间件实现思路,右侧是为了获取配置文件,左侧是对于切面的处理。
- 门面模式可以是对接口的包装提供出接口服务,也可以是对逻辑的包装通过自定义注解对接口提供服务能力。
2. 代码实现
2.1 配置服务类
public class StarterService {

    private String userStr;

    public StarterService(String userStr) {
        this.userStr = userStr;
    }

    public String[] split(String separatorChar) {
        return StringUtils.split(this.userStr, separatorChar);
    }

}
- 以上类的内容较简单只是为了获取配置信息。
2.2 配置类注解定义
@ConfigurationProperties("itstack.door")
public class StarterServiceProperties {

    private String userStr;

    public String getUserStr() {
        return userStr;
    }

    public void setUserStr(String userStr) {
        this.userStr = userStr;
    }

}
- 用于定义好后续在
application.yml中添加itstack.door的配置信息。
2.3 自定义配置类信息获取
@Configuration
@ConditionalOnClass(StarterService.class)
@EnableConfigurationProperties(StarterServiceProperties.class)
public class StarterAutoConfigure {

    @Autowired
    private StarterServiceProperties properties;

    @Bean
    @ConditionalOnMissingBean
    @ConditionalOnProperty(prefix = "itstack.door", value = "enabled", havingValue = "true")
    StarterService starterService() {
        return new StarterService(properties.getUserStr());
    }

}
- 以上代码是对配置的获取操作,主要是对注解的定义;
@Configuration、@ConditionalOnClass、@EnableConfigurationProperties,这一部分主要是与SpringBoot的结合使用。
2.4 切面注解定义
@Retention(RetentionPolicy.RUNTIME)
@Target(ElementType.METHOD)
public @interface DoDoor {

    String key() default "";

    String returnJson() default "";

}
- 定义了外观模式门面注解,后续就是此注解添加到需要扩展白名单的方法上。
- 这里提供了两个入参,key:获取某个字段例如用户ID、returnJson:确定白名单拦截后返回的具体内容。
2.5 白名单切面逻辑
@Aspect
@Component
public class DoJoinPoint {

    private Logger logger = LoggerFactory.getLogger(DoJoinPoint.class);

    @Autowired
    private StarterService starterService;

    @Pointcut("@annotation(org.itstack.demo.design.door.annotation.DoDoor)")
    public void aopPoint() {
    }

    @Around("aopPoint()")
    public Object doRouter(ProceedingJoinPoint jp) throws Throwable {
        //获取内容
        Method method = getMethod(jp);
        DoDoor door = method.getAnnotation(DoDoor.class);
        //获取字段值
        String keyValue = getFiledValue(door.key(), jp.getArgs());
        logger.info("itstack door handler method:{} value:{}", method.getName(), keyValue);
        if (null == keyValue || "".equals(keyValue)) return jp.proceed();
        //配置内容
        String[] split = starterService.split(",");
        //白名单过滤
        for (String str : split) {
            if (keyValue.equals(str)) {
                return jp.proceed();
            }
        }
        //拦截
        return returnObject(door, method);
    }

    private Method getMethod(JoinPoint jp) throws NoSuchMethodException {
        Signature sig = jp.getSignature();
        MethodSignature methodSignature = (MethodSignature) sig;
        return getClass(jp).getMethod(methodSignature.getName(), methodSignature.getParameterTypes());
    }

    private Class<? extends Object> getClass(JoinPoint jp) throws NoSuchMethodException {
        return jp.getTarget().getClass();
    }

    //返回对象
    private Object returnObject(DoDoor doGate, Method method) throws IllegalAccessException, InstantiationException {
        Class<?> returnType = method.getReturnType();
        String returnJson = doGate.returnJson();
        if ("".equals(returnJson)) {
            return returnType.newInstance();
        }
        return JSON.parseObject(returnJson, returnType);
    }

    //获取属性值
    private String getFiledValue(String filed, Object[] args) {
        String filedValue = null;
        for (Object arg : args) {
            try {
                if (null == filedValue || "".equals(filedValue)) {
                    filedValue = BeanUtils.getProperty(arg, filed);
                } else {
                    break;
                }
            } catch (Exception e) {
                if (args.length == 1) {
                    return args[0].toString();
                }
            }
        }
        return filedValue;
    }

}
- 这里包括的内容较多,核心逻辑主要是;
Object doRouter(ProceedingJoinPoint jp),接下来我们分别介绍。
@Pointcut(“@annotation(org.itstack.demo.design.door.annotation.DoDoor)”)
定义切面,这里采用的是注解路径,也就是所有的加入这个注解的方法都会被切面进行管理。
getFiledValue
获取指定key也就是获取入参中的某个属性,这里主要是获取用户ID,通过ID进行拦截校验。
returnObject
返回拦截后的转换对象,也就是说当非白名单用户访问时则返回一些提示信息。
doRouter
切面核心逻辑,这一部分主要是判断当前访问的用户ID是否白名单用户,如果是则放行
jp.proceed();,否则返回自定义的拦截提示信息。
3. 测试验证
这里的测试我们会在工程:itstack-demo-design-10-00中进行操作,通过引入jar包,配置注解的方式进行验证。
3.1 引入中间件POM配置
<dependency>
    <groupId>org.springframework.boot</groupId>
    <artifactId>itstack-demo-design-10-02</artifactId>
</dependency>
- 打包中间件工程,给外部提供jar包服务
3.2 配置application.yml
# 自定义中间件配置
itstack:
  door:
    enabled: true
    userStr: 1001,aaaa,ccc #白名单用户ID,多个逗号隔开
- 这里主要是加入了白名单的开关和白名单的用户ID,逗号隔开。
3.3 在Controller中添加自定义注解
/**
 * http://localhost:8080/api/queryUserInfo?userId=1001
 * http://localhost:8080/api/queryUserInfo?userId=小团团
 */
@DoDoor(key = "userId", returnJson = "{\"code\":\"1111\",\"info\":\"非白名单可访问用户拦截!\"}")
@RequestMapping(path = "/api/queryUserInfo", method = RequestMethod.GET)
public UserInfo queryUserInfo(@RequestParam String userId) {
    return new UserInfo("虫虫:" + userId, 19, "天津市南开区旮旯胡同100号");
}
- 这里核心的内容主要是自定义的注解的添加
@DoDoor,也就是我们的外观模式中间件化实现。 - key:需要从入参取值的属性字段,如果是对象则从对象中取值,如果是单个值则直接使用。
- returnJson:预设拦截时返回值,是返回对象的Json。
3.4 启动SpringBoot
  .   ____          _            __ _ _
 /\\ / ___'_ __ _ _(_)_ __  __ _ \ \ \ \
( ( )\___ | '_ | '_| | '_ \/ _` | \ \ \ \
 \\/  ___)| |_)| | | | | || (_| |  ) ) ) )
  '  |____| .__|_| |_|_| |_\__, | / / / /
 =========|_|==============|___/=/_/_/_/
 :: Spring Boot ::        (v2.1.2.RELEASE)

2020-06-11 23:56:55.451  WARN 65228 --- [           main] ion$DefaultTemplateResolverConfiguration : Cannot find template location: classpath:/templates/ (please add some templates or check your Thymeleaf configuration)
2020-06-11 23:56:55.531  INFO 65228 --- [           main] o.s.b.w.embedded.tomcat.TomcatWebServer  : Tomcat started on port(s): 8080 (http) with context path ''
2020-06-11 23:56:55.533  INFO 65228 --- [           main] o.i.demo.design.HelloWorldApplication    : Started HelloWorldApplication in 1.688 seconds (JVM running for 2.934)
- 启动正常,SpringBoot已经启动可以对外提供服务。
3.5 访问接口接口测试
白名单用户访问
http://localhost:8080/api/queryUserInfo?userId=1001(opens new window)
{"code":"0000","info":"success","name":"虫虫:1001","age":19,"address":"天津市南开区旮旯胡同100号"}
- 此时的测试结果正常,可以拿到接口数据。
非白名单用户访问
http://localhost:8080/api/queryUserInfo?userId=小团团(opens new window)
{"code":"1111","info":"非白名单可访问用户拦截!","name":null,"age":null,"address":null}
- 这次我们把
userId换成小团团,此时返回的信息已经是被拦截的信息。而这个拦截信息正式我们自定义注解中的信息:@DoDoor(key = "userId", returnJson = "{\"code\":\"1111\",\"info\":\"非白名单可访问用户拦截!\"}")


