Elasticsearch+filefeat+Kibana(EFK)架构学习
一. 安装ES7集群
- 准备三台服,最少配置2core4G,磁盘空间最少20G,并关闭防火墙
- 设置集群免密登录,方便scp文件等操作参考集群免密登录方法
- 下载es7的elasticsearch-7.17.3-x86_64.rpm包
- 安装
yum -y localinstal elasticsearch-7.17.3-x86_64.rpm
- 修改node1配置文件
vim /etc/elasticsearch/elasticsearch.yml
cluster.name: elk
node.name: elk01
path.data: /var/lib/elasticsearch
path.logs: /var/log/elasticsearch
network.host: 0.0.0.0
discovery.seed_hosts: ["10.10.10.11","10.10.10.12","10.10.10.13"]
cluster.initial_master_nodes: ["10.10.10.11","10.10.10.12","10.10.10.13"]
相关参数说明:
- cluster.name:
集群名称,若不指定,则默认是"elasticsearch",⽇志⽂件的前缀也是集群名称。 - node.name:
指定节点的名称,可以⾃定义,推荐使⽤当前的主机名,要求集群唯⼀。 - path.data:
数据路径。 - path.logs:
⽇志路径 - network.host:
ES服务监听的IP地址 - discovery.seed_hosts:
服务发现的主机列表,对于单点部署⽽⾔,主机列表和"network.host"字段置相同即可
- 同步配置⽂件到集群的其他节点
data_rsync.sh /etc/elasticsearch/elasticsearch.yml
并修改其他两个节点的name
- 删除所有临时数据
rm -rf /var/{lib,log}/elasticsearch/* /tmp/*
ll /var/{lib,log}/elasticsearch/ /tmp/
- 分别在三个节点启动es服务
systemctl start elasticsearch
9.验证集群状态
curl 10.10.10.11:9200/_cat/nodes?v
二,在11机器上安装kibana
- 下载kibana的rpm包,并安装
yum -y localinstall kibana-7.17.3-x86_64.rpm
- 修改kibana的配置⽂件
vim /etc/kibana/kibana.yml
...
server.host: "10.10.10.11"
server.name: "kibana-server"
elasticsearch.hosts:
["http://10.10.10.11:9200","http://10.10.10.12:9200","http://10.10.10.13:9200"]
i18n.locale: "en"
- 启动kibana服务
systemctl enable --now kibana
systemctl status kibana
systemctl start kibana
kibana的使用
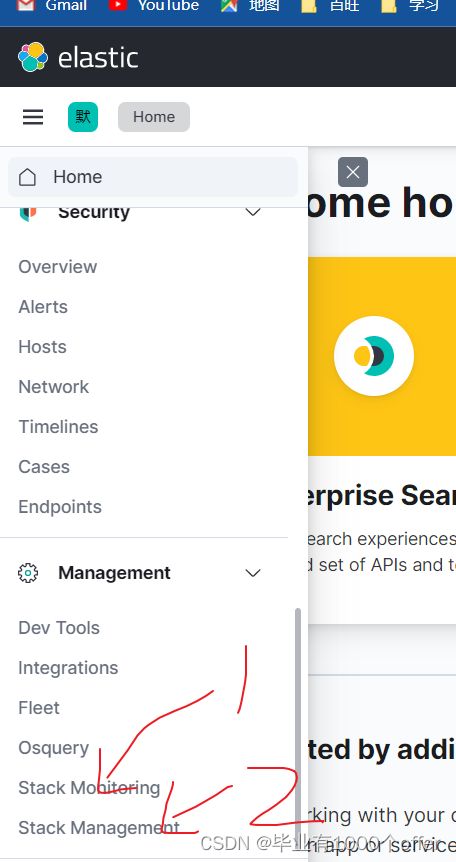
- 下图1处是资源监控,监控节点,数据等,2处是stack管理

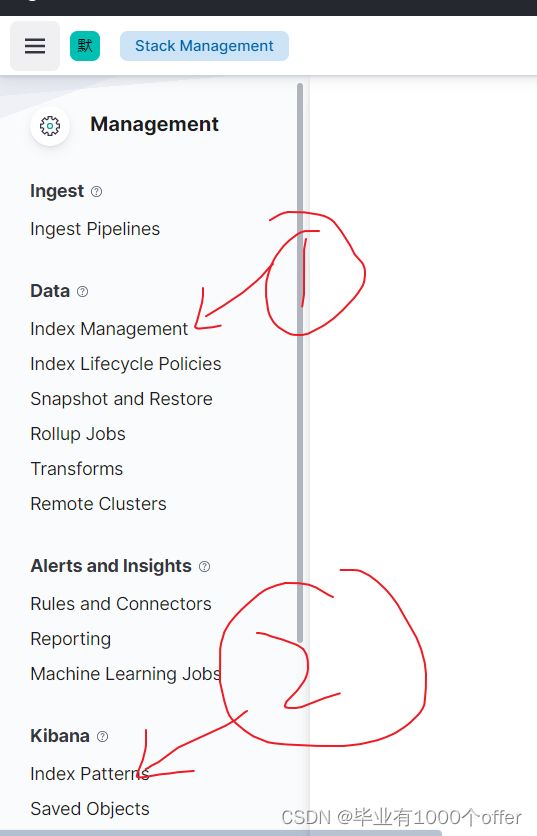
- 点开stack管理,可以看见里面有如下图,1处是索引管理2、处是索引匹配规则,可以在索引pattern设置匹配的pattern,即可在discover里面显示匹配的模板。

三,filebeat使用和配置模板
- 安装filebeat
yum -y localinstall filebeat-7.17.3-x86_64.rpm
- 编写配置文件,在/etc/filebeat/config目录下
mkdir /etc/filebeat/config
cat > /etc/filebeat/config/01-stdin-to-console.yml <<'EOF'
# 指定输⼊的类型
filebeat.inputs:
# 指定输⼊的类型为"stdin",表示标准输⼊
- type: stdin
# 指定输出的类型
output.console:
 # 打印漂亮的格式
 pretty: true
EOF
(2)运⾏filebeat实例,即可在控制台输入,控制台打印处理后的结果
filebeat -e -c /etc/filebeat/config/01-stdin-to-console.yml
filebeat的几种模式和配置
- 直接控制台输入输出,就是上面配置。stadio格式
- log格式,直接读取log文件,并输出控制台,tags就是一个标签,用作判断,field是自定义的字段
filebeat.inputs:
- type: log
 # 是否启动当前的输⼊类型,默认值为true
 enabled: true
 # 指定数据路径
 paths:
 - /tmp/test.log
 - /tmp/*.txt
 # 给当前的输⼊类型搭上标签
 tags: ["测试","容器运维","DBA运维","SRE运维⼯程师"]
 # ⾃定义字段
 fields:
   school: "出去了化工大学"
- type: log
 enabled: true
 paths:
 - /tmp/test/*/*.log
 tags: ["kafka","云原⽣开发"]
 fields:
   name: "测试"
   hobby: "linux,抖⾳"
 # 将⾃定义字段的key-value放到顶级字段.
 # 默认值为false,会将数据放在⼀个叫"fields"字段的下⾯.
 fields_under_root: true
output.console:
 pretty: true
- 将输出写入elasticsearch
filebeat.inputs:
- type: log
 # 是否启动当前的输⼊类型,默认值为true
 enabled: true
 # 指定数据路径
 paths:
 - /tmp/test.log
 - /tmp/*.txt
 # 给当前的输⼊类型搭上标签
 tags: ["测试","容器运维","DBA运维","SRE运维⼯程师"]
 # ⾃定义字段
 fields:
   school: "出去了化工大学"
- type: log
 enabled: true
 paths:
 - /tmp/test/*/*.log
 tags: ["kafka","云原⽣开发"]
 fields:
   name: "测试"
   hobby: "linux,抖⾳"
 # 将⾃定义字段的key-value放到顶级字段.
 # 默认值为false,会将数据放在⼀个叫"fields"字段的下⾯.
 fields_under_root: true
output.elasticsearch:
 hosts:["http://10.10.10.11:9200","http://10.10.10.12:9200","http://10.10.10.13:9200"]
即可在kibana根据配置好的模板和pattern查询相应的日志记录

4. 配置日志过滤
 include_lines: ['^ERROR', '^WARN','DANGER']
 # 指定⿊名单,排除指定的内容
 exclude_lines: ['^DBUG',"TEST"]
- 自定义索引模板名称
filebeat.inputs:
- type: log
 # 是否启动当前的输⼊类型,默认值为true
 enabled: true
 # 指定数据路径
 paths:
 - /tmp/test.log
 - /tmp/*.txt
 # 给当前的输⼊类型搭上标签
 tags: ["测试","容器运维","DBA运维","SRE运维⼯程师"]
 # ⾃定义字段
 fields:
   school: "出去了化工大学"
- type: log
 enabled: true
 paths:
 - /tmp/test/*/*.log
 tags: ["kafka","云原⽣开发"]
 fields:
   name: "测试"
   hobby: "linux,抖⾳"
 # 将⾃定义字段的key-value放到顶级字段.
 # 默认值为false,会将数据放在⼀个叫"fields"字段的下⾯.
 fields_under_root: true
output.elasticsearch:
 hosts:["http://10.10.10.11:9200","http://10.10.10.12:9200","http://10.10.10.13:9200"]
 index: "es-linux-eslog-%{+yyyy.MM.dd}"
# 禁⽤索引⽣命周期管理
setup.ilm.enabled: false
# 设置索引模板的名称
setup.template.name: "es-linux-eslog"
# 设置索引模板的匹配模式
setup.template.pattern: "es-linux-eslog*"
- 多个索引,写入多个索引案例
filebeat.inputs:
- type: log
 # 是否启动当前的输⼊类型,默认值为true
 enabled: true
 # 指定数据路径
 paths:
 - /tmp/test.log
 - /tmp/*.txt
 # 给当前的输⼊类型搭上标签
 tags: ["测试","容器运维","DBA运维","SRE运维⼯程师"]
 # ⾃定义字段
 fields:
   school: "出去了化工大学"
- type: log
 enabled: true
 paths:
 - /tmp/test/*/*.log
 tags: ["kafka","云原⽣开发"]
 fields:
   name: "测试"
   hobby: "linux,抖⾳"
 # 将⾃定义字段的key-value放到顶级字段.
 # 默认值为false,会将数据放在⼀个叫"fields"字段的下⾯.
 fields_under_root: true
output.elasticsearch:
 hosts:["http://10.10.10.11:9200","http://10.10.10.12:9200","http://10.10.10.13:9200"]
  indices:
 - index: "es-linux-eslog-%{+yyyy.MM.dd}"
 # 匹配指定字段包含的内容
   when.contains:
     tags: "DBA运维"
 - index: "es-linux-eslog-DBA-%{+yyyy.MM.dd}"
   when.contains:
     tags: "kafka"

#
# 禁⽤索引⽣命周期管理
setup.ilm.enabled: false
# 设置索引模板的名称
setup.template.name: "es-linux-eslog"
# 设置索引模板的匹配模式
setup.template.pattern: "es-linux-eslog*"
multiline.type: pattern
# 指定匹配模式
#表示收集[开头到下一个[开头的位置的日志
 multiline.pattern: '^\['
# 下⾯2个参数参考官⽅架构图即可,如上图所示。
 multiline.negate: true
 multiline.match: after


