SpringBoot学习
Spring Boot是由Pivotal团队提供的全新框架,其设计目的是用来简化新 Spring 应用的初始搭建以及开发过程。该框架使用了特定的方式来进行配置,从而使开发人员不再需要定义样板化的配置。
Java一直被人诟病的一点就是臃肿、麻烦。主要体现在两点:
复杂的配置
项目各种配置其实是开发时的损耗, 因为在思考 Spring 特性配置和解决业务问题之间需要进行思维切换,所以写配置挤占了写应用程序逻辑的时间。
混乱的依赖管理
项目的依赖管理也是件吃力不讨好的事情。决定项目里要用哪些库就已经够让人头痛的了,你还要知道这些库的哪个版本和其他库不会有冲突,这也是件棘手的问题。并且,依赖管理也是一种损耗,添加依赖不是写应用程序代码。一旦选错了依赖的版本,随之而来的不兼容问题毫无疑问会是生产力杀手。
Spring Boot 主要特征是:
创建独立的spring应用程序
直接内嵌tomcat、jetty和undertow(不需要打包成war包部署)
提供了固定化的“starter”配置,以简化构建配置
尽可能的自动配置spring和第三方库
提供产品级的功能,如:安全指标、运行状况监测和外部化配置等
绝对不会生成代码,并且不需要XML配置
SpringBoot第一个例子
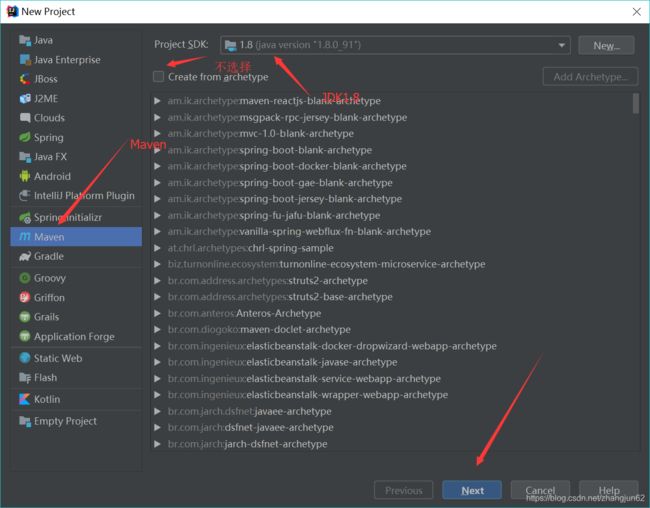
开发工具IDEA、JDK1.8
打开IDEA、创建Maven工程(跳过骨架)
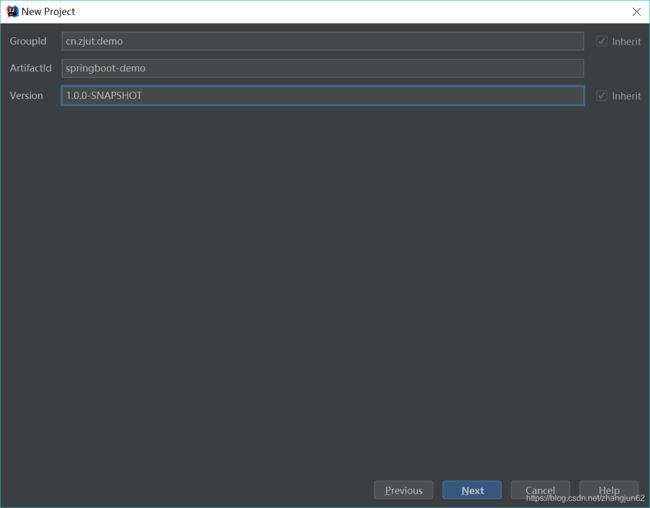
输入项目Maven坐标
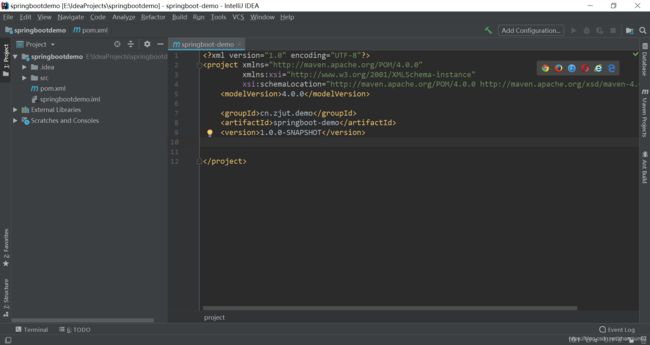
选择工程路径完成项目创建
添加依赖
SpringBoot提供了一个名为spring-boot-starter-parent的工程,里面已经对各种常用依赖(并非全部)的版本进行了管理,自己创建的项目需要以这个项目为父工程,这样就不用操心依赖的版本问题,需要什么依赖,直接引入坐标即可!
添加父工程坐标
    org.springframework.boot
    spring-boot-starter-parent
    2.0.4.RELEASE
添加web启动器
        org.springframework.boot
        spring-boot-starter-web
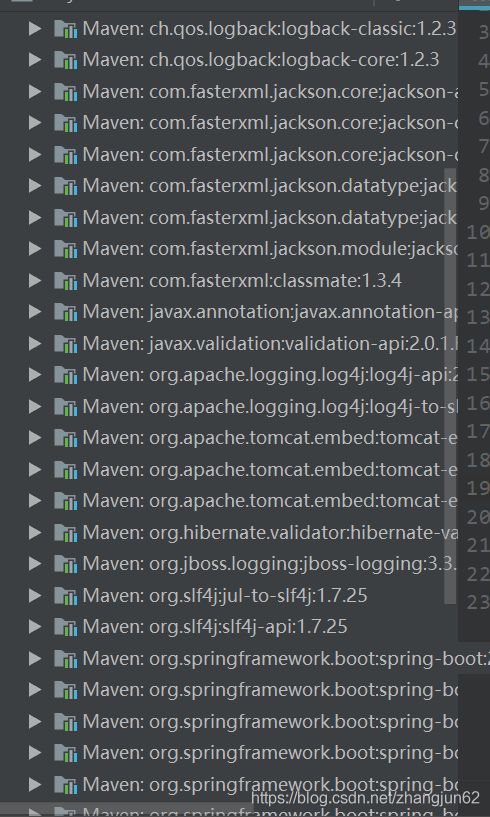
添加依赖不需要版本 ,由SpringBoot管理。工程在加入以来后会出现很多jar包
POM文件
    4.0.0

    cn.zjut.demo
    springboot-demo
    1.0.0-SNAPSHOT


        org.springframework.boot
        spring-boot-starter-parent
        2.0.4.RELEASE


            org.springframework.boot
            spring-boot-starter-web
Spring Boot项目通过main函数即可启动,需要创建一个启动类
import org.springframework.boot.SpringApplication;
import org.springframework.boot.autoconfigure.SpringBootApplication;

@SpringBootApplication
public class BootDemoApplication {
    public static void main(String[] args) {
        SpringApplication.run(BootDemoApplication.class, args);
    }
}
创建Controller类
import org.springframework.web.bind.annotation.GetMapping;
import org.springframework.web.bind.annotation.RestController;

//@RestController注解相当于@ResponseBody + @Controller合在一起的作用
@RestController
public class HelloController {
    //@GetMapping是一个组合注解,是@RequestMapping(method = RequestMethod.GET)的缩写
    //@PostMapping是一个组合注解,是@RequestMapping(method = RequestMethod.POST)的缩写
    @GetMapping("hello")
    public String hello(){
        return "Hello, SpringBoot";
    }
}
启动项目
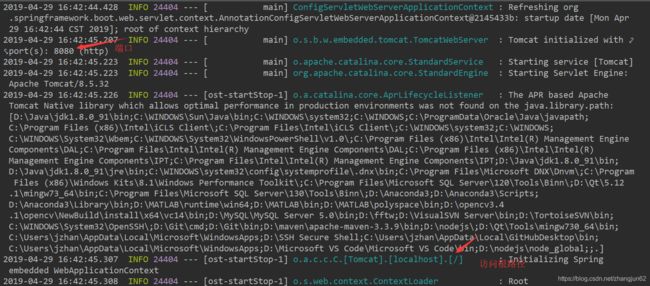
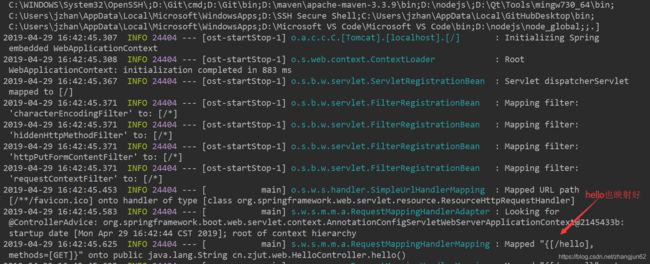
启动项目看到控制台输出端口、访问路径、Controller映射等信息
访问http://localhost:8080/hello 得到Hello, SpringBoot表明整个工程测试成功
Java配置
传统配置Bean是通过xml方式,但是对于SpringBoot是没有xml文件,主要是通过Java配置方式来配置Bean。在Spring3.0开始,Spring官方就已经开始推荐使用java配置来代替传统的xml配置。
配置数据库连接池来使用Java配置
传统xml配置
Java配置
Java配置主要靠java类和一些注解,比较常用的注解有:
@Configuration:声明一个类作为配置类,代替xml文件
@Bean:声明在方法上,将方法的返回值加入Bean容器,代替
@PropertySource:指定外部属性文件
首先引入druid数据源依赖
    com.alibaba
    druid
    1.1.16
创建jdbc.properties文件
jdbc.driverClassName=com.mysql.jdbc.Driver
jdbc.url=jdbc:mysql://127.0.0.1:3306/leyou
jdbc.username=root
jdbc.password=1234
实现配置类
import com.alibaba.druid.pool.DruidDataSource;
import org.springframework.beans.factory.annotation.Value;
import org.springframework.context.annotation.Bean;
import org.springframework.context.annotation.Configuration;
import org.springframework.context.annotation.PropertySource;

import javax.sql.DataSource;

@Configuration
@PropertySource("classpath:jdbc.properties")
public class JdbcConfig {
    @Value("${jdbc.url}")
    private String url;

    @Value("${jdbc.driverClassName}")
    private String driverClassName;

    @Value("${jdbc.username}")
    private String username;

    @Value("${jdbc.password}")
    private String password;


    @Bean
    public DataSource dataSource(){
        DruidDataSource dataSource = new DruidDataSource();
        dataSource.setDriverClassName(driverClassName);
        dataSource.setUrl(url);
        dataSource.setUsername(username);
        dataSource.setPassword(password);
        return dataSource;
    }
}
HelloController类注入DataSource dataSource属性
import org.springframework.beans.factory.annotation.Autowired;
import org.springframework.web.bind.annotation.GetMapping;
import org.springframework.web.bind.annotation.RestController;

import javax.sql.DataSource;

@RestController
public class HelloController {
    @Autowired
    private DataSource dataSource;

    @GetMapping("hello")
    public String hello(){
        return "Hello, SpringBoot";
    }
}
打上断点 ,Debug方式启动,访问hello方法,查看dataSource对象相关属性有值表明注入成功
SpringBoot属性注入
创建一个类JdbcProperties用于属性注入
首先将属性文件名改为application.properties,SpringBoot自动识别这个文件
导入Lombok依赖,通过@Data注解为类生成setter/getter、hashCode、equals等方法
import lombok.Data;
import org.springframework.boot.context.properties.ConfigurationProperties;

//SpringBoot扫描@ConfigurationProperties会将此类作为属性注入类,prefix表示属性文件里属性前缀
@ConfigurationProperties(prefix = "jdbc")
@Data
public class JdbcProperties {
    String url;
    String driverClassName;
    String username;
    String password;
}
JdbcConfig类通过@EnableConfigurationProperties注解使用属性注入类,为dataSource相关属性赋值
import com.alibaba.druid.pool.DruidDataSource;
import org.springframework.boot.context.properties.EnableConfigurationProperties;
import org.springframework.context.annotation.Bean;
import org.springframework.context.annotation.Configuration;

import javax.sql.DataSource;

@Configuration
@EnableConfigurationProperties(JdbcProperties.class)
public class JdbcConfig {
    //使用方式一
//    @Autowired
//    JdbcProperties jdbcProperties;

    //使用方式二
//    public JdbcConfig(JdbcProperties jdbcProperties){
//        this.jdbcProperties = jdbcProperties
//    }

    //使用方式三
    @Bean
    public DataSource dataSource(JdbcProperties prop){
        DruidDataSource dataSource = new DruidDataSource();
        dataSource.setDriverClassName(prop.getDriverClassName());
        dataSource.setUrl(prop.getUrl());
        dataSource.setUsername(prop.getUsername());
        dataSource.setPassword(prop.getPassword());
        return dataSource;
    }
}
Debug启动工程,运行到断点位置,查看dataSource对象相关属性有值,表明测试成功
SpringBoot另外一种读取属性文件进行属性注入的方式更加简化
import com.alibaba.druid.pool.DruidDataSource;
import org.springframework.boot.context.properties.ConfigurationProperties;
import org.springframework.context.annotation.Bean;
import org.springframework.context.annotation.Configuration;

import javax.sql.DataSource;

@Configuration
public class JdbcConfig {
    @Bean
    @ConfigurationProperties("jdbc")
    public DataSource dataSource(){
        DruidDataSource dataSource = new DruidDataSource();
        return dataSource;
    }
}
Debug启动工程,运行到断点位置,查看dataSource对象相关属性有值,表明测试成功
Yaml配置文件
配置文件除了使用格式为 application.properties,还可以使用后缀名为.yaml或者yml,即application.yaml,application.yml
基本格式:
jdbc:
  driverClassName: com.mysql.jdbc.Driver
  url: jdbc:mysql://127.0.0.1:3306/leyou
  username: root
  password: 1234
  user:
    name: zhangsan
    age: 18
    language:
      - Java
      - C++
      - C
      - Pyhton
如果两个文件都存在,将两个配置文件合并,如果有重复,以properties为准
自动配置原理
启动类有注解@SpringBootApplication和SpringApplication.run()
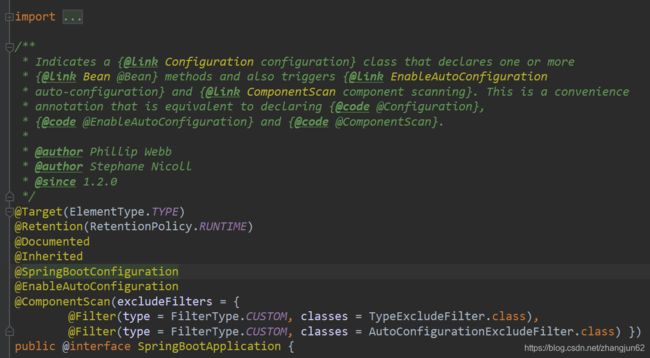
点击@SpringBootApplication进入源码发现注解上有三个注解:
@SpringBootConfiguration
@EnableAutoConfiguration
@ComponentScan
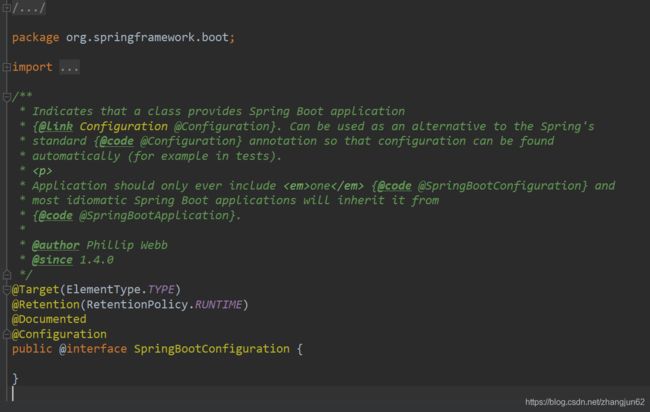
点击 @SpringBootConfiguration进入源码
在这个注解上面,又有一个@Configuration注解。这个注解的作用就是声明当前类是一个配置类,然后Spring会自动扫描到添加了@Configuration的类,并且读取其中的配置信息。而@SpringBootConfiguration是来声明当前类是SpringBoot应用的配置类,项目中只能有一个。所以一般无需自己添加。
@EnableAutoConfiguration
关于这个注解,官网上有一段说明:
> The second class-level annotation is `@EnableAutoConfiguration`. This annotation
> tells Spring Boot to “guess” how you want to configure Spring, based on the jar
> dependencies that you have added. Since `spring-boot-starter-web` added Tomcat
> and Spring MVC, the auto-configuration assumes that you are developing a web
> application and sets up Spring accordingly.
基本翻译:第二级注解`@EnableAutoConfiguration`,告诉SpringBoot基于你所添加的依赖,去“猜测”你想要如何配置Spring。比如我们引入`spring-boot-starter-web`,而这个启动器中帮我们添加`tomcat`、`SpringMVC`的依赖。此时自动配置就知道你是要开发一个web应用,所以就帮你完成web及SpringMVC的默认配置!
SpringBoot内部对大量的第三方库或Spring内部库进行了默认配置,这些配置是否生效,取决于我们是否引入了对应库所需的依赖,如果有那么默认配置就会生效。所以,使用SpringBoot构建一个项目,只需要引入所需框架的依赖,配置就可以交给SpringBoot处理了。除非你不希望使用SpringBoot的默认配置,它也提供了自定义配置的入口。
@ComponentScan
配置组件扫描的指令。提供了类似与
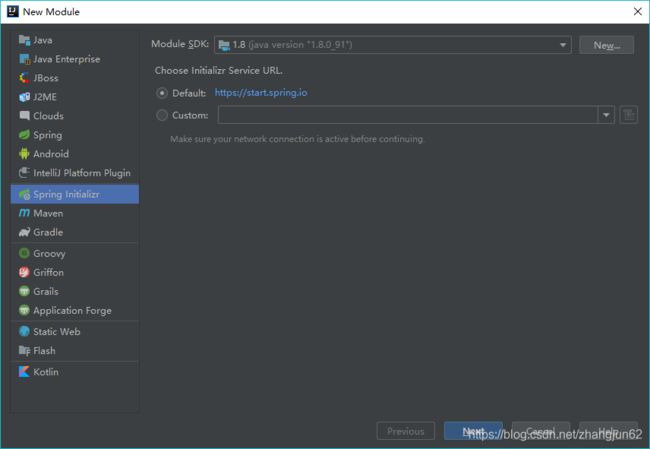
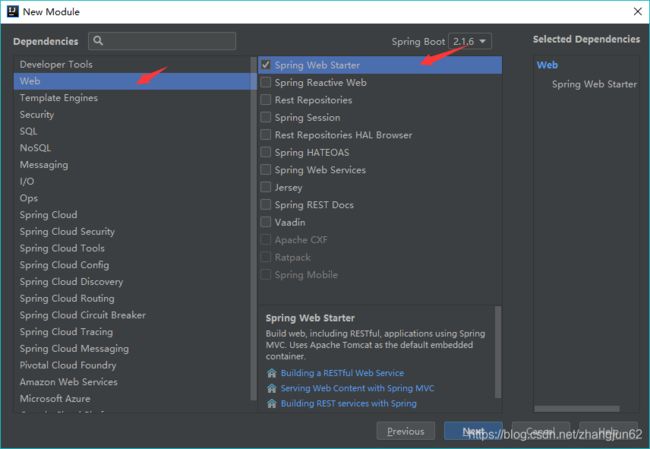
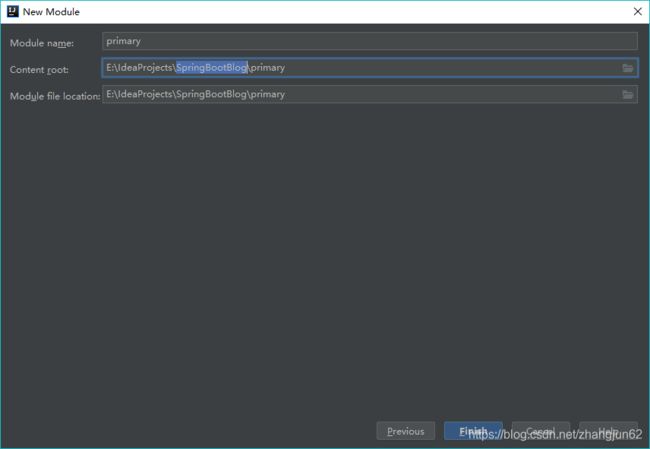
使用IDEA的Spring Initiallizer创建Spring Boot工程
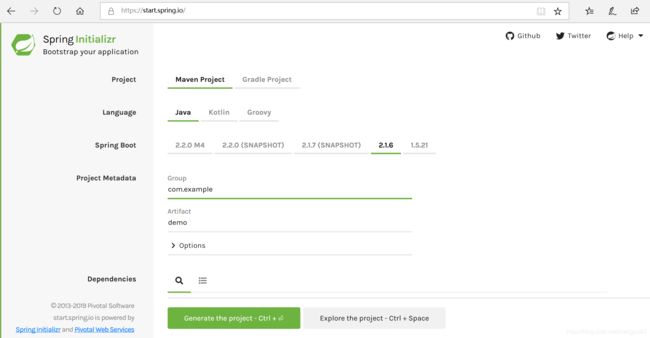
Service URL:这里的内容不用修改。该 URL 表示在创建 Spring starter 工程时若需要的一些资源在本地 Maven 仓库中没有,则需要从该 URL 中进行下载。另外,也可以打开该URL 地址,完成线上工程的创建。
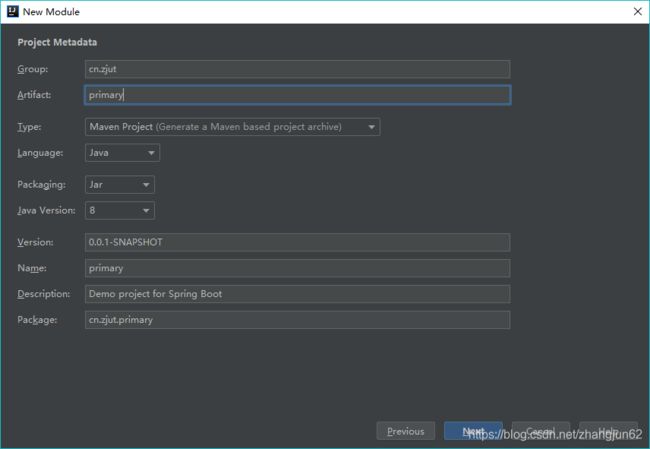
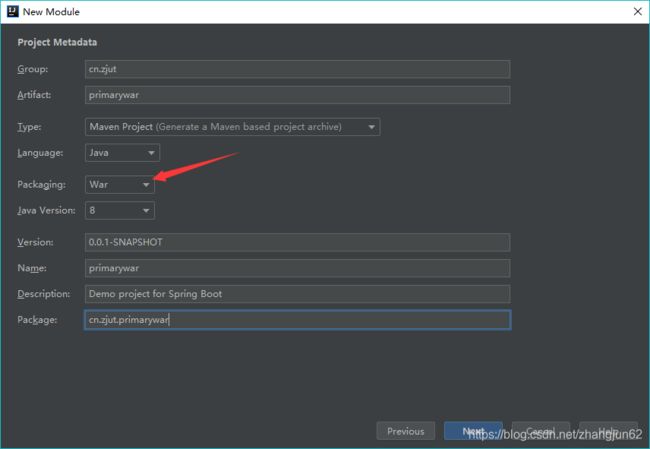
Packaging:虽然创建的是 web 工程,这里要选择打 Jar 包。因为 Spring Boot 的 web 工程是作为一个可直接运行的 Java 工程出现的,其中已经内置了 Tomcat。Java 工程一旦启动,Tomcat 自动启动并会让应用程序开始运行。客户端可以通过浏览器直接对应用进行访问。
Package:在域名倒序后至少要多写出一级,这一级一般都为工程名称。当然,若是一个项目中包含多个工程,那么这里应该多写出两级:项目名称+工程名称。后面所有的代码都要求必须出现在该级别的下面级别中,不能出现在平级包中。
工程编辑
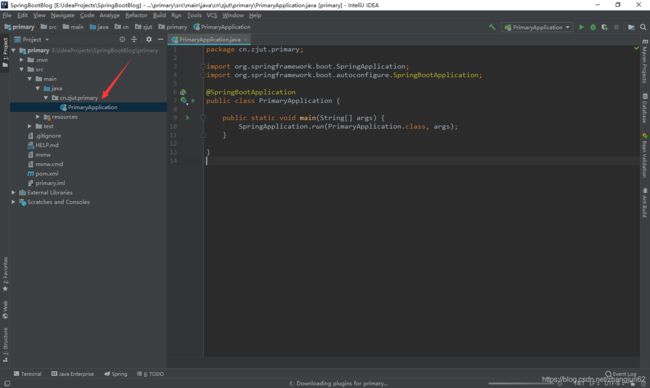
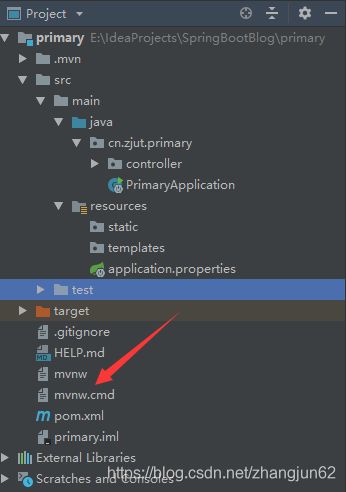
IDEA会生成一个自动启动类PimaryApplication,与前面手动创建的SpringBoot工程一致
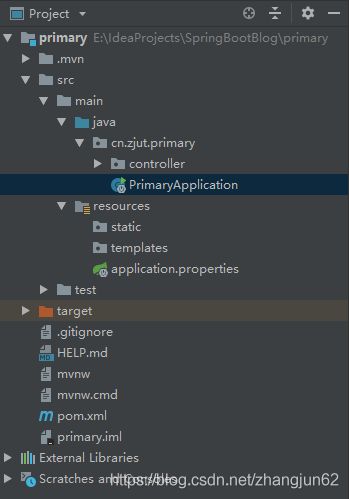
在启动类所在的包下再创建一个子包,在其中编写 SpringMVC 的处理器类。注意,要求代码所在的包必须是启动类所在包的子孙包,不能是同级包。
import org.springframework.web.bind.annotation.RequestMapping;
import org.springframework.web.bind.annotation.RestController;

@RestController
@RequestMapping("/test")
public class SomeHandler {
    @RequestMapping("/some")
    public String someHandle(){
        return "Hello, Spring Boot";
    }
}
运行工程并访问
工程解析
启动类在前面已经讲诉,故不再赘述
src/main/resources 目录
static目录:存放静态资源,例如CSS、JS、Image等资源
templates 目录:存放动态资源。Spring Boot 不建议使用 jsp 作为动态数据展示页面,而是建议使用 Thymeleaf。Thymeleaf 是一种 Java 模板引擎,可以显示动态数据。Thymeleaf文件的扩展名为 html,是对 html 的扩展。该目录用于存放 Thymeleaf 文件。
这两个目录中存放的资源都相当于存放在当前 Web 应用的根下,不过,一般不使用它们存放资源。
application.properties:Spring Boot 的主配置文件。
核心依赖与插件没有版本号
查看当前工程
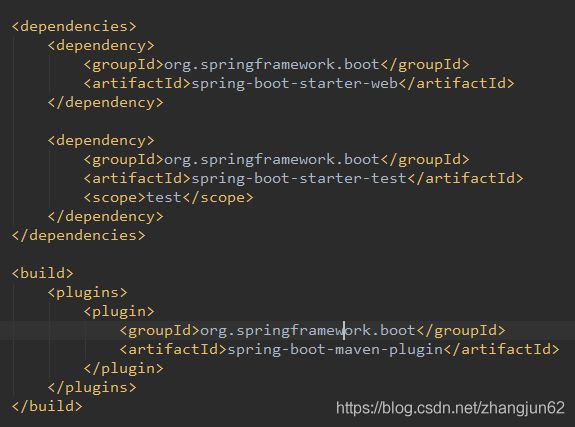
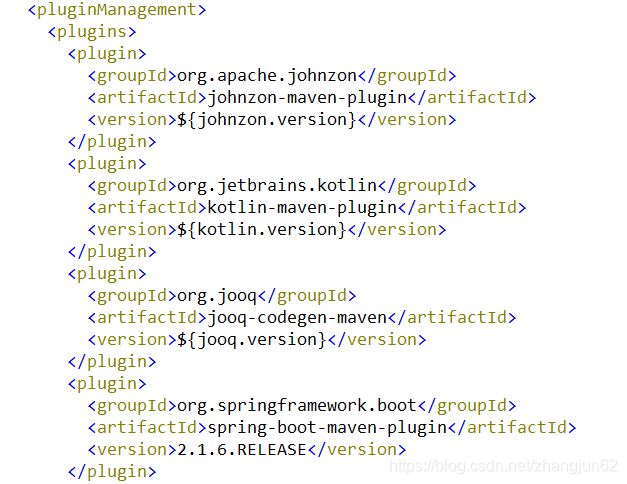
在 pom 文件中包含 Spring Boot 的两个核心依赖及一个核心插件。一个是 Spring Boot 的Web 启动依赖,一个是 Spring Boot 的测试启动依赖;而这个核心插件是用于完成对 SpringBoot 工程打包结果的再打包。可以注意到,它们均没有版本号。
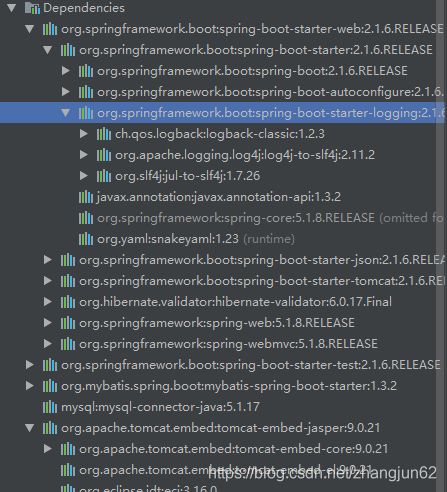
虽然它们都没有版本号,但打开工程中的 Maven Dependencies 可以看到,它们的版本号均为 2.1.6
它们的版本号均继承自父工程。从 pom 文件中可以看出,其父工程为spring-boot-starter-parent。
查看 spring-boot-starter-parent
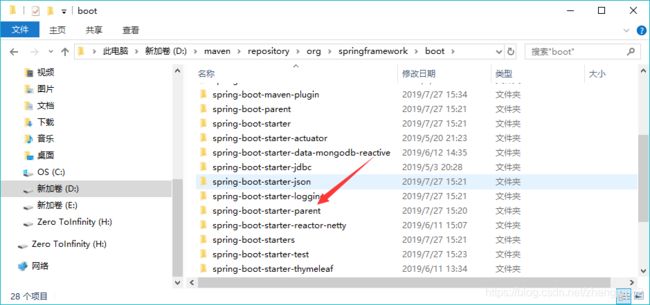
打开 Maven 本地仓库,在 org.springframework 中找到工程 spring-boot-starter-parent
进入该工程目录,找到其 pom 文件。
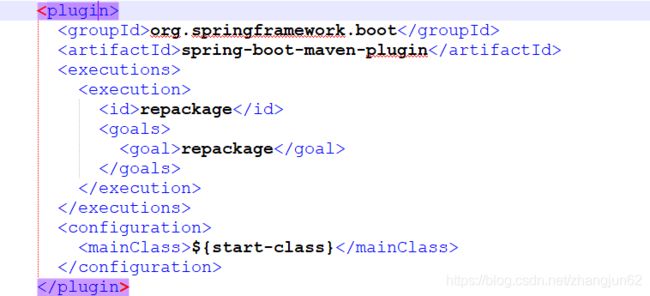
打开该 pom 文件,发现该工程的
从该插件的配置信息可以看出,其执行的目标是 repackage,即对工程进行重新打包。首次打包是由 Maven 的 package 插件完成的,其打包的结果仅仅是将当前工程中自定义的类打包为了一个普通的 Jar 包,没有 Spring Boot 的相关资源,无法直接运行。当然,其打包的结果是.jar 文件。
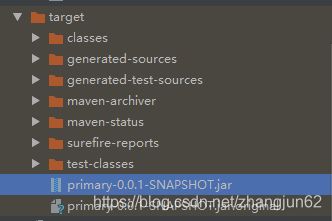
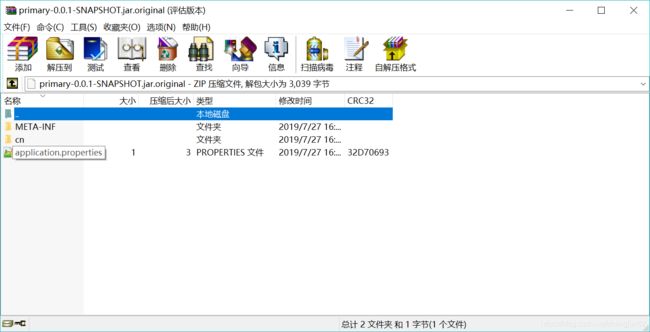
重新打包是由 spring-boot-maven-plugin 插件完成的,其是将前面打成的 jar 包进行了二次打包,将原来的软件包变为了 Spring Boot 可执行包,在其中不仅添加了 Spring Boot 依赖,还添加了很多其它配置。同时,其还将原来的.jar 文件扩展名变为了.orininal,而二次打包后的文件扩展名成为了.jar。
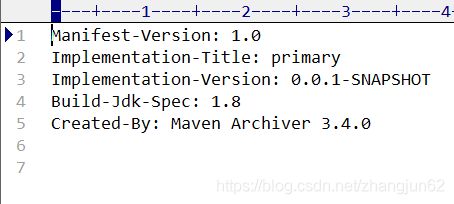
可以打开这两个包,查看其中内容的不同。首先打开.orininal 包,发现其中只有当前工程中写入的类,没有 Spring Boot 的依赖。然后再打开 META-INF 中的清单文件 MANIFEST.MF,发现其中并没入口类 Main-Class。
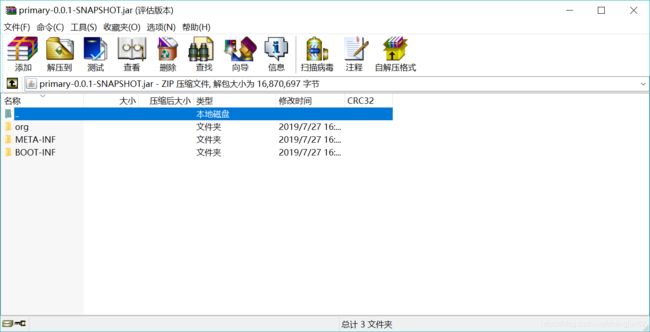
再打开二次打包的.jar 文件,发现其中已经增加了 Spring Boot 的各种依赖了。其中:
BOOT-INF 目录:存放的是当前应用程序的类及其所依赖的类
META-INF 目录:存放的是 Maven 相关的配置文件
org 目录:存放的是 SpringBoot 启动所需的类
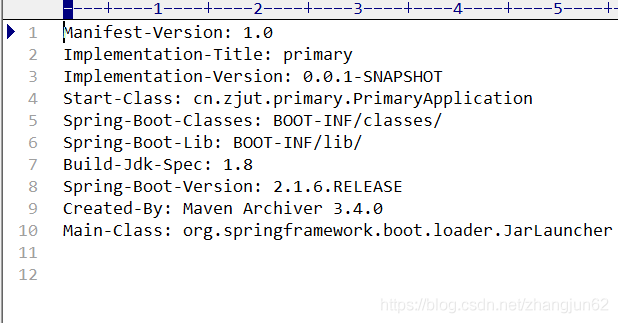
并且,打开其 META-INF 中的清单文件 MANIFEST.MF,不仅可以看到主类 Main-Class,还可以看到当前工程的启动类 Start-Class。
不过,这个插件配置信息中仍没有版本号。说明该工程仍存在父工程。在该pom 文件开头部分可以看到该工程的父工程为 spring-boot-dependencies。
查看 spring-boot-dependencies
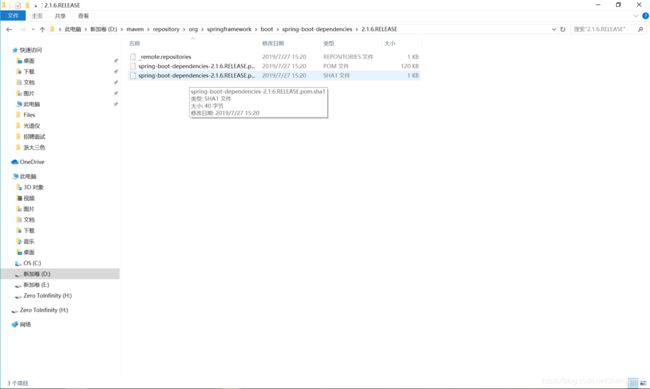
在 Maven 本地仓库中找到 spring-boot-dependencies 工程。进入工程目录,找到该工程的 pom 文件。
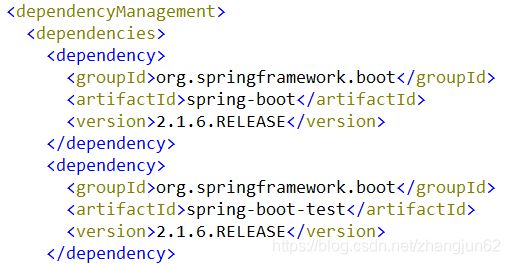
打开该文件,在
在
修改默认的 Jar 包依赖版本
找到 spring-boot-dependencies 工程的 pom 文件,可以看到其中已经定义好了很多依赖的版本号,其中就包含
所以,若要使当前定义的 Spring Boot 项目依赖于其它版本的 Jar 包,例如依赖于 5.0.1版本的 Spring 的 Jar 包,则只需在当前项目的 pom.xml 文件中使用新的版本号将原版本号覆盖即可。
spring-boot-starter-parent 工程中主要声明了对选择性继承插件的详细配置,而spring-boot-dependencies 工程中主要定义了选择性继承依赖,选择性继承插件,及依赖的版本号。
mvnw
在 Spring Boot 工程中自带的有两个文件:mvnw 与 mvnw.cmd。
Maven 是一个常用的构建工具,但是 Maven 的版本和插件的配合并不是十分完美,有时为了保证有些插件的正常运行,不得不需要切换到一个稍微旧一些的版本。而这个切换工作需要用户重新安装一个 Maven,那么就太麻烦了。
有一个工具 Maven Wrapper(包装器),可以完成在 Maven 的某一版本下轻松切换到其它版本的目的。需要注意的是,Maven Wrapper 并不是 Maven 官方提供的工具,而是第三方工具,若要使用,则需要安装。
Spring Boot工程中的mvnw即为安装好的Maven Wrapper工具。其中mvnw.cmd为MavenWrapper 的命令行运行窗口,而 mvnw 文件则为 Maven Wrapper 的配置文件。
这两个文件可以删除。
官网创建
在点击了 Generate Project 按钮后,即可打开一个下载对话框。官网将配置好的 Spring Boot工程生成了一个 zip 压缩文件,只要将其下载到本地即可。下载后,将其解压到 工作空间 中,在 idea 中即可马上看到该工程。注意,此时该工程是作为一个 Module 出现的。然后,再通过“导入外部 Moduel 方式”将该工程导入为 Maven 工程即可。
基于 war 的 的 Spring Boot
前面创建的 Spring Boot 工程最终被打为了 Jar 包,是以可执行文件的形式出现的,其使用了 Spring Boot 内嵌的 Tomcat 作为 Web 服务器来运行 web 应用的。新版 Dubbo 的监控中心工程就是典型的应用。但在实际生产环境下,对于 Web 工程,很多时候需要的是 war包,然后部署到企业级 Web 服务器中。
工程创建
工程编辑
添加一个处理器类
import org.springframework.web.bind.annotation.RequestMapping;
import org.springframework.web.bind.annotation.RestController;

@RestController
@RequestMapping("/test")
public class SomeHandler {
    @RequestMapping("/some")
    public String someHandle(){
        return "Hello, Spring Boot";
    }
}
运行并访问
打包部署
运行 Maven 的 package 命令,将其打为 war 包。找到该 war 包,将其部署到 Tomcat 的 webapps 目录中,启动 Tomcat。在浏览器中可以访问到该工程。注意,由于工程是部署到了 Tomcat 的 webapps 中,不是部署到 webapps/ROOT 中,所以在访问时需要指定工程名。
工程解析
web环境初始化
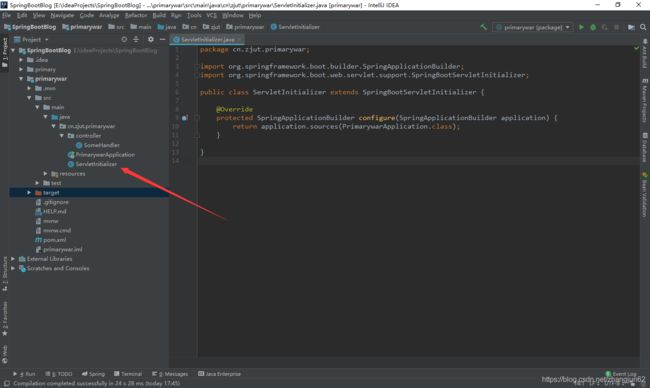
在该工程中发现其自动增加了一个类 ServletInitializer,该类重写了父类的 configure()方法。该方法用于完成 web 环境的配置,即 web 环境的初始化工作。
打开 SpringBootServletInitializer 类,查看其 configure()方法的注释可知,该方法已经完成了所有应用程序配置的默认设置,用户只需要写代码即可。
/**
 * Configure the application. Normally all you would need to do is to add sources
 * (e.g. config classes) because other settings have sensible defaults. You might
 * choose (for instance) to add default command line arguments, or set an active
 * Spring profile.
 * @param builder a builder for the application context
 * @return the application builder
 * @see SpringApplicationBuilder
 */
protected SpringApplicationBuilder configure(SpringApplicationBuilder builder) {
   return builder;
}
ServletAPI 依赖
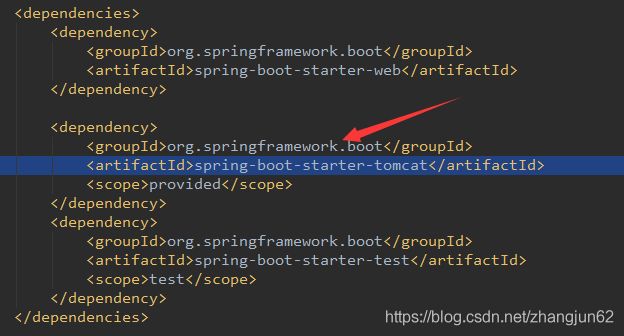
由于这是一个 war 包工程,将来需要部署到服务器,即在打包时无需 ServletAPI。然而在编译时是需要的,所以在工程的 pom 文件中专门添加了
SpringBoot热部署
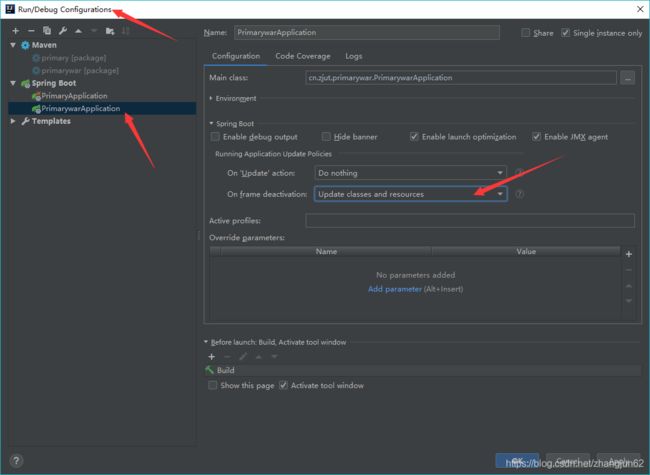
Idea 中的 Spring Boot 工程若要使用热部署,需要完成两个步骤:导入 devtools 依赖,编辑当前工程的配置信息。这两个步骤是在每一个使用热部署的 Spring Boot 工程中均要设置的。
需要注意,Spring Boot 工程在 Idea 中的热部署与 Eclipse 中的热部署,工程修改后的重新启动时机是不同的。Eclipse 中只要修改过的文件被保存了,则工程会马上重新部署。而 Idea则不同,其对文件修改后的保存是自动的,所以其重新部署的时机是 Idea 整个 IDE 窗口被钝化时,即 Windows 窗口切换到其它窗口时,工程会重新部署。
    org.springframework.boot
    spring-boot-devtools
其意义是,当 Idea 被钝化时,即当 Idea 窗口被切换时,更新类与资源。
在开发调试过程中,已经启动了工程的运行。此时又修改了代码或配置文件,若要使修改生效,则需要重新启动工程。这种方式降低了开发效率。
热部署,即在修改了代码或配置文件后,一经保存,系统马上对工程进行自动重启,无需手工重启。若要实现热部署,只需在 pom 中增加一个依赖即可。
不过,对于热部署的使用是有利有弊。利是无需手工重启工程,但弊端也很明显:在修改过代码或配置后,只要保存系统就会重启工程,即使这个修改还未完毕,其也会重启,从而导致代码重启后报错。
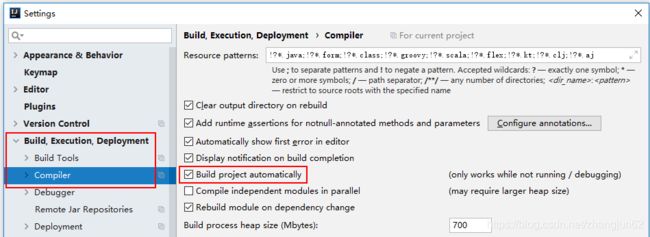
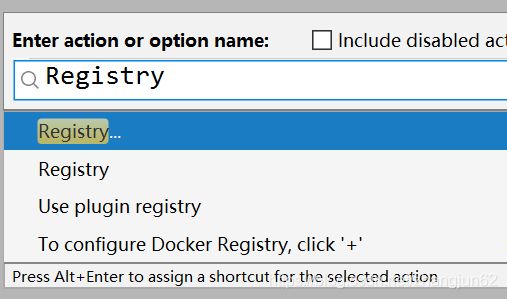
Ctrl + Shift + A,打开搜索框,输入 Registry。
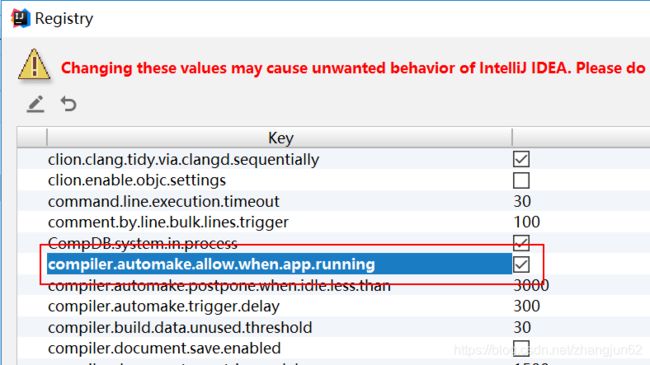
找到如下条目后,勾选即可。
SpringBoot主配置文件
Spring Boot 的主配置文件是 src/main/resources 中默认创建的 spring.properties 文件。双击该文件,其默认会使用 Spring Properties Editor 编辑器打开。使用该编辑器打开后的文件在书写多级属性时会有自动提示功能。
server.port=8888
server.servlet.context-path=/primarywar
不过需要注意,这里指定的 Tomcat 的端口号及应用的根路径,仅仅是针对于内置 Tomcat的,是测试时使用的。将工程打为 war 包后部署到真正的 Tomcat,这些配置是不起作用的,即 Tomcat 的端口号为真正 Tomcat 的端口号,而项目的根路径为 war 包名称。
Spring Boot 的主配置文件也可使用 application.yml 文件。yml,也可写为 yaml。
在开发之初 YAML 的本意是 Yet Another Markup Language(仍是一种标记语言)。后来为了强调这种语言是以数据为中心,而不是以标记为中心,所以将 YAML 解释为 Yaml Ain'Markup Language(Yaml 不是一种标记语言)。它是一种直观的能够被电脑识别的数据序列化格式,是一个可读性高并且容易被人阅读,容易和脚本语言交互,用来表达多级资源序列的
编程语言。
yml 与 properties 文件的主要区别是对于多级属性,即 key 的显示方式不同。yml 文件在输入时,只需按照点(.)的方式输出 key 即可,输入完毕后回车即出现了如下形式。该形式要求冒号后与值之间要有一个空格。
server:
  port: 8888
  servlet:
    context-path: /primarywar
Actuator
Actuator['æktʃʊˌeɪtə]( 激励者;执行器)是 Spring Boot 提供的对应用系统的自省和监控的集成功能,可以对应用系统进行配置查看、相关功能统计等。在 Spring Cloud 中主要是完成微服务的监控,完成监控治理。可以查看微服务间的数据处理和调用,当它们之间出现了异常,就可以快速定位到出现问题的地方。
其功能与 Dubbo 的监控中心类似,不同的是,Dubbo 的监控中心是需要专门部署的,而 Spring Boot 的 Actuator 是存在于每一个工程中的。
创建工程
创建工程,导入依赖
        org.springframework.boot
        spring-boot-starter-web


        org.springframework.boot
        spring-boot-starter-test
        test


        org.springframework.boot
        spring-boot-starter-actuator
修改配置文件
#当前应用的端口号与上下文路径
server.port=8888
server.servlet.context-path=/actuatortest

#Actuator监控的端口号与上下文路径
management.server.port=9999
management.server.servlet.context-path=/monitor
#指定监控终端的基本路径,默认为actuator
management.endpoints.web.base-path=/base
访问测试
添加 Info 信息
修改配置文件
在配置文件中添加如下 Info 信息,则可以通过 info 监控终端查看到。
#当前应用的端口号与上下文路径
server.port=8888
server.servlet.context-path=/actuatortest

#Actuator监控的端口号与上下文路径
management.server.port=9999
management.server.servlet.context-path=/monitor
#指定监控终端的基本路径,默认为actuator
management.endpoints.web.base-path=/base

#自定义info信息
info.company.name=abc
info.company.url=http://www.abc.com
info.company.addr=Hangzhou China

info.auth.name=zhangsan
info.auth.dep=development

#从pom.xml文件中读取相应值
[email protected]@
[email protected]@
[email protected]@
[email protected]@
访问测试
开放其它监控终端
默认情况下,Actuator 仅开放了 health 与 info 两个监控终端,但其还有很多终端可用,不过,需要手动开放。
修改配置文件
#开放所有监控终端,默认只开启health和info监控终端
#在yml中*号为关键字,需要使用双引号将其括起来
management.endpoints.web.exposure.include=*
management:
  server:
    port: 9999
    servlet:
      context-path: /monitor
  endpoints:
    web:
      base-path: /base
      exposure:
        include: '*' #开放所有终端
        #include: ['env', 'beans'] #开放制定终端
访问测试
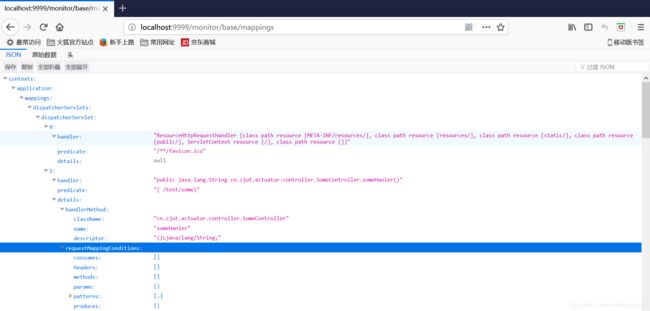
mappings终端
下面是使用 mappings 终端,可以看到当前工程中所有的 URI 与处理器的映射关系,及详细的处理器方法及其映射规则。很实用。
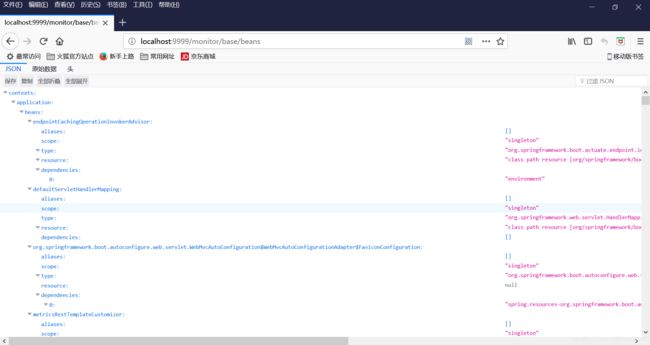
beans终端
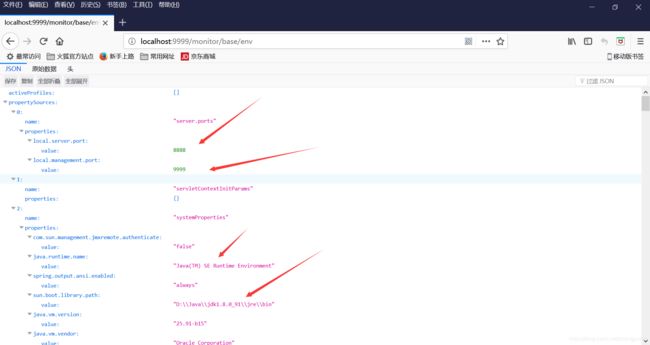
env 终端
可以看到当前应用程序运行主机的所有软硬件环境信息。
单独关闭某些监控终端
在开放了所有监控终端的情况下,有些终端显示的信息并不想公开,此时可以单独关闭这些终端。
修改配置文件
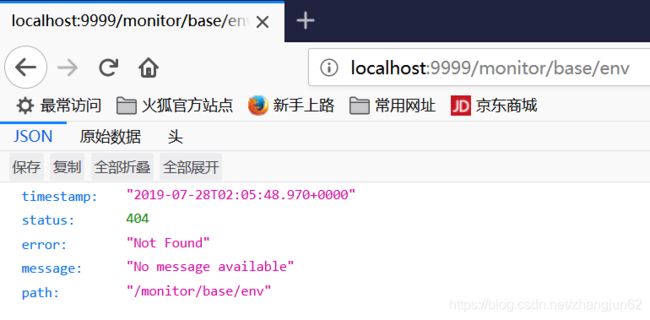
management.endpoints.web.exposure.exclude=env,beans访问测试
在关闭这些终端后,其它终端仍可继续使用。
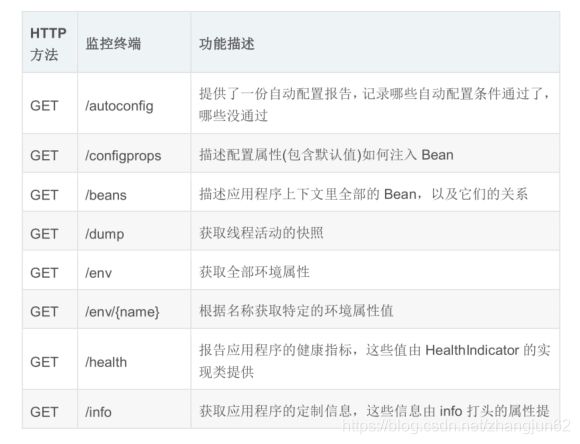
常用的监控终端
SpringBoot重要用法
自定义异常页面
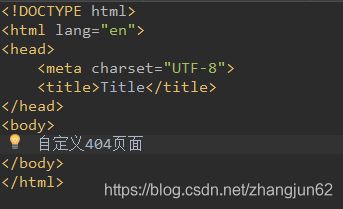
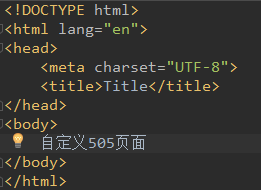
对于 404、405、500 等异常状态,服务器会给出默认的异常页面,而这些异常页面一般都是英文的,且非常不友好。我们可以通过简单的方式使用自定义异常页面,并将默认状态码页面进行替换。
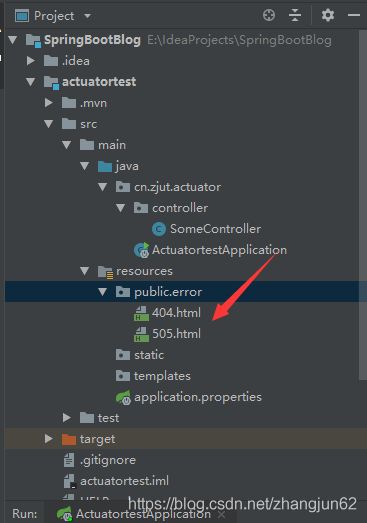
定义目录
在 src/main/resources 目录下再定义新的目录 public/error。
定义异常页面
在 error 目录中定义异常页面。这些异常页面的名称必须为相应的状态码,扩展名为 html。
单元测试
总步骤
Spring Boot 下的单元测试比较简单,首先工程要具有 spring boot 的 test 依赖。
其次需要在测试类上添加两个注解:@RunWith(SpringRunner.class) @SpringBootTest(classes=SpringBoot 启动类.class)
定义工程
定义 Service
public interface ISomeService {
    void doSome();
}
定义 Service 实现类
import cn.zjut.springboottest.service.ISomeService;
import org.springframework.stereotype.Service;

@Service
public class SomeServiceImpl implements ISomeService {

    @Override
    public void doSome() {
        System.out.println("执行doSome方法");
    }
}
定义测试类
@SpringBootTest 注解的 classes 属性的值为被测试内容的的启动类。
import cn.zjut.springboottest.service.ISomeService;
import org.junit.Test;
import org.junit.runner.RunWith;
import org.springframework.beans.factory.annotation.Autowired;
import org.springframework.boot.test.context.SpringBootTest;
import org.springframework.test.context.junit4.SpringRunner;

@RunWith(SpringRunner.class)
@SpringBootTest(classes = SpringboottestApplication.class)
public class SpringboottestApplicationTests {
    @Autowired
    private ISomeService someService;

    @Test
    public void test(){
        someService.doSome();
    }
}
多环境选择
在开发应用时,通常同一套程序会被运行在多个不同的环境,例如,开发、测试、生产环境等。每个环境的数据库地址、服务器端口号等配置都会不同。若在不同环境下运行时将配置文件修改为不同内容,那么,这种做法不仅非常繁琐,而且很容易发生错误。
在开发应用时,有时不同的环境,其需要运行的接口的实现类也是不同的。例如,若要开发一个具有短信发送功能的应用,开发环境中要执行的 send()方法仅需调用短信模拟器即可,而生产环境中要执行的 send()则需要调用短信运营商所提供的短信发送接口。这种情况下,就需要开发两个相关接口的实现类去实现 send()方法。
对于不同的环境,需要使用不同的配置文件,执行不同的类。而这个选择只需在 SpringBoot 的主配置文件中指定即可。
下面以不同的环境“使用配置有不同的端口号的配置文件,及调用不同接口实现类”为例来演示多环境选择问题的解决。
总步骤
定义多个子配置文件 或 在 application.yml 中定义多个环境
在主配置文件中做环境选择
在接口实现类上通过@Profile 做环境选择
多配置文件实现方式
定义工程
定义配置文件
定义多个配置文件
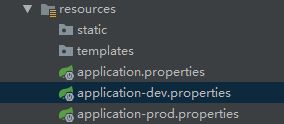
在 src/main/resources 中再定义两个配置文件,分别对应开发环境与生产环境。
说明
在 Spring Boot 中多环境配置文件名需要满足 application-{profile}.properties 的格式,其中{profile}为对应的环境标识,例如,
application-dev.properties:开发环境
application-test.properties:测试环境
application-prod.properties:生产环境
至于哪个配置文件会被加载,则需要在 application.properties 文件中通过spring.profiles.active 属性来设置,其值对应{profile}值。例如,spring.profiles.active=test 就会加载 application-test.properties 配置文件内容。
在生产环境下,application.properties 中一般配置通用内容,并设置 spring.profiles.active属性的值为 dev,即,直接指定要使用的配置文件为开发时的配置文件,而对于其它环境的选择,一般是通过命令行方式去激活。配置文件application-{profile}.properties 中则配置各个环境的不同内容。
定义业务代码
public interface ISomeService {
    String send();
}
import org.springframework.context.annotation.Profile;
import org.springframework.stereotype.Service;

@Service
@Profile("dev")
public class DevelopServiceImpl implements ISomeService {
    @Override
    public String send() {
        return "开发环境实现类";
    }
}
import org.springframework.context.annotation.Profile;
import org.springframework.stereotype.Service;

@Service
@Profile("prod")
public class ProduceServiceImpl implements ISomeService {
    @Override
    public String send() {
        return "生产环境实现类";
    }
}
在实现类上添加@Profile 注解,并在注解参数中指定前述配置文件中的{profile}值,用于指定该实现类所适用的环境。
定义处理器
import cn.zjut.multienv.service.ISomeService;
import org.springframework.beans.factory.annotation.Autowired;
import org.springframework.web.bind.annotation.RequestMapping;
import org.springframework.web.bind.annotation.RestController;

@RestController
@RequestMapping("/test")
public class SomeController {
    @Autowired
    private ISomeService someService;
    @RequestMapping("/some")
    public String someHandle(){
        return someService.send();
    }
}
运行
打开主类直接运行,即可在控制台看到默认使用的是开发环境,即端口号使用的是 8888,而工程的根路径为/ddd。
![]()
访问
从页面显示内容可知,其执行的业务接口实现类为 DevelopServiceImpl,即开发阶段应使用的实现类。
修改配置文件
运行
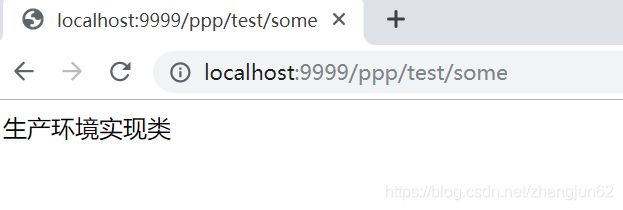
将上次运行停掉后再次运行主类,即可在控制台看到使用的是生产环境,即端口号使用的是 9999,而工程的根路径为/ppp。
![]()
访问
从页面显示内容可知,此次执行的业务接口实现类为 ProduceServiceImpl,即生产环境下应使用的实现类。
在命令行下选择环境
将工程打为 Jar 包后,在命令行运行。若要想切换运行环境,不需要修改主配置文件,只需添加一个命令参数即可动态指定。
现在的主配置文件中指定的是 dev 环境。
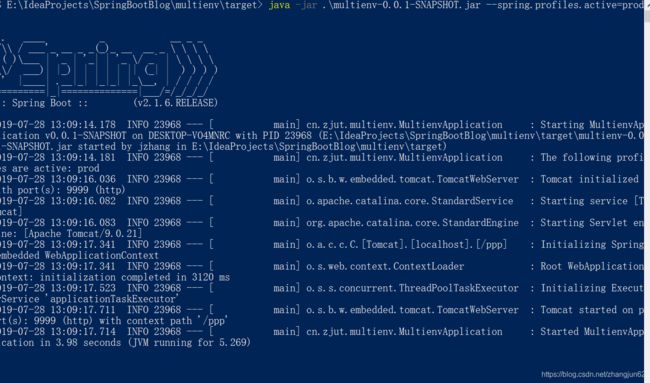
将当前工程打为 Jar 包后,在命令行运行时添加如下参数。
此时执行的就是生产环境,调用的就是 ProduceServiceImpl 类。
在命令行中添加的参数可以是写在配置文件中的任意属性。其原理是命令行设置的属性值的优选级高于配置文件的。
单配置文件实现方式
这种实现方式只能使用 application.yml 文件,使用 application.properties 文件好像文件本身就会出错。
修改配置文件
spring:
  profiles:
    active:
    - dev
---
spring:
  profiles: dev
server:
  port: 8888
  servlet:
    context-path: /ddd
---
spring:
  profiles: prod
server:
  port: 9999
  servlet:
    context-path: /ppp
运行与访问方式与前面的多配置文件的完全相同。
读取自定义配置
自定义配置,可以是定义在主配置文件 application.properties 中的自定义属性,也可以是自定义配置文件中的属性。
总步骤
通过@Value(“${ }”)读取指定的自定义属性
若要读取自定义配置文件,则需要在该读取类上添加@PropertySource 注解
自定义配置文件不能是 yml 文件,只能是 properties 文件
读取主配置文件中的属性
修改主配置文件
student.name=张三修改 SomeController
import org.springframework.beans.factory.annotation.Value;
import org.springframework.web.bind.annotation.RequestMapping;
import org.springframework.web.bind.annotation.RestController;

@RestController
@RequestMapping("/test")
public class SomeController {
    @Value("${student.name}")
    private String name;
    @RequestMapping("/some")
    public String someHandle(){
        return name;
    }
}
在@Value 注解中通过${ }符号可以读取指定的属性值
读取指定配置文件中的属性
一般情况下,主配置文件中存放系统中定义好的属性设置,而自定义属性一般会写入自定义的配置文件中。也就是说,Java 代码除了可以读取主配置文件中的属性外,还可以读取指定配置文件中的属性,可以通过@PropertySource 注解加载指定的配置文件。
不能自定义 yml
spring boot 官网给出说明,@PropertySource 注解不能加载 yml 文件。所以其建议自定义配置文件就使用属性文件。
修改主配置文件
自定义配置文件
该配置文件为 properties 文件,文件名随意,存放在 src/main/resources 目录中。
修改 SomeHandler
若属性的值存在中文,则需要添加 encoding 属性。
import org.springframework.beans.factory.annotation.Value;
import org.springframework.context.annotation.PropertySource;
import org.springframework.web.bind.annotation.RequestMapping;
import org.springframework.web.bind.annotation.RestController;

@RestController
@RequestMapping("/test")
@PropertySource(value = "classpath:myapp.properties", encoding = "utf-8")
public class SomeController {
    @Value("${student.name}")
    private String name;
    @RequestMapping("/some")
    public String someHandle(){
        return name;
    }
}
读取对象属性
修改自定义配置文件
此时的 student 称为对象属性。
定义配置属性类
import lombok.Data;
import org.springframework.boot.context.properties.ConfigurationProperties;
import org.springframework.context.annotation.PropertySource;
import org.springframework.stereotype.Component;

@Component
@PropertySource("classpath:myapp.properties")
@ConfigurationProperties("student")
@Data
public class Student {
    private String name;
    private int age;
    private double score;
}
@ProertySource 用于指定要读取的配置文件
@ConfigurationProperties 用于指定要读取配置文件中的对象属性
@Component 表示当前从配置文件读取来的对象,由 Spring 容器创建
@Data生成Get/Set方法
修改 SomeHandler
import cn.zjut.customconfig.config.Student;
import org.springframework.beans.factory.annotation.Autowired;
import org.springframework.web.bind.annotation.RequestMapping;
import org.springframework.web.bind.annotation.RestController;

@RestController
@RequestMapping("/test")
public class SomeController {
    @Autowired
    private Student student;
    @RequestMapping("/some")
    public String someHandle(){
        return student.getName();
    }
}
读取 List
修改自定义配置文件
country.cities[0]=beijing
country.cities[1]=shanghai
country.cities[2]=guangzhou
定义配置属性类
import lombok.Data;
import org.springframework.boot.context.properties.ConfigurationProperties;
import org.springframework.context.annotation.PropertySource;
import org.springframework.stereotype.Component;

import java.util.List;

@Component
@PropertySource("classpath:myapp.properties")
@ConfigurationProperties("country")
@Data
public class Country {
    private List cities;
}
修改 SomeHandler
import cn.zjut.customconfig.config.Country;
import org.springframework.beans.factory.annotation.Autowired;
import org.springframework.web.bind.annotation.RequestMapping;
import org.springframework.web.bind.annotation.RestController;

@RestController
@RequestMapping("/test")
public class SomeController {
    @Autowired
    private Country country;
    @RequestMapping("/some")
    public String someHandle(){
        for (String city : country.getCities()) {
            System.out.println(city);
        }
        return country.toString();
    }
}
读取 List
修改自定义配置文件
group.students[0].name=zhangsan
group.students[0].age=23
group.students[0].score=93.5

group.students[1].name=lisi
group.students[1].age=24
group.students[1].score=94.5

group.students[2].name=wangwu
group.students[2].age=25
group.students[2].score=95.5
定义配置属性类
import lombok.Data;

@Data
public class Student {
    private String name;
    private int age;
    private double score;
}
import lombok.Data;
import org.springframework.boot.context.properties.ConfigurationProperties;
import org.springframework.context.annotation.PropertySource;
import org.springframework.stereotype.Component;

import java.util.List;

@Component
@PropertySource("classpath:myapp.properties")
@ConfigurationProperties("group")
@Data
public class Group {
    private List students;
}
修改 SomeHandler
import cn.zjut.customconfig.config.Group;
import cn.zjut.customconfig.config.Student;
import org.springframework.beans.factory.annotation.Autowired;
import org.springframework.web.bind.annotation.RequestMapping;
import org.springframework.web.bind.annotation.RestController;

@RestController
@RequestMapping("/test")
public class SomeController {
    @Autowired
    private Group group;
    @RequestMapping("/some")
    public String someHandle(){
        for (Student student : group.getStudents()) {
            System.out.println(student);
        }
        return group.toString();
    }
}
Spring Boot 下使用 JSP
在 Spring Boot 下直接使用 JSP 文件,其是无法解析的,需要做专门的配置。
在 Spring Boot 下使用 JSP 文件需要完成以下两个步骤:
在 pom 文件中注册 JSP 解析器依赖
在 pom 文件中注册资源目录
在主配置文件中注册视图前辍与后辍(不是必须的)
直接添加 JSP
创建 webapp目录
在 src/main 下创建 webapp 目录,用于存放 jsp 文件。这就是一个普通的目录,无需执行 Mark Directory As。
创建 index.jsp
创建 jsp页面前设置
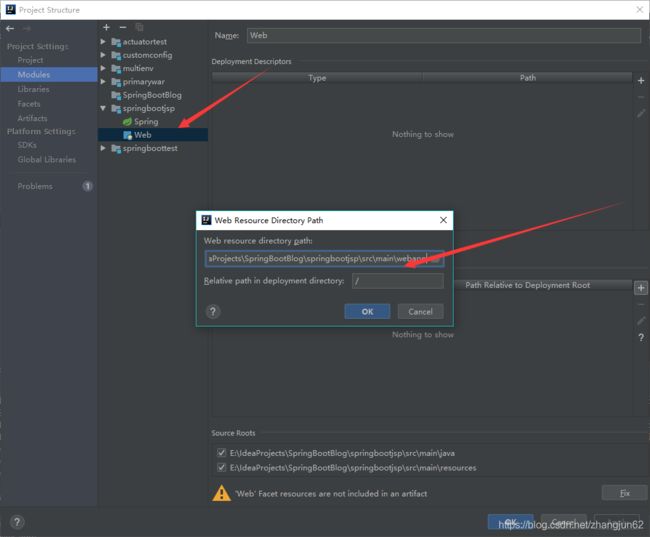
在 spring boot 工程中若要创建 jsp 文件,一般是需要在 src/main 下创建 webapp 目录,然后在该目录下创建 jsp 文件。但通过 Alt + Insert 发现没有创建 jsp 文件的选项。此时,需要打开 Project Structrue 窗口,将 webapp 目录指定为 web 资源目录,然后才可以创建 jsp文件
此时,便可在 webapp 中找到 jsp 的创建选项了 。
创建 index 页面
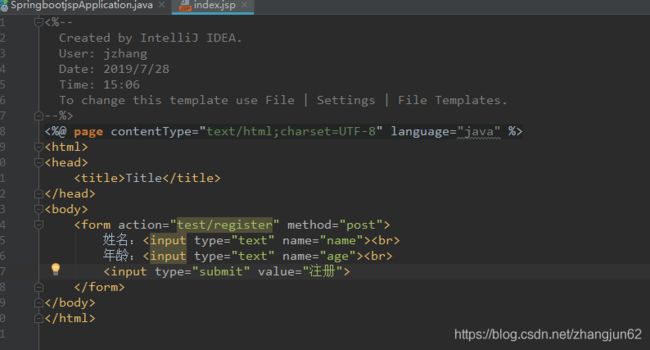
在 src/main/webapp 下创建一个 html 文件,并命名为 index.html,创建完毕后再将其重命名为 index.jsp。因为 Idea 中是没有 JSP 页面模板的,不能直接创建 JSP 文件。
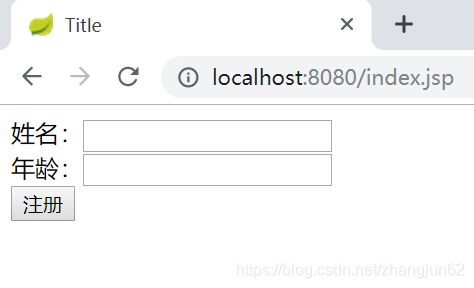
此时启动工程后在浏览器直接访问,发现其并没有显示 index 页面。因为当前工程不能识别 jsp 文件。
使用物理视图
添加 jasper 依赖
在 pom 中添加一个 Tomcat 内嵌的 jsp引擎 jasper 依赖。jsp 引擎是用于解析 jsp文件的,即将 jsp 文件解析为 Servlet 是由 jsp 引擎完成的。embed,嵌入。
    org.apache.tomcat.embed
    tomcat-embed-jasper
注册 webapp
在 pom 文件中将 webapp 目录注册为资源目录。不过,我们一般会添加两个资源目录:
        src/main/java

            **/*.xml


        src/main/webapp
        META-INF/resources

            **/*.*
创建 welcome.jsp
在 webapp 目录下再创建一个子目录 jsp,在其中创建 welcome.jsp 文件。
<%@ page contentType="text/html;charset=UTF-8" language="java" %>


    Title


    name = ${name}

    age = ${age}
修改 SomeHandler
import org.springframework.stereotype.Controller;
import org.springframework.ui.Model;
import org.springframework.web.bind.annotation.RequestMapping;

@Controller
@RequestMapping("/test")
public class SomeController {
    @RequestMapping("/register")
    public String registerHandle(String name, int age, Model model){
        model.addAttribute("name", name);
        model.addAttribute("age", age);
        return "/jsp/welcome.jsp";
    }
}
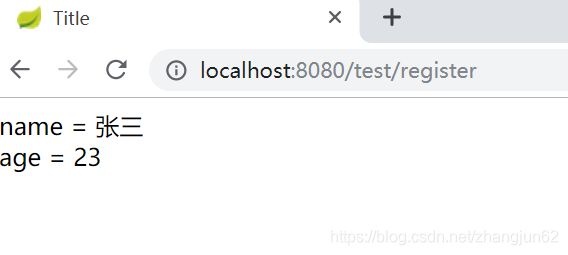
访问
使用逻辑视图
修改主配置文件
spring.mvc.view.prefix=/
spring.mvc.view.suffix=.jsp
修改处理器
import org.springframework.stereotype.Controller;
import org.springframework.ui.Model;
import org.springframework.web.bind.annotation.RequestMapping;

@Controller
@RequestMapping("/test")
public class SomeController {
    @RequestMapping("/register")
    public String registerHandle(String name, int age, Model model){
        model.addAttribute("name", name);
        model.addAttribute("age", age);
        return "jsp/welcome";
    }
}
执行效果与前面的相同。
关于静态资源请求
查看控制台的启动日志,DispatcherServlet 的
问题。
Spring Boot 中使用 MyBatis
在Spring Boot中使用MyBatis无需定义MyBatis的主配置文件,需要完成以下三个步骤:
在 pom 文件中导入三个依赖:MyBatis 与 Spring Boot 整合依赖、MySQL 驱动依赖,及Druid 依赖
在 Spring Boot 主配置文件中注册三个信息:映射文件、实体类别名,及数据源
Dao 接口上添加@Mapper 注解
修改 pom 文件
导入两个依赖
MyBatis 与 Spring Boot 整合依赖
注意,这个依赖是由 mybatis 开发,并非由 Spring 开发,所以这里需要指明版本号。因为父工程中没有定义该版本号。
    org.mybatis.spring.boot
    mybatis-spring-boot-starter
    1.3.2
MySQL 驱动依赖
注意,该依赖要指定版本号,若不指定其也会从父工程中继承,但版本过高,代码运行出错。
    mysql
    mysql-connector-java
    5.1.17
Druid依赖
    com.alibaba
    druid
    1.1.10
定义实体类及 DB
定义实体类
import lombok.Data;

@Data
public class Student {
    private Integer id;
    private String name;
    private int age;
}
定义 DB
定义 Dao
@Mapper
public interface IStudentDao {
    void insertStudent(Student student);
}
定义映射文件
insert into student(`name`, `age`) values (#{name}, #{age})
定义 Service接口和实现类
import cn.zjut.jsp.bean.Student;

public interface IStudentService {
    void addStudent(Student student);
}
import cn.zjut.jsp.bean.Student;
import cn.zjut.jsp.dao.IStudentDao;
import cn.zjut.jsp.service.IStudentService;
import org.springframework.beans.factory.annotation.Autowired;
import org.springframework.stereotype.Service;
@Service
public class StudentServiceImpl implements IStudentService {
@Autowired
private IStudentDao studentDao;
@Override
public void addStudent(Student student) {
studentDao.insertStudent(student);
}
}修改 StudentController
import cn.zjut.jsp.bean.Student;
import cn.zjut.jsp.service.IStudentService;
import org.springframework.beans.factory.annotation.Autowired;
import org.springframework.stereotype.Controller;
import org.springframework.ui.Model;
import org.springframework.web.bind.annotation.RequestMapping;

@Controller
@RequestMapping("/student")
public class StudentController {
    @Autowired
    private IStudentService studentService;

    @RequestMapping("/register")
    public String registerHandle(Student student, Model model){
        model.addAttribute("name", student.getName());
        model.addAttribute("age", student.getAge());
        studentService.addStudent(student);
        return "jsp/welcome";
    }
}
修改主配置文件
注册映射文件
注册实体类别名
注册数据源
spring.mvc.view.prefix=/
spring.mvc.view.suffix=.jsp

mybatis.mapper-locations=classpath:cn/zjut/jsp/dao/*.xml
mybatis.type-aliases-package=cn.zjut.jsp.bean

spring.datasource.type=com.alibaba.druid.pool.DruidDataSource
spring.datasource.driver-class-name=com.mysql.jdbc.Driver
spring.datasource.url=jdbc:mysql:///test
spring.datasource.username=root
spring.datasource.password=1234
Spring Boot 的事务支持
Spring Boot 对于事务的支持,只需完成两个步骤:
在启动类上添加@EnableTransactionManagement 注解,开启事务
在 Service 实现类的方法上添加@Transactional 注解
修改启动类
@SpringBootApplication
@EnableTransactionManagement //开启事务
public class SpringbootjspApplication {

    public static void main(String[] args) {
        SpringApplication.run(SpringbootjspApplication.class, args);
    }

}
修改 Service 实现类
import cn.zjut.jsp.bean.Student;
import cn.zjut.jsp.dao.IStudentDao;
import cn.zjut.jsp.service.IStudentService;
import org.springframework.beans.factory.annotation.Autowired;
import org.springframework.stereotype.Service;
import org.springframework.transaction.annotation.Transactional;

@Service
public class StudentServiceImpl implements IStudentService {
    @Autowired
    private IStudentDao studentDao;
    @Transactional
    @Override
    public void addStudent(Student student) {
        studentDao.insertStudent(student);
        int i = 3/0;
        studentDao.insertStudent(student);
    }
}
正常测试
以上代码运行后,页面与代码均会显示报错,查看 DB 表,没有任何记录插入。
对比测试
将Service实现类中的@Transactional注解注释掉,再运行,页面与代码仍均会显示报错,但查看 DB 表,会发现插入了一条记录,即异常前的插入语句没有回滚。
import cn.zjut.jsp.bean.Student;
import cn.zjut.jsp.dao.IStudentDao;
import cn.zjut.jsp.service.IStudentService;
import org.springframework.beans.factory.annotation.Autowired;
import org.springframework.stereotype.Service;
import org.springframework.transaction.annotation.Transactional;

@Service
public class StudentServiceImpl implements IStudentService {
    @Autowired
    private IStudentDao studentDao;
    //@Transactional
    @Override
    public void addStudent(Student student) {
        studentDao.insertStudent(student);
        int i = 3/0;
        studentDao.insertStudent(student);
    }
}
Spring Boot 对日志的控制
logback 日志技术介绍
Spring Boot 中使用的日志技术为 logback。其与 Log4J 都出自同一人,性能要优于 Log4J,是 Log4J 的替代者。
在 Spring Boot 中若要使用 logback,则需要具有 spring-boot-starter-logging 依赖,而该依赖被 spring-boot-starter-web 所依赖,即不用直接导入 spring-boot-starter-logging 依赖。
spring boot 中使用 logback
在 Spring Boot 中使用 logback 日志,有两种方式。
添加配置属性
只需在核心配置文件中添加如下配置即可。
logging:
  pattern:
    console: xxx:%level %msg%n
  level:
    root: warn
    cn.zjut.jsp.dao: debug
注意,在日志显示格式的属性值前面的 xxx:是随意内容。在 yml 文件中的属性值若以%开头会报错,所以添加一些随意字符。在 properties 文件中不存在该问题。
添加配置文件
该文件名为 logback.xml,且必须要放在 src/main/resources 类路径下。
%-5level - %msg%n
在工程中做以上修改即可,控制台的运行结果如下:
Spring Boot 中使用 Redis
应用场景
使用 Redis 缓存的数据划分为两类:DB 中相关表更新后,Redis 缓存中的存放的相关数据要清除,否则客户端获取到的就不是最新数据,这是一类数据;还有一类数据是,对数据的准确性要求不是很高的数据,其可以与 DB 中数据不一致,但差别不能太大,所以该类数据一般会设置过期时效。
Spring Boot 对于以上两类数据,均可使用 API 方式与注解方式进行缓存。但 Spring Boot使用注解方式在对指定缓存空间设置缓存时效时非常麻烦,所以对于两类数据的缓存可以分别使用两种方式实现。
都需要的步骤
在 pom 文件中添加 spring boot 与 redis 整合依赖
在主配置文件中注册 redis 连接信息、MyBatis 中实体类的别名
由于要将查询的实体类对象缓存到 Redis,Redis 要求实体类必须序列化。所以需要实体
类实现序列化接口
使用注解方式还需要的步骤
在工程入口类上添加@EnableCaching 注解
在查询方法上添加@Cacheable 注解,在增删改方法上添加@CacheEvict 注解
在主配置文件中注册缓存空间名称
使用 API 方式还需要的步骤
Service 中被自动注入的 RedisTemplate 需要的泛型,key 与 value 要求类型相同,要么都是 String,要么都是 Object。建议使用 Object,其通用性更好。
在Service的查询方法中通过RedisTemplate对象获取到Redis的操作对象,然后再对Redis进行读写操作。
当前工程完成让用户在页面中输入要查询学生的 id,其首先会查看 Redis 缓存中是否存在,若存在,则直接从 Redis 中读取;若不存在,则先从 DB 中查询出来,然后再存放到 Redis缓存中。但用户也可以通过页面注册学生,一旦有新的学生注册,则需要将缓存中的学生信息清空。根据id查询出的学生信息要求必须是实时性的,其适合使用注解方式的Redis缓存。
同时,通过页面还可以查看到总学生数,但对其要求是差不多就行,无需是实时性的对于 Spring Boot 工程,其适合使用 API 方式的 Redis 缓存,该方式方便设置缓存的到期时限。
修改 pom 文件
在 pom 文件中添加 Spring Boot 与 Redis 整合依赖。
    org.springframework.boot
    spring-boot-starter-data-redis
修改主配置文件
修改实体类 Student
由于要将查询的实体类对象缓存到 Redis,Redis 要求实体类必须序列化。所以需要实体类实现序列化接口。
import java.io.Serializable;

@Data
public class Student implements Serializable {
    private Integer id;
    private String name;
    private int age;
}
修改 index 页面
<%@ page contentType="text/html;charset=UTF-8" language="java" %>
Title
查询总人数
修改 StudentController
在其中添加两个处理器方法。
@RequestMapping("/find")
@ResponseBody
public Student findHandle(Integer id){
    return studentService.findStudentById(id);
}

@RequestMapping("/studentCount")
@ResponseBody
public Integer countHandle(){
    return studentService.findStudentCount();
}
修改 Service 接口
import cn.zjut.jsp.bean.Student;

public interface IStudentService {
    void addStudent(Student student);
    Student findStudentById(Integer id);
    Integer findStudentCount();
}
修改 Service 接口实现类
import cn.zjut.jsp.bean.Student;
import cn.zjut.jsp.dao.IStudentDao;
import cn.zjut.jsp.service.IStudentService;
import org.springframework.beans.factory.annotation.Autowired;
import org.springframework.cache.annotation.CacheEvict;
import org.springframework.cache.annotation.Cacheable;
import org.springframework.data.redis.core.BoundValueOperations;
import org.springframework.data.redis.core.RedisTemplate;
import org.springframework.stereotype.Service;
import org.springframework.transaction.annotation.Transactional;

import java.util.concurrent.TimeUnit;

@Service
public class StudentServiceImpl implements IStudentService {
    @Autowired
    private IStudentDao studentDao;

    @Autowired
    private RedisTemplate redisTemplate;

    @CacheEvict(value = "realTimeCache", allEntries = true)
    @Transactional
    @Override
    public void addStudent(Student student) {
        studentDao.insertStudent(student);
    }

    @Cacheable(value = "realTimeCache", key = "'student_' + #id")
    @Override
    public Student findStudentById(Integer id) {
        System.out.println("从DB中查询Student");
        return studentDao.selectStudentById(id);
    }

    //使用双重检测锁解决热点缓存问题
    @Override
    public Integer findStudentCount() {
        //获取Redis操作对象
        BoundValueOperations ops = redisTemplate.boundValueOps("count");
        //从缓存中获取数据
        Object count = ops.get();
        if (count == null){
            synchronized (this){
                count = ops.get();
                if (count == null){
                    //从DB中查询数据
                    count = studentDao.selectStudentCount();
                    //将数据写入到缓存,并设置超时时间
                    ops.set(count, 10, TimeUnit.SECONDS);
                }
            }
        }
        return (Integer) count;
    }
}
修改Dao
import cn.zjut.jsp.bean.Student;
import org.apache.ibatis.annotations.Mapper;

@Mapper
public interface IStudentDao {
    void insertStudent(Student student);
    Student selectStudentById(Integer id);
    Integer selectStudentCount();
}
修改映射文件
insert into student(`name`, `age`) values (#{name}, #{age})
启动 Redis
![]()
启动 Linux 主机
登录 Redis
查看 Redis
启动 sentinel 集群
Spring Boot
在非Spring Boot工程中若要使用SpringMVC的拦截器,在定义好拦截器后,需要在 Spring
配置文件中对其进行注册。但 Spring Boot 工程中没有了 Spring 配置文件,那么如何使用拦
截器呢
Spring Boot 对于原来在配置文件配置的内容,现在全部体现在一个类中,该类需要继承自 WebMvcConfigurationSupport 类,并使用@Configuration 进行注解,表示该类为一个JavaConfig/CodeConfig 类,其充当配置文件的角色。
定义工程
定义拦截器
import org.springframework.web.servlet.HandlerInterceptor;

import javax.servlet.http.HttpServletRequest;
import javax.servlet.http.HttpServletResponse;

public class SomeInterceptor implements HandlerInterceptor {
    @Override
    public boolean preHandle(HttpServletRequest request, HttpServletResponse response, Object handler) {
        System.out.println("执行拦截器"+request.getRequestURI());
        return true;
    }
}
定义处理器
import org.springframework.stereotype.Controller;
import org.springframework.web.bind.annotation.RequestMapping;
import org.springframework.web.bind.annotation.ResponseBody;

@Controller
public class SomeController {
    @RequestMapping("/first/some")
    @ResponseBody
    public String someHandle(){
        return "/first/some";
    }

    @RequestMapping("/second/other")
    @ResponseBody
    public String otherHandle(){
        return "second/other";
    }
}
定义配置文件类
import cn.zjut.springbootinterceptor.interceptor.SomeInterceptor;
import org.springframework.context.annotation.Configuration;
import org.springframework.web.servlet.config.annotation.InterceptorRegistry;
import org.springframework.web.servlet.config.annotation.WebMvcConfigurationSupport;

@Configuration
public class MyWebMvcConfiguration extends WebMvcConfigurationSupport {
    @Override
    protected void addInterceptors(InterceptorRegistry registry) {
        SomeInterceptor someInterceptor = new SomeInterceptor();
        registry.addInterceptor(someInterceptor)
                .addPathPatterns("/first/**")
                .excludePathPatterns("/second/**");
    }
}
Spring Boot 中使用 Servlet
在 Spring Boot 中使用 Servlet,根据 Servlet 注册方式的不同,有两种使用方式。若使用的是 Servlet3.0+版本,则两种方式均可使用;若使用的是 Servlet2.5 版本,则只能使用配置类方式。
注解方式
若使用的是 Servlet3.0+版本,可以直接使用 Servlet 的注解对 Servlet 进行注册。其总步骤有两步:
在定义好的 Servlet 上使用@WebServlet 注解
在入口类上添加@ServletComponentScan 注解
创建工程
创建 Servlet
这里在创建 Servlet 时需要注意,不能直接使用 IDEA 中的向导直接创建 Servlet,无法创建。需要通过创建一个 class,让其继承自 HttpServlet 方式创建。然后在 Servlet 上添加@WebServlet 注解。
import javax.servlet.ServletException;
import javax.servlet.annotation.WebServlet;
import javax.servlet.http.HttpServlet;
import javax.servlet.http.HttpServletRequest;
import javax.servlet.http.HttpServletResponse;
import java.io.IOException;
import java.io.PrintWriter;

@WebServlet("/some")
public class SomeServlet extends HttpServlet {
    @Override
    protected void doGet(HttpServletRequest request, HttpServletResponse response) throws ServletException, IOException {
        PrintWriter out = response.getWriter();
        out.println("Hello Spring Boot Servlet");
    }
}
修改入口类
import org.springframework.boot.SpringApplication;
import org.springframework.boot.autoconfigure.SpringBootApplication;
import org.springframework.boot.web.servlet.ServletComponentScan;

@SpringBootApplication
@ServletComponentScan("cn.zjut.boot.servlet")//开启Servlet扫描
public class ServletApplication {

    public static void main(String[] args) {
        SpringApplication.run(ServletApplication.class, args);
    }

}
配置类方式
若使用的是 Servlet2.5 版本,没有 Servlet 注解,此时只能使用配置类方式。其总步骤有两步,无需在入口类上添加@ServletComponentScan 注解。
定义配置类
import cn.zjut.boot.servlet.SomeServlet;
import org.springframework.boot.web.servlet.ServletRegistrationBean;
import org.springframework.context.annotation.Bean;
import org.springframework.context.annotation.Configuration;

@Configuration
public class MyApplicationContext {
    @Bean
    public ServletRegistrationBean getServletBean(){
        SomeServlet someServlet = new SomeServlet();
        return new ServletRegistrationBean<>(someServlet, "/some");
    }
}
Spring Boot 中使用 Filter
在 Spring Boot 中使用 Filter 与前面的使用 Servlet 相似,根据 Filter 注册方式的不同,有两种使用方式。若使用的是 Servlet3.0+版本,则两种方式均可使用;若使用的是 Servlet2.5版本,则只能使用配置类方式。
注解方式
若使用的是 Servlet3.0+版本,可以直接使用 Filter 的注解对 Filter 进行注册。其总步骤有两步:
在定义好的 Filter 上使用@WebFilter 注解
在入口类上添加@ServletComponentScan 注解
使用工程
创建 Filter
这里在创建 Filter 时需要注意,不能直接使用 IDEA 中的向导直接创建 Filter,无法创建。需要通过创建一个 class,让其实现 Filter 接口方式创建。然后在 Filter 上添加@WebFilter注解。
import javax.servlet.*;
import java.io.IOException;

public class SomeFilter implements Filter {
    @Override
    public void init(FilterConfig filterConfig) throws ServletException {

    }

    @Override
    public void doFilter(ServletRequest request, ServletResponse response, FilterChain filterChain) throws IOException, ServletException {
        System.out.println("信息已过滤");
        filterChain.doFilter(request, response);
    }

    @Override
    public void destroy() {

    }
}
修改入口类
在@ServletComponentScan 注解中注册 Filter 所在的包,当然,Spring Boot 支持通配符的使用。
@SpringBootApplication
@ServletComponentScan("cn.zjut.boot.*")//开启Servlet扫描
public class ServletApplication {

    public static void main(String[] args) {
        SpringApplication.run(ServletApplication.class, args);
    }

}
配置方式
若使用的是 Servlet2.5 版本,没有 Filter 注解,此时只能使用配置类方式。其总步骤有两步,与@ServletComponentScan 注解无关。
修改配置类
@Bean
public FilterRegistrationBean getFilterBean(){
    SomeFilter someFilter = new SomeFilter();
    FilterRegistrationBean registrationBean = new FilterRegistrationBean<>(someFilter);
    registrationBean.addUrlPatterns("/*");
    return registrationBean;
}
Thymeleaf
Thymeleaf 简介
Thymeleaf[taɪm lif],百里香叶。Thymeleaf 是一个流行的模板引擎,该模板引擎采用 Java语言开发。模板引擎是为了使用户界面与业务数据(内容)分离而产生的,它可以生成特定格式的文档。例如,用于网站的模板引擎就会生成一个标准的 HTML 文档。不同的语言体系中都有自己的模板引擎,例如,Java 中常见的模板引擎有 Velocity、Freemaker、Thymeleaf等。不同的模板引擎都会具有自己的特定的标签体系,而 Thymeleaf 以 HTML 标签为载体,在 HTML 的标签下实现对数据的展示。
Thymeleaf 本身与 SpringBoot 是没有关系的,但 SpringBoot 官方推荐使用 Thymeleaf 作为前端页面的数据展示技术,SpringBoot 很好地集成了这种模板技术。
Thymeleaf 的官网为: http://www.thymeleaf.org
从官网可以看到,其目前提供两个版本:3.x 与 2.x。Spring Boot2.x 默认使用的是Thymeleaf3.x 版本,而 Spring Boot1.x 则使用的是 Thymeleaf2.x 版本。
Spring Boot 集成 Thymeleaf
创建工程
        org.springframework.boot
        spring-boot-starter-thymeleaf


        org.springframework.boot
        spring-boot-starter-web


        org.springframework.boot
        spring-boot-devtools
        runtime
        true


        org.projectlombok
        lombok
        true


        org.springframework.boot
        spring-boot-starter-test
        test
定义配置文件
#开发阶段,建议关闭thymeleaf缓存,否则会出现数据未更新状况
spring.thymeleaf.cache=false
定义处理器
import org.springframework.stereotype.Controller;
import org.springframework.ui.Model;
import org.springframework.web.bind.annotation.RequestMapping;

@Controller
public class ThymeleafController {
    @RequestMapping("/test/myindex")
    public String indexHandle(Model model){
        model.addAttribute("welcome", "Hello Thymeleaf World");
        //这里index是Thymeleaf页面文件index.html,但不用html后缀
        return "index";
    }
}
定义 index.html 页面
在 src/main/resources/templates 目录下定义 index.html 页面。
在页面的标签中需要添加 Thymeleaf 的命名空间属性: xmlns:th="http://www.thymeleaf.org"
    Title


    显示动态数据
    显示动态数据
    显示动态数据
Thymeleaf标准表达式
常用的 Thymeleaf 标准表达式有三种。标准表达式都是用于获取代码中存放到 Model中的属性值的,只不过获取方式不同而已。
变量表达式${ …}
使用${…}括起来的表达式,称为变量表达式。该表达式的内容会显示在 HTML 标签体文本处。
该表达式一般都是通过 th:text 标签属性进行展示的。
修改处理器类
import cn.zjut.thymeleaf.vo.Student;
import org.springframework.stereotype.Controller;
import org.springframework.ui.Model;
import org.springframework.web.bind.annotation.RequestMapping;

@Controller
public class ThymeleafController {
    @RequestMapping("/test/myindex")
    public String indexHandle(Model model){
        model.addAttribute("welcome", "Hello Thymeleaf World");
        Student student = new Student("张三", 23);
	model.addAttribute("student", student);
        //这里index是Thymeleaf页面文件index.html,但不用html后缀
        return "index";
    }
}
创建 VO 类
import lombok.AllArgsConstructor;
import lombok.Data;
import lombok.NoArgsConstructor;

@Data
@NoArgsConstructor
@AllArgsConstructor
public class Student {
    private String name;
    private int age;
}
修改 index 页面
    Title


    显示动态数据
    显示动态数据
    显示动态数据


    显示动态数据
    显示动态数据
    显示动态数据
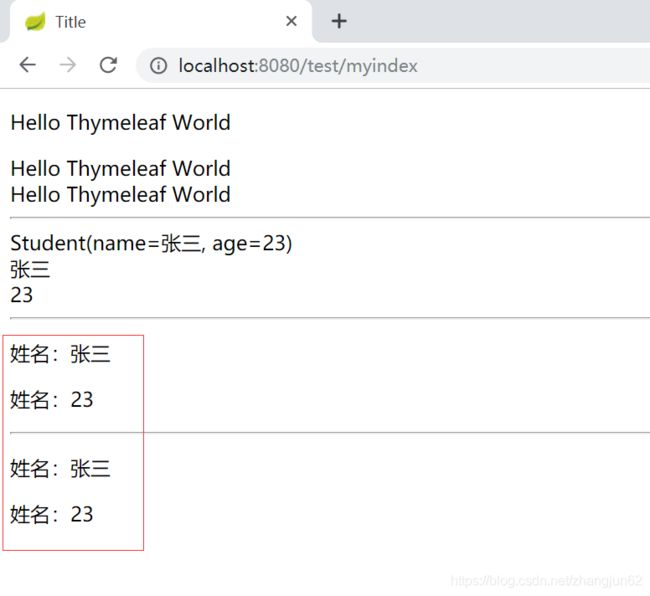
测试效果
选择表达式*{ …}
选择表达式,也称为星号表达式,其是使用*{…}括起来的表达式。一般用于展示对象的属性。该表达式的内容会显示在HTML标签体文本处。但其需要与th:object标签属性联用,先使用 th:object 标签选择了对象,再使用*{…}选择要展示的对象属性。该表达式可以有效降低页面中代码的冗余。
不过,其也可以不与 th:object 标签联用,在*{…}中直接使用“对象.属性”方式,这种写法与变量表达式相同。
该表达式一般都是通过 th:text 标签属性进行展示的。
修改 index
    姓名:
    姓名:


姓名:
姓名:
测试效果
URL 表达式@{ …}
使用@{…}括起来,并且其中只能写一个绝对 URL 或相对 URL 地址的表达式,称为 URL表达式。这个绝对/相对 URL 地址中一般是包含有动态参数的,需要结合变量表达式${…}进行字符串拼接。
@{…}中的 URL 地址具有三种写法。为了演示这三种写法的区别,先为当前工程添加一个上下文路径,然后直接在 index.html 文件中修改。
#当前工程的上下文路径
server.servlet.context-path=/thy
#开发阶段,建议关闭thymeleaf缓存,否则会出现数据未更新状况
spring.thymeleaf.cache=false
以 http 协议开头的绝对地址
在进行字符串拼接时使用加号(+)连接,容易出错。但使用双竖线则无需字符串拼接,简单易读。但是,Idea 会对其中的问号(?)报错,不过其不影响运行。
查询1

查询2
查询3
在页面通过查看源码可以看到其解析结果。当然,对于 and 符(&)Thymeleaf 会将其解析为实体形式(&),但浏览器会对(&)进行正确解析。
以/ 开头的相对地址
在 URL 表达式中,Thymeleaf 会将开头的斜杠(/)解析为当前工程的上下文路径ContextPath,而浏览器会自动为其添加“http://主机名:端口号”,即其即为一个绝对路径。
查询4
查询5
在页面通过查看源码可以看到其解析结果中已经添加了上下文路径。
而在页面则可以看到浏览器对其解析的结果已经添加了 http://localhost:8080。
不以/ 开头的相对地址
查询6在页面通过查看源码可以看到其解析结果中是未添加任何东西的,即没有上下文路径。也就是说,其是相对于当前请求路径的一个相对地址。
而在页面则可以看到浏览器对其解析的结果已经添加了 http://localhost:8080/thy/test,这是相对于当前请求路径的的一个相对地址的转换结果。
Thymeleaf常见属性
官方在线文档
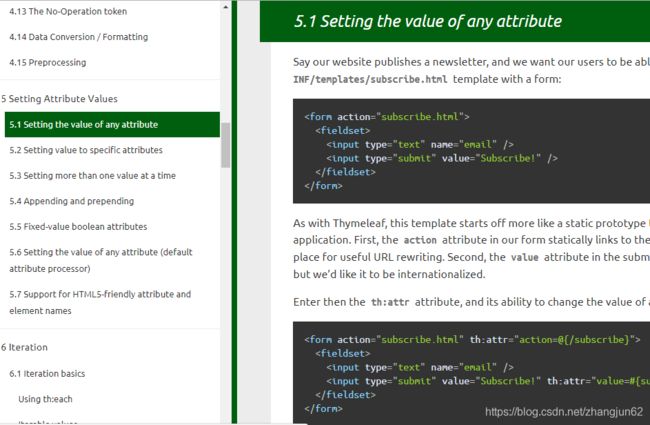
Thymeleaf 的属性很多,从官网的 Docs 模块的在线文档中可以看到。
逻辑运算相关属性
th:if
该属性用于逻辑判断,类似于 JSTL 中的
修改处理器
在处理器中添加如下语句。
model.addAttribute("gender", "male");修改 index 页面
在 index.html 文件中添加如下语句。
男
效果
th:switch/th:case
属性用于多分支判断,类似于 Java 中的 Swith-Case 语句。
修改处理器
在处理器中添加如下语句。
model.addAttribute("age",35);修改 index 页面
在 index.html 文件中添加如下语句。
一旦某个 case 与 switch 的值相匹配了,剩余的 case 则不再比较。th:case=”*”表示默表示默认的 case,前面的 case 都不匹配时候执行该 case。
    儿童
    青少年
    青年
    中青年
    中年
    中老年
    老年
th:each
该属性用于遍历数组、List、Set、Map,类似于 JSTL 中的
遍历 List
遍历数组、Set 与遍历 List 方式是相同的。
修改处理器
在 Controller 中添加如下代码。
Student student1 = new Student("张三",23);
Student student2 = new Student("李四",24);
Student student3 = new Student("王五",25);

List students = new ArrayList<>();
students.add(student1);
students.add(student2);
students.add(student3);

model.addAttribute("students", students);
修改 index 页面
前面的 stu 为当前遍历对象,而${students}为遍历的集合。
效果
遍历状态对象
如何获取到当前遍历的状态信息呢?例如,当前遍历的是第几个,当前遍历的是集合中索引号为多少的元素,这个索引号是奇数还是偶数等。这些状态信息被定义在一个状态对象中,而这个状态对象有两种获取方式,一种是在 th:each 中指定,一种是在当前遍历变量名后添加 Stat 后辍。
常用的状态对象属性
index: 当前遍历对象的索引号(从 0 开始计算)
count: 当前遍历对象是第几个(从 1 开始计算)
even/odd: 布尔值,当前遍历对象的索引号是否是偶数/奇数(从 0 开始计算)
first/last: 布尔值,当前遍历对象是否是第一个/最后一个
修改 index
效果
遍历 Map
Map 的键值对是一个 Map.Entry 对象。
修改处理器
Map stuMap = new HashMap<>();
stuMap.put("stu1", student1);
stuMap.put("stu2", student2);
stuMap.put("stu3", student3);

model.addAttribute("stuMap", stuMap);
修改 index 页面
Idea 对这个遍历对象的 key、value 属性会报错,但不影响运行。
效果
html 标签相关
th:text/th:utext
这两个属性均用于在标签体中显示动态文本。但不同的是,th:utext 会解析文本中的HTML 标签,而 th:text 则是原样显示。
修改处理器
model.addAttribute("welcome", "
Thymeleaf,
I'm learning.
");
修改 index
th:name/th:value
该属性用于获取标签动态 name 属性值,及标签的默认 value 值。
修改处理器
model.addAttribute("attrName","age");修改 index
效果
在页面查看源码可以看到如下效果。
URL 路径相关
th:action、th:src、th:href,这三个都是与 URL 路径相关的属性。若这些 URL 中包含有动态参数,则它们的值需要 URL 表达式@{…}与变量表达式${…}配合使用。下面以标签中的 th:src 为例演示用法。
创建目录放图片
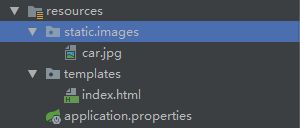
在工程的 src/main/resources/static 目录下创建一个 Directory,命名为 images,并在其中存放入一张图片 car.jpg。
修改处理器
model.addAttribute("photo","car.jpg");修改 index
![]()
css/js 相关
th:id/th:name
这两个属性可以获取标签的动态 id 与 name 属性,以便在 js 中使用。
th:style
该属性用于获取标签的 css 动态样式。
th:onclick
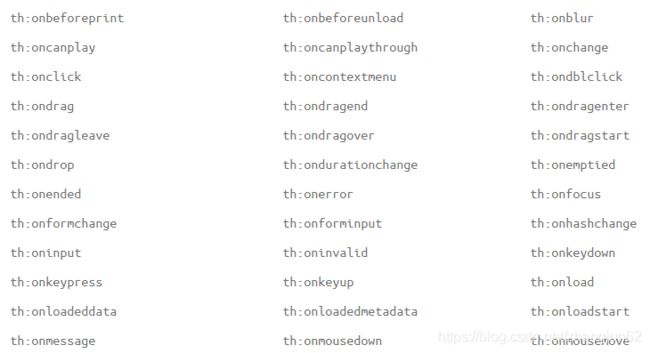
该属性用于获取标签的单击事件所触发的动态事件,即单击事件所触发的方法名。这些js 事件属性很多,都是以 th:on 开头。
内联属性 th:inline
其应用场景是,在 HTML 某标签显示文本内部存在部分数据来自于动态数据,或 JS 内部需要使用动态数据的场景。在该场景中,可以使用[[${…}]]或[(${…})]的方式将动态数据嵌入到指定的文本或脚本内部。
th:inline 的取值有四个:text, javascript、css 和 non。分别表示内联文本、内联脚本、内联 css,与禁止内联,即不解析[[${…}]]。不过,th:inline=”text”可以省略不写。
需求场景描述
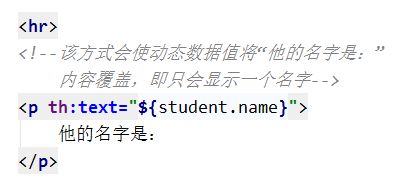
如上所示,我们的需求是,在”他的名字是“后面紧跟动态数据,但以上写法会使动态数据直接显示在
标签体中,而将”他的名字是“内容覆盖。
内联文本
    他的名字是:[[${student.name}]]


    他的名字是:[[${student.name}]]
运行效果是:
内联脚本
内联 CSS
修改index 页面
先在index 页面中添加一个
背景变为红色
修改处理器
model.addAttribute("elementId","reddiv");
model.addAttribute("bgColor","red");
再修改 index 页面
在 index 页面中添加如下代码,使用内联 CSS 定义
背景变为红色
运行效果
万能属性 th:attr
该标签只所以称为万能属性,其主要具有两个应用场景,这两个场景在官方文档中均有详细讲解。
为无定义的属性赋予动态参数
很多 HTML 标签的属性都有其对应的 Thymeleaf 的 th 命名空间中属性,但并不是所有的都存在对应属性。若没有其对应的 th 命名空属性,但又想让其获取动态值,就需要使用该属性了。
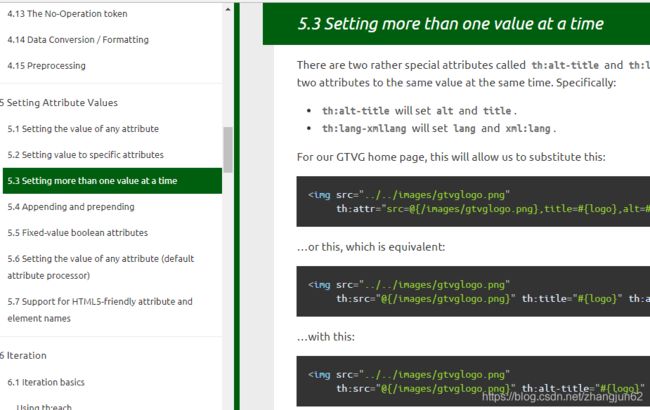
一次为多个属性赋予动态参数
若想一次为多个属性赋予动态参数,则可以使用该属性。
Thymeleaf运算基础
Thymeleaf 字面量
字面量,即字面常量。Thymeleaf 中有四种字面量:文本、数字、布尔,及 null。
文本字面量
由单引号括起来的字符串,称为文本字面量。
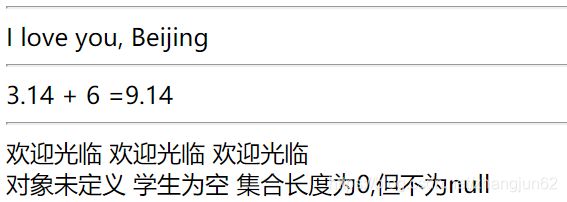
I love you,
数字字面量
数字字面量就是数字,可以是整数,也可以是小数。
3.14 + 6 =
布尔字面量
布尔字面量就是 true、false,也可以写为 TRUE、FALSE、True、False。
修改处理器
model.addAttribute("isClose",false);修改 index 页面
    欢迎光临
    关门歇业
    欢迎光临
    关门歇业
    欢迎光临
    关门歇业
null 字面量
表示空,其一般用于判断。若对象未定义,或对象已定义但其值为 null,则为 null 的判断结果为 true;若集合不为 null,但长度为 0,则为 null 的判断结果为 false。
修改处理器
Student studentNull = null;
model.addAttribute("studentNull", studentNull);

List cities = new ArrayList<>();
model.addAttribute("cities", cities);
修改 index 页面
    对象未定义
    学生为空
    集合长度为0,但不为null
Thymeleaf 运算符
字符串拼接运算符
可以使用加号(+)进行字符串拼接,也可以将文本字面量与动态数据直接写入由双竖线括起来的字符串内,此时无需使用加号进行连接。
算术运算符
+ , - , * , / , %,但不支持++与--运算。
关系运算符
以下两种写法均支持:
> , < , >= , <= , == , !=
gt , lt , ge , le , eq , ne
逻辑运算符
非:not 或者 !
与:and
或:or
条件运行符
? :
Thymeleaf 内置对象
为了方便使用,Thymeleaf 中内置了很多对象,程序员可以直接使用。
ServletAPI
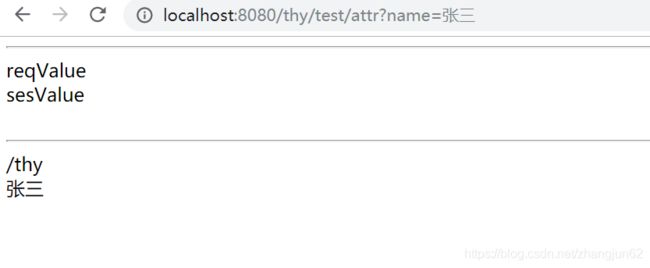
通过#reqest、#session、#servletContext 可以获取到 HttpServletRequest、HttpSession 及ServletContext 对象,然后就可以调用其相应的方法了。
修改处理器
在处理器中再定义一个处理器方法。
@RequestMapping("/test/attr")
public String attrHandle(HttpServletRequest request, HttpSession session){
    request.setAttribute("req","reqValue");
    session.setAttribute("ses","sesValue");
    session.getServletContext().setAttribute("spp","appValue");

    return "index2";
}
定义页面
再定义一个页面 index2.html。
Title
提交请求及运行效果
表达式实用对象
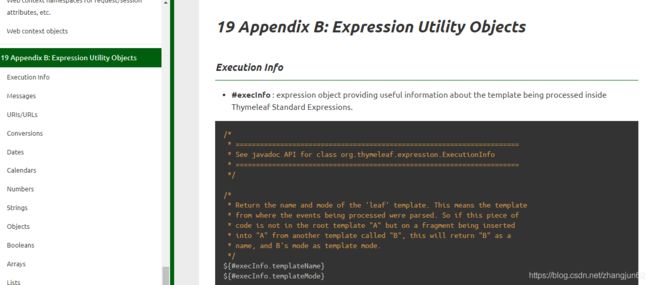
Tymeleaf 提供了大量的表达式实用对象,这些对象中存在大量的方法。这些方法直接使用“#工具对象.方法”的方式使用。其使用方式类似于 Java 中的静态方法。这些工具对象相关文档在官网文档的第 19 条中。
工具对象简介
这些工具对象都是以#开头,由于是对象,所以首字母是小写,且一般都是复数形式,即一般都是以 s 结尾。
#executionInfo:获取当前 Thymeleaf 模板对象的执行信息。
#messages:获取外部信息。
#uris/#urls:URI/URL 处理工具。
#conversions:类型转换工具。
#dates:日期处理工具。
#calendars:日历处理工具。
#numbers:数字处理工具。
#strings:字符串处理工具。
#Objects:对象处理工具。
#booleans:布尔值处理工具。
#arrays:数组处理工具。
#lists:List 处理工具。
#sets:Set 处理工具。
#maps:Map 处理工具。
#aggregates:聚合处理工具,例如,对数组、集合进行求和、平均值等。
#ids:th:id 属性处理工具。
应用举例
修改处理器
@RequestMapping("/test/util")
public String utilHandle(Model model){
    int[] nums = {1, 2, 3, 4, 5};
    model.addAttribute("nums", nums);
    model.addAttribute("today", new Date());
    model.addAttribute("cardId","325523200106256537");

    return "index3";
}
定义页面
再定义一个页面 index3.html。
Title
效果
