【MybatisPlus】快速使用MybatisPlus和几种常见插件
目录
什么是MybatisPlus
搭建MybatisPlus环境
实体类常用注解
@TableName
@TableId
@TableField
@TableLogic
CRUD接口
条件构造器
功能一:MP分页插件
功能二:生成MP的分布式主键Id
一. ASSIGN_ID(雪花算法)
二. AUTO (自动增长策略)
三. 自定义输入策略
功能三:乐观锁插件
功能四:防全表更新与删除插件
公司使用mp进行开发,所以花两天来学习mp,推荐mp官方文档进行学习,mp得几个插件还是非常不错得,条件构造器对于单表查询来说也十分方便,
这篇文章能让你快速了解什么是条件构造器(QueryWrapper),如何使用mp来进行crud,以及四个插件的使用,
什么是MybatisPlus
MyBatis-Plus (opens new window)(简称 MP)是一个 MyBatis (opens new window)的增强工具,在 MyBatis 的基础上只做增强不做改变,为简化开发、提高效率而生。

简介 | MyBatis-Plus (baomidou.com)
搭建MybatisPlus环境
1. Pom文件
            com.baomidou
            mybatis-plus-boot-starter
            3.5.2


            com.baomidou
            mybatis-plus-boot-starter-test
            3.5.2
2. 启动类上加@MapperScan注解
@MapperScan("com.baomidou.mybatisplus.samples.quickstart.mapper")3. mapper继承BaseMapper,泛型必须填实体类
@Repository
public interface UserMapper extends BaseMapper {

}
实体类常用注解
当实体类字段和数据库字段不相同时,一般使用以下注解进行映射(括号中填数据库字段)
@TableName
- 描述:表名注解,标识实体类对应的表
- 使用位置:实体类
@TableName("sys_user")
public class User {
    private Long id;
    private String name;
    private Integer age;
    private String email;
}
@TableId
- 描述:主键注解
- 使用位置:实体类主键字段
@TableName("sys_user")
public class User {
    @TableId("sys_id")
    private Long id;
    private String name;
    private Integer age;
    private String email;
}

@TableField
- 描述:字段注解(非主键)
@TableName("sys_user")
public class User {
    @TableId
    private Long id;
    @TableField("sys_name")
    private String name;
    private Integer age;
    private String email;
}
| 属性 | 类型 | 必须指定 | 默认值 | 描述 |
|---|---|---|---|---|
| value | String | 否 | "" | 数据库字段名 |
| exist | boolean | 否 | true | 是否为数据库表字段 |
| condition | String | 否 | "" | 字段 where 实体查询比较条件,有值设置则按设置的值为准,没有则为默认全局的 %s=#{%s},参考(opens new window) |
| update | String | 否 | "" | 字段 update set 部分注入,例如:当在version字段上注解update="%s+1" 表示更新时会 set version=version+1 (该属性优先级高于 el 属性) |
| insertStrategy | Enum | 否 | FieldStrategy.DEFAULT | 举例:NOT_NULLinsert into table_a( |
| updateStrategy | Enum | 否 | FieldStrategy.DEFAULT | 举例:IGNOREDupdate table_a set column=#{columnProperty} |
| whereStrategy | Enum | 否 | FieldStrategy.DEFAULT | 举例:NOT_EMPTYwhere |
| fill | Enum | 否 | FieldFill.DEFAULT | 字段自动填充策略 |
| select | boolean | 否 | true | 是否进行 select 查询 |
| keepGlobalFormat | boolean | 否 | false | 是否保持使用全局的 format 进行处理 |
| jdbcType | JdbcType | 否 | JdbcType.UNDEFINED | JDBC 类型 (该默认值不代表会按照该值生效) |
| typeHandler | Class | 否 | UnknownTypeHandler.class | 类型处理器 (该默认值不代表会按照该值生效) |
| numericScale | String | 否 | "" | 指定小数点后保留的位数 |
@TableLogic
- 描述:表字段逻辑处理注解(逻辑删除)并不会物理删除数据
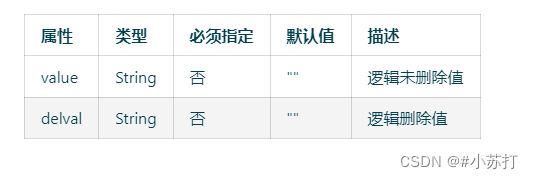
使用方法:
1.在实体类属性上加@TableLogic(value=“0”,delval=“1”),未删除时为0,被删除时为12.删:调用BaseMapper的deleteById(id)或者Service的removeById(id),走Update方法
效果:
没有@TableLogic注解调用deleteById/removeById,直接删除数据。
SQL:delete from xxxtable where id = 1
有注解走Update方法
SQL:Update xxxtable set is_delete = 0 where id = 1
3.改:使用了@TableLogic注解,调用update方法,是不会将该字段放入修改字段中,而是默认添加在where条件字段中。即使你给dataStatus赋值也不能修改字段。
SQL: Update xxxtable set 字段1 = 值1,字段2 = 值2 where id = 1 and is_delete = 04.查:使用了@TableLogic注解,使用queryWapper等查询时,没有筛选是否删除的条件,但是sql还是自动加上了条件:SELECT * from xxxtable where is_delete =0
CRUD接口
基于官网
CRUD 接口 | MyBatis-Plus (baomidou.com)
条件构造器
wrapper:构造sql语句的各种条件,比如 >=10 写作
ge("age", 18),通过Wrapper构建各种条件,在crud的时传入Wrapper(条件)构造sql语句QueryWrapperwrapper = new QueryWrapper<>(); //创建条件构造器 wrapper.ge("sys_id", 10); //创建sql条件 List users = userMapper.selectList(wrapper); //查询时传入sql条件 ------------------- 等同于sql语句:select * from user where sys_id >= 10
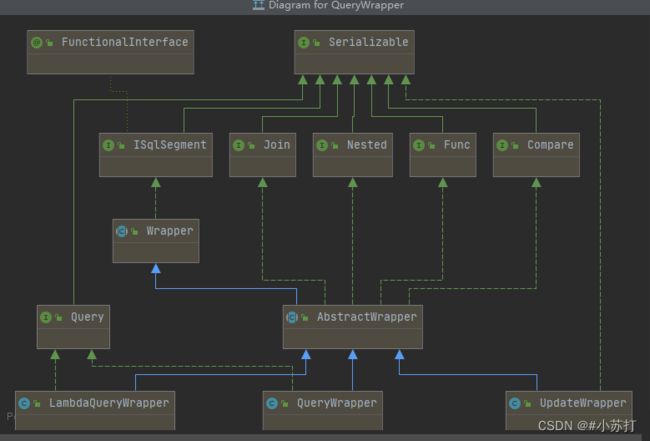
条件构造器的继承图
条件构造器 | MyBatis-Plus (baomidou.com)
功能一:MP分页插件
1. 导入pom文件
            com.baomidou
            mybatis-plus-extension
            3.4.2
2. 写配置类
@Configuration
public class MybatisPlusConfig {
    @Bean
    public MybatisPlusInterceptor mybatisPlusInterceptor() {
        MybatisPlusInterceptor interceptor = new MybatisPlusInterceptor();
        interceptor.addInnerInterceptor(new PaginationInnerInterceptor(DbType.MYSQL));
        return interceptor;
    }
}
3. 使用
new Page 配置selectPage等使用
        Page page1 = new Page<>(1,5);
        Page page2 = new Page<>(2,5);

        Page userPage1 = userMapper.selectPage(page1, null);
        Page userPage2 = userMapper.selectPage(page2, null);
        System.out.println("第一页");
        userPage1.getRecords().forEach(System.out::println);
        System.out.println("第二页");
        userPage2.getRecords().forEach(System.out::println);

        输出结果:
        第一页
        User(id=1, name=Jone, age=18, [email protected])
        User(id=2, name=Jack, age=20, [email protected])
        User(id=3, name=Tom, age=28, [email protected])
        User(id=4, name=Sandy, age=21, [email protected])
        User(id=5, name=Billie, age=24, [email protected])
        第二页
        User(id=6, name=小白, age=22, email=小白.qq.com)
        User(id=7, name=小黑子, age=22, email=小黑子.qq.com)
        User(id=8, name=小黑子, age=222, email=小黑子.qq.com)
        User(id=9, name=黑子, age=222, email=小黑子.qq.com)
        User(id=10, name=黑子, age=222, email=小黑子.qq.com)
功能二:生成MP的分布式主键Id
一. ASSIGN_ID(雪花算法)
如果不设置 type 值,默认则使用 IdType.ASSIGN_ID 策略(自 3.3.0 起)。该策略会使用雪花算法自动生成主键 ID,主键类型为 Long 或 String。
雪花算法(SnowFlake)是 Twitter 开源的分布式 id 生成算法。其核心思想就是:使用一个 64 bit 的 long 型的数字(19位)作为全局唯一 id。在分布式系统中的应用十分广泛,且 ID 引入了时间戳,基本上保持自增的
使用方法
@TableId 的 type 使用 ASSGN_ID 类型
    @Data
    @TableName("sys_user")
    public class User {
         @TableId(value = "sys_id",type = IdType.ASSIGN_ID)
         private Long id;
         @TableField("sys_name")
         private String name;
         @TableField("sys_age")
         private Integer age;
         @TableField("sys_email")
         private String email;
    }
二. AUTO (自动增长策略)
aout自动增长策略,这个配合数据库使用,mysql可以,但是oracle不行。
使用方法
在主键字段上加上 @TableId(type = IdType.AUTO),数据库表设计自动递增
@Data
public class UserInfo {
    //指定主键使用数据库ID自增策略
    @TableId(type = IdType.AUTO)
    private Integer id;
    private String userName;
    private String passWord;
}
三. 自定义输入策略
自定义输入策略
使用方法
1. 首先添加@Bean
//注册Bean容器
@Bean
public IdentifierGenerator identifierGenerator() {
        return new CustomIdGenerator();
}

//配置类
public class CustomIdGenerator implements IdentifierGenerator {
    private final char[] arrays = {
            '0','1','2','3','4','5','6','7','8','9','a','b','c','d','e','f','g','h','i','j','k','l','m','n','o','p','q','r','s','t','u','v','w','x','y','z'
    };

    private final Random random = new Random();

    @Override
    public Number nextId(Object entity) {

        long ops =  0L;
        for (int i = 0; i < 15; i++) {
            int tmp = random.nextInt(9)+1;
            ops = ops * 10 + tmp;
        }
        return ops;
    }

    @Override
    public String nextUUID(Object entity) {
        StringBuffer buffer = new StringBuffer();
        String name = entity.getClass().getSimpleName().toLowerCase();
        buffer.append(name).append("-");
        for (int i = 0; i < 9; i++) {
            buffer.append(arrays[random.nextInt(26) + 10]);
            buffer.append(arrays[random.nextInt(10)]);
        }
        return buffer.toString();
    }
}
2. 设置实体类主键tpye = NONE
@TableId(value = "sys_id",type = NONE)
    private Long id;
功能三:乐观锁插件
使用方法
1. spring boot 注解方式:
//乐观锁插件配置
@Bean
public MybatisPlusInterceptor mybatisPlusInterceptor() {
    MybatisPlusInterceptor interceptor = new MybatisPlusInterceptor();
    interceptor.addInnerInterceptor(new OptimisticLockerInnerInterceptor());
    return interceptor;
}
2. 在实体类的字段上加上@Version注解
@Version
private Integer version;
功能四:防全表更新与删除插件
使用方法
1. spring boot 注解方式:
@Configuration
public class MybatisPlusConfig {
  @Bean
  public MybatisPlusInterceptor mybatisPlusInterceptor() {
    MybatisPlusInterceptor interceptor = new MybatisPlusInterceptor();
    interceptor.addInnerInterceptor(new BlockAttackInnerInterceptor());
    return interceptor;
  }
}
测试代码(全局更新测试)
@SpringBootTest
public class UserSeriveImpTest {
    @Autowired
    private UserMapper userMapper;
    @Test
    @Rollback
    @Transactional
    public void test(){
        /**
         + SQL:UPDATE user  SET name=?,email=?;
         */
            System.out.println(userMapper.selectList(null));
            User user = new User();
            user.setId(999L);
            user.setName("custom_name");
            user.setEmail("[email protected]");
            //出现错误 com.baomidou.mybatisplus.core.exceptions.MybatisPlusException: Prohibition of table update operation
            userMapper.update(user, null);
            System.out.println(userMapper.selectList(null));
    }
}
使用防全表更新与删除插件

没有使用防全表更新与删除插件
![]()
完成了更新,我这里回滚了
以下是一些mp中wrapper的练手
package cn.tedu.vo;

import cn.tedu.dao.UserMapper;
import cn.tedu.pojo.User;
import com.baomidou.mybatisplus.core.conditions.query.QueryWrapper;
import org.junit.jupiter.api.Test;
import org.springframework.beans.factory.annotation.Autowired;
import org.springframework.boot.test.context.SpringBootTest;

import java.util.List;

@SpringBootTest
class SsmApplicationTests {

    @Autowired
    private UserMapper userMapper;


    @Test
    void contextLoads() {
        User user1 = new User(null,"haha","123","13233335555","[email protected]",1);
        userMapper.insert(user1); //新增

        userMapper.deleteById(11);//删除

        User user = userMapper.selectById(2); //查一个
        System.out.println(user+"===========");

        List users = userMapper.selectList(null); //查所有
        for (User u : users) {
            System.out.println(u+"~~~~~~~~~~~~~~");
        }

        //按条件查询= , SELECT * FROM user WHERE email='[email protected]'
        User uu = new User();
        uu.setEmail("[email protected]");//set的设置就相当于是=的设置
        //需用一个条件构造器,他会根据不为空的属性,自动发起查询语句(email='[email protected]')
        QueryWrapper qw = new QueryWrapper(uu);//这里表示where email='[email protected]'
        userMapper.selectList(qw);//按条件查到多个

        //按条件查询>= , SELECT * FROM user WHERE id>=3
        QueryWrapper qw2 = new QueryWrapper<>();
        //>gt =ge <=le !=ne
        qw2.ge("id",3);//这里表示where id>=3
        userMapper.selectList(qw2);

        //模糊查询,like
        QueryWrapper qw3 = new QueryWrapper<>();
//        qw3.likeRight("username","a");//这里表示where username like 'a%'
//        qw3.likeLeft("username","a");//这里表示where username like '%a'
        qw3.like("username","a");//这里表示where username like '%a%'
        qw3.orderByDesc("id");//排序,可以升序 降序
        userMapper.selectList(qw3);

        //in查询
        QueryWrapper qw4 = new QueryWrapper<>();
//        int[] arr = {1,2,3}; //要用引用类型
        Integer[] arr = {1,2,3}; //要用引用类型
//        qw4.in("id",arr); //这里表示where id in(1,2,3)
        //也可以添加判断条件,这里表示arr不为空时,才会拼接查询条件
        qw4.in(arr!=null&&arr.length!=0,"id",arr);
        userMapper.selectList(qw4);

        //更新操作
        QueryWrapper qw5 = new QueryWrapper<>();
        User uu2 = new User();
        uu2.setId(1).setEmail("[email protected]").setPhone("110");
        userMapper.updateById(uu2);//只会把id的值作为查询条件,其他的都用来set

        //批量删
        List list = Arrays.asList(new Integer[]{21,22,23,24,25,26,27,28,29,30,31,32});
        userMapper.deleteBatchIds(list);

    }

}