Using Eclipse for Android C/C++ Development
http://mhandroid.wordpress.com/2011/01/23/using-eclipse-for-android-cc-development/
Programming in C/C++ on Android is just awesome! This tutorial shows how to setup Eclipse for using C/C++ together with Java in Android projects.
0) Prerequisities
You need to have Google ADT (Android Development Tools) installed. See http://developer.android.com/sdk/eclipse-adt.html how to do it.
You also need Android ndk. Download it from http://developer.android.com/sdk/ndk/index.html and unpack it somewhere.
1) Install CDT (C/C++ Development Tools) into Eclipse.
Choose Help->Install New Software… from the main menu.
Choose http://download.eclipse.org/releases/galileo as the source site. If you have another Eclipse release than Galileo choose the appropriate url.
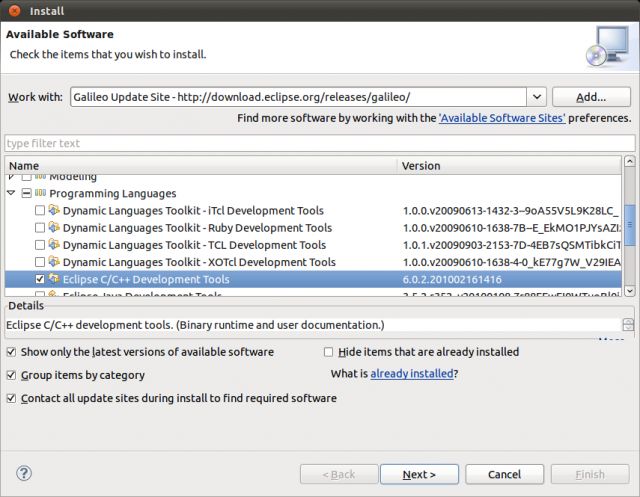
Click Next, Accept licences and finish the installation process.
2) In Eclipse create Android project to which you want to add C/C++ code (if you already don’t have one).
For this tutorial I’ve created simple MyAndroidProject.
3) In file manager create jni/ directory in your project directory and place your C/C++ sources file here. Also put here Android.mk file which is a makefile that tells Android build-system how to build your files.
Take a look into Android ndk docs/ANDROID-MK.html file how to create one.
Simple example of Android.mk file:
LOCAL_PATH := $(call my-dir)

include $(CLEAR_VARS)

LOCAL_LDLIBS    := -llog

LOCAL_MODULE    := native
LOCAL_SRC_FILES := native.c

include $(BUILD_SHARED_LIBRARY)
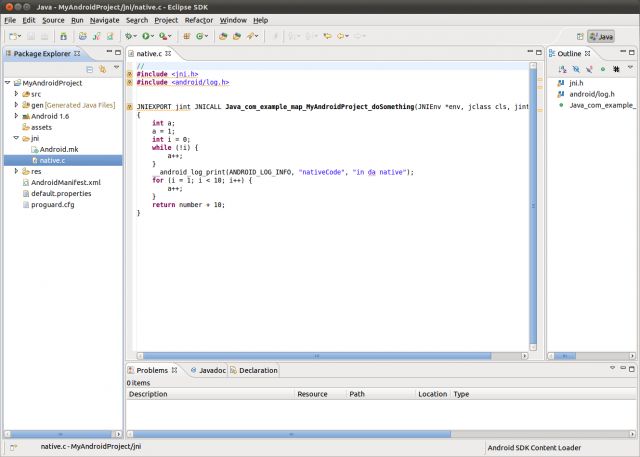
4) Refresh (F5) directories in Package Explorer to see jni directory here. Open your .c/.cpp file.
Your .c/.cpp file (native.c in my case) contains a lot of syntax errors which are not truly syntax errors. This is because Eclipse threats the project as a pure Java project. We have to convert the project into mixed Java & C/C++ project.
5) Press Ctrl+n (or choose File->New->Other… from main menu) and selectConvert to a C/C++ Project.
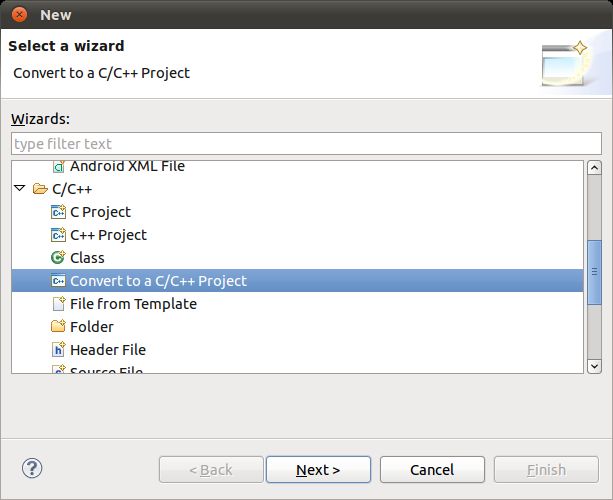
This will convert your project into a mixed Java & C/C++ project rather than into pure C/C++ project (the name of the function is misleading).
Click Next. Then choose your project and below choose Makefile project and – Other Toolchain –. Click Finish.
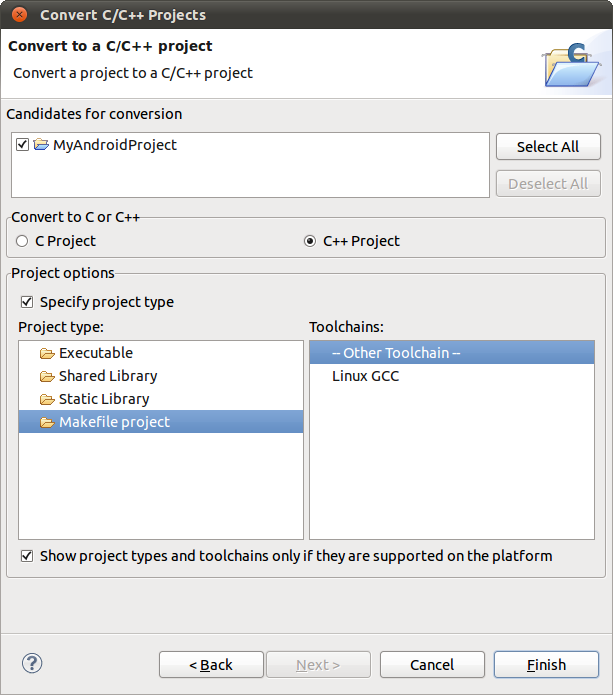
After doing this Eclipse will ask you if you want to switch to C/C++ perspective. ChooseYes because otherwise you wouldn’t be able to set C/C++ build preferences.
6) Click on your project with right button and select Properties or press Alt+Enter
Properties windows will appear. Here you have to configure use of ndk-build instead of make all command and set proper include paths.
7) Choose C/C++ Build and configure ndk-build as a build command
In Builder settings fill ndk-build into Build command entry. You have to uncheck Use default build command. You also need to have ndk-build script in your PATH.
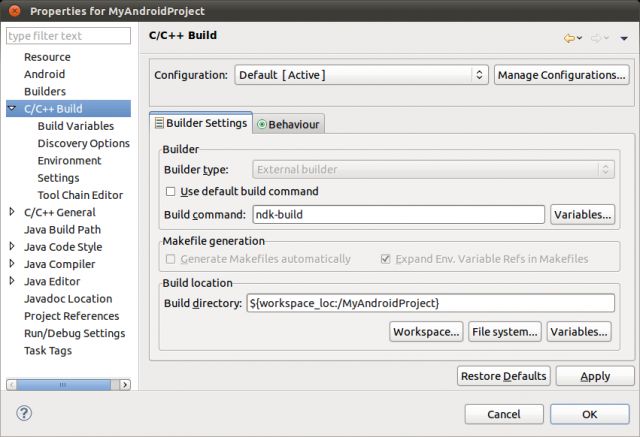
In Behaviour setting uncheck clean (ndk-build cleans project automatically on build and does not support separate clean command) and clear all text from build (ndk-build does not accept all as a parameter.
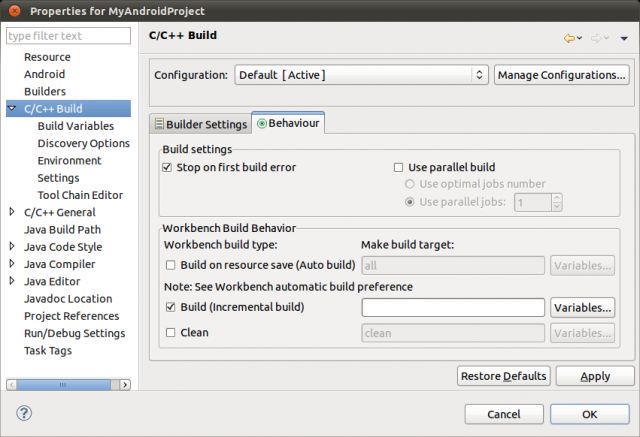
Click Apply to save settings.
8) Choose C/C++ General->Paths and Symbols and configure include path
In Includes tab choose GNU C or GNU C++ and click Add… button. Add path to include directory which is located in platforms/android-4/arch/arm/usr/include subdirectory of place where you’ve unpacked Android ndk. Include path depends on target for which you are compiling (android-4 in my case — i.e. Android 1.6).
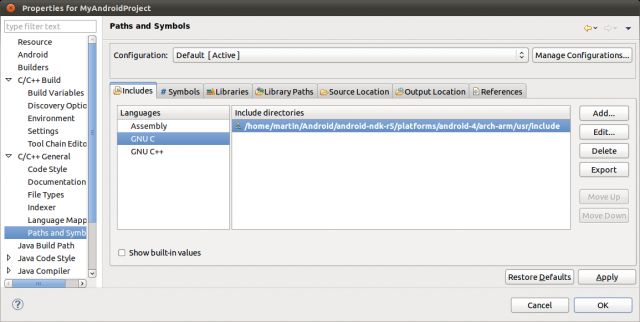
Finally click Apply and OK and that is all. Now you can use all Eclipse power for editing your C/C++ sources. If you click Run or Debug Eclipse will compile C/C++ code as well as Java code and run it on device/emulator. However you will not be able to debug C/C++ code.