解析gtest框架运行机制
前言
Google test是一款开源的白盒单元测试框架,据说目前在Google内部已在几千个项目中应用了基于该框架的白盒测试。
最近的工作是在搞一个基于gtest框架搭建的自动化白盒测试项目,该项目上线也有一段时间了,目前来说效果还是挺不错的。
侯捷先生在《STL源码剖析》中说过一句话:”会用STL,是一种档次。对STL原理有所了解,又是一个档次。追踪过STL源码又是一个档次。第三种档次的人用起STL来,虎虎生风之势绝非第一档次的人能够望其项背。“
我认为使用一种框架时也是一样,只有当你知道框架内部是如何运行的,不仅知其然,还知其所以然,才能避免一些坑,使框架用起来更效率。
就拿平常项目中用的最简单的一个测试demo(test_foo.cpp)来说吧
int foo(int a, int b)

{

    return a + b;

}


class TestWidget : public testing::Environment

{

public:

    virtual void SetUp();

    virtual void TearDown();

};


TEST(Test_foo, test_normal)

{

    EXPECT_EQ(2, foo(1, 1));

}


int main(int argc, char const *argv[])

{

    testing::AddGlobalTestEnvironment(new TestSysdbg);

    testing::InitGoogleTest(&argc, argv);

    return RUN_ALL_TESTS();

    return 0;

}
你可知道gtest是如何调用被测接口,如何输出测试结果的吗?本文主要解答这个问题。
解析
从预处理开始
可能有些童鞋会问,为什么要从预处理开始讲呢?是这样的,用过gtest框架的都知道,我们所编写的每一个测试用例都是一个TEST宏,想知道背后的运行机制,就得知道那些TEST宏展开后是什么样的,而所有的宏、包含的头文件、inline函数都是在预处理阶段被预处理器展开的,然后才是经过编译器编译成汇编代码,接着汇编器把汇编代码生成可重定位的目标文件,然后链接器再把可重定位的目标文件链接成可执行文件的目标文件。
所以本文从预处理开始介绍。
需要提到的是Gtest中用到了许多的宏技巧以及c++的模板技巧。先不看源码中TEST宏的定义,直接用下面指令单独调用预处理器对源文件进行预处理:
cpp test_foo.cpp test_foo.i –I/ gtest/gtest-1.6/
打开生成的经过预处理的文件test_foo.i
class Test_foo_test_normal_Test : public ::testing::Test

{

public:

    Test_foo_test_normal_Test() {}


private:

    virtual void TestBody();

public:

    virtual void SetUp();

    virtual void TearDown();

};


class Test_foo_test_normal_Test : public ::testing::Test

{

public:

    Test_foo_test_normal_Test() {}


private:

    virtual void TestBody();

    static ::testing::TestInfo* const test_info_ __attribute__ ((unused));

    Test_foo_test_normal_Test(Test_foo_test_normal_Test const &);

    void operator=(Test_foo_test_normal_Test const &);

};


::testing::TestInfo* const Test_foo_test_normal_Test

  ::test_info_ =

    ::testing::internal::MakeAndRegisterTestInfo(

      "Test_foo", "test_normal", __null, __null,

        (::testing::internal::GetTestTypeId()),

        ::testing::Test::SetUpTestCase,

        ::testing::Test::TearDownTestCase,

new ::testing::internal::TestFactoryImpl<Test_foo_test_normal_Test>);


void Test_foo_test_normal_Test::TestBody()

{

  switch (0)

    case 0:

    default:

      if (const ::testing::AssertionResult gtest_ar =

        (::testing::internal::

        EqHelper<(sizeof(::testing::internal::IsNullLiteralHelper(2)) == 1) >

        ::Compare("2", "foo(1, 1)", 2, foo(1, 1)))) ;

      else

        ::testing::internal::AssertHelper(::testing::TestPartResult::kNonFatalFailure,

        "test_foo.cpp", 17, gtest_ar.failure_message()) = ::testing::Message();

}


int main(int argc, char *argv[])

{

    testing::AddGlobalTestEnvironment(new TestWidget);

    testing::InitGoogleTest(&argc, argv);

    return (::testing::UnitTest::GetInstance()->Run());

    return 0;

}
可以看到TEST宏经过预处理器处理后展开为:
- 定义了一个继承自::testing::test类的新类Test_foo_test_normal_Test,该类的名字为TEST宏两个形参的拼接而成。
- TEST宏中的测试代码被展开并定义为生成类的成员函数TestBody的函数体。
- 生成类的静态数据成员test_info_被初始化为函MakeAndRegisterTestInfo的返回值。具体意义后面介绍。
MakeAndRegisterTestInfo函数
从上面来看MakeAndRegisterTestInfo函数是一个比较关键的函数了,从字面意思上看就是生成并注册该测试案例的信息,在头文件gtest.cc中可以找到关于它的定义,他是一个testing命名空间中的嵌套命名空间internal中的非成员函数:
TestInfo* MakeAndRegisterTestInfo(

    const char* test_case_name, const char* name,

    const char* type_param,

    const char* value_param,

    TypeId fixture_class_id,

    SetUpTestCaseFunc set_up_tc,

    TearDownTestCaseFunc tear_down_tc,

    TestFactoryBase* factory) {

  TestInfo* const test_info =

      new TestInfo(test_case_name, name, type_param, value_param,

                   fixture_class_id, factory);

  GetUnitTestImpl()->AddTestInfo(set_up_tc, tear_down_tc, test_info);

  return test_info;

}
其中形参的意义如下:
- test_case_name:测试套名称,即TEST宏中的第一个形参。
- name:测试案例名称。
- type_param:测试套的附加信息。默认为无
- value_param:测试案例的附加信息。默认为无
- fixture_class_id:test fixture类的id
- set_up_tc :函数指针,指向函数SetUpTestCaseFunc
- tear_down_tc:函数指针,指向函数TearDownTestCaseFunc
- factory:指向工厂对象的指针,该工厂对象创建上面TEST宏生成的测试类的对象
我们看到在MakeAndRegisterTestInfo函数体中定义了一个TestInfo对象,该对象包含了一个TEST宏中标识的测试案例的测试套名称、测试案例名称、测试套附加信息、测试案例附加信息、创建测试案例类对象的工厂对象的指针这些信息。
下面大家可能就会比较好奇所谓的工厂对象,可以在gtest-internal.h中找带它的定义
template <class TestClass>

class TestFactoryImpl : public TestFactoryBase {

 public:

  virtual Test* CreateTest() { return new TestClass; }

};
TestFactoryImpl类是一个模板类,它的作用就是单纯的创建对应于模板形参类型的测试案例对象。因为模板的存在也大大简化了代码,否则可能就要写无数个TestFactoryImpl类了,呵呵。
GetUnitTestImpl()->AddTestInfo(set_up_tc, tear_down_tc, test_info);
乍一看似乎是对test_info对象的一些熟悉信息进行设置。究竟是怎么样呢?源码面前,了无秘密,我们还是得去找到它的源码,在gtest-internal-inl中可以找到它的定义
inline UnitTestImpl* GetUnitTestImpl() {

  return UnitTest::GetInstance()->impl();

}
它的实现也是非常简单,关键还是在UnitTest类的成员函数GetInstance和返回类型的成员函数impl,继续追踪下去
class GTEST_API_ UnitTest {

public:

// Gets the singleton UnitTest object.  The first time this method

// is called, a UnitTest object is constructed and returned.

// Consecutive calls will return the same object.

  static UnitTest* GetInstance();


  internal::UnitTestImpl* impl() { return impl_; }

  const internal::UnitTestImpl* impl() const { return impl_; }


private:

  mutable internal::Mutex mutex_;

  internal::UnitTestImpl* impl_;

}


UnitTest * UnitTest::GetInstance() {

#if (_MSC_VER == 1310 && !defined(_DEBUG)) || defined(__BORLANDC__)

   static UnitTest* const instance = new UnitTest;

   return instance;

#else

   static UnitTest instance;

   return &instance;

}
根据代码和注释可知GetInstance是Unitest类的成员函数,它仅仅是生成一个静态的UniTest对象然后返回。实际上这么做是为了实现UniTest类的单例(Singleton)实例。而impl只是单纯的返回UniTest的UnitTestImpl类型的指针数据成员impl_。
再联系之前的代码,通过UnitTestImpl类的AddTestInfo设置Test_Info类对象的信息。其实绕了一圈,最终就是通过AddTestInfo设置Test_info类对象的信息,自然地,我们需要知道AddTestInfo的实现啦:
void AddTestInfo(Test::SetUpTestCaseFunc set_up_tc,

                   Test::TearDownTestCaseFunc tear_down_tc,

                   TestInfo* test_info) {

    GetTestCase(test_info->test_case_name(),

                test_info->type_param(),

                set_up_tc,

                tear_down_tc)->AddTestInfo(test_info);

}
而AddTestInfo是通过GetTestCase函数实现的
TestCase* UnitTestImpl::GetTestCase(const char* test_case_name,

                                    const char* type_param,

                                    Test::SetUpTestCaseFunc set_up_tc,

                                    Test::TearDownTestCaseFunc tear_down_tc) {

  // Can we find a TestCase with the given name?

  const std::vector<TestCase*>::const_iterator test_case =

      std::find_if(test_cases_.begin(), test_cases_.end(),

                   TestCaseNameIs(test_case_name));


  if (test_case != test_cases_.end())

    return *test_case;


  // No.  Let's create one.

  TestCase* const new_test_case =

      new TestCase(test_case_name, type_param, set_up_tc, tear_down_tc);


  // Is this a death test case?

  if (internal::UnitTestOptions::MatchesFilter(String(test_case_name),

                                               kDeathTestCaseFilter)) {

    // Yes.  Inserts the test case after the last death test case

    // defined so far.  This only works when the test cases haven't

    // been shuffled.  Otherwise we may end up running a death test

    // after a non-death test.

    ++last_death_test_case_;

    test_cases_.insert(test_cases_.begin() + last_death_test_case_,

                       new_test_case);

  } else {

    // No.  Appends to the end of the list.

    test_cases_.push_back(new_test_case);

  }


  test_case_indices_.push_back(static_cast<int>(test_case_indices_.size()));

  return new_test_case;

}
从上面代码可以看出其实并不是一开始猜测的设置Test_Info对象的信息,而是判断包含Test_info对象中的测试套名称、测试案例名称等信息的TestCase对象的指针是否在一个vector向量中,若存在就返回这个指针;若不存在就把创建一个包含这些信息的TestCase对象的指针加入到vector向量中,并返回这个指针。
至于vector向量test_cases_,它是UnitTestImpl中的私有数据成员,在这个向量中存放了整个测试项目中所有包含测试套、测试案例等信息的TestCase对象的指针。
紧接着我们看到从GetTestCase返回的TestCase指针调用TestCase类中的成员函数AddTestInfo,在gtest.cc中可以找到它的定义如下:
void TestCase::AddTestInfo(TestInfo * test_info) {

  test_info_list_.push_back(test_info);

  test_indices_.push_back(static_cast<int>(test_indices_.size()));

}
调用这个函数的目的是在于将Test_info对象添加到test_info_list_中,而test_info_list_是类TestCase中的私有数据成员,它也是一个vector向量。原型为
std::vector<TestInfo*> test_info_list_;
该向量保存着整个项目中所有包含测试案例对象各种信息的Test_Info对象的指针。
而test_indices_也是类TestCase中的私有数据成员,保存着test_info_list中每个元素的索引号。它仍然是一个vector向量,原型为
std::vector<int> test_indices_;
TEST宏
此时,我们再来看看TEST宏的具体定义实现:
#if !GTEST_DONT_DEFINE_TEST

# define TEST(test_case_name, test_name) GTEST_TEST(test_case_name, test_name)

#endif


#define GTEST_TEST(test_case_name, test_name)\

  GTEST_TEST_(test_case_name, test_name, \

              ::testing::Test, ::testing::internal::GetTestTypeId())


#define TEST_F(test_fixture, test_name)\

  GTEST_TEST_(test_fixture, test_name, test_fixture, \

              ::testing::internal::GetTypeId<test_fixture>())
可以看到,TEST宏和事件机制对于的TEST_F宏都是调用了GTEST_TEST_宏,我们再追踪这个宏的定义
#define GTEST_TEST_(test_case_name, test_name, parent_class, parent_id)\

class GTEST_TEST_CLASS_NAME_(test_case_name, test_name) : public parent_class {\

 public:\

  GTEST_TEST_CLASS_NAME_(test_case_name, test_name)() {}\

 private:\

  virtual void TestBody();\

  static ::testing::TestInfo* const test_info_ GTEST_ATTRIBUTE_UNUSED_;\

  GTEST_DISALLOW_COPY_AND_ASSIGN_(\

      GTEST_TEST_CLASS_NAME_(test_case_name, test_name));\

};\

\

::testing::TestInfo* const GTEST_TEST_CLASS_NAME_(test_case_name, test_name)\

  ::test_info_ =\

    ::testing::internal::MakeAndRegisterTestInfo(\

        #test_case_name, #test_name, NULL, NULL, \

        (parent_id), \

        parent_class::SetUpTestCase, \

        parent_class::TearDownTestCase, \

        new ::testing::internal::TestFactoryImpl<\

            GTEST_TEST_CLASS_NAME_(test_case_name, test_name)>);\

void GTEST_TEST_CLASS_NAME_(test_case_name, test_name)::TestBody()
我们终于看到了在预处理展开中得到的案例类的定义和注册案例类对象信息的定义代码啦。唯一的疑问在于类的名字是GTEST_TEST_CLASS_NAME_,从字面意思可以知道这宏就是获得类的名字
#define GTEST_TEST_CLASS_NAME_(test_case_name, test_name) \

  test_case_name##_##test_name##_Test
果不其然,宏GTEST_TEST_CLASS_NAME的功能就是把两个参数拼接为一个参数。
RUN_ALL_TESTS宏
我们的测试程序就是从main函数中的RUN_ALL_TEST的调用开始的,在gtest.h中可以找到该宏的定义
#define RUN_ALL_TESTS()\

  (::testing::UnitTest::GetInstance()->Run())
RUN_ALL_TESTS就是简单的调用UnitTest的成员函数GetInstance,我们知道GetInstance就是返回一个单例(Singleton)UnitTest对象,该对象调用成员函数Run
int UnitTest::Run() {

  impl()->set_catch_exceptions(GTEST_FLAG(catch_exceptions));


  return internal::HandleExceptionsInMethodIfSupported(

      impl(),

      &internal::UnitTestImpl::RunAllTests,

     "auxiliary test code (environments or event listeners)") ? 0 : 1;

}
Run函数也是简单的调用HandleExceptionsInMethodIfSupported函数,追踪它的实现
template <class T, typename Result>

Result HandleExceptionsInMethodIfSupported(

    T* object, Result (T::*method)(), const char* location) {


    if (internal::GetUnitTestImpl()->catch_exceptions()) {

     ......  //异常处理省略

     } else {

     return (object->*method)();

   }

 }
HandleExceptionsInMethodIfSupported是一个模板函数,他的模板形参具现化为调用它的UnitTestImpl和int,也就是T = UnitTestImpl, Result = int。在函数体里调用UnitTestImpl类的成员函数RunAllTests
bool UnitTestImpl::RunAllTests() {

    ......

    const TimeInMillis start = GetTimeInMillis();  //开始计时

    if (has_tests_to_run && GTEST_FLAG(shuffle)) {

       random()->Reseed(random_seed_);

       ShuffleTests();

     }

     repeater->OnTestIterationStart(*parent_, i);


     if (has_tests_to_run) {

       //初始化全局的SetUp事件

       repeater->OnEnvironmentsSetUpStart(*parent_);

       //顺序遍历注册全局SetUp事件

       ForEach(environments_, SetUpEnvironment);

       //初始化全局TearDown事件

       repeater->OnEnvironmentsSetUpEnd(*parent_);

       //

       // set-up.

       if (!Test::HasFatalFailure()) {

         for (int test_index = 0; test_index < total_test_case_count();

              test_index++) {

           GetMutableTestCase(test_index)->Run(); //TestCase::Run

         }

       }

      // 反向遍历取消所有全局事件.

      repeater->OnEnvironmentsTearDownStart(*parent_);

     std::for_each(environments_.rbegin(), environments_.rend(),

                    TearDownEnvironment);

      repeater->OnEnvironmentsTearDownEnd(*parent_);

    }

    elapsed_time_ = GetTimeInMillis() - start; //停止计时

    ......

}
如上面代码所示,UnitTestImpl::RunAllTests主要进行全局事件的初始化,以及变量注册。而真正的执行部分在于调用GetMutableTestCase
TestCase* UnitTest::GetMutableTestCase(int i) {

  return impl()->GetMutableTestCase(i); //impl返回UnitTestImpl类型指针

}


TestCase* UnitTestImpl:: GetMutableTestCase(int i) {

    const int index = GetElementOr(test_case_indices_, i, -1);

    return index < 0 ? NULL : test_cases_[index];

}
经过两次调用返回vector向量test_cases_中的元素,它的元素类型为TestCase类型。然后调用TestCase::Run
void TestCase::Run() {

  ......  //省略

  const internal::TimeInMillis start = internal::GetTimeInMillis();

  for (int i = 0; i < total_test_count(); i++) {

    GetMutableTestInfo(i)->Run(); //调用TestCase::GetMutableTestInfo

  }                                     //以及Test_Info::Run

  ...... //省略

}


TestInfo* TestCase::GetMutableTestInfo(int i) {

  const int index = GetElementOr(test_indices_, i, -1);

  return index < 0 ? NULL : test_info_list_[index];

}
看到又转向调用TestCase::GetMutableTestInfo,返回向量test_info_list_的元素。而它的元素类型为Test_info。进而又转向了Test_info::Run
void TestInfo::Run() {

  ......  //省略

  Test* const test = internal::HandleExceptionsInMethodIfSupported(

      factory_, &internal::TestFactoryBase::CreateTest,

      "the test fixture's constructor");

  ......  //省略

    test->Run();  // Test::Run

  ......   //省略

  }
在TestInfo::Run中调用了HandleExceptionsInMethodIfSupported,通过上文中的分析可以得知该函数在这个地方最终的作用是调用internal::TestFactoryBase::CreateTest将factor_所指的工厂对象创建的测试案例对象的地址赋给Test类型的指针test。所以最后调用了Test::Run。
void Test::Run() {

  if (!HasSameFixtureClass()) return;


  internal::UnitTestImpl* const impl = internal::GetUnitTestImpl();

  impl->os_stack_trace_getter()->UponLeavingGTest();

  internal::HandleExceptionsInMethodIfSupported(this, &Test::SetUp, "SetUp()");

  // We will run the test only if SetUp() was successful.

  if (!HasFatalFailure()) {

    impl->os_stack_trace_getter()->UponLeavingGTest();

    internal::HandleExceptionsInMethodIfSupported(

        this, &Test::TestBody, "the test body");

  }


  // However, we want to clean up as much as possible.  Hence we will

  // always call TearDown(), even if SetUp() or the test body has

  // failed.

  impl->os_stack_trace_getter()->UponLeavingGTest();

  internal::HandleExceptionsInMethodIfSupported(

      this, &Test::TearDown, "TearDown()");

}
在Test::Run函数体中我们看到通过HandleExceptionsInMethodIfSupported调用了TestBody,先来看看Test中TestBody的原型声明
virtual void TestBody() = 0;
TestBody被声明为纯虚函数。一切都明朗了,在上文中通过test调用Test::Run,进而通过test::调用TestBody,而test实际上是指向继承自Test类的案例类对象,进而发生了多态,调用的是Test_foo_test_normal_Test::TestBody,也就是我们最初在TEST或者TEST_F宏中所写的测试代码。
如此遍历,就是顺序执行测试demo程序中所写的每一个TEST宏的函数体啦。
总结
经过对预处理得到的TEST宏进行逆向跟踪,到正向跟踪RUN_ALL_TESTS宏,了解了gtest的整个运行过程,里面涉及到一下GOF设计模式的运用,比如工厂函数、Singleton、Impl等。仔细推敲便可发现gtest设计层层跳转,虽然有些复杂,但也非常巧妙,很多地方非常值得我们自己写代码的时候学习的。
另外本文没有提到的地方如断言宏,输出log日志等,因为比较简单就略过了。断言宏和输出log就是在每次遍历调用TestBody的时候进行相应的判断和输出打印,有兴趣的童鞋可以自行研究啦。
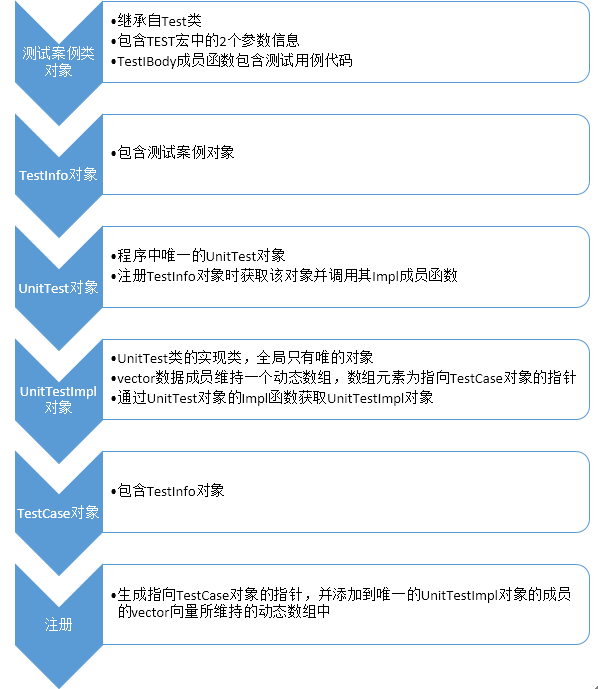
下图是一个简单的TEST宏展开后的流程图

最后再简单将gtest的运行过程简述一遍:
- 整个测试项目只有一个UnitTest对象,因而整个项目也只有一个UnitTestImpl对象。
- 每一个TEST宏生成一个测试案例类,继承自Test类。
- 对于每一个测试案例类,由一个工厂类对象创建该类对象。
- 由该测试案例类对象创建一个Test_Info类对象。
- 由Test_Info类对象创建一个Test_case对象
- 创建Test_case对象的指针,并将其插入到UnitTestImpl对象的数据成员vector向量的末尾位置。
- 对每一个TEST宏进行2-6步骤,那么对于唯一一个UnitTestImpl对象来说,它的数据成员vector向量中的元素按顺序依次指向每一个包含测试案例对象信息的TestCase对象。
- 执行RUN_ALL_TESTS宏,开始执行用例。从头往后依次遍历UnitTestImpl对象中vector向量的中的元素,对于其中的每一个元素指针,经过一系列间接的方式最终调用其所对应的测试案例对象的TestBody成员函数,即测试用例代码。
参考文献
(完)