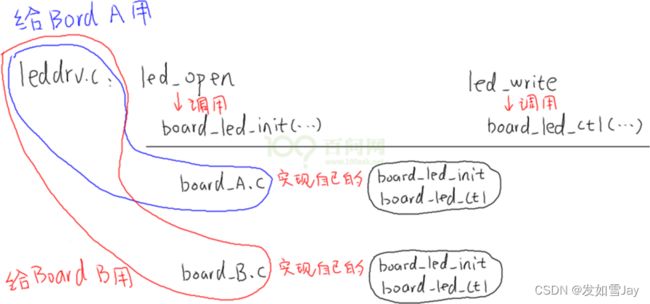
把驱动拆分为通用的框架(leddrv.c
)、具体的硬件操作(board_X.c
):
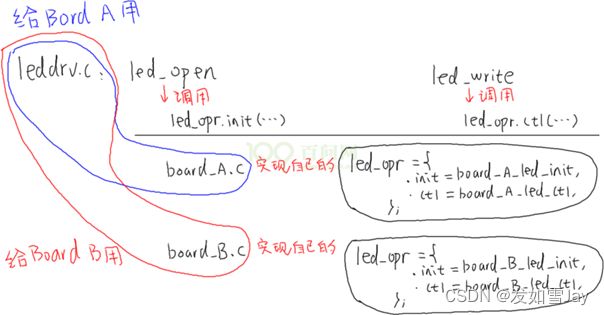
如图:
抽象出一个结构体:
每个单板相关的board_X.c
实现自己的led_operations
结构体,供上层的leddrv.c
调用
驱动程序分为上下两层:leddrv.c
、board_demo.c
。
leddrv.c
负责注册file_operations
结构体,它的open/write
成员会调用board_demo.c
中提供的硬件led_opr
中的对应函数。
led_opr.h
:
#ifndef _LED_OPR_H
#define _LED_OPR_H
//把LED的操作抽象为这个结构体
struct led_operations {
int (*init) (int which); /* 初始化LED, which-哪个LED */
int (*ctl) (int which, char status); /* 控制LED, which-哪个LED, status:1-亮,0-灭 */
};
struct led_operations *get_board_led_opr(void);
#endif
board_demo.c
:头文件led_opr.h
的实现
#include
#include
#include
#include
#include
#include
#include
#include
#include
#include
#include
#include
#include
#include
#include
#include "led_opr.h"
/* 初始化LED, which-哪个LED */
static int board_demo_led_init (int which) {
printk("%s %s line %d, led %d\n", __FILE__, __FUNCTION__, __LINE__, which);
return 0;
}
/* 控制LED, which-哪个LED, status:1-亮,0-灭 */
static int board_demo_led_ctl (int which, char status) {
printk("%s %s line %d, led %d, %s\n", __FILE__, __FUNCTION__, __LINE__, which, status ? "on" : "off");
return 0;
}
//含有led相关操作函数的结构体
static struct led_operations board_demo_led_opr = {
.init = board_demo_led_init,
.ctl = board_demo_led_ctl,
};
struct led_operations *get_board_led_opr(void){
return &board_demo_led_opr;
}
leddrv.c
:
#include
#include
#include
#include
#include
#include
#include
#include
#include
#include
#include
#include
#include
#include
#include
#include "led_opr.h"
#define LED_NUM 2
/* 1. 确定主设备号 */
static int major = 0;
static struct class *led_class;
struct led_operations *p_led_opr;
#define MIN(a, b) (a < b ? a : b)
/* 3. 实现对应的open/read/write等函数,填入file_operations结构体 */
static ssize_t led_drv_read (struct file *file, char __user *buf, size_t size, loff_t *offset){
printk("%s %s line %d\n", __FILE__, __FUNCTION__, __LINE__);
return 0;
}
/* write(fd, &val, 1); */
static ssize_t led_drv_write (struct file *file, const char __user *buf, size_t size, loff_t *offset){
int err;
char status;
struct inode *inode = file_inode(file);
int minor = iminor(inode);
printk("%s %s line %d\n", __FILE__, __FUNCTION__, __LINE__);
err = copy_from_user(&status, buf, 1);
/* 根据次设备号和status控制LED */
p_led_opr->ctl(minor, status);
return 1;
}
static int led_drv_open (struct inode *node, struct file *file){
int minor = iminor(node);
printk("%s %s line %d\n", __FILE__, __FUNCTION__, __LINE__);
/* 根据次设备号初始化LED */
p_led_opr->init(minor);
return 0;
}
static int led_drv_close (struct inode *node, struct file *file){
printk("%s %s line %d\n", __FILE__, __FUNCTION__, __LINE__);
return 0;
}
/* 2. 定义自己的file_operations结构体 */
static struct file_operations led_drv = {
.owner = THIS_MODULE,
.open = led_drv_open,
.read = led_drv_read,
.write = led_drv_write,
.release = led_drv_close,
};
/* 4. 把file_operations结构体告诉内核:注册驱动程序 */
/* 5. 谁来注册驱动程序啊?得有一个入口函数:安装驱动程序时,就会去调用这个入口函数 */
static int __init led_init(void){
int err;
int i;
printk("%s %s line %d\n", __FILE__, __FUNCTION__, __LINE__);
major = register_chrdev(0, "100ask_led", &led_drv); /* /dev/led */
led_class = class_create(THIS_MODULE, "100ask_led_class");
err = PTR_ERR(led_class);
if (IS_ERR(led_class)) {
printk("%s %s line %d\n", __FILE__, __FUNCTION__, __LINE__);
unregister_chrdev(major, "100ask_led");
return -1;
}
for (i = 0; i < LED_NUM; i++)
device_create(led_class, NULL, MKDEV(major, i), NULL, "100ask_led%d", i); /* /dev/100ask_led0,1,... */
p_led_opr = get_board_led_opr();
return 0;
}
/* 6. 有入口函数就应该有出口函数:卸载驱动程序时,就会去调用这个出口函数 */
static void __exit led_exit(void){
int i;
printk("%s %s line %d\n", __FILE__, __FUNCTION__, __LINE__);
for (i = 0; i < LED_NUM; i++)
device_destroy(led_class, MKDEV(major, i)); /* /dev/100ask_led0,1,... */
device_destroy(led_class, MKDEV(major, 0));
class_destroy(led_class);
unregister_chrdev(major, "100ask_led");
}
module_init(led_init);
module_exit(led_exit);
MODULE_LICENSE("GPL");
测试程序ledtest.c
:
#include
#include
#include
#include
#include
#include
/*
* ./ledtest /dev/100ask_led0 on
* ./ledtest /dev/100ask_led0 off
*/
int main(int argc, char **argv){
int fd;
char status;
/* 1. 判断参数 */
if (argc != 3) {
printf("Usage: %s \n" , argv[0]);
return -1;
}
/* 2. 打开文件 */
fd = open(argv[1], O_RDWR);
if (fd == -1){
printf("can not open file %s\n", argv[1]);
return -1;
}
/* 3. 写文件 */
if (0 == strcmp(argv[2], "on")){
status = 1;
write(fd, &status, 1);
}
else{
status = 0;
write(fd, &status, 1);
}
close(fd);
return 0;
}
makefile
:
# 1. 使用不同的开发板内核时, 一定要修改KERN_DIR
# 2. KERN_DIR中的内核要事先配置、编译, 为了能编译内核, 要先设置下列环境变量:
# 2.1 ARCH, 比如: export ARCH=arm64
# 2.2 CROSS_COMPILE, 比如: export CROSS_COMPILE=aarch64-linux-gnu-
# 2.3 PATH, 比如: export PATH=$PATH:/home/book/100ask_roc-rk3399-pc/ToolChain-6.3.1/gcc-linaro-6.3.1-2017.05-x86_64_aarch64-linux-gnu/bin
# 注意: 不同的开发板不同的编译器上述3个环境变量不一定相同,
# 请参考各开发板的高级用户使用手册
KERN_DIR = /home/book/100ask_roc-rk3399-pc/linux-4.4
all:
make -C $(KERN_DIR) M=`pwd` modules
$(CROSS_COMPILE)gcc -o ledtest ledtest.c
clean:
make -C $(KERN_DIR) M=`pwd` modules clean
rm -rf modules.order
rm -f ledtest
# 参考内核源码drivers/char/ipmi/Makefile
# 要想把a.c, b.c编译成ab.ko, 可以这样指定:
# ab-y := a.o b.o
# obj-m += ab.o
# leddrv.c board_demo.c 编译成 100ask.ko
100ask_led-y := leddrv.o board_demo.o
obj-m += 100ask_led.o
在ubuntu系统上使用交叉编译工具链编译之后,将.ko
文件和测试程序拷贝到网络文件系统中
cp 100ask_led.ko ledtest /home/book/nfs_rootfs/
启动开发板,将虚拟机中ubuntu系统的网络文件系统目录挂载到开发板上,192.168.3.54为ubuntu系统的ip
mount -t nfs -o nolock,vers=3 192.168.3.54:/home/book/nfs_rootfs /mnt
在 /mnt 目录下,装载驱动程序:
insmod 100ask_led.ko
在 /mnt 目录下,查看是否有该驱动程序:
cat /proc/devices
在 /mnt 目录下,查看内核中加载的驱动程序:
lsmod
#或
lsmod | grep 100ask_led
在 /mnt 目录下,查看是否有主设备节点
ls /dev/100ask_led* -l
在 /mnt 目录下,执行测试程序:
./ledtest /dev/100ask_led0 on
在 /mnt 目录下,卸载驱动程序
rmmod 100ask_led
查看打印信息,在 /mnt 目录下:
dmesg
IMX6ULL开发板对应的board_demo.c
#include
#include
#include
#include
#include
#include
#include
#include
#include
#include
#include
#include
#include
#include
#include
#include
#include "led_opr.h"
static volatile unsigned int *CCM_CCGR1 ;
static volatile unsigned int *IOMUXC_SNVS_SW_MUX_CTL_PAD_SNVS_TAMPER3;
static volatile unsigned int *GPIO5_GDIR ;
static volatile unsigned int *GPIO5_DR ;
/* 初始化LED, which-哪个LED */
static int board_demo_led_init (int which){
unsigned int val;
//printk("%s %s line %d, led %d\n", __FILE__, __FUNCTION__, __LINE__, which);
if (which == 0){
if (!CCM_CCGR1){
CCM_CCGR1 = ioremap(0x20C406C, 4);
IOMUXC_SNVS_SW_MUX_CTL_PAD_SNVS_TAMPER3 = ioremap(0x2290014, 4);
GPIO5_GDIR = ioremap(0x020AC000 + 0x4, 4);
GPIO5_DR = ioremap(0x020AC000 + 0, 4);
}
/* GPIO5_IO03 */
/* a. 使能GPIO5
* set CCM to enable GPIO5
* CCM_CCGR1[CG15] 0x20C406C
* bit[31:30] = 0b11
*/
*CCM_CCGR1 |= (3<<30);
/* b. 设置GPIO5_IO03用于GPIO
* set IOMUXC_SNVS_SW_MUX_CTL_PAD_SNVS_TAMPER3
* to configure GPIO5_IO03 as GPIO
* IOMUXC_SNVS_SW_MUX_CTL_PAD_SNVS_TAMPER3 0x2290014
* bit[3:0] = 0b0101 alt5
*/
val = *IOMUXC_SNVS_SW_MUX_CTL_PAD_SNVS_TAMPER3;
val &= ~(0xf);
val |= (5);
*IOMUXC_SNVS_SW_MUX_CTL_PAD_SNVS_TAMPER3 = val;
/* b. 设置GPIO5_IO03作为output引脚
* set GPIO5_GDIR to configure GPIO5_IO03 as output
* GPIO5_GDIR 0x020AC000 + 0x4
* bit[3] = 0b1
*/
*GPIO5_GDIR |= (1<<3);
}
return 0;
}
static int board_demo_led_ctl (int which, char status) /* 控制LED, which-哪个LED, status:1-亮,0-灭 */
{
//printk("%s %s line %d, led %d, %s\n", __FILE__, __FUNCTION__, __LINE__, which, status ? "on" : "off");
if (which == 0){
if (status) /* on: output 0*/
{
/* d. 设置GPIO5_DR输出低电平
* set GPIO5_DR to configure GPIO5_IO03 output 0
* GPIO5_DR 0x020AC000 + 0
* bit[3] = 0b0
*/
*GPIO5_DR &= ~(1<<3);
}
else /* off: output 1*/
{
/* e. 设置GPIO5_IO3输出高电平
* set GPIO5_DR to configure GPIO5_IO03 output 1
* GPIO5_DR 0x020AC000 + 0
* bit[3] = 0b1
*/
*GPIO5_DR |= (1<<3);
}
}
return 0;
}
static struct led_operations board_demo_led_opr = {
.num = 1,
.init = board_demo_led_init,
.ctl = board_demo_led_ctl,
};
struct led_operations *get_board_led_opr(void){
return &board_demo_led_opr;
}
在芯片手册中确定的寄存器地址被称为物理地址,在Linux内核中无法直接使用。需要使用内核提供的ioremap把物理地址映射为虚拟地址,使用虚拟地址。
ioremap
函数的使用:
原型:
#include
void __iomem *ioremap(phys_addr_t offset, size_t size)
作用:把物理地址phys_addr
开始的一段空间(大小为size),映射为虚拟地址;返回值是该段虚拟地址的首地址。
virt_addr = ioremap(phys_addr, size);
实际上,它是按页(4096字节)进行映射的,是整页整页地映射的。
假设phys_addr = 0x10002,size=4,ioremap的内部实现是:
a. phys_addr按页取整,得到地址0x10000
b. size按页取整,得到4096
c. 把起始地址0x10000,大小为4096的这一块物理地址空间,映射到虚拟地址空间,
假设得到的虚拟空间起始地址为0xf0010000
d. 那么phys_addr = 0x10002对应的virt_addr = 0xf0010002
不再使用该段虚拟地址时,要执行iounmap函数:
iounmap(virt_addr)