【ChirpStack 】如何获取 JWT TOKEN并利用 API 下发数据?
LoRa App Server 提供了两类 API 接口,其中 RESTful JSON API 提供了一个 API console,在AS地址的基础上使用 /api 即可访问,罗列了 API 端点和文档介绍,测试起来非常方便。
本文主要介绍 如何使用 chirpstack 的API 进行测试以及如何获取 JWT TOKEN。
首先展示效果:
版权声明:本文为博主原创文章,遵循 CC 4.0 BY-SA 版权协议,转载请附上原文出处链接和本声明。
本文链接:https://blog.csdn.net/qq_39217004/article/details/130587131
————————————————
版权声明:本文为CSDN博主「Ethernet_Comm」的原创文章,遵循CC 4.0 BY-SA版权协议,转载请附上原文出处链接及本声明。
原文链接:https://blog.csdn.net/qq_39217004/article/details/130587131
文章目录
- 1.ChirpStack Application Server REST API 如何使用?
-
- 1.1 直接使用报错
- 1.2 获取token认证
-
- 1.2.1 获取 JWT TOKEN
- 1.2.2 将 JWT TOKEN 输入web网页,并刷新页面
- 1.2.3 请求 api 接口,获取到数据
- 1.3 整个流程如下描述
- 1.4 注意事项
- 2. 如何利用api下发数据?
1.ChirpStack Application Server REST API 如何使用?
1.1 直接使用报错
我在本地搭建的 chirpstack 环境,直接使用 api 的步骤如下:
-
启动 chirpstack 服务后在访问
http://127.0.0.1:8080/api -
利用api接口, get /api/application 时,报错。
比如,我想获取所有的 application,则直接请求这个 api接口时,会报错以下信息,具体的操作如图:
为何会报错呢?根据官方的信息介绍,是需要认证才可以。
1.2 获取token认证
官方介绍: RESTful JSON API
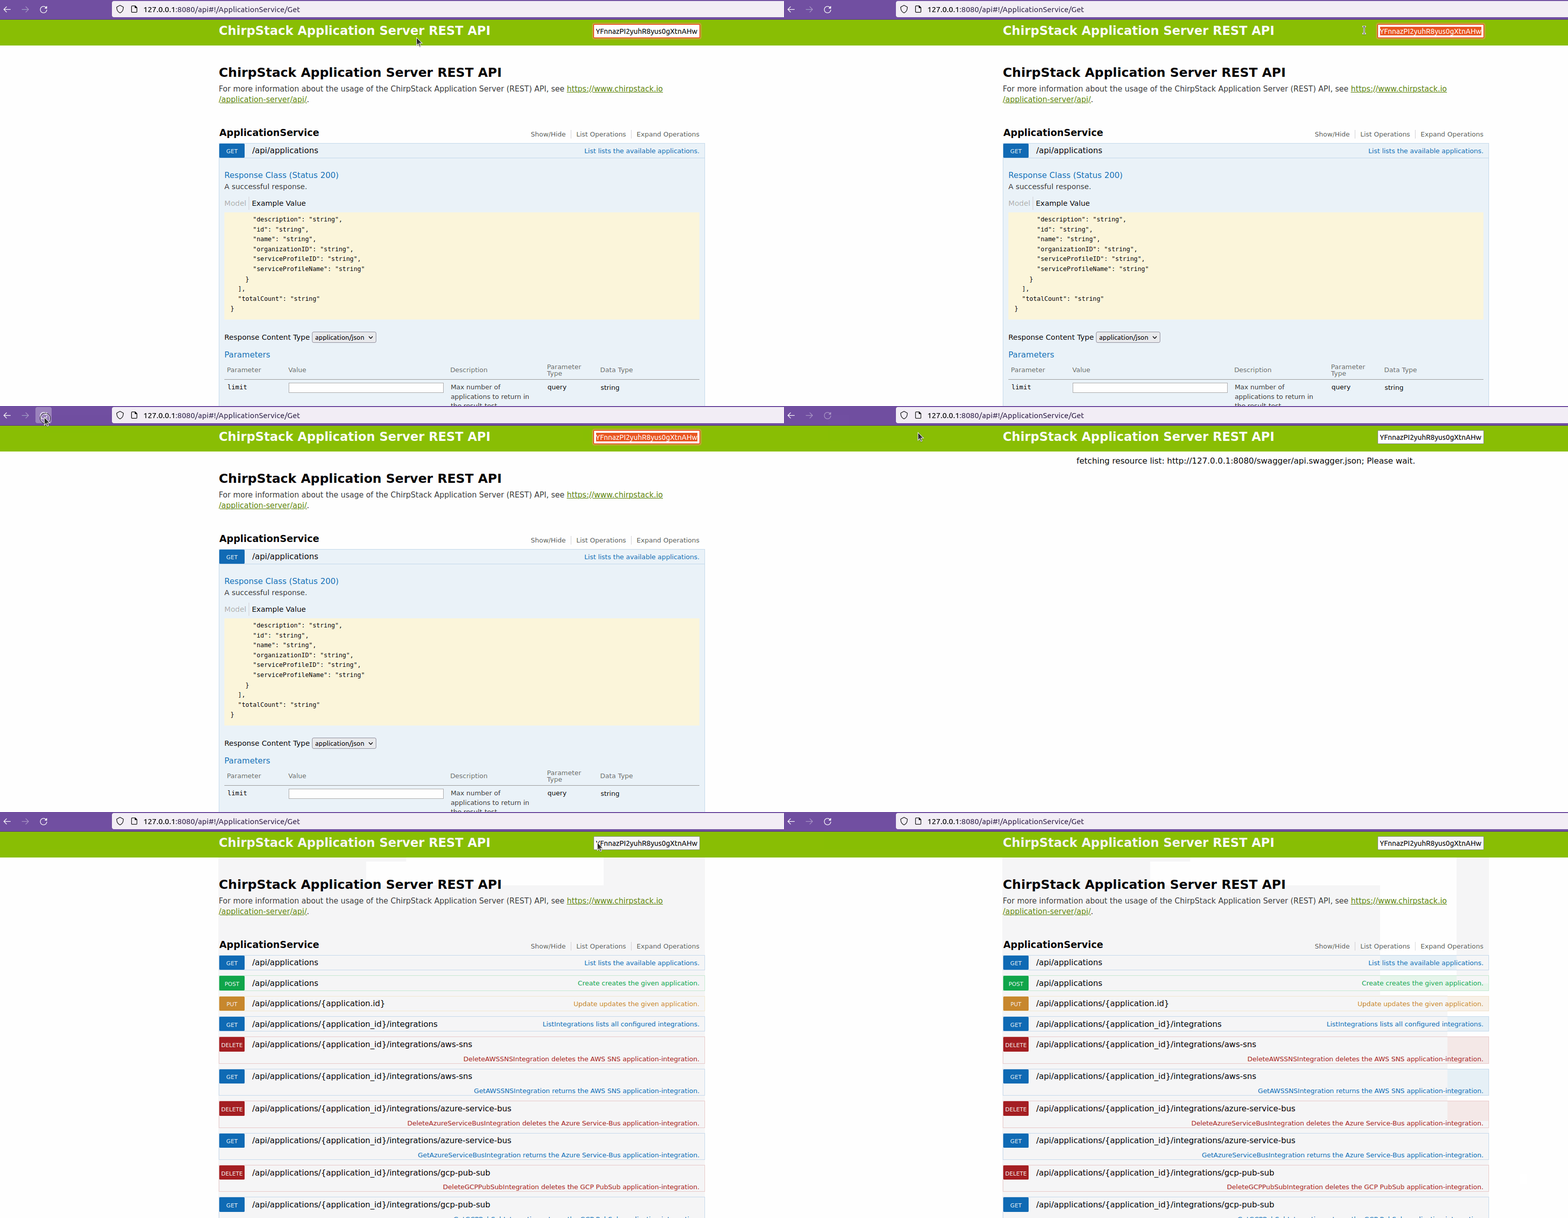
大部分 API 端点都需要有效的 JWT token 才能使用,它们可以填写在右上角的输入区域。
根据项目介绍,API 的认证机制采用了 JSON web-tokens。
我们可以简单使用 login API 来得到一个短期的 token,也可以使用如下方式得到一个更灵活的 token。
认证过程参考:
LoRaWAN LTE-M Gateway Outdoor version
LoRaServer 笔记 2.4 使用 RESTful JSON API
1.2.1 获取 JWT TOKEN
- 在
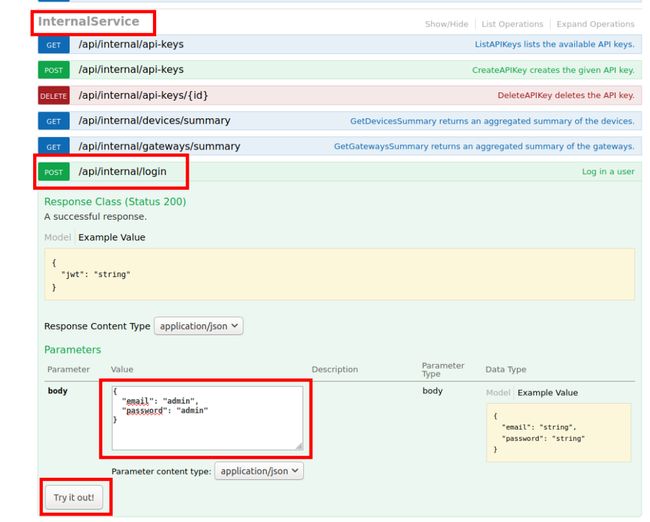
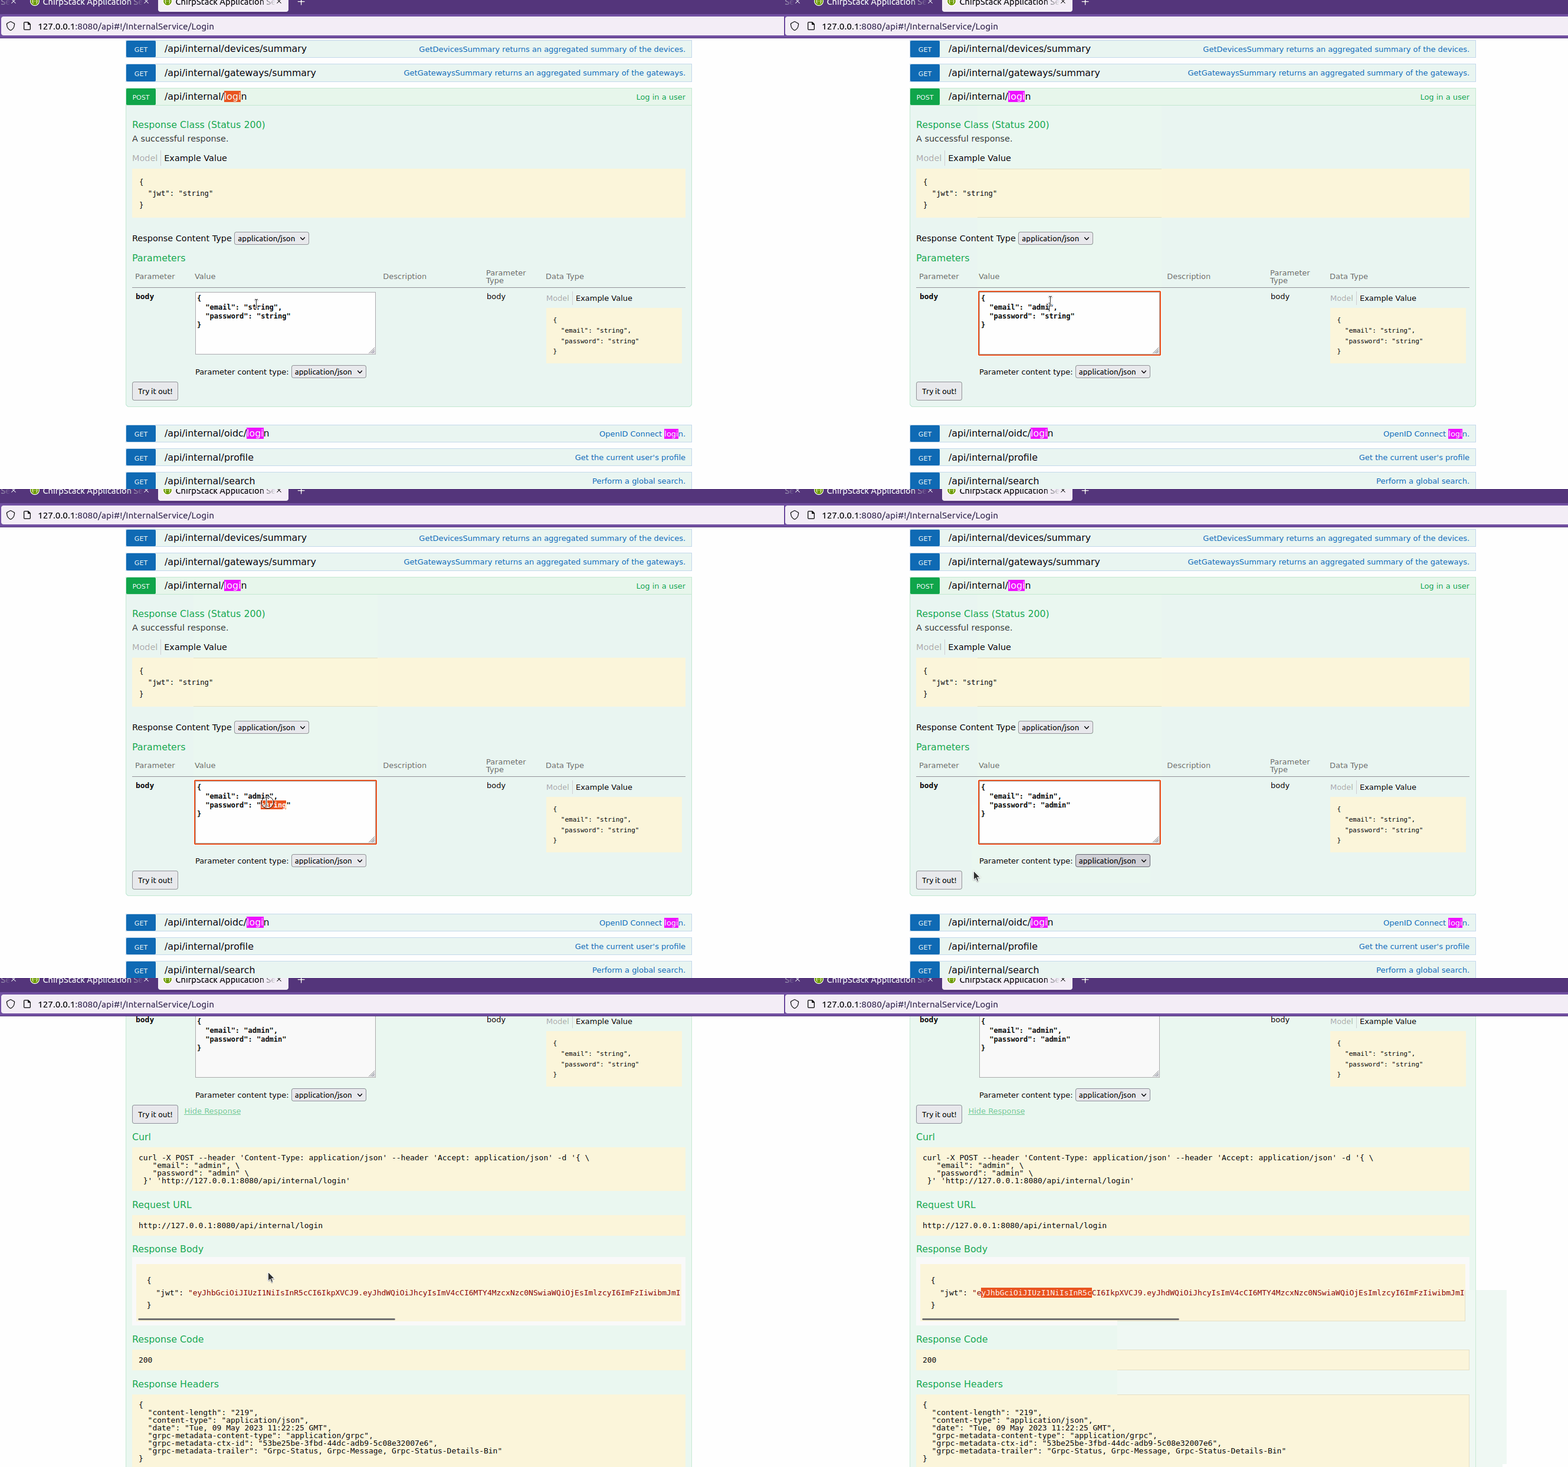
InternalService块中,利用的方法获取JWT TOKEN,在POST /api/internal/login中操作如下:输入用户名和密码,生成密钥
1.2.2 将 JWT TOKEN 输入web网页,并刷新页面
注意:输入 token后不要点击回车,直接刷新页面
1.2.3 请求 api 接口,获取到数据
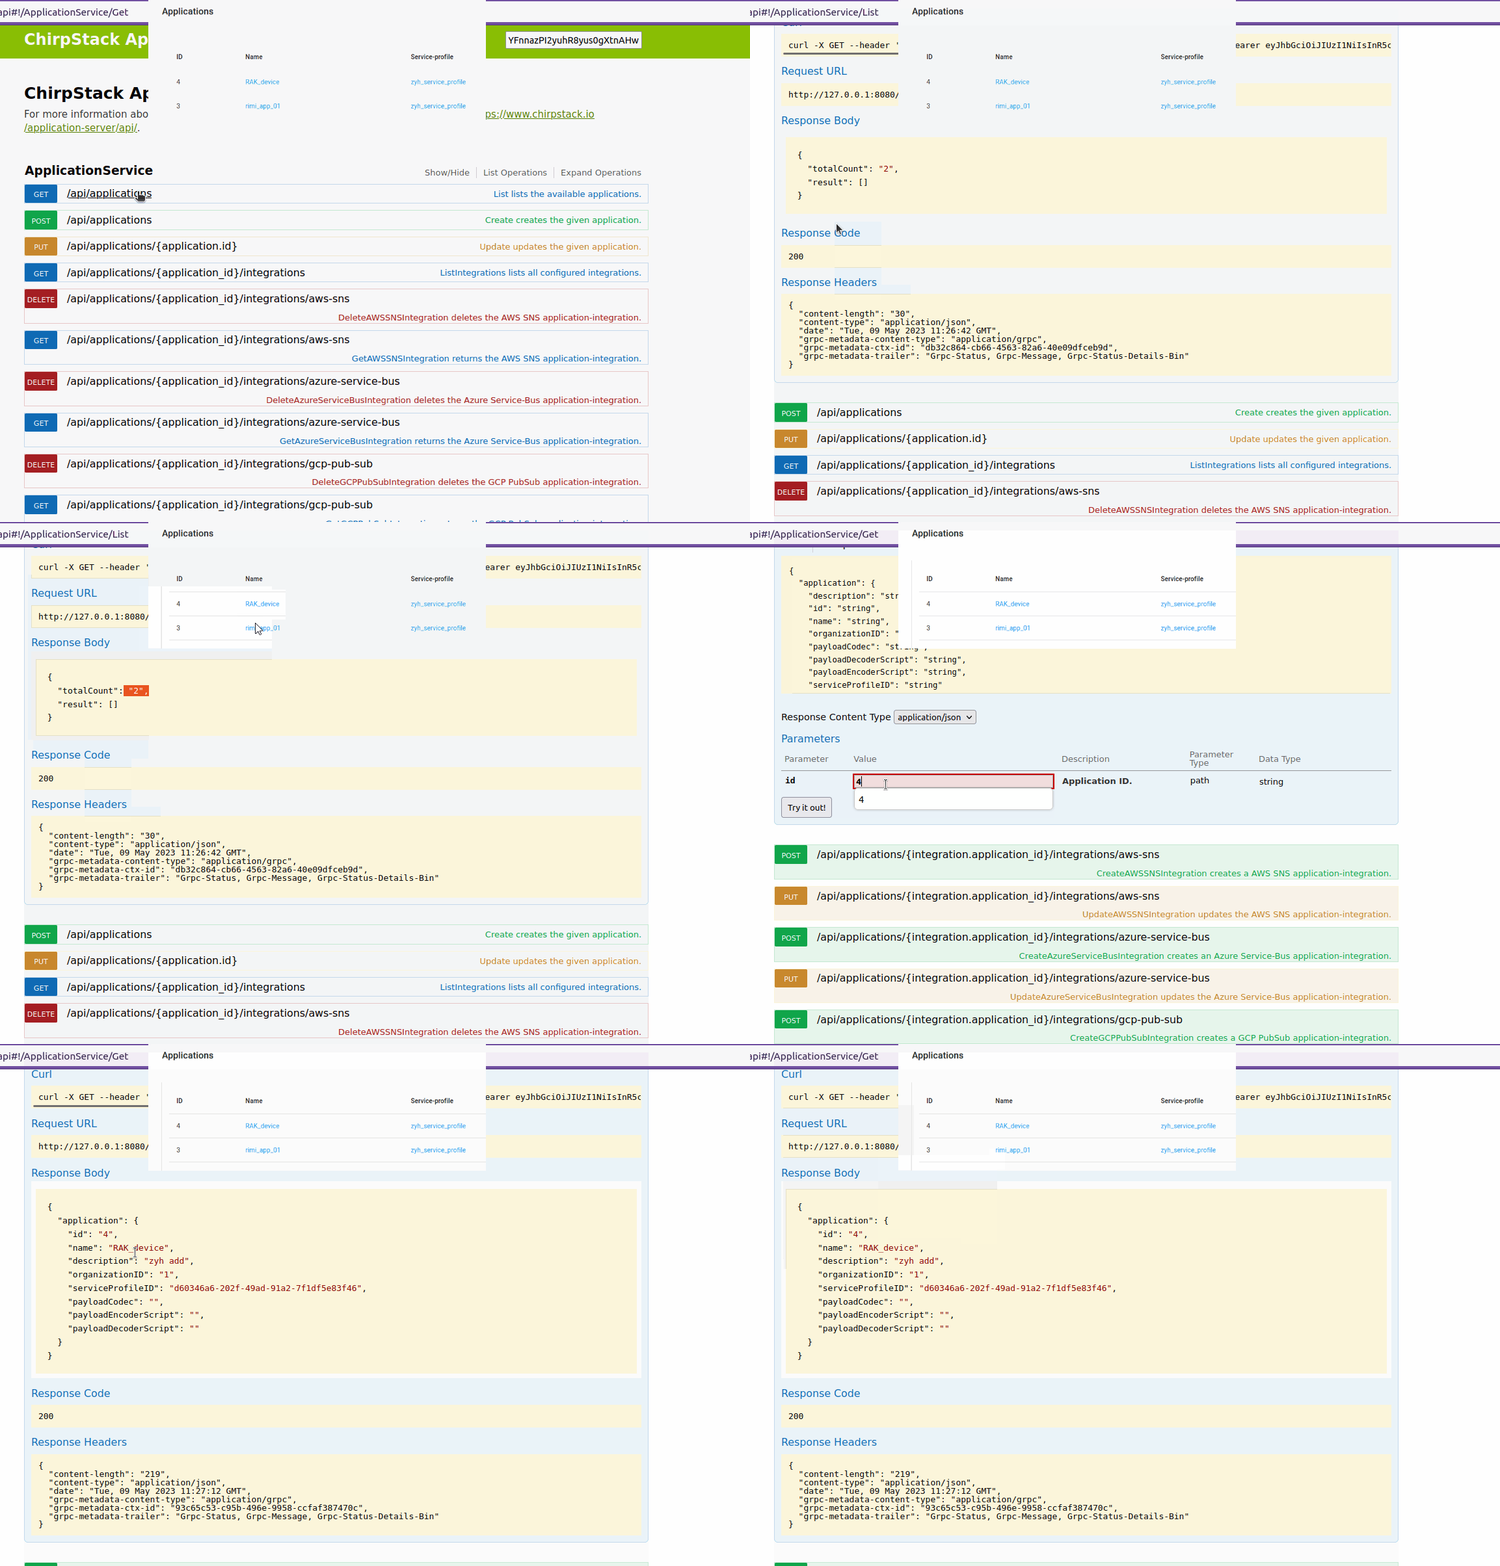
比如我的 chirpstack 的 application 中创建了 2 个应用,我通过请求以下两个 api 可以获取 application 的信息
1.3 整个流程如下描述
e. Chirpstack API
A web interface allows you to communicate with the Chirpstack API, to do this, simply enter 192.168.0.1:8080/api in the search bar of the browser:
This interface allows for example to send a downlink message, to add or remove a device from a program outside Chirpstack.
Before performing any operation, it is necessary to obtain a JWT TOKEN, for this you must go to the InternalService section, then POST /api/internal/login and fill in the body field as below.
Then by clicking on Try it out! a response containing the JWT TOKEN is generated in JSON form:
{ "jwt":"JWT_TOKEN" }
The JWT_TOKEN can then be copied and pasted in the box provided at the top of the page. It is then necessary to refresh the page to take the token into account.
All operations are then released
1.4 注意事项
实测在 搜狗浏览器和系统自带的 Microsof tedge 浏览器以及 google 浏览器 都不行,但是在 **火狐浏览器 **中是可以的。
2. 如何利用api下发数据?
功能描述:使用 /api/devices/{device_queue_item.dev_eui}/queue这个指令给节点下发数据,
【前提条件】
- 节点已经上限
- 网页已经验证过 JWT TOKEN
注意:以下 data 字段的内容是 base64 编码,表示 hello,可以用 base64在线转换网站
{
  "deviceQueueItem":
  {
    "confirmed": false,
    "devEUI": "8800011100020003",
    "fCnt": 0,
	"data":"aGVsbG8=",
    "fPort": 10,
  }
}
实验结果描述:
将以上的 JSON 数据填写到 body 栏中,给lm401节点发送数据 hello,节点接收到数据 68 65 6c 6c 6f (hello)


