启动入口
@SpringBootApplication
public class DemoApplication {
    public static void main(String[] args) {
        // step.1
        SpringApplication.run(DemoApplication.class, args);
    }
}
实例化 SpringApplication 对象
// step.2
public static ConfigurableApplicationContext run(Class primarySource, String... args) {
    return run(new Class[]{primarySource}, args);
}

// step.3
// 实例化SpringApplication对象,在构造方法内加载一些资源
public static ConfigurableApplicationContext run(Class[] primarySources, String[] args) {
    return new SpringApplication(primarySources).run(args);
}

// step.4
public SpringApplication(Class... primarySources) {
    this(null, primarySources);
}
加载运行类信息 & 确定应用类型 & 加载初始化器 & 加载监听器 & 设置运行主类
// step.5
@SuppressWarnings({ "unchecked", "rawtypes" })
public SpringApplication(ResourceLoader resourceLoader, Class... primarySources) {
    this.resourceLoader = resourceLoader;
    Assert.notNull(primarySources, "PrimarySources must not be null");
    // 加载运行类信息,此处的primarySources实际上是启动传入的class
    this.primarySources = new LinkedHashSet<>(Arrays.asList(primarySources));
    // 确定应用类型,默认servlet
    this.webApplicationType = WebApplicationType.deduceFromClasspath();
    this.bootstrapRegistryInitializers = new ArrayList<>(getSpringFactoriesInstances(BootstrapRegistryInitializer.class));
    // 加载初始化器
    setInitializers((Collection) getSpringFactoriesInstances(ApplicationContextInitializer.class));
    // 加载监听器
    setListeners((Collection)getSpringFactoriesInstances(ApplicationListener.class));
    // 设置运行主类
    this.mainApplicationClass = deduceMainApplicationClass();
}
从 getSpringFactoriesInstances() 方法进入可以发现,系统使用 SpringFactoriesLoader 来加载一些预设的配置
- SpringFactoriesLoader 正是 SpringBoot 简化配置的方式
FACTORIES_RESOURCE_LOCATION 由此静态常量定义可知,SpringFactoriesLoader 会将此目录下定义的一些配置加载进来,且支持扩展,开发者根据引入规则按需配置即可,无需再像以前配置spring时写xml文件
public final class SpringFactoriesLoader {

/**
 * The location to look for factories.
 * Can be present in multiple JAR files.
 */
public static final String FACTORIES_RESOURCE_LOCATION = "META-INF/spring.factories";


private static final Log logger = LogFactory.getLog(SpringFactoriesLoader.class);

static final Map>> cache = new ConcurrentReferenceHashMap<>();


private SpringFactoriesLoader() {
}
如果希望自定义初始化器,则需要实现 ApplicationContextInitializer 接口
加载希望自定义监听器,则需要实现 ApplicationListener 接口
以上两者都需要在resources目录下添加 META-INF/spring.factories 配置文件,将自定义的初始化器注册进去![]()
执行启动方法 run()
// step.6
/**
 * Run the Spring application, creating and refreshing a new
 * {@link ApplicationContext}.
 * @param args the application arguments (usually passed from a Java main method)
 * @return a running {@link ApplicationContext}
 */
public ConfigurableApplicationContext run(String... args) {
    // 记录启动开始时间
    long startTime = System.nanoTime();
    // 创建引导上下文
    DefaultBootstrapContext bootstrapContext = createBootstrapContext();
    // 声明应用上下文
    ConfigurableApplicationContext context = null;
    // 设置 无显示器依然启动
    configureHeadlessProperty();
    // 创建所有 Spring 运行监听器并发布应用启动事件 并启用监听器
    SpringApplicationRunListeners listeners = getRunListeners(args);
    listeners.starting(bootstrapContext, this.mainApplicationClass);
    try {
        // 封装命令行参数
        ApplicationArguments applicationArguments = new DefaultApplicationArguments(args);
        // 环境准备 加载当前指定环境的运行参数 例如application-dev.yml 或 .properties
        ConfigurableEnvironment environment = prepareEnvironment(listeners, bootstrapContext, applicationArguments);
        // 设置需要忽略的bean
        configureIgnoreBeanInfo(environment);
        // 打印banner 可通过 SpringApplication.setBannerMode(Banner.Mode.OFF)
        Banner printedBanner = printBanner(environment);
        // 创建应用上下文 即spring容器
        context = createApplicationContext();
        context.setApplicationStartup(this.applicationStartup);
        // 设置bean工厂;初始化.factories中配置;各监听器处理上下文准备事件;设置bean定义加载器;设置资源加载器;设置beanName生成器等
        prepareContext(bootstrapContext, context, environment, listeners, applicationArguments, printedBanner);
        // 设置容器状态;给bean工厂设置;添加后置处理器;国际化;派发早期事件;创建web容器;将上述流程中被加载的bean实例化等
        refreshContext(context);
        // 刷新上下文后置处理
        afterRefresh(context, applicationArguments);
        // 记录启动完成时长
        Duration timeTakenToStartup = Duration.ofNanos(System.nanoTime() - startTime);
        if (this.logStartupInfo) {
            new StartupInfoLogger(this.mainApplicationClass).logStarted(getApplicationLog(), timeTakenToStartup);
        }
        // 发布上下文准备就绪事件
        listeners.started(context, timeTakenToStartup);
        // 执行自定义的run方法
        callRunners(context, applicationArguments);
    }
    catch (Throwable ex) {
        handleRunFailure(context, ex, listeners);
        throw new IllegalStateException(ex);
    }
    try {
        Duration timeTakenToReady = Duration.ofNanos(System.nanoTime() - startTime);
        listeners.ready(context, timeTakenToReady);
    }
    catch (Throwable ex) {
        handleRunFailure(context, ex, null);
        throw new IllegalStateException(ex);
    }
    return context;
}
- 创建引导上下文
可以看到在默认情况下并没有bootstrapRegistryInitializers,个人理解为此处支持了开发者自定义某些在spring容器创建前需要执行的初始化器
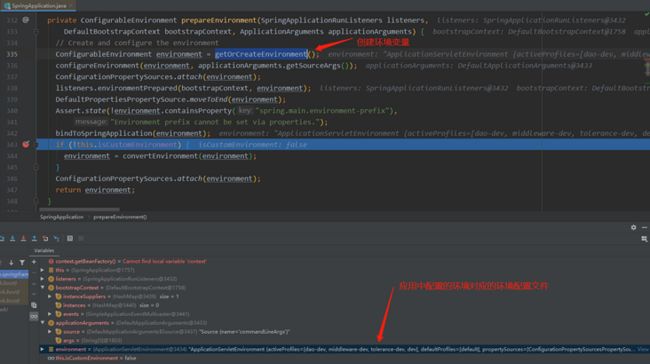
- 设置环境变量
可以看到此处加载了一些自定义的环境配置文件
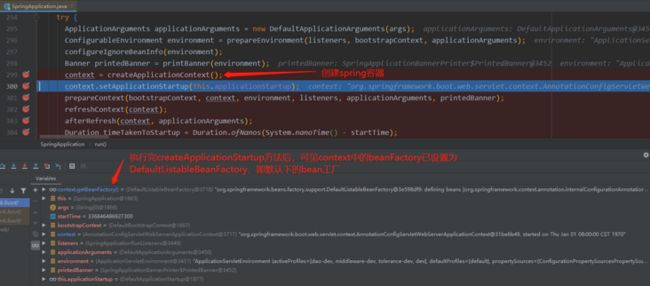
- 创建Spring容器

- 运行时监听器

扩展功能 callRunners(context, applicationArguments)
可以在启动完成后执行自定义的内容;有2种实现方式
- 实现 ApplicationRunner 接口
- 实现 CommandLineRunner 接口
参考资料:
https://blog.csdn.net/weixin_...
https://blog.csdn.net/w200921...