OpenStack GPU直通服务器
layout: post
title: OpenStack GPU直通服务器
catalog: true
tag: [OpenStack, GPU]
- 1. 概述
- 2. 直通GPU特性
- 3. 功能说明
- 3.1. 操作系统支持
- 3.2. 设备支持
- 4. 实现方案
- 5. 部署方案
- 5.1. 示例环境说明
- 5.2. 上线步骤
- 5.2.1. 硬件安装
- 5.2.2. GPU计算节点主机配置
- 5.2.2.1. IOMMU设置
- 5.2.2.1.1. BIOS设置
- 5.2.2.1.2. grab设置
- 5.2.2.2. PCI-STUB设置
- 5.2.2.3. vfio设置
- 5.2.2.3.1. 查看显卡信息
- 5.2.2.3.2. 设置blacklist
- 5.2.2.3.3. 设置whitelist
- 5.2.2.4. 验证
- 5.2.2.1. IOMMU设置
- 5.2.3. OpenStack配置
- 5.2.3.1. 控制节点
- 5.2.3.2. 计算节点
- 5.2.4. 创建gpu机型
- 5.2.5. gpu服务器启动及验证
- 6. 常见问题
- 6.1. NVIDIA显卡的问题
- 7. 参考
1. 概述
直通GPU 云服务器(GPU Virtual Machine)是基于 GPU 的快速、稳定、弹性的计算服务,主要应用于深度学习训练\推理、图形图像处理以及科学计算等场景。
直通GPU 云服务器提供和标准 云服务器一致的方便快捷的管理方式,相对于vGPU云服务器,直通GPU使用的PCI透传技术能带来几乎和物理设备同等的性能。
2. 直通GPU特性
直通GPU具备以下产品特点
- 租户独享物理GPU,可利用几乎与物理设备同等的性能。
- 直通GPU 云服务器位于云内部网络,内网时延低,提供优秀的计算能力。
3. 功能说明
3.1. 操作系统支持
直通GPU云服务器支持Windows和Linux操作系统。
3.2. 设备支持
支持主流厂商PCI插槽的GPU卡。
4. 实现方案
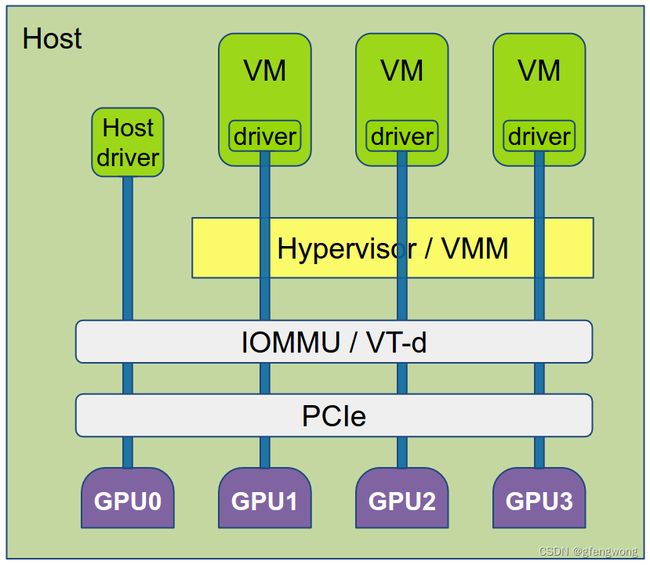
直通GPU云服务器采用了PCI Passthrough技术,将宿主机上某个PCI槽位透传给虚拟机使用,GPU卡即安装在PCI卡槽上,如下图:
PCI直通特性允许虚拟机完全访问与直接控制物理PCI设备。此机制对任何类型的PCI设备都是通用的,并且可以与网络接口卡(NIC),
图形处理单元(GPU)或可以连接到PCI总线的任何其他设备一起运行,在PCI直通的情况下,整个物理设备只能分配给一个虚拟机,并且不能共享。
各组件的关系如下:
5. 部署方案
5.1. 示例环境说明
| 组件 | 版本 | 备注 |
|---|---|---|
| GPU | NVIDIA A100 | |
| 操作系统版本 | CentOS Linux release 7.8.2003 (Core) | |
| 内核版本 | 3.10.0-1127.el7.x86_64 | |
| OpenStack版本 | Train |
5.2. 上线步骤
5.2.1. 硬件安装
按照相关指导安装显卡至计算节点
如有问题需要向显卡厂商寻求协助
注:英伟达服务器支持列表:
https://www.nvidia.com/object/vgpu-certified-servers.html
一般情况下,单独划分GPU AZ,如果存在不同型号的GPU,则划分更新的AZ。
5.2.2. GPU计算节点主机配置
5.2.2.1. IOMMU设置
5.2.2.1.1. BIOS设置
在BIOS中enable VT-x, VT-d, Onboard VGA. Onboard VGA 的enable可以避免一些错误的出现,具体参考Not only for miners GPU integration in Nova environment.
5.2.2.1.2. grab设置
编辑文件 /etc/default/grub
如果没有
GRUB_CMDLINE_LINUX_DEFAULT则编辑GRUB_CMDLINE_LINUX
对于Intel芯片:GRUB_CMDLINE_LINUX_DEFAULT=“intel_iommu=on”
对于AMD芯片:GRUB_CMDLINE_LINUX_DEFAULT=“iommu=pt iommu=1”
编辑完执行 grub2-mkconfig -o /boot/grub/grub.cfg 更新grub配置,如果UEFI启动则grub2-mkconfig -o /boot/efi/EFI/centos/grub.cfg
5.2.2.2. PCI-STUB设置
编辑 /etc/modules 添加如下内容
pci_stub
vfio
vfio_iommu_type1
vfio_pci
kvm
kvm_intel
5.2.2.3. vfio设置
5.2.2.3.1. 查看显卡信息
- 查看显卡的ID
其中 3D controller为NVIDIA GPU, Bridge为NVLink总线设备
此处需记录NVIDIA GPU的PCI总线ID是25:00.0 2b:00.0等多个,由于该GPU卡有多个PCI接口, vendor ID是 10de, product ID是 20b0, 后面会用到
lspci -nn | grep NVIDIA
25:00.0 3D controller [0302]: NVIDIA Corporation Device [10de:20b0] (rev a1)
2b:00.0 3D controller [0302]: NVIDIA Corporation Device [10de:20b0] (rev a1)
48:00.0 3D controller [0302]: NVIDIA Corporation Device [10de:20b0] (rev a1)
4d:00.0 3D controller [0302]: NVIDIA Corporation Device [10de:20b0] (rev a1)
8c:00.0 3D controller [0302]: NVIDIA Corporation Device [10de:20b0] (rev a1)
91:00.0 3D controller [0302]: NVIDIA Corporation Device [10de:20b0] (rev a1)
b7:00.0 Bridge [0680]: NVIDIA Corporation Device [10de:1af1] (rev a1)
b8:00.0 Bridge [0680]: NVIDIA Corporation Device [10de:1af1] (rev a1)
b9:00.0 Bridge [0680]: NVIDIA Corporation Device [10de:1af1] (rev a1)
ba:00.0 Bridge [0680]: NVIDIA Corporation Device [10de:1af1] (rev a1)
bb:00.0 Bridge [0680]: NVIDIA Corporation Device [10de:1af1] (rev a1)
bc:00.0 Bridge [0680]: NVIDIA Corporation Device [10de:1af1] (rev a1)
c5:00.0 3D controller [0302]: NVIDIA Corporation Device [10de:20b0] (rev a1)
cb:00.0 3D controller [0302]: NVIDIA Corporation Device [10de:20b0] (rev a1)
- 查看显卡当前驱动
lspci -s 4d:00.0 -k
4d:00.0 3D controller: NVIDIA Corporation Device 20b0 (rev a1)
	Subsystem: NVIDIA Corporation Device 134f
	Kernel driver in use: nvidia
	Kernel modules: nouveau, nvidia_drm, nvidia
5.2.2.3.2. 设置blacklist
编辑 /etc/modprobe.d/blacklist.conf 添加如下内容
blacklist snd_hda_intel
blacklist amd76x_edac
blacklist vga16fb
blacklist nouveau
blacklist rivafb
blacklist nvidiafb
blacklist rivatv
blacklist nvidia_drm
blacklist nvidia
5.2.2.3.3. 设置whitelist
加载 vfio-pci 并绑定到GPU设备
编辑 /etc/modprobe.d/vfio.conf, ids即上面的VendorID:PRODUCTID
options vfio-pci ids=10de:20b0
将 vfio-pci 驱动加入 /etc/modules-load.d/modules.conf, 确保在开机的时候加载
编辑 /etc/modules-load.d/modules.conf
vfio-pci
更新initramfs,执行 grub2-mkconfig -o /boot/grub/grub.cfg 更新grub配置,如果UEFI启动则grub2-mkconfig -o /boot/efi/EFI/centos/grub.cfg
重启服务器使上面修改生效
总体操作如下图:
最后一步是解绑,一般环境是新的不用解绑,如复用则重装系统
5.2.2.4. 验证
lspci -s 4d:00.0 -nnk
4d:00.0 3D controller [0302]: NVIDIA Corporation Device [10de:20b0] (rev a1)
	Subsystem: NVIDIA Corporation Device [10de:134f]
	Kernel driver in use: vfio-pci
	Kernel modules: nouveau, nvidia_drm, nvidia
关键词 ernel driver in use: vfio-pci 说明上面操作成功
5.2.3. OpenStack配置
- 对于控制节点来说,api需要能接收pci信息,调度器需要增加过滤器以达到想要pci虚拟机,就调度到pci节点的效果
- 对于计算节点来说,需要制定和api相同的设备,再api请求过来的时候
5.2.3.1. 控制节点
- 编辑
/etc/nova/nova.conf增加根据pci调度的过滤器PciPassthroughFilter
enabled_filters=AvailabilityZoneFilter,ComputeFilter,ComputeCapabilitiesFilter,ImagePropertiesFilter,ServerGroupAntiAffinityFilter,ServerGroupAffinityFilter,PciPassthroughFilter
available_filters=nova.scheduler.filters.all_filters
- 增加pci配置
product_id, vendor_id 分别修改为实际环境
[pci]
alias = { "name": "nvidia-a100", "product_id": "20b0", "vendor_id": "10de", "device_type": "type-PF" }
这里需要特别注意下 device_type, 需要按libvirt识别,最简单直接的方式是,启动 nova-computer 服务之后开启debug日志,有一条信息如下
DEBUG nova.compute.resource_tracker [req-2e31a4aa-c3a1-47b6-b975-639940d4c453 - - - - -] Auditing locally available compute resources for gpu-computer1 (node: gpu-computer1) update_available_resource /usr/lib/python2.7/site-packages/nova/compute/resource_tracker.py:870
{"dev_id": "pci_0000_25_00_0", "product_id": "20b0", "dev_type": "type-PF", "numa_node": 0, "vendor_id": "10de", "label":....
这里的 pci_0000_25_00_0 即上面显卡的其中一个pci总线ID 25:00:0, 以这里的 dev_type 为准,这个值主要是通过kvm收集信息、openstack做转化得来的,其中libvirt层的信息可以通过如下命令获取
virsh nodedev-dumpxml pci_0000_25_00_0
<device>
  <name>pci_0000_25_00_0</name>
  <path>/sys/devices/pci0000:17/0000:17:00.0/0000:18:00.0/0000:19:04.0/0000:20:00.0/0000:21:10.0/0000:23:00.0/0000:24:00.0/0000:25:00.0</path>
  <parent>pci_0000_24_00_0</parent>
  <driver>
    <name>vfio-pci</name>
  </driver>
  <capability type='pci'>
    <domain>0</domain>
    <bus>37</bus>
    <slot>0</slot>
    <function>0</function>
    <product id='0x20b0' />
    <vendor id='0x10de'>NVIDIA Corporation</vendor>
    <capability type='virt_functions' maxCount='16'/>
    <iommuGroup number='47'>
      <address domain='0x0000' bus='0x25' slot='0x00' function='0x0'/>
    </iommuGroup>
    <numa node='0'/>
    <pci-express>
      <link validity='cap' port='0' speed='16' width='16'/>
      <link validity='sta' speed='16' width='16'/>
    </pci-express>
  </capability>
</device>
关键字 type-PF
昨晚上述修改之后重启服务
systemctl restart openstack-nova-api
systemctl restart openstack-nova-scheduler
5.2.3.2. 计算节点
控制哪些设备可以透传,对齐nova-api所请求设备
编辑 /etc/nova/nova.conf 有的环境是 /etc/nova/computer.conf ,具体文件以cat /usr/lib/systemd/system/openstack-nova-compute.service 为准,如果ExecStart 没写明配置文件则 /etc/nova/nova.conf, 如果写明配置文件则以具体配置文件路径为准
[pci]
passthrough_whitelist = { "vendor_id": "10de", "product_id": "20b0" }
alias = { "name": "nvidia-a100", "product_id": "20b0", "vendor_id": "10de", "device_type": "type-PF"}
修改完成之后重启服务生效
systemctl restart openstack-nova-compute
5.2.4. 创建gpu机型
openstack flavor create --public --ram 2048 --disk 20 --vcpus 2 gpu-flavor
# nvidia-a100 即为alias中的name, 1为GPU的数量, 调度时以pci_passthrough做过滤
openstack flavor set gpu-flavor --property pci_passthrough:alias='nvidia-a100:1'
5.2.5. gpu服务器启动及验证
以上面机型创建虚拟机,镜像这里以 CentOS7.9 为例,服务器启动之后登陆服务器,检查pci设备
- 查看PCI设备
lspci -nn|grep -i nvi
00:05:0  3D controller  [0302]: NVIAIDA Corporation GA100 [GRID A100X] [10de:20b0] (rev a1)
- 下载并安装驱动
https://www.nvidia.cn/Download/index.aspx?lang=cn 选择产品类型,操作系统选择 linux 64-bit
wget https://www.nvidia.cn/content/DriverDownloads/confirmation.php?url=/tesla/460.106.00/NVIDIA-Linux-x86_64-460.106.00.run&lang=cn&type=Tesla
chmod +x NVIDIA-Linux-x86_64-460.106.00.run
# 安装对应版本的gcc、kernel-devel
yum install kernel-devel-$(uname -r) kernel-headers-$(uname -r) gcc -y
./NVIDIA-Linux-x86_64-460.106.00.run
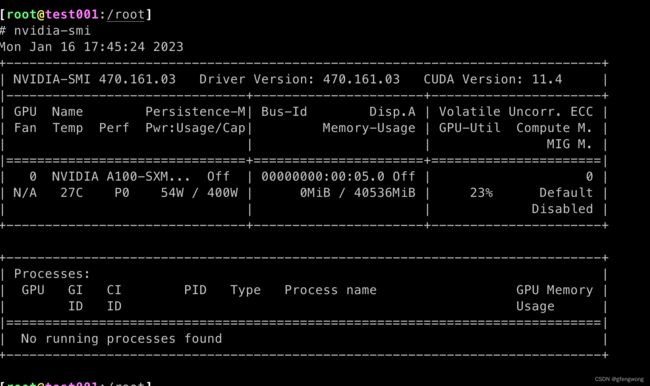
安装成功之后使用 nvidia-smi 就能看到显卡信息
6. 常见问题
6.1. NVIDIA显卡的问题
因为NIVIDIA显卡的驱动会检测是否跑在虚拟机里,如果在虚拟机里驱动就会出错,所以我们需要对显卡驱动隐藏hypervisor id。
在OpenStack的Pile版本中的Glance 镜像引入了img_hide_hypervisor_id=true的property,所以可以对镜像执行如下的命令隐藏hupervisor id:
openstack image set IMG-UUID --property img_hide_hypervisor_id=true
通过此镜像安装的instance就会隐藏hypervisor id。
可以通过下边的命令查看hypervisor id是否隐藏:
cpuid | grep hypervisor_id
hypervisor_id = "KVMKVMKVM "
hypervisor_id = "KVMKVMKVM "
上边的显示结果说明没有隐藏,下边的显示结果说明已经隐藏:
cpuid | grep hypervisor_id
hypervisor_id = " @ @ "
hypervisor_id = " @ @ "
7. 参考
- pci-passthrough
- gpu-passthrough-in-openstack
- GPGPU on OpenStack - The Best Practice for GPGPU Internal Cloud

