AIGC:文生图stable-diffusion-webui部署及使用
1 stable-diffusion-webui介绍
Stable Diffusion Web UI 是一个基于 Stable Diffusion 的基础应用,利用 gradio 模块搭建出交互程序,可以在低代码 GUI 中立即访问 Stable Diffusion
- Stable Diffusion 是一个画像生成 AI,能够模拟和重建几乎任何可以以视觉形式想象的概念,而无需文本提示输入之外的任何指导
- Stable Diffusion Web UI 提供了多种功能,如 txt2img、img2img、inpaint 等,还包含了许多模型融合改进、图片质量修复等附加升级。
- 通过调节不同参数可以生成不同效果,用户可以根据自己的需要和喜好进行创作。
- 我们可以通过Stable Diffusion Web UI 训练我们自己的模型,它提供了多种训练方式,通过掌握训练方法可以自己制作模型。
2 stable-diffusion-webui安装部署
2.1 conda环境安装
conda环境准备详见:annoconda
2.2 运行环境构建
git clone https://github.com/AUTOMATIC1111/stable-diffusion-webui.git
cd stable-diffusion-webui
conda create -n sdw python=3.9
conda activate sdw

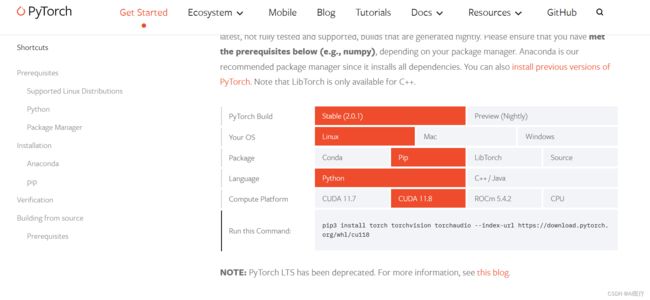
pip3 install torch torchvision torchaudio --index-url https://download.pytorch.org/whl/cu118
注意:pytorch版本下载,根据本地环境选择对应的版本,下载地址:地址
2.3 模型下载
(1)模型文件
模型下载地址:地址,下载完成后,按下面的目录存放
mkdir -p models/Stable-diffusion/

mv /opt/v1-5-pruned-emaonly.safetensors models/Stable-diffusion/
(2)通过proxy下载,解决下载慢或下载失败的问题
[root@localhost stable-diffusion-webui]# vi modules/launch_utils.py 将https://github.com替换为https://ghproxy.com/https://github.com,即使用Ghproxy代理
修改的内容如下:
def prepare_environment():
    torch_index_url = os.environ.get('TORCH_INDEX_URL', "https://download.pytorch.org/whl/cu118")
    torch_command = os.environ.get('TORCH_COMMAND', f"pip install torch==2.0.1 torchvision==0.15.2 --extra-index-url {torch_index_url}")
    requirements_file = os.environ.get('REQS_FILE', "requirements_versions.txt")

    xformers_package = os.environ.get('XFORMERS_PACKAGE', 'xformers==0.0.20')
    gfpgan_package = os.environ.get('GFPGAN_PACKAGE', "https://ghproxy.com/https://github.com/TencentARC/GFPGAN/archive/8d2447a2d918f8eba5a4a01463fd48e45126a379.zip")
    clip_package = os.environ.get('CLIP_PACKAGE', "https://ghproxy.com/https://github.com/openai/CLIP/archive/d50d76daa670286dd6cacf3bcd80b5e4823fc8e1.zip")
    openclip_package = os.environ.get('OPENCLIP_PACKAGE', "https://ghproxy.com/https://github.com/mlfoundations/open_clip/archive/bb6e834e9c70d9c27d0dc3ecedeebeaeb1ffad6b.zip")

    stable_diffusion_repo = os.environ.get('STABLE_DIFFUSION_REPO', "https://ghproxy.com/https://github.com/Stability-AI/stablediffusion.git")
    k_diffusion_repo = os.environ.get('K_DIFFUSION_REPO', 'https://ghproxy.com/https://github.com/crowsonkb/k-diffusion.git')
    codeformer_repo = os.environ.get('CODEFORMER_REPO', 'https://ghproxy.com/https://github.com/sczhou/CodeFormer.git')
    blip_repo = os.environ.get('BLIP_REPO', 'https://ghproxy.com/https://github.com/salesforce/BLIP.git')

    stable_diffusion_commit_hash = os.environ.get('STABLE_DIFFUSION_COMMIT_HASH', "cf1d67a6fd5ea1aa600c4df58e5b47da45f6bdbf")
    k_diffusion_commit_hash = os.environ.get('K_DIFFUSION_COMMIT_HASH', "c9fe758757e022f05ca5a53fa8fac28889e4f1cf")
    codeformer_commit_hash = os.environ.get('CODEFORMER_COMMIT_HASH', "c5b4593074ba6214284d6acd5f1719b6c5d739af")
    blip_commit_hash = os.environ.get('BLIP_COMMIT_HASH', "48211a1594f1321b00f14c9f7a5b4813144b2fb9")
2.4 webui运行
(1)设置允许root用户运行(如果不以root用户运行,可以跳过这个步骤)
当我们以root用户运行时,会报如下错误:
 [root@localhost stable-diffusion-webui]# sh webui.sh

################################################################
Install script for stable-diffusion + Web UI
Tested on Debian 11 (Bullseye)
################################################################

################################################################
ERROR: This script must not be launched as root, aborting...
################################################################
通过修改webui.sh解决
vi webui.sh修改文件第51行,修改后如下
# this script cannot be run as root by default
can_run_as_root=1
(2)启动项目
仅在本机访问,webui绑定127.0.0.1地址,启动命令如下:
sh webui.sh可以通过局域网访问,webui绑定0.0.0.0地址,启动命令如下:
sh webui.sh --listen可以通过局域网访问,webui绑定0.0.0.0地址,带--xformers启动,启动时会自动安装xformers组件,加速GPU运行
sh webui.sh --listen --xformers3 stable-diffusion-webui使用
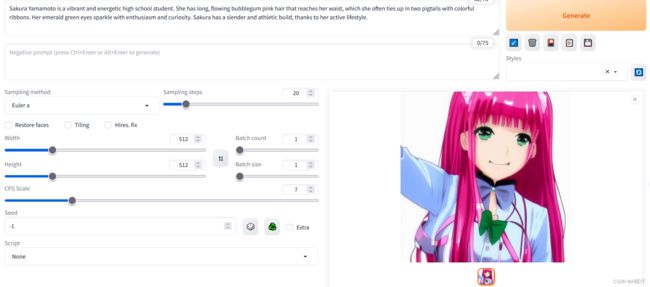
启动界面可以大致分为4个区域【模型】【功能】【参数】【出图】四个区域
(1)模型区域:模型区域用于切换我们需要的模型,模型下载后放置相对路径为/modes/Stable-diffusion目录里面,网上下载的safetensors、ckpt、pt模型文件请放置到上面的路径,模型区域的刷新箭头刷新后可以进行选择。
(2)功能区域:功能区域主要用于我们切换使用对应的功能和我们安装完对应的插件后重新加载UI界面后将添加对应插件的快捷入口在功能区域,功能区常见的功能描述如下
- txt2img(文生图) --- 标准的文字生成图像;
- img2img (图生图)--- 根据图像成文范本、结合文字生成图像;
- Extras (更多)--- 优化(清晰、扩展)图像;
- PNG Info --- 图像基本信息
- Checkpoint Merger --- 模型合并
- Textual inversion --- 训练模型对于某种图像风格
- Settings --- 默认参数修改
(3)参数区域:根据您选择的功能模块不同,可能需要调整的参数设置也不一样。例如,在文生图模块您可以指定要使用的迭代次数,掩膜概率和图像尺寸等参数配置
(4)出图区域:出图区域是我们看到AI绘图的最终结果,在这个区域我们可以看到绘图使用的相关参数等信息。
3.1 txt2img(文生图)
在设置页面中,您可以输入文本,选择模型并配置其他参数。文本是必需的,它将成为图像生成的依据。您可以选择预定义的模型或上传自己的模型。您还可以选择一些其他参数,例如批处理大小,生成的图像尺寸等。下面是一些参数的说明:
- 采样方法 (Sampler):这个参数允许您选择用于生成图像的采样方法。默认情况下,该参数设置为“Eulea”,但您也可以选择“DPM++”后面的新加入选项,这个会比默认的生成的图片细节内容更加丰富些。
- 迭代步数(Sampling steps): 这个参数允许您指定图像生成的迭代次数。较多的迭代次数可能会导致更好的图像质量,但也需要更长的时间来完成生成,默认50起步。
- 宽度&高度:这个参数允许您指定图片生成的高度和宽度。较大的高度宽度需要更多的显存计算资源,这里默认512*512即可,需要图片放大我们可以去更多(send to extras)模块用放大算法进行图片放大。
- 生成批次(Batch count):此参数允许您用指定模型将为每个生成的图像运行的最大迭代次数。增加这个值多次生成图片但生成的时间也会更长(有多图需要建议减少图片生成的批次改为增加单次生成图片的数量参数即可)。
- 每批数量(Batch size):此参数允许您指定一次可以生成的最大图像数量。如果您的系统资源有限,并且需要以较小的批量生成映像,那么这可能很有用。
- 提示词相关性(CFG Scale):此参数可以变更图像与提示符的一致程度(增加这个值将导致图像更接近你的提示,但过高会让图像色彩过于饱和,数值越小AI绘图发挥的自我空间越大越有可能产生有创意的结果(默认为7)。
- 种子数(Seed): 此参数允许您指定一个随机种子,将用于初始化图像生成过程。相同的种子值每次都会产生相同的图像集,这对于再现性和一致性很有用。如果将种子值保留为-1,则每次运行文本-图像特性时将生成一个随机种子。
- 优化面部(Restore faces):优绘制面部图像可勾选,头像是近角时勾选貌似容易过度拟合出现虚化,适合在远角时勾选该选项。
- 可平铺(Tiling):用于生成一个可以平铺的图像。
- Highres. fix:使用两个步骤的过程进行生成,以较小的分辨率创建图像,然后在不改变构图的情况下改进其中的细节,选择该部分会有两个新的参数Scale latent在潜空间中对图像进行缩放。另一种方法是从潜在的表象中产生完整的图像,将其升级,然后将其移回潜在的空间。Denoising strength 决定算法对图像内容的保留程度。在0处,什么都不会改变,而在1处,你会得到一个不相关的图像;
3.2 imge2img(图生图)
img2img功能可以让您用stable diffusion web ui生成元画像和似的构图色彩的画像,或者指定一部分内容进行变换。
与text2img相比,img2img新增了缩放模式和一个重绘幅度(Denoising strength)参数设置,上面的例子中这边增加了黑发提示和调整图片大小并且设置重绘幅度(Denoising strength)值为1,帮我们重新生成了一张黑发的女主图片,下面是相关参数说明。
- 缩放模式:主要是我们调整了图片尺寸后以何种模式保证图片的输出效果(可选有:拉伸/裁剪/填充/just resize);
- 重绘幅度(Denoising strength):图像模仿自由度,越高越自由发挥,越低和参考图像越接近,通常小于0.3基本就是加个滤镜;
3.3 Inpaint(重绘)
inpaint功能可以让您用stable diffusion web ui将图片中被手工遮罩的部分重新绘制,如果您发现了一张整体尚可、细节崩坏的图,就可以点击这个按钮开始局部重绘。web ui会自动为您生成一个遮罩层,您可以用鼠标在图片上涂抹需要修复的区域。然后点击“生成”按钮,web ui会根据遮罩层和原图生成一个新的图片,并显示在右侧,(官方有基于1.5的专门的inpaint 修复模型),除此之外重绘我们还能利用pix2pix插件类chatgpt来实现改图功能。
- 蒙版模糊(Mask blur):遮色片的模糊,用于控制遮罩图像的模糊程度,具体来说,遮罩模糊度越大,遮罩图像的边缘就越模糊,相邻像素之间的颜色差异就越小,从而导致修复图像的效果更加平滑和自然。相反,如果遮罩模糊度较小,则遮罩图像的边缘更加锐利,修复图像的效果可能会更加清晰和精细。需要注意的是,较大的遮罩模糊度可能会导致修复图像的细节丢失,因此需要权衡模糊度和修复图像的细节之间的平衡
- 蒙版模式:
- 重绘蒙版内容: 此选项是让它帮我们重绘我们加遮色片的区域(生成一个新的围脖);
- 重绘非蒙版内容:此选项会保留我们涂抹的遮色片区域(此例子中的围脖)并重新绘制图片的其他内容生成 一张新的图;
3.4 Extras(图像缩放)
Extras部分提供了一些额外的功能,包括Super Resolution(超分辨率),针对二次元图片有专门的发放大算法需要另外加载,下面将分别介绍如何使用这些功能。
Super Resolution(超分辨率)
超分辨率功能可以将低分辨率图像提高到高分辨率图像的大小,从而提高图像的清晰度和细节。使用超分辨率功能需要输入一张低分辨率的图像,并指定要将其放大的倍数。
使用超分辨率功能的步骤如下:
Step 1:打开Stable Diffusion ,并点击“Extras”按钮。
Step 2:在“Image”栏中上传一张低分辨率图像。
Step 3:选择对应的缩放算法。您可以选择2、3或4倍,或指定自定义倍数。
Step 4:单击“Process”按钮,等待处理完成后即可查看生成的高分辨率图像。
4 问题解决
4.1 Cannot locate TCMalloc问题
[root@localhost stable-diffusion-webui]# sh webui.sh --listen

################################################################
Install script for stable-diffusion + Web UI
Tested on Debian 11 (Bullseye)
################################################################

Cannot locate TCMalloc (improves CPU memory usage)
通过如下命令解决:
yum install gperftools gperftools-devel安装完成后再次启动,错误已经消失
4.2 Couldn't determine Stable Diffusion's hash问题
如果git版本为1.8则升级git版本
把老版本的 Git 卸掉。
sudo yum -y remove git
sudo yum -y remove git-*


添加 End Point 到 CentOS 7 仓库
sudo yum -y install https://packages.endpointdev.com/rhel/7/os/x86_64/endpoint-repo.x86_64.rpm


安装 Git
sudo yum -y install git
依次忽略git相关文件夹
git config --global --add safe.directory /opt/stable-diffusion-webui/repositories/stable-diffusion-stability-ai

git config --global --add safe.directory /opt/stable-diffusion-webui/repositories/CodeFormer

git config --global --add safe.directory /opt/stable-diffusion-webui/repositories/k-diffusion

git config --global --add safe.directory /opt/stable-diffusion-webui/repositories/BLIP

git config --global --add safe.directory /opt/stable-diffusion-webui/repositories/taming-transformers
解决方法详见:Couldn‘t determine Stable Diffusion‘s hash问题解决


