docker swarm集群---SpringCloud基础设施及业务篇
本文的主节点IP为A,A可以是公网或者内网地址。
配置好集群以及仓库管理等的基础设施之后,下一步就是使用他们了,我们的项目目前主要是使用Java作为主要技术栈,使用springcloud来进行微服务的架构,涉及多个仓库,所以本篇文章我会记录下我们项目部署相关的细节。
首先,我把所有的Java仓库分为四类,在gitosis.conf中,前三类各属于一个文件夹。第四类可能有多个文件夹,每个文件夹包含一个消费者仓库consumer和一个生产者仓库client,以下我们以一个新闻业务为例进行说明。
- 配置与注册中心
- 网关
- 监控类
- 业务类
我会重点讲解一下配置与注册中心的编写、配置与部署,其他几项的步骤差不多,就不会太过详细的讲解了,监控类主要是指zipkin等组件,目前还没有研究透,所以目前先不进行记录,但是预留一个位置。
0.配置gitosis.conf
这里我假设所有项目都是由相同的账号来进行编写,项目名称为non,则配置与注册中心的文件夹名为non_base,网关的文件夹为non_gateway,监控类的文件夹为non_monitor,最后业务类的文件夹命名格式为non_业务名称,如用户业务则为non_user。
于是可以这样来写gitosis.conf。
[group non]
members = zekdot@z-terminal
writable = non_base non_monitor non_gateway non_user
然后添加并进行提交
git commit -am "增加新项目"
git push origin master
我们顺手在主机A上创建一个overlay网络,否则可能之后部署的服务不能彼此通信。
docker network create --driver overlay non_network
1.配置与注册中心
首先新建文件夹non_base,初始化git仓库并添加远程地址。
mkdir non_base
git init
git remote add origin zgit@A:non_base.git
1.1.注册中心
注册中心是Spring Cloud必不可少的一个组件,它可以实现服务治理,个人感觉就是能够让其他程序或者用户本身知道哪些服务当前在线,状态如何,而这些是由注册中心封装心跳包等功能实现的。
注册中心的代码和配置等可以参考以下的博客中的创建“服务注册中心”的Eureka的配置部分,因为本文也是参考他的做的,所以不再重复了。
Spring Cloud构建微服务架构:服务注册与发现(Eureka、Consul)【Dalston版】
本文唯一的区别就是端口使用了9101,即application.properties修改成如下:
spring.application.name=eureka-server
server.port=9101

eureka.instance.hostname=localhost
eureka.client.register-with-eureka=false
eureka.client.fetch-registry=false
最后在和pom.xml同目录下创建Dockerfile。
FROM openjdk:8u282-slim as eureka
ENV TZ=Asia/Shanghai
RUN ln -snf /usr/share/zoneinfo/$TZ /etc/localtime && echo $TZ > /etc/timezone
ADD app.jar app.jar
RUN bash -c "touch /app.jar"
ENTRYPOINT ["java","-jar","app.jar"]
1.2.配置中心
配置中心对于Spring Cloud来说其实是一个可选的组件,他可以实现各项目的集中配置,所谓配置,就是指application.properties中的内容,它定义了项目的端口号、项目名称、数据库url用户名密码等。
我的项目采用了配置中心这一组件的主要理由是为了增强项目的可配置性,因为之后项目都会打包到镜像中然后部署为容器,如果想要修改配置文件的话有两种方案:
- 修改配置文件,重新打包镜像
- 给容器挂载一个卷来存储配置文件,启动的时候载入
但这两种我觉得都不如直接创建一个配置中心,当需要修改配置文件时,只需要修改,然后git add commit push,再重启容器来的方便。
首先我们需要在gitosis.conf增加一个用于配置项目的仓库non_config:
[group non]
members = zekdot@z-terminal
writable = non_base non_monitor non_gateway non_user non_config
然后增加提交并推送。
为了测试配置中心搭建情况,我们创建一个测试的配置文件。
mkdir non_config
cd non_config
git init
git remote add origin zgit@A:non_config.git
touch test-client.yml
然后写入如下的内容:
spring:
  application:
    name: test-client
eureka:
  client:
    serviceUrl:
      defaultZone: http://A:9101/eureka/
    healthcheck:
      enabled: true
  instance:
    lease-renewal-interval-in-seconds: 10
    lease-expiration-duration-in-seconds: 30
server:
  port: 9111
然后添加,提交推送即可。
配置中心整体流程依然是按照如下博客的配置完成的,可以参考。
Spring Cloud构建微服务架构:分布式配置中心【Dalston版】
当然,我们项目中使用的是自己搭建的服务器,所以需要把git的地址改成我们自己的,而且本项目采用了9102作为配置中心的端口。
spring.application.name=config-server
spring.cloud.config.server.git.uri=zgit@A:lancai_config.git
server.port=9102
此外,如果我们上一篇博客创建的公私钥对是有密码的,如果完全按照博客中的内容来搭建配置中心会出现权限问题,因此我们需要做一些措施来解决这个问题。
具体来说就是在配置文件后面再增加一下公私钥对的密码。
spring.cloud.config.server.git.passphrase=密码内容
spring.cloud.config.server.git.strict-host-key-checking=false
然后还有最后一个问题,就是在集群下,部署的服务不能确定会到哪一台服务器上,如果这台服务器没有所需要的私钥的话也会导致失效。目前我考虑了三种方案来解决这种问题。
- 不要以服务的形式来启动配置中心的容器,把它和公钥所在的服务器强绑定。
- 以服务的形式来启动配置中心的容器,并给每一台服务器都复制一份访问git服务器的私钥。
- 配置NFS,把私钥所在文件夹配置为共享文件夹。NFS的配置可以参考我的另一篇博客:Ubuntu服务端客户端配置NFS
为了简单和稳定起见,我这里采用了第二个方案,给每一个服务器都复制了一份私钥文件夹/home/zekdot/.ssh,里面需要存在当时创建git服务器的公钥对应的私钥,如当时公钥为test.pub,那么私钥就为test。
此外还需要配置一下保证让test用于A主机的认证,在/home/zekdot/.ssh下创建一个文本文件config,并写入如下的内容:
Host A
HostName A
User zgit
IdentityFile /root/.ssh/zekdot
IdentitiesOnly yes
如果不写这个的话,从服务器连接A的时候可能会报错:
org.eclipse.jgit.errors.UnsupportedCredentialItem: ssh://[email protected]:22: org.eclipse.jgit.transport.CredentialItem$Password:Password for [email protected],
	at org.springframework.cloud.config.server.support.PassphraseCredentialsProvider.get(PassphraseCredentialsProvider.java:83) ~[spring-cloud-config-server-1.3.1.RELEASE.jar!/:1.3.1.RELEASE],
	at org.eclipse.jgit.transport.CredentialsProviderUserInfo.promptPassword(CredentialsProviderUserInfo.java:109) ~[org.eclipse.jgit-4.6.0.201612231935-r.jar!/:4.6.0.201612231935-r],
最后在同目录下创建Dockerfile并写入同样文件
FROM openjdk:8u282-slim as config-server
ENV TZ=Asia/Shanghai
RUN ln -snf /usr/share/zoneinfo/$TZ /etc/localtime && echo $TZ > /etc/timezone
ADD app.jar app.jar
RUN bash -c "touch /app.jar"
ENTRYPOINT ["java","-jar","app.jar"]
项目完成之后就可以来完成集成和部署了。在eureka和config-server同目录下创建文件docker-compose.yml,并写入如下内容:
# yaml 配置
version: '3'
services:
  eureka:
    build:
      context: ./eureka
      dockerfile: Dockerfile
    image: "A:5000/eureka:latest"
    ports:
      - 9101:9101
    deploy:
      mode: replicated
      replicas: 1
    networks:
      - non-network
  config-server:
    build:
      context: ./config-server
      dockerfile: Dockerfile
    image: "A:5000/config-server:latest"
    ports:
      - 9102:9102
    deploy:
      mode: replicated
      replicas: 1
    networks:
      - non-network
    volumes:
      - /home/zekdot/.ssh:/root/.ssh
networks:
  non-network:
    external: true
这些做完之后,就可以添加、提交、推送了。
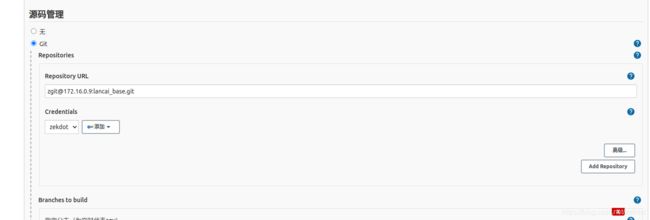
下一步我们需要从jenkins去配置流水线了,访问http://A:8080,新建任务,选择构建一个自由风格的软件。然后选择git方式,并输入关键信息:
这里是我自己的项目,按照刚才我们的说明,Repository URL应该填写zgit@A:lancai_base.git,并且需要选择我们上一节添加的凭证,以此才能正常访问git。
之后我们增加四个构建步骤,四个构建步骤都选择执行shell,一起来构建并部署。
四个shell分别如下:
第一个是用来在部署目录下创建一个文件夹,然后把docker-compose.yml复制到创建的文件夹下。
#!/bin/bash
SERVICE_NAME=base
DEPLOY_SPACE=/deployFactory
if [ ! -d $DEPLOY_SPACE/$SERVICE_NAME ]; then mkdir $DEPLOY_SPACE/$SERVICE_NAME; fi
cp $WORKSPACE/docker-compose.yml $DEPLOY_SPACE/$SERVICE_NAME/docker-compose.yml
第二个是用来创建eureka的jar包,并把Dockerfile复制过来准备拿之后打包的jar包构建镜像。
#!/bin/bash
SERVICE_NAME=base
DEPLOY_SPACE=/deployFactory
PROJECT_NAME=eureka
# 构建jar包
# 如果有之前版本的jar包,清除历史版本的jar包
if [ -d $PROJECT_NAME/target/*.jar ]; then rm $PROJECT_NAME/target/*.jar; fi
# 构建当前版本的jar包
cd $PROJECT_NAME && /usr/local/apache-maven-3.6.3/bin/mvn install -DskipTests
if [ ! -d $DEPLOY_SPACE/$SERVICE_NAME/$PROJECT_NAME ]; then mkdir $DEPLOY_SPACE/$SERVICE_NAME/$PROJECT_NAME; fi
cp $WORKSPACE/$PROJECT_NAME/target/*.jar $DEPLOY_SPACE/$SERVICE_NAME/$PROJECT_NAME/app.jar
cp $WORKSPACE/$PROJECT_NAME/Dockerfile $DEPLOY_SPACE/$SERVICE_NAME/$PROJECT_NAME/Dockerfile
第三个是用来创建config-server的jar包,并把Dockerfile复制过来准备拿之后打包的jar包构建镜像。
#!/bin/bash
SERVICE_NAME=base
DEPLOY_SPACE=/deployFactory
PROJECT_NAME=config-server
# 构建jar包
# 如果有之前版本的jar包,清除历史版本的jar包
if [ -d $PROJECT_NAME/target/*.jar ]; then rm $PROJECT_NAME/target/*.jar; fi
# 构建当前版本的jar包
cd $PROJECT_NAME && /usr/local/apache-maven-3.6.3/bin/mvn install -DskipTests
if [ ! -d $DEPLOY_SPACE/$SERVICE_NAME/$PROJECT_NAME ]; then mkdir $DEPLOY_SPACE/$SERVICE_NAME/$PROJECT_NAME; fi
cp $WORKSPACE/$PROJECT_NAME/target/*.jar $DEPLOY_SPACE/$SERVICE_NAME/$PROJECT_NAME/app.jar
cp $WORKSPACE/$PROJECT_NAME/Dockerfile $DEPLOY_SPACE/$SERVICE_NAME/$PROJECT_NAME/Dockerfile
最后一个是用来构建镜像,然后拿镜像进行部署,部署为一个stack。
SERVICE_NAME=base
DEPLOY_SPACE=/deployFactory
cd $DEPLOY_SPACE/$SERVICE_NAME && docker-compose build
cd $DEPLOY_SPACE/$SERVICE_NAME && docker-compose push
docker stack rm $SERVICE_NAME
cd $DEPLOY_SPACE/$SERVICE_NAME && docker stack deploy --compose-file docker-compose.yml $SERVICE_NAME
然后保存,再回到面板进行构建。
一段时间之后,会发现构建完成了:
这时候再访问portainer,即http://A:9000
查看stack项,发现已经部署好了两个服务:
访问http://A:9101可以发现注册中心已经部署好了。最后在A主机上执行如下命令来获取我们配置的test-client的配置:
curl localhost:9102/test-client/default/master
如果一切正常,会得到如下的输出:
{“name”:“test-client”,“profiles”:[“default”],“label”:“master”,“version”:null,“state”:null,“propertySources”:[{“name”:“[email protected]:lancai_config.git/test-client.yml”,“source”:{“spring.application.name”:“test-client”,“spring.zipkin.base-url”:“http://172.19.240.22:9411”,“eureka.client.serviceUrl.defaultZone”:“http://172.19.240.22:9101/eureka/”,“eureka.client.healthcheck.enabled”:true,“eureka.instance.lease-renewal-interval-in-seconds”:10,“eureka.instance.lease-expiration-duration-in-seconds”:30,“server.port”:9111}}]}
可以看到,这个和我们配置的test-client.yml中的内容对应起来了,说明我们的配置中心已经搭建完成了。
2.网关
网关相当于所有微服务的一个统一的访问入口,配置细节可以直接参考如下的博客:
Spring Cloud构建微服务架构:服务网关(基础)【Dalston版】
这里我们采用配置中心配置的方式对网关进行配置,在non_config文件夹下创建api-gateway.yml,向其中写入如下内容:
spring:
  application:
    name: api-gateway

server:
  port: 9103

eureka:
  client:
    serviceUrl:
      defaultZone: http://A:9101/eureka/
然后添加、提交、推送,等项目配置好之后就可以从配置中心读取到这些配置了。
为了让项目能够从配置中心读取配置项,在/src/main/resources中新建bootstrap.yml,并向其中写入如下内容:
spring:
  application:
    name: api-gateway
  cloud:
    config:
      uri: http://172.16.0.9:9102/
      profile: default
      label: master
然后在src同级目录下新建Dockerfile,写入如下内容:
FROM openjdk:8u282-slim as api-gateway
ENV TZ=Asia/Shanghai
RUN ln -snf /usr/share/zoneinfo/$TZ /etc/localtime && echo $TZ > /etc/timezone
ADD app.jar app.jar
RUN bash -c "touch /app.jar"
ENTRYPOINT ["java","-jar","app.jar"]
之后在同级目录下新建docker-compose.yml,内容如下:
# yaml 配置
version: '3'
services:
  api-gateway:
    build:
      context: ./api-gateway
      dockerfile: Dockerfile
    image: A:5000/api-gateway:latest
    ports:
      - 9103:9103
    deploy:
      mode: replicated
      replicas: 1
    networks:
      - non_network
networks:
  non_network:
    external: true
接下来可以去jenkins建立流水线,git填写non_gateway。
构建过程有三个:
#!/bin/bash
SERVICE_NAME=lancai_gateway
DEPLOY_SPACE=/deployFactory
if [ ! -d $DEPLOY_SPACE/$SERVICE_NAME ]; then mkdir $DEPLOY_SPACE/$SERVICE_NAME; fi
cp $WORKSPACE/docker-compose.yml $DEPLOY_SPACE/$SERVICE_NAME/docker-compose.yml
#!/bin/bash
SERVICE_NAME=lancai_gateway
DEPLOY_SPACE=/deployFactory
PROJECT_NAME=api-gateway
# 构建jar包
# 如果有之前版本的jar包,清除历史版本的jar包
if [ -d $PROJECT_NAME/target/*.jar ]; then rm $PROJECT_NAME/target/*.jar; fi
# 构建当前版本的jar包
cd $PROJECT_NAME && /usr/local/apache-maven-3.6.3/bin/mvn install -DskipTests
if [ ! -d $DEPLOY_SPACE/$SERVICE_NAME/$PROJECT_NAME ]; then mkdir $DEPLOY_SPACE/$SERVICE_NAME/$PROJECT_NAME; fi
cp $WORKSPACE/$PROJECT_NAME/target/*.jar $DEPLOY_SPACE/$SERVICE_NAME/$PROJECT_NAME/app.jar
cp $WORKSPACE/$PROJECT_NAME/Dockerfile $DEPLOY_SPACE/$SERVICE_NAME/$PROJECT_NAME/Dockerfile
SERVICE_NAME=lancai_gateway
DEPLOY_SPACE=/deployFactory
cd $DEPLOY_SPACE/$SERVICE_NAME && docker-compose build
cd $DEPLOY_SPACE/$SERVICE_NAME && docker-compose push
docker stack rm $SERVICE_NAME
cd $DEPLOY_SPACE/$SERVICE_NAME && docker stack deploy --compose-file docker-compose.yml $SERVICE_NAME
构建完成之后,可以访问http://A:9101,可以发现出现了一个新的项目:
说明网关部署完成。
3.业务
这里以一个新闻业务为例,搭建的话实际上就是一个生产者和一个消费者,具体可以参考如下的博客来分别在idea中搭建生产者和消费者:
Spring Cloud构建微服务架构:服务消费(基础)【Dalston版】
Spring Cloud构建微服务架构:服务注册与发现(Eureka、Consul)【Dalston版】
首先仿照网关在non_config文件夹下创建配置的yml文件news-client,news-consumer,然后仿照上一节完成文件内容。
此外还有Dockerfile和docker-compose.yml,也仿照api-gateway完成即可。
最后增加jenkins流水线,构建步骤如下:
#!/bin/bash
# 服务名称,下同
SERVICE_NAME=news
# 如果有之前版本的jar包,清除历史版本的jar包
if [ -d $SERVICE_NAME-client/target/*.jar ]; then rm $SERVICE_NAME-client/target/*.jar; fi
# 构建当前版本的jar包
cd $SERVICE_NAME-client && /usr/local/apache-maven-3.6.3/bin/mvn install -DskipTests
cd ..
# 如果有之前版本的jar包,清除历史版本的jar包
if [ -d $SERVICE_NAME-consumer/target/*.jar ]; then rm $SERVICE_NAME-consumer/target/*.jar; fi
# 构建当前版本的jar包
cd $SERVICE_NAME-consumer && /usr/local/apache-maven-3.6.3/bin/mvn install -DskipTests
#!/bin/bash
SERVICE_NAME=news
DEPLOY_SPACE=/deployFactory
if [ ! -d $DEPLOY_SPACE/$SERVICE_NAME ]; then mkdir $DEPLOY_SPACE/$SERVICE_NAME; fi
if [ ! -d $DEPLOY_SPACE/$SERVICE_NAME/client ]; then mkdir $DEPLOY_SPACE/$SERVICE_NAME/client; fi
if [ ! -d $DEPLOY_SPACE/$SERVICE_NAME/consumer ]; then mkdir $DEPLOY_SPACE/$SERVICE_NAME/consumer; fi
cp $WORKSPACE/$SERVICE_NAME-client/target/*.jar $DEPLOY_SPACE/$SERVICE_NAME/client/app.jar
cp $WORKSPACE/$SERVICE_NAME-client/Dockerfile $DEPLOY_SPACE/$SERVICE_NAME/client/Dockerfile
cp $WORKSPACE/$SERVICE_NAME-consumer/target/*.jar $DEPLOY_SPACE/$SERVICE_NAME/consumer/app.jar
cp $WORKSPACE/$SERVICE_NAME-consumer/Dockerfile $DEPLOY_SPACE/$SERVICE_NAME/consumer/Dockerfile
cp $WORKSPACE/docker-compose.yml $DEPLOY_SPACE/$SERVICE_NAME/docker-compose.yml
SERVICE_NAME=news
DEPLOY_SPACE=/deployFactory
cd $DEPLOY_SPACE/$SERVICE_NAME && docker-compose build
cd $DEPLOY_SPACE/$SERVICE_NAME && docker-compose push
docker stack rm $SERVICE_NAME
cd $DEPLOY_SPACE/$SERVICE_NAME && docker stack deploy --compose-file docker-compose.yml $SERVICE_NAME


