angular 异步验证_使用Angular和Flask处理用户身份验证
angular 异步验证
This post provides a solution to the question, “How do I handle user authentication with AngularJS and Flask?”.
这篇文章提供了以下问题的解决方案:“如何使用AngularJS和Flask处理用户身份验证?”。

Before beginning, keep in mind that this is not the only solution to the question at hand, and it may not even be the right solution for your situation. Regardless of the solution you implement, it is important to note that since end users have full control of the browser as well as access to the front-end code, sensitive data living in your server-side API must be secure. In other words, make certain that you implement an authentication strategy on the server-side to protect sensitive API endpoints.
在开始之前,请记住,这不是解决当前问题的唯一方法,甚至可能不是您所处情况的正确解决方案。 无论采用何种解决方案,都必须注意,由于最终用户对浏览器具有完全控制权,并且可以访问前端代码,因此,驻留在服务器端API中的敏感数据必须是安全的。 换句话说,请确保您在服务器端实施身份验证策略以保护敏感的API端点。
That said, we need to enable the following workflow:
也就是说,我们需要启用以下工作流程:
- When the client accesses the main route, an index page is served, at which point Angular takes over, handling all routing on the client-side.
- The Angular app immediately “asks” the server if a user is logged in.
- Assuming the server indicates that a user is not logged in, the client is immediately asked to log in.
- Once logged in, the Angular app then tracks the user’s login status.
- 当客户端访问主路由时,将为索引页面提供服务,此时Angular接管,处理客户端的所有路由。
- 如果用户已登录,Angular应用程序将立即“询问”服务器。
- 假设服务器指示用户未登录,则立即要求客户端登录。
- 登录后,Angular应用程序将跟踪用户的登录状态。
This tutorial uses Python 3.4 and Angular 1.3.15.
本教程使用Python 3.4和Angular 1.3.15 。
入门 (Getting Started)
First, grab the boilerplate code from the repo, activate a virtual environment and install the requirements.
首先,从存储库中获取样板代码,激活虚拟环境并安装需求。
Then create the initial migration:
然后创建初始迁移:
|
Test out the app:
测试该应用程序:
|
Navigate to http://localhost:5000/ and you should see a simple welcome message – “Welcome!”. Once done admiring the main page, kill the server, and glance over the code within the “project” folder:
导航到http:// localhost:5000 / ,您应该看到一条简单的欢迎消息-“ Welcome!”。 欣赏完主页后,杀死服务器,然后浏览“ project”文件夹中的代码:
|
Nothing too spectacular. The majority of the back-end code/logic resides in the __init__.py file, while the Angular app resides in the “static” directory.
没什么太壮观的。 大部分后端代码/逻辑位于__init__.py文件中,而Angular应用位于“静态”目录中。
For more on this structure, please check out the Real Python course.
有关此结构的更多信息,请查看Real Python课程。
构建登录API (Building the Login API)
Let’s start with the back-end API…
让我们从后端API开始……
用户注册 (User Registration)
Update the register() function in __init__.py:
更新__init__.py中的register()函数:
|
Here, we set the payload sent with the POST request (from the client-side) to json_data, which is then used to create a User instance. We then attempted to add the user to the database and commit the changes. If this succeeds a user is added, and then we return a JSON response via the jsonify method method with a status of “success”. If it fails, the session is closed and an error response, “this user is already registered”, is sent.
在这里,我们将与POST请求一起发送的有效负载(从客户端)设置为json_data ,然后将其用于创建User实例。 然后,我们尝试将用户添加到数据库并提交更改。 如果成功,则添加一个用户,然后我们通过jsonify 方法方法返回status为“成功”的JSON响应。 如果失败,则关闭会话并发送错误响应“此用户已注册”。
Make sure to add the following imports as well:
确保还添加以下导入:
|
The latter import must be imported after we create the
dbinstance – e.g.,db = SQLAlchemy(app)– to avoid a circular dependency.在创建
db实例后必须导入后者(例如db = SQLAlchemy(app),以避免循环依赖。
Let’s test this via curl. Fire up the server and then run the following command in a new terminal window:
让我们通过curl测试一下。 启动服务器,然后在新的终端窗口中运行以下命令:
|
You should see a success message:
您应该看到一条成功消息:
|
Try it again, and you should see an error:
再试一次,您将看到一个错误:
|
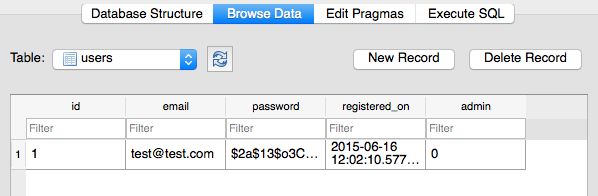
Finally, open the database in the SQLite Database Browser to ensure the user did get INSERTed into the table:
最后,在SQLite数据库浏览器中打开数据库,以确保用户确实将INSERTed插入表中:
On to the login…
继续登录...
用户登录 (User Login)
Update the login() function in __init__.py:
更新__init__.py中的login()函数:
|
We queried the database to see if a user exists, based on the email sent in the payload, and, if so, the password is then verified. The appropriate response is returned.
我们根据有效负载中发送的电子邮件查询数据库,以查看用户是否存在,如果存在,则对密码进行验证。 返回适当的响应。
Make sure to update the imports:
确保更新导入:
|
With the server running, test again with curl-
在服务器运行的情况下,再次使用curl-
|
-and you should see:
-并且您应该看到:
|
Test again with curl, sending the wrong user credentials, and you should see:
使用curl重新测试,发送错误的用户凭据,您应该看到:
|
Perfect!
完善!
用户注销 (User Logout)
Update the logout() function like so, in order to update the session:
像这样更新logout()函数,以更新session :
|
This should be straightforward, and you can probably guess the response to this curl request – but test again if you’d like. Once done, let’s move to the client-side!
这应该很简单,您可能会猜到对此curl请求的响应-但如果需要,请再次测试。 完成后,让我们转到客户端!
开发Angular应用 (Developing the Angular App)
Need the code from the previous section? Grab it from the repo.
需要上一节中的代码吗? 从抓住它回购 。
Now, here’s where things get a bit tricky. Again, since end users have full access to the power of the browser as well as DevTools and the client-side code, it’s vital that you not only restrict access to sensitive endpoints on the server-side – but that you also not store sensitive data on the client-side. Keep this in mind as you add auth functionality to your own application stack.
现在,这里变得有些棘手。 同样,由于最终用户可以完全访问浏览器以及DevTools和客户端代码的功能,因此,不仅要限制对服务器端敏感端点的访问,而且还不要存储敏感数据,这一点至关重要在客户端。 将身份验证功能添加到自己的应用程序堆栈时,请记住这一点。
Let’s jump right in by creating a service to handle authentication.
让我们通过创建一个处理身份验证的服务直接进入。
认证服务 (Authentication Service)
Start with the basic structure of this service by adding the following code to a new file called services.js in the “static” directory:
从此服务的基本结构开始,将以下代码添加到“静态”目录中名为services.js的新文件中:
|
Here, we defined the service name, AuthService, and injected the dependencies that we will be using – $q, $timeout, $http – and then return the functions for use outside the service.
在这里,我们定义了服务名称AuthService ,并注入了将要使用的依赖项– $q , $timeout , $http ,然后返回用于服务之外的函数。
Make sure to add the script to the index.html file:
确保将脚本添加到index.html文件:
|
Let’s create each function…
让我们创建每个函数…
isLoggedIn()
isLoggedIn()
|
This function returns true if user evaluates to true – e.g., a user is logged in – otherwise it returns false.
如果user评估为true (例如,用户已登录),则此函数返回true ,否则返回false。
login()
login()
|
Here, we used the $q service to set up a promise, which we’ll access in a future controller. We also utilized the $http service to send an AJAX request to the /api/login endpoint that we already set up in our back-end Flask app.
在这里,我们使用$ q服务设置了promise ,我们将在以后的控制器中访问它。 我们还利用$ http服务将AJAX请求发送到我们已经在后端Flask应用程序中设置的/api/login端点。
Based on the returned response, we either resolve or reject the object and set the value of user to true or false.
根据返回的响应,我们解析或拒绝该对象,并将user的值设置为true或false 。
logout()
logout()
|
Here, we followed the same formula as the login() function, except we sent a GET request rather than a POST and, to be cautious, instead of sending an error if the user does not exist, we’re just logging the user out.
在这里,我们遵循与login()函数相同的公式,除了我们发送的是GET请求而不是POST,为谨慎起见,如果用户不存在,则不会发送错误,我们只是将用户注销。
register()
register()
|
Again, we followed a similar formula to the logout() function. Can you tell what’s happening?
同样,我们遵循与logout()函数类似的公式。 你能告诉发生什么事吗?
That’s it for the service. Keep in mind that we still have not “used” this service. In order to do that, we just need to inject it into the necessary components in the Angular app. In our case, that will be the controllers, each associated with a different route…
服务就是这样。 请记住,我们仍未“使用”此服务。 为此,我们只需要将其注入Angular应用程序的必要组件中即可。 在我们的例子中,将是控制器,每个控制器都与一条不同的路线相关联……
客户端路由 (Client-side Routing)
Add the remainder of the client-side routes to the app.js file:
将其余的客户端路由添加到app.js文件中:
|
Here, we created five new routes. Now we can add the subsequent templates and controllers.
在这里,我们创建了五条新路线。 现在,我们可以添加后续的模板和控制器。
模板和控制器 (Templates and Controllers)
Looking back at our routes, we need to setup two partials/templates and three controllers:
回顾我们的路线,我们需要设置两个partials / templates和三个控制器:
|
Login
登录
First, add the following HTML to a new file called login.html:
首先,将以下HTML添加到名为login.html的新文件中:
|
Add this file to the “partials” directory.
将此文件添加到“ partials”目录。
Take note of the form. We used the ng-model directive on each of the inputs so that we can capture those values in the controller. Also, when the form is submitted, the ng-submit directive handles the event by firing the login() function.
注意表格。 我们在每个输入上使用ng-model指令,以便我们可以在控制器中捕获这些值。 另外,提交表单时, ng-submit指令通过触发login()函数来处理事件。
Next, within the “static” folder and add a new file called controllers.js. Yes, this will hold all of our Angular app’s controllers. Be sure to add the script to the index.html file:
接下来,在“静态”文件夹中,添加一个名为controllers.js的新文件。 是的,这将容纳我们所有Angular应用程序的控制器。 确保将脚本添加到index.html文件:
|
Now, let’s add the first controller:
现在,让我们添加第一个控制器:
|
So, when the login() function is fired, we set some initial values and then call login() from the AuthService, passing the user inputed email and password as arguments. The subsequent success or error is then handled and the DOM/view/template is updated appropriately.
因此,在触发login()函数时,我们设置了一些初始值,然后从AuthService调用login() ,并将用户输入的电子邮件和密码作为参数传递。 然后处理后续的成功或错误,并适当地更新DOM /视图/模板。
Did you notice how we logged the return value of AuthService.isLoggedIn() to the console? This is to ensure that the value is correct based on whether a user is logged in or out – true or false, respectively.
您是否注意到我们如何将AuthService.isLoggedIn()的返回值记录到控制台? 这是为了确保根据用户是登录还是注销(分别为true或false来正确设置值。
Ready to test the first round-trip – client to server and then back again to client?
准备测试第一个往返-客户端到服务器,然后再次回到客户端吗?
Fire up the server and navigate to http://localhost:5000/#/login in your browser. First, try logging in with the user credentials used to register earlier – e.g, [email protected] and test. If all went well, you should be redirected to the main URL. Next, try to log in using invalid credentials. You should see the error message flash, “Invalid username and/or password”.
启动服务器并在浏览器中导航到http:// localhost:5000 /#/ login 。 首先,尝试使用用于较早注册的用户凭据登录-例如, [email protected]和test 。 如果一切顺利,则应将您重定向到主URL。 接下来,尝试使用无效的凭据登录。 您应该看到错误消息闪烁,“无效的用户名和/或密码”。
Once done, make sure to remove console.log(AuthService.isLoggedIn());.
完成后,请确保删除console.log(AuthService.isLoggedIn()); 。
Logout
登出
Add the controller:
添加控制器:
|
Here, we called AuthService.logout() and then redirected the user to the /login route after the promise is resolved.
在这里,我们调用AuthService.logout() ,然后在解决承诺后将用户重定向到/login路由。
Add a button to home.html:
在home.html中添加一个按钮:
|
And then test it out again. Remember to remove console.log(AuthService.isLoggedIn()); after you’re done testing.
然后再次测试。 请记住删除console.log(AuthService.isLoggedIn()); 完成测试后。
Register
寄存器
Add a new new file called register.html to the “partials” folder and add the following HTML:
将一个名为register.html的新文件添加到“ partials”文件夹中,并添加以下HTML:
|
Next, add the controller:
接下来,添加控制器:
|
You’ve seen this before, so let’s move right on to testing.
您之前已经看过此内容,因此让我们继续进行测试。
Fire up the server and register a new user at http://localhost:5000/#/register. Make sure to test logging in with that new user as well.
启动服务器并在http:// localhost:5000 /#/ register上注册一个新用户。 确保也测试与该新用户的登录。
Well, that’s it for the templates and controllers. We now need to add in functionality to check if a user is logged in on each and every change of route.
好吧,模板和控制器就是这样。 现在,我们需要添加功能,以检查用户是否在每次更改路线时都已登录。
路线变更 (Route Changes)
Add the following code to app.js:
将以下代码添加到app.js:
|
The $routeChangeStart event happens before the actual route change occurs. So, whenever a route is accessed, before the view is served, we ensure that the user is logged in. Test this out!
$ routeChangeStart事件在实际路由更改发生之前发生。 因此,无论何时访问路由,在提供视图之前,我们都要确保用户已登录。请进行测试!
保护某些路线 (Protect Certain Routes)
Right now all client-side routes require a user to be logged in. What if you want certain routes restricted and other routes open? You can add the following code to each route handler, replacing true with false for routes that you do not want to restrict:
现在,所有客户端路由都要求用户登录。如果要限制某些路由而打开其他路由,该怎么办? 您可以将以下代码添加到每个路由处理程序,对于不希望限制的路由,将true替换为false :
|
In our case, update the routes like so:
在我们的情况下,请按照以下方式更新路线:
|
Now just update the $routeChangeStart code in main.js:
现在只需更新$routeChangeStart中的$routeChangeStart代码:
|
Test each route out!
测试每条路线!
结论 (Conclusion)
That’s it. Questions? Comment below.
而已。 有什么问题吗 在下面发表评论。
翻译自: https://www.pybloggers.com/2015/06/handling-user-authentication-with-angular-and-flask/
angular 异步验证