HumanML3D; motion-latent-diffusion; DeepPhase 代码介绍
其实仔细看一些代码也是非常有收获的。
DeepPhase 那里基本上跟踪到了输入,输出,和测试时的后处理过程
HumanML3D
目前的疑惑点在系数的全局旋转,是在是搞不清楚。问了问题果然是区别对待的就是为了face Z+ 。存储的global 这个应该是个逆。 然后后面的速度,应该也是局部的速度
raw_pose_processing.py
amass_to_pose: 这个函数主要就是把系数转成了3D关键点,并且对于关键点做一个绕着x轴顺时针90度的旋转。
生成文件带有M的,是做了动作的镜像。
motion_representation.py
uniform_skeleton: 这个函数主要就是对齐骨骼,tgt 这个是随便从数据集里面找到一个然后把所有的初始位置都对齐到这里。
# 对齐缩放,也就是平移
scale_rt = tgt_leg_len / src_leg_len
# print(scale_rt)
src_root_pos = positions[:, 0]
tgt_root_pos = src_root_pos * scale_rt
# 之后就是求系数,重新求出 joints
skeleton.py 这个里面是重点
get_offsets_joints: 这个就其实定义了骨架的结构,即偏离父节点的长度和方向(一般都是横平竖直的),前向的时候就是用这个旋转。 (骨骼就是按照横平竖直那样子标准坐标系定义的)
inverse_kinematics_np:
一、这里面先计算人体的朝向,
1)先通过肩膀和胯下,计算向量,这两个向量是直接相加,作为身体’水平方向’
2)竖直方向用 [0,1,0], 叉积算出朝前的方向 forward
【疑问】对于躺下的动作,应该直接就会有问题
二、然后计算出 [0,0,1] 到 forward 的旋转,作为root 旋转
三、接下来该算每一个关节的旋转。
t2m_raw_offsets: 这个其实记录了,后一(子)节点相对于当前节点的标准旋转
当去除掉全局+父旋转时,就是local 旋转。
TIPS: 解释一下这里IK的本质,其实就是当给定标准pose后,稠密点IK的计算方式。因此IK也分多种情况:1)给定稠密点,求出相对标准姿态的骨骼系数 2)给定叶节点,求出相邻跟骨骼的合适位置
quat_params 里面存储的就是各个骨骼旋转的系数。
接下来继续 motion_representation.py
【1】选择一个样本,获得骨骼的长度,进行IK。最终对齐(tgt)骨骼系数,然后得到新的关键点坐标
【2】接着就认为整个序列的最低点在地面上,然后放置在地面上
【3】按照第一帧的XZ坐标,进行对齐
【4】接着算出第一帧旋转的值,然后把人给转正
【5】根据脚的移动速度算出是否接触地面(经验值)
【6】然后计算,速度,和角速度
【7】计算joint相对位置(对齐到x,z),并且转正。然后计算 height,和转正之后骨骼点的位置
【8】一些额外的特征,然后joint velocity 还是有个root 旋转,其实应该就是顺便记录下全局位置
【9】后面的代码展示了回复的步骤
这里面再分析一下速度的计算
'''XZ at origin'''
root_pos_init = positions[0] # pos 只做到步骤[2],这里选择了序列的第一帧
root_pose_init_xz = root_pos_init[0] * np.array([1, 0, 1]) # 这里是记录下第一帧的hip位置
positions = positions - root_pose_init_xz # 以第一帧hip为原点,对齐所有的点

# forward_init 是第一帧朝前的向量
target = np.array([[0, 0, 1]])
root_quat_init = qbetween_np(forward_init, target) # 计算和标准朝向的差距,注意这里本质上一个逆
root_quat_init = np.ones(positions.shape[:-1] + (4,)) * root_quat_init # 扩展一下
positions = qrot_np(root_quat_init, positions) # 其实就是把第一帧给转正了,其他的修正一下

# root_quat = qbetween_np(forward, target) # 最开始是个逆? 转正的旋转
r_rot = quat_params[:, 0].copy() # 因此这个本质上是个逆? 这个非常重要
'''Root Linear Velocity'''
velocity = (positions[1:, 0] - positions[:-1, 0]).copy()
velocity = qrot_np(r_rot[1:], velocity) # 这一步具体意义不明,但结合上面的意义就是转正
# 强行理解就是,让(x,y)位置还能保留角度信息
'''Root Angular Velocity'''
r_velocity = qmul_np(r_rot[1:], qinv_np(r_rot[:-1])) # 就是获得相对旋转

# position:局部坐标 + 转正
ric_data = positions[:, 1:].reshape(len(positions), -1)
local_vel # 其实也是带有旋转的
# root_rot_velocity (B, seq_len, 1)
# root_linear_velocity (B, seq_len, 2)
# root_y (B, seq_len, 1)
# ric_data (B, seq_len, (joint_num - 1)*3)
# rot_data (B, seq_len, (joint_num - 1)*6)
# local_velocity (B, seq_len, joint_num*3)
# foot contact (B, seq_len, 4)
接下来就是如何从 data 数据中恢复骨骼
recover_root_rot_pos:这个就是恢复 root 的位置(r_pos)和y轴旋转。
recover_from_rot:利用 r_pos 和 系数 进行 forward 获得最终的 关键点.
recover_from_ric:之前的 ric 已经转正了,现在需要
Motion Latent Diffusion
先说一下利用blender渲染部分:
主要文件在 mld/render/blender/render.py(joints.py) 中
大概思路就是每一帧都会重新画圆柱和球,并且保存到图片上。 传入的参数 mat 不是矩阵,而是材质
代码的管理主要是通过 OmegaConf 这个库来进行的。优势就是可以随意增加key,v,而且可以$引用(需要load之后resolve)
loss
models/losses/utils.py 这里面应该才是最终用到的loss
感觉核心是看 models/architechtures/modeltype/mld.py
网路结构
文本的: mld.models.architectures.mld_clip.MldTextEncoder
这里面主要是 from transformers import AutoModel, AutoTokenizer 然后获得 两个 model,对输入的文本序列进行编码得到text embedding
动作的: mld.models.architectures.mld_vae.MldVae
latent_dim: [1, 256] 使用了vae
【跟踪cat之后在哪里截取的,其实就是df之后直接截取的,time_emd 也需要】
mld_denoiser: text torch.Size([1, 2, 256]) torch.Size([1, 2, 768])
最后的时候把拼起来的 time_emd 和 text_emd 只取前面的。
DeepPhase
训练 deepphase AE 的数据是通过 unity 处理的。大致的过程是
Assets\Projects\DeepPhase\PhaseExtraction\DeepPhasePipeline.cs 中的TrainingSetup 类有个静态函数 Export 里面调用了 DeepPhaseModule.ComputeCurves 具体细节在 文件 Assets\Scripts\Animation\Modules\DeepPhaseModule.cs 中
有个Compute 函数,记载了计算特征的值,主要是
velocities[j] = (posC.PositionTo(spaceC) - posP.PositionTo(spaceP)) / Asset.GetDeltaTime();

// 这段代码在 Assets\Scripts\Extensions\Vector3Extensions.cs 中
public static Vector3 PositionTo(this Vector3 position, Matrix4x4 to) {
	//return to.inverse.MultiplyPoint(position);
	return to.inverse.MultiplyPoint3x4(position);
}
结论:训练的特征是局部的速度
GNN网路的训练数据制作过程主要在 Assets\Projects\DeepPhase\Demos\Quadruped\QuadrupedPipeline.cs 中的 ControllerSetup
这里面就是制作数据的过程。
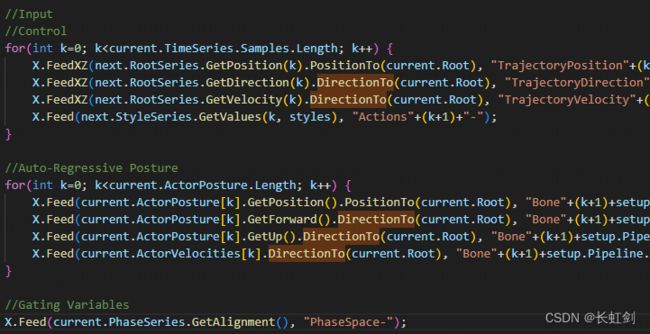
首先是 input 数据分为三部分,控制就是输入,因此是用的未来的数据。但都需要在当前的局部坐标系下面做。

GetForward().DirectionTo(current.Root) 说明也是局部坐标系下的
public static Vector3 GetPosition(this Matrix4x4 matrix) {
	return new Vector3(matrix[0,3], matrix[1,3], matrix[2,3]);
}
public static Vector3 PositionTo(this Vector3 position, Matrix4x4 to) {
	//return to.inverse.MultiplyPoint(position);
	return to.inverse.MultiplyPoint3x4(position);
}
public static Vector3 GetForward(Quaternion q){
	return q * Vector3.forward; // 0,0,1
}
public static Vector3 DirectionTo(this Vector3 direction, Matrix4x4 to) {
	return direction.DirectionTo(to.GetRotation());
}
public static Vector3 DirectionTo(this Vector3 direction, Quaternion to) {
	return Quaternion.Inverse(to) * direction;
}
关于速度那一块,其实这里直接求出来是没有对齐的,只是使用的时候用的相对
#ActorVelocities  = editor.GetSession().GetActor().GetBoneVelocities();
# GetVelocity()
public Vector3 GetBoneVelocity(int index, bool mirrored) {
	if(Timestamp - Asset.GetDeltaTime() < 0f) {
		return (Asset.GetFrame(Timestamp + Asset.GetDeltaTime()).GetBoneTransformation(index, mirrored).GetPosition() - GetBoneTransformation(index, mirrored).GetPosition()) / Asset.GetDeltaTime();
	} else {
		return (GetBoneTransformation(index, mirrored).GetPosition() - Asset.GetFrame(Timestamp - Asset.GetDeltaTime()).GetBoneTransformation(index, mirrored).GetPosition()) / Asset.GetDeltaTime();
	}
}
输出这里细节比较多,比如最开始的root 是和 delta 有关的。
然后测试的时候主要看 Assets\Projects\DeepPhase\Demos\Quadruped\QuadrupedController_GNN.cs 文件里的 Read 函数。
其中有个关于 Actor alignment 的概念,这个应该是表示的 T pose 骨骼的朝向和大小 (估计是为了防止骨骼长短不一致)
此外还发现有IK。而且还是自己写的,感觉可以看一下,算法细节。
在文件 Assets\Scripts\Animation\Actor.cs 中的函数RestoreAlignment 中
Vector3 position = GetPosition();
Quaternion rotation = GetRotation();
Vector3 childPosition = GetChild(0).GetPosition();
Quaternion childRotation = GetChild(0).GetRotation();
Vector3 target = (childPosition-position);
Vector3 aligned = rotation * Alignment; // 只根据旋转到哪里
SetRotation(Quaternion.FromToRotation(aligned, target) * rotation); // 根据位置把相差的旋转补上
GetChild(0).SetPosition(position + Alignment.magnitude * target.normalized);
GetChild(0).SetRotation(childRotation);
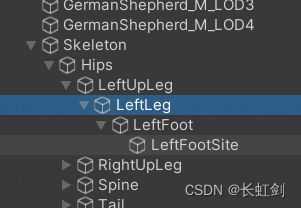
接下来介绍一下IK部分,首先了解下骨骼信息

然后先看建立的 IK 骨骼
LeftHandIK = IK.Create(Actor.FindTransform("LeftForeArm"), Actor.GetBoneTransforms("LeftHandSite"));
RightHandIK = IK.Create(Actor.FindTransform("RightForeArm"), Actor.GetBoneTransforms("RightHandSite"));
LeftFootIK = IK.Create(Actor.FindTransform("LeftLeg"), Actor.GetBoneTransforms("LeftFootSite"));
RightFootIK = IK.Create(Actor.FindTransform("RightLeg"), Actor.GetBoneTransforms("RightFootSite"));
核心算法文件就在 Assets\Scripts\Tools\UltimateIK\UltimateIK.cs 中
Create 的第一个参数可以看作root骨骼,第二个参数可以认为是叶点(多个),不过这里面就是一个,最终建立的 objective 就一个。但是保存的joint 是 root到也骨骼之间的所有骨骼。 obj 和 joint 会互相关联, obj 应该是只关联到 joints 的叶关节。
Slove 函数,首先把joint 设置层级,设置初始参数,虽然写的是Zero,但应该是init。然后开始核心的 solve IK 循环。
//Solve IK
for(int i=0; i<Iterations; i++) {
    if(!IsConverged()) {
        if(AllowRootUpdateX || AllowRootUpdateY || AllowRootUpdateZ) {
            Vector3 delta = Vector3.zero;
            int count = 0;
            foreach(Objective o in Objectives) {
                if(o.Active) {
                    delta += GetWeight(Joints[o.Joint], o) * (o.TargetPosition - Joints[o.Joint].Transform.position);
                    count += 1;
                }
            }
            delta.x *= AllowRootUpdateX ? RootWeight : 0f;
            delta.y *= AllowRootUpdateY ? RootWeight : 0f;
            delta.z *= AllowRootUpdateZ ? RootWeight : 0f;
            if(count > 0) {
                GetRoot().position += delta / count;
            }
        }
        Optimise(Joints.First());
    }
}
上面 optimise 之前的部分就是可以调整 root 解决一些偏差,但是一般都是false。
o 是代表的目标位置, joint 是不断优化的,也就是说如果优化过程对不齐这点差距,是希望通过root 平移实现的。
最最核心还是得看 Optimise 部分。
下面这段代码就是核心代码了,大体思路和CCD不一样,这个是从root开始到目标骨骼的调整,不过有一个权重,就是越靠近root调整越小。至于调整策略,就是希望让当前joint靠旋转让最后的骨骼和target重合,无论是在旋转上,还是平移上。当然该算法也没有考虑到时间连续性,可能会存在一些问题。具体细节看注释。
void Optimise(Joint joint) { //最开始就是root
    if(joint.Active) {
        Vector3 pos = joint.Transform.position;
        Quaternion rot = joint.Transform.rotation;
        Vector3 forward = Vector3.zero;
        Vector3 up = Vector3.zero;
        int count = 0;

        //Solve Objective Rotations
        foreach(int index in joint.Objectives) { // 正常情况下就一个
            Objective o = Objectives[index];
            if(o.Active && o.SolveRotation) {
                Quaternion q = Quaternion.Slerp(
                    rot,
                    o.TargetRotation * Quaternion.Inverse(Joints[o.Joint].Transform.rotation) * rot,
                    GetWeight(joint, o)
                ); // 需要Joint来个旋转A才能让端点骨骼和目标旋转重合,于是希望当前父骨骼靠近旋转 A.dot(rot) [世界坐标系下]
                forward += q*Vector3.forward;
                up += q*Vector3.up;
                count += 1;
            }
        }

        //Solve Objective Positions
        foreach(int index in joint.Objectives) {
            Objective o = Objectives[index];
            if(o.Active && o.SolvePosition) {
                Quaternion q = Quaternion.Slerp(
                    rot,
                    Quaternion.FromToRotation(Joints[o.Joint].Transform.position - pos, o.TargetPosition - pos) * rot,
                    GetWeight(joint, o)
                ); // 这个就是希望靠着当前父骨骼旋转,来让端点接近目标
                forward += q*Vector3.forward;
                up += q*Vector3.up;
                count += 1;
            }
        }

        if(count > 0) {
            joint.Transform.rotation = Quaternion.LookRotation((forward/count).normalized, (up/count).normalized);
            joint.ResolveLimits(AvoidJointLimits);
        }
    }

    foreach(int index in joint.Childs) {
        Optimise(Joints[index]);
    }
}
那foot contact 是怎么体现的,通过代码 ProcessFootIK 可以看到,其实就是设置target 的时候选择使用目标和之前的骨骼各多少。那个 contact 就作为一个权重,但是之前用SmoothStep 函数进行了一定的压缩。
用于调试的
Vector3 axis; float angle;
angle = 45f;
axis = new Vector3(0,1,0);
Quaternion q3 = Quaternion.AngleAxis(angle, axis);
Matrix4x4 rot = new Matrix4x4();
rot.SetTRS(Vector3.zero, q3, Vector3.one);

Debug.Log("轴向角转四元数:" + q3);
Debug.Log("forward: " + GetForward(q3) + Vector3.forward); // (0,0,1) 就是取最后一列
Debug.Log("up: " + GetUp(q3));
Debug.Log("mat: \n" + rot);
