Spring 用注解更简单存取对象
Spring 用注解更简单存取对象
上一篇文章是最原始的创建使用,这篇主要是讲 Spring 更简单的存储和读取对象的核心是使用注解 ,也是日常生活企业用的最多的方法 “注解” 所以这篇的内容是很重要的 !!!
文章目录
- Spring 用注解更简单存取对象
-
- 一、更简单的存储 Bean 对象
-
- 1.1 前置工作
- 二、添加注解存储 Spring 中(存)
-
- 2.1、类注解
-
- 2.1.1、@Controller
- 2.1.2、@Service
- 2.1.3、@Repository
- 2.1.4、@Component
- 2.1.5、@Configuration
- 2.2、类注解的区别
-
- 2.2.1、类注解的关系
- 2.3、方法注解
-
- 2.3.1、@Bean
-
- 2.3.1.1、方法注解要配合5大类注解一起使用
- 2.3.1.2、@Bean 重命名
- 三、Bean(对象) 的命名
- 四、获取 Bean 对象 (对象装配)
-
- @Autowired
- 4.1、属性注入(企业、个人 常用)
- 4.2、构造方法注入(官方推荐)
- 4.3、Setter 注入
- 4.4、三个注入的区别对比 (面试)
- @Resource 另一种注入的方式
一、更简单的存储 Bean 对象
1.1 前置工作
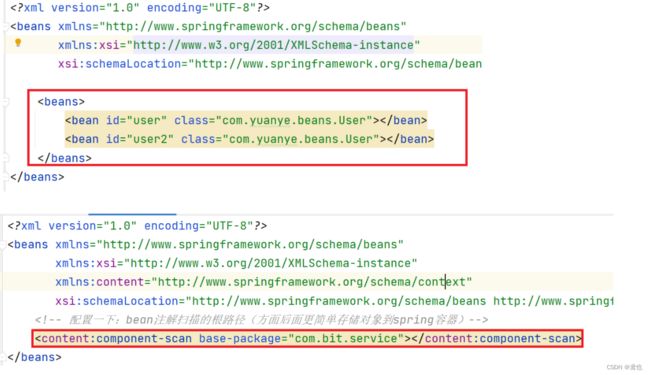
需要再 Spring 的配置文件中设置组件 Component 的根路径
<beans xmlns="http://www.springframework.org/schema/beans"
       xmlns:xsi="http://www.w3.org/2001/XMLSchema-instance"
       xmlns:content="http://www.springframework.org/schema/context"
       xsi:schemaLocation="http://www.springframework.org/schema/beans http://www.springframework.org/schema/beans/spring-beans.xsd http://www.springframework.org/schema/context https://www.springframework.org/schema/context/spring-context.xsd">

    <content:component-scan base-package="根路径">content:component-scan>
beans>
这是很重要的一步,在 resources 包下创建 xml 文件来配置 Spring 信息。这里面主要加了一个 component 扫描路径代码。
<content:component-scan base-package="组件扫描根路径">content:component-scan>
❓❓❓问题来了,为什么要这要设置,不能想以前添加 bean 对象吗?
使用扫描包根路径的作用:这个配置信息可以扫描你设置的根路径以下的类,扫描是否添加了注解,把添加了注解的类存入 spring 容器里面,不加根路径范围全部扫描所有文件的话增加工作量效率不高吃性能。
注意只有在根路径里面添加了注解才会被添加进 spring 里面,在根路径意外的即使添加了注解是不会被添加进spring 里的
使用扫描包路径的优势:
- 不用再每次注册内容的使用都在配置文件中添加 bean 对象,之后做项目的时候每次注册bean对象会增加工作量相率正确性也不高。扫描包配置添加注解直接存入 spring 里面 更方便快捷提升效率提高性能
- 配置文件信息代码少,不复杂,只关注根路径就行
- 与注解搭配使用,目前企业都主要是用注解,而不是用的原始方法
二、添加注解存储 Spring 中(存)
2.1、类注解
2.1.1、@Controller
import org.springframework.stereotype.Controller;

@Controller
public class UserController {
    public void sayHi() {
        System.out.println("hi UserController");
    }
}
@Controller 注解就相当于在spring 容器里面存储了 bean 对象:
<bean id="userController" class="com.yuanye.beans.userController">bean>
@Controller 注解在spring启动的时候就把当前的对象存储在容器里面了。获取对象的方法还是老三步骤:
1、得到 Spring 上下文
2、使用上下文对象获得一个 bean
3、使用 bean
具体操作步骤可以看这篇文章 Spring核心 and 创建使用
2.1.2、@Service
将对象存储在 spring 容器中
import org.springframework.stereotype.Service;

@Service
public class UserService {
    public void sayhi() {
        System.out.println("hi UserService");
    }
}
@Service 注解就相当于在spring 容器里面存储了 bean 对象:
<bean id="UserService" class="com.yuanye.beans.UserService">bean>
2.1.3、@Repository
将对象存储在 spring 容器中
import org.springframework.stereotype.Repository;

@Repository
public class UserRepository {
    public void sayhi() {
        System.out.println("hi UserRepository");
    }
}
与上面的方法是一样,不再赘述。
2.1.4、@Component
以上。
import org.springframework.stereotype.Component;

@Component
public class UserComponent {
    public void sayHi() {
        System.out.println("hi,UserComponent");
    }
}
2.1.5、@Configuration
同上。
import org.springframework.context.annotation.Configuration;


@Configuration
public class UserConfiguration {
    public void sayHi() {
        System.out.println("hi,UserConfiguration");
    }
}
2.2、类注解的区别
❓❓❓问题:尽然他们的功能都是一样的,那么他们究竟是有什么区别尼??
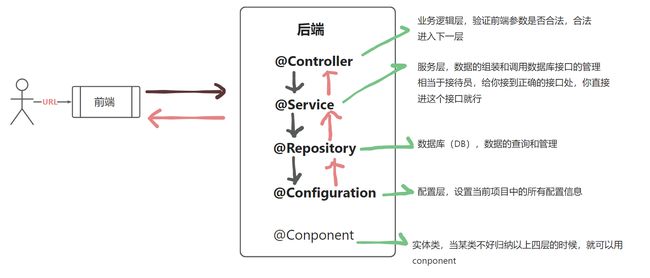
主要还是用来处理业务逻辑相关,让程序员一看使用某注解就明白某类在业务功能上面的用途。
- @Controller:表示业务逻辑层(首先与前端交互验证)
- @Service:表示服务层
- @Repository:持久层
- @Configuration:配置层
- @Component:实体类
程序的工程分层图如下:
这张图也详细说明了每个注解的作用。
2.2.1、类注解的关系
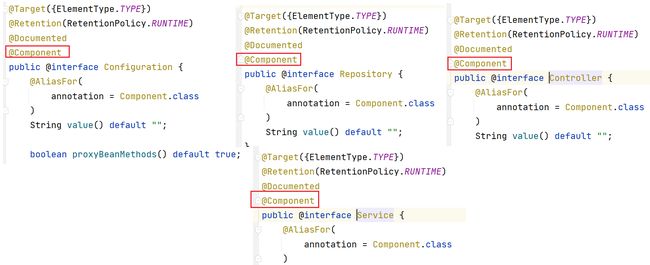
从源代码来说,@Controller / @Service / @Repository / @Configuration 等注解他们都有@Component的注解。
结论:@Controller / @Service / @Repository / @Configuration 等注解他们本身属于是 @Component 的 子类
2.3、方法注解
方法注解就是放在方法上面的注解
2.3.1、@Bean
目标:@Bean 将当前方法返回的对象存入到 Spring 容器中
代码实现:
import com.yuanye.model.UserInfo;
import org.springframework.context.annotation.Bean;

public class UserBeans {
    @Bean
    public UserInfo getUser() { // 方法名就是 bean name
        UserInfo userInfo = new UserInfo();// 伪代码
        userInfo.setId(1);
        userInfo.setName("鸢也");
        userInfo.setPassword("123456");
        return userInfo;
    }
}
这是在 Spring 中注册方法,获取这个方法还是三步骤,只不过 bean name 是方法的名字
UserInfo userInfo = applicationContext.getBean("getUser",UserInfo.class);
但是这样写程序会报错:
Exception in thread "main" org.springframework.beans.factory.NoSuchBeanDefinitionException:
❓❓❓这又是为什么尼??
2.3.1.1、方法注解要配合5大类注解一起使用
答案就是方法注解要配合类注解一起使用。这是 spring 设计之初就是这样设计的。
❓❓❓为何要这样设计???
原因是出于性能的考量:相当于就是加一个范围,不加范围一个项目可能有成千上百个方法,如果都要扫描一遍检查是否要将返回值存储到 Spring 里面中,那么代价太大,效率低,成本高。故要 方法注解搭配类注解 来实现对象的托管。
正确代码:
import com.yuanye.model.UserInfo;
import org.springframework.context.annotation.Bean;
import org.springframework.stereotype.Component;

@Component
public class UserBeans {
    @Bean
    public UserInfo getUser() { // 方法名就是 bean name
        UserInfo userInfo = new UserInfo();
        userInfo.setId(1);
        userInfo.setName("鸢也");
        userInfo.setPassword("123456");
        return userInfo;
    }
}
2.3.1.2、@Bean 重命名
@Bean 有一个特性 ,它可以重命名 id name。
- 可以给当前对象指定多个名称
- 使用多给名称获取的对象是同一个
- 使用了重命名不可再使用原方法名来作为 id name(原方法id name 就会得不到对象)
import com.yuanye.model.UserInfo;
import org.springframework.context.annotation.Bean;
import org.springframework.stereotype.Component;

@Component
public class UserBeans {
    @Bean(name = {"user","userfo"}) //@Bean("user")
    public UserInfo getUser() { // getUser 已经无法再使用,得不到对象
        UserInfo userInfo = new UserInfo();
        userInfo.setId(1);
        userInfo.setName("鸢也");
        userInfo.setPassword("123456");
        return userInfo;
    }
}
当他重命名的时候,获取 bean id 就是用的重命名,更方便操作。以上两种写法都可以,如果是一个重命名参数格式 @Bean("user") ,多个重命名参数格式 @Bean(name = {"user","userfo"})
注意:使用了重命名就只能使用重命名之后 老方法获取对象 name 不可再次使用 原方法名,因为程序会报错,就拿不到当前对象
三、Bean(对象) 的命名
首先查看源码:(一般用在类中的命名方式)通常使用在 bean id(name) 上面
public static String decapitalize(String name) {
        if (name == null || name.length() == 0) {
            return name;
        }
        if (name.length() > 1 && Character.isUpperCase(name.charAt(1)) &&
                        Character.isUpperCase(name.charAt(0))){
            return name;
        }
        char chars[] = name.toCharArray();
        chars[0] = Character.toLowerCase(chars[0]);
        return new String(chars);
    }
在第二个if判断语句中,可以看出某类如果第一个字符和第二个字符是大写,那么就返回原来的名字就不用修改;
第10行代码中,如果第一个字符是大写,第二个字符是小写,那么就要修改 bean 的名称,就要把第一个字母改为小写即可。
四、获取 Bean 对象 (对象装配)
@Autowired
获取 bean 对象也叫做对象装配 ,是把对象取出来放到某个类中,有时候也叫作 对象注入 (DI:Dependency Injection)。
对象注入的方式有3种:
- 属性注入 (企业、个人 常用)
- 构造方法注入 (官方推荐)
- Setter 注入
注入又是怎么样理解?
程序运行期间动态的将当前类需要的依赖类,比如说A类里面需要调用B的方法,那么A类就需要依赖B类,需要B对象。那么在A类里面动态的加载B类过程就叫做“注入”。
说白了就是在 Spring 当中把对象拿进当前的对象
之前我们都是用的旧方法的三部曲:
1、得到 Spring 上下文
2、使用上下文对象获得一个 bean
3、使用 bean
现在也是可以用一个注解就搞定的。
4.1、属性注入(企业、个人 常用)
使用属性注入的方式获得对象,获取对象的注解为 @Autowired ,接下来我们用 @Service 注入到 @Controller的方法中
@Controller代码实现如下:
@Controller
public class ArtController {
    @Autowired
    private ArtService artService;

    public void addArt(String title, String content) {
        if (title!=null && content!=null &&
                !title.equals("") && !content.equals("")) {
            // 满足校验条件就 执行 Service
            artService.addArt(title,content);//注入了ArtService类就可以使用里面的方法了
        }else {
            System.out.println("添加文章失败,前端传递了非法参数");
        }
    }
}
@Serviced代码如下:
@Service
public class ArtService {
    public void addArt(String title,String content) {
        System.out.println("执行了文章的 Service 方法:" +
                ""+title+" | "+content);
    }
}
@Autowired
private ArtService artService;
这段代码就是属性注入的代码,动态的把 ArtService 这个对象注入进了 ArtController 类里面。
运行顺序:先使用类型进行查询,如果在 Spring 中查询到了同类型的对象就直接返回;否则使用类名称进行查询,如果两个都查询不到,那么注入失败,否则就是成功。属性注入意思就说你申请的属性中类和类名都是可以在 spring 里面找的,类找不到就换成类名找 。
4.2、构造方法注入(官方推荐)
当一个类中只用一个构造方法的时候,此时注解 @Autowired 可以省略,当有多个构造方法的时候 @Autowired 不可以省略。当有多个构造方法的时候,需要注入那个类就在构造方法钱加上注解 @Autowired
这是官方推荐的方法,有点是他的通用性,移植性好,缺点是多个注入代码会显得比较的臃肿,当然也可以更改设计模式让代码不会太臃肿。
4.3、Setter 注入
setter注入里面的注解是千万不能省略的,不管是一个还是多个 setter 方法都是不能省略的,这点与构造方法注入要分清楚。
private ArtService artService;
@Autowired
public void setArtService(ArtService artService) {
    this.artService = artService;
}
这里主要是创建一个 setter 方法 来注入,大差不差与构造方法差不多,只不过 注解 需要注意一下。
4.4、三个注入的区别对比 (面试)
1、属性注入:优点他的方式是最简单,代码最少得;缺点:此种写法只适用于 IoC 容器,非 IoC 容器不能识别。(但是企业,个人经常用这种方法)
2、构造方法注入:是官方推荐的方案。优点:通用性比较好,代码移植性高;缺点:代码比较多,看起来比较臃肿。(官方推荐)
3、Setter 注入:是 Spring 早期版本推荐的注入方式,通用性好,现在是推荐使用构造方法注入也是默认的注入方式。(早期版本推荐)
@Resource 另一种注入的方式
@Resource 的功能是与 @Autowired 的功能是一致的,但也是有区别。
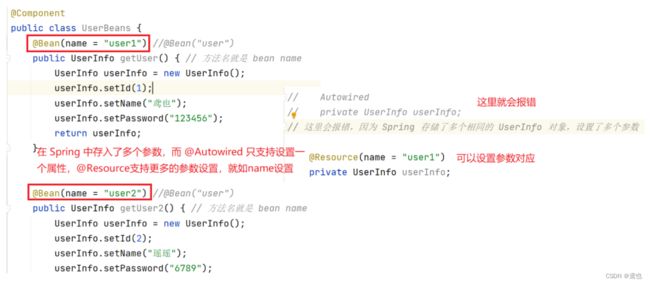
根据上面的图片
- 第一个区别就是设置的参数不同,使用 @Autowired 只能设置一个属性,而@Resource 却可以设置多个参数。
- 他们的出生是不同的:@Autowired 来自于 Spring 框架,@Resource 来自于 JDK。
- 修饰的对象不同:@Autowired 可以用于属性注入,构造方法注入,Setter 注入,@Resource只能用在 属性注入和 Setter 注入,不能用于构造方法注入。
对于多种参数的情况,Spring 也是想了办法解决的。
针对一个对象类型被 Spring 注入多个,我们可以使用 @Autowired + @Qualifier .
格式:
1、@Resource(name = “”)
@Resource(name = "user1")
private UserInfo userInfo;
2、@Autowired + @Qualifier
@Autowired
@Qualifier("user1")//@Qualifier(value = "user1")
private UserInfo userInfo;
总结:
1、将对象存储在 Spring 中:
- 使用类注解 @Controller / @Service / @Repository / @Configuration /@Component [注意他们注解之间的关系]
- 使用方法注解 @Bean 【必须和5大注解类一起使用】
2、从 Spring 中获取对象:
- 属性注入
- 构造方法注入
- Setter 注入
4、注入的关键字:
- @Autowired
- @Resource
两个关键字之间的区别:出生不同;参数设置不同,@Autowired支持一个属性参数,@Resource支持多个参数设置
5、解决一个对象类型被 Spring 注入多个 Bean 的方法
- 使用@Resource(name = “”)
- 使用@Autowired+@Qualifier(“”)


