爬虫从小白到精通笔记---第二周---非结构化数据和结构化数据的提取
二、非结构化数据和结构化数据的提取
页面解析和数据提取
一般来讲对我们而言,需要抓取的是某个网站或者某个应用的内容,提取有用的价值。内容一般分为两部分,非结构化的数据 和 结构化的数据。
- 非结构化数据:先有数据,再有结构,(http://www.baidu.com)/)
- 结构化数据:先有结构、再有数据(http://wangyi.butterfly.mopaasapp.com/news/api?type=war&page=1&limit=10)
- 不同类型的数据,我们需要采用不同的方式来处理。
非结构化的数据处理
文本、电话号码、邮箱地址
- 正则表达式
HTML 文件
- 正则表达式
- XPath
- CSS选择器
结构化的数据处理
JSON 文件
- JSON Path
- 转化成Python类型进行操作(json类)
XML 文件
- 转化成Python类型(xmltodict)
- XPath
- CSS选择器
- 正则表达式
2.1 正则表达式RE模块
为什么要学正则表达式
实际上爬虫一共就四个主要步骤:
- 明确目标 (要知道你准备在哪个范围或者网站去搜索)
- 爬 (将所有的网站的内容全部爬下来)
- 去 (去掉对我们没用处的数据)
- 处理数据(按照我们想要的方式存储和使用)
我们在昨天的案例里实际上省略了第3步,也就是"取"的步骤。因为我们down下了的数据是全部的网页,这些数据很庞大并且很混乱,大部分的东西使我们不关心的,因此我们需要将之按我们的需要过滤和匹配出来。
那么对于文本的过滤或者规则的匹配,最强大的就是正则表达式,是Python爬虫世界里必不可少的神兵利器。
什么是正则表达式
正则表达式,又称规则表达式,通常被用来检索、替换那些符合某个模式(规则)的文本。
正则表达式是对字符串操作的一种逻辑公式,就是用事先定义好的一些特定字符、及这些特定字符的组合,组成一个"规则字符串",这个"规则字符串"用来表达对字符串的一种过滤逻辑。
给定一个正则表达式和另一个字符串,我们可以达到如下的目的:
- 给定的字符串是否符合正则表达式的过滤逻辑(“匹配”);
- 通过正则表达式,从文本字符串中获取我们想要的特定部分(“过滤”)。

正则表达式匹配规则
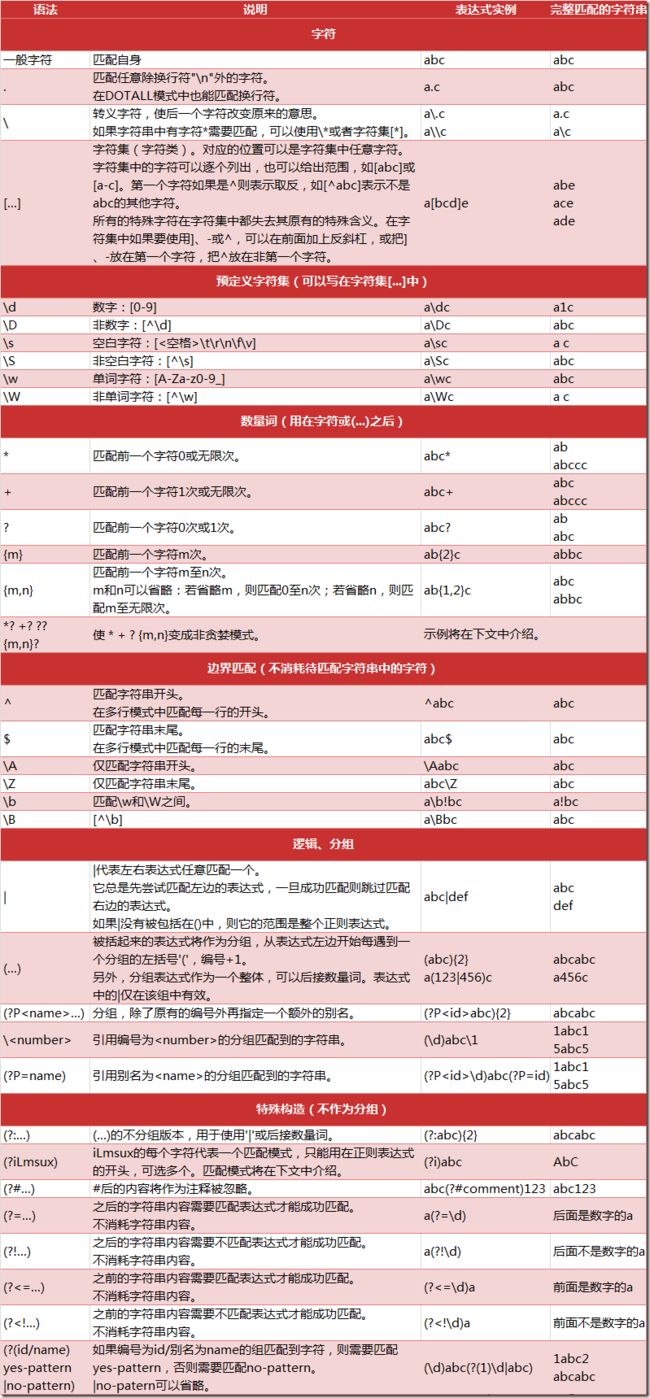
Python 的 re 模块
在 Python 中,我们可以使用内置的 re 模块来使用正则表达式。
有一点需要特别注意的是,正则表达式使用 对特殊字符进行转义,所以如果我们要使用原始字符串,只需加一个 r 前缀,示例:
r'chuanzhiboke\t\.\tpython'
re 模块的一般使用步骤如下:
- 使用
compile()函数将正则表达式的字符串形式编译为一个Pattern对象 - 通过
Pattern对象提供的一系列方法对文本进行匹配查找,获得匹配结果,一个 Match 对象。 - 最后使用
Match对象提供的属性和方法获得信息,根据需要进行其他的操作
compile 函数
compile 函数用于编译正则表达式,生成一个 Pattern 对象,它的一般使用形式如下:
import re

# 将正则表达式编译成 Pattern 对象
pattern = re.compile(r'\d+')
在上面,我们已将一个正则表达式编译成 Pattern 对象,接下来,我们就可以利用 pattern 的一系列方法对文本进行匹配查找了。
Pattern 对象的一些常用方法主要有:
- match 方法:从起始位置开始查找,一次匹配
- search 方法:从任何位置开始查找,一次匹配
- findall 方法:全部匹配,返回列表
- finditer 方法:全部匹配,返回迭代器
- split 方法:分割字符串,返回列表
- sub 方法:替换
match 方法
match 方法用于查找字符串的头部(也可以指定起始位置),它是一次匹配,只要找到了一个匹配的结果就返回,而不是查找所有匹配的结果。它的一般使用形式如下:
match(string[, pos[, endpos]])
其中,string 是待匹配的字符串,pos 和 endpos 是可选参数,指定字符串的起始和终点位置,默认值分别是 0 和 len (字符串长度)。因此,当你不指定 pos 和 endpos 时,match 方法默认匹配字符串的头部。
当匹配成功时,返回一个 Match 对象,如果没有匹配上,则返回 None。
>>> import re
>>> pattern = re.compile(r'\d+')  # 用于匹配至少一个数字

>>> m = pattern.match('one12twothree34four')  # 查找头部,没有匹配
>>> print (m)
None

>>> m = pattern.match('one12twothree34four', 2) # 从'e'的位置开始匹配,没有匹配
>>> print (m)
None

>>> m = pattern.match('one12twothree34four', 3) # 从'1'的位置开始匹配,正好匹配
>>> print (m)                                         # 返回一个 Match 对象
<_sre.SRE_Match object at 0x10a42aac0>

>>> m.group(0)   # 可省略 0
'12'
>>> m.start(0)   # 可省略 0
3
>>> m.end(0)     # 可省略 0
5
>>> m.span(0)    # 可省略 0
(3, 5)
在上面,当匹配成功时返回一个 Match 对象,其中:
- group([group1, …]) 方法用于获得一个或多个分组匹配的字符串,当要获得整个匹配的子串时,可直接使用 group() 或 group(0);
- start([group]) 方法用于获取分组匹配的子串在整个字符串中的起始位置(子串第一个字符的索引),参数默认值为 0;
- end([group]) 方法用于获取分组匹配的子串在整个字符串中的结束位置(子串最后一个字符的索引+1),参数默认值为 0;
- span([group]) 方法返回 (start(group), end(group))。
再看看一个例子:
>>> import re
>>> pattern = re.compile(r'([a-z]+) ([a-z]+)', re.I) # re.I 表示忽略大小写
>>> m = pattern.match('Hello World Wide Web')
>>> print (m) # 匹配成功,返回一个 Match 对象
<_sre.SRE_Match object at 0x10bea83e8>
>>> m.group(0) # 返回匹配成功的整个子串
'Hello World'
>>> m.span(0) # 返回匹配成功的整个子串的索引
(0, 11)
>>> m.group(1) # 返回第一个分组匹配成功的子串
'Hello'
>>> m.span(1) # 返回第一个分组匹配成功的子串的索引
(0, 5)
>>> m.group(2) # 返回第二个分组匹配成功的子串
'World'
>>> m.span(2) # 返回第二个分组匹配成功的子串
(6, 11)
>>> m.groups() # 等价于 (m.group(1), m.group(2), ...)
('Hello', 'World')
>>> m.group(3) # 不存在第三个分组
Traceback (most recent call last):
File "" , line 1, in <module>
IndexError: no such group
search 方法
search 方法用于查找字符串的任何位置,它也是一次匹配,只要找到了一个匹配的结果就返回,而不是查找所有匹配的结果,它的一般使用形式如下:
search(string[, pos[, endpos]])
其中,string 是待匹配的字符串,pos 和 endpos 是可选参数,指定字符串的起始和终点位置,默认值分别是 0 和 len (字符串长度)。
当匹配成功时,返回一个 Match 对象,如果没有匹配上,则返回 None。
让我们看看例子:
>>> import re
>>> pattern = re.compile('\d+')
>>> m = pattern.search('one12twothree34four')  # 这里如果使用 match 方法则不匹配
>>> m
<_sre.SRE_Match object at 0x10cc03ac0>
>>> m.group()
'12'
>>> m = pattern.search('one12twothree34four', 10, 30)  # 指定字符串区间
>>> m
<_sre.SRE_Match object at 0x10cc03b28>
>>> m.group()
'34'
>>> m.span()
(13, 15)
再来看一个例子:
# -*- coding: utf-8 -*-

import re
# 将正则表达式编译成 Pattern 对象
pattern = re.compile(r'\d+')
# 使用 search() 查找匹配的子串,不存在匹配的子串时将返回 None
# 这里使用 match() 无法成功匹配
m = pattern.search('hello 123456 789')
if m:
    # 使用 Match 获得分组信息
    print ('matching string:',m.group())
    # 起始位置和结束位置
    print ('position:',m.span())
执行结果:
matching string: 123456
position: (6, 12)
findall 方法
上面的 match 和 search 方法都是一次匹配,只要找到了一个匹配的结果就返回。然而,在大多数时候,我们需要搜索整个字符串,获得所有匹配的结果。
findall 方法的使用形式如下:
findall(string[, pos[, endpos]])
其中,string 是待匹配的字符串,pos 和 endpos 是可选参数,指定字符串的起始和终点位置,默认值分别是 0 和 len (字符串长度)。
findall 以列表形式返回全部能匹配的子串,如果没有匹配,则返回一个空列表。
看看例子:
import re
pattern = re.compile(r'\d+')   # 查找数字

result1 = pattern.findall('hello 123456 789')
result2 = pattern.findall('one1two2three3four4', 0, 10) #(表示切片[0:10])

print (result1)
print (result2)
执行结果:
['123456', '789']
['1', '2']
再先看一个栗子:
# re_test.py

import re

#re模块提供一个方法叫compile模块,提供我们输入一个匹配的规则
#然后返回一个pattern实例,我们根据这个规则去匹配字符串
pattern = re.compile(r'\d+\.\d*')

#通过partten.findall()方法就能够全部匹配到我们得到的字符串
result = pattern.findall("123.141593, 'bigcat', 232312, 3.15")

#findall 以 列表形式 返回全部能匹配的子串给result
for item in result:
    print (item)
运行结果:
123.141593
3.15
finditer 方法
finditer 方法的行为跟 findall 的行为类似,也是搜索整个字符串,获得所有匹配的结果。但它返回一个顺序访问每一个匹配结果(Match 对象)的迭代器。
看看例子:
# -*- coding: utf-8 -*-

import re
pattern = re.compile(r'\d+')

result_iter1 = pattern.finditer('hello 123456 789')
result_iter2 = pattern.finditer('one1two2three3four4', 0, 10)

print (type(result_iter1))
print (type(result_iter2))

print 'result1...'
for m1 in result_iter1:   # m1 是 Match 对象
    print ('matching string: {}, position: {}'.format(m1.group(), m1.span()))

print 'result2...'
for m2 in result_iter2:
    print ('matching string: {}, position: {}'.format(m2.group(), m2.span()))
执行结果:
result1...
matching string: 123456, position: (6, 12)
matching string: 789, position: (13, 16)
result2...
matching string: 1, position: (3, 4)
matching string: 2, position: (7, 8)
split 方法
split 方法按照能够匹配的子串将字符串分割后返回列表,它的使用形式如下:
split(string[, maxsplit])
其中,maxsplit 用于指定最大分割次数,不指定将全部分割。
看看例子:
import re
p = re.compile(r'[\s\,\;]+')
print (p.split('a,b;; c   d'))
执行结果:
['a', 'b', 'c', 'd']
sub 方法
sub 方法用于替换。它的使用形式如下:
sub(repl, string[, count])
其中,repl 可以是字符串也可以是一个函数:
- 如果 repl 是字符串,则会使用 repl 去替换字符串每一个匹配的子串,并返回替换后的字符串,另外,repl 还可以使用 id 的形式来引用分组,但不能使用编号 0;
- 如果 repl 是函数,这个方法应当只接受一个参数(Match 对象),并返回一个字符串用于替换(返回的字符串中不能再引用分组)。
- count 用于指定最多替换次数,不指定时全部替换。
看看例子:
import re
p = re.compile(r'(\w+) (\w+)') # \w = [A-Za-z0-9]
s = 'hello 123, hello 456'

print (p.sub(r'hello world', s))  # 使用 'hello world' 替换 'hello 123' 和 'hello 456'
print (p.sub(r'\2 \1', s))        # 引用分组

def func(m):
    print(m)
    return 'hi' + ' ' + m.group(2) #group(0) 表示本身,group(1)表示hello,group(2) 表示后面的数字

print (p.sub(func, s))  #多次sub,每次sub的结果传递给func
print (p.sub(func, s, 1))         # 最多替换一次
执行结果:
hello world, hello world
123 hello, 456 hello
hi 123, hi 456
hi 123, hello 456
匹配中文
在某些情况下,我们想匹配文本中的汉字,有一点需要注意的是,中文的 unicode 编码范围 主要在 [u4e00-u9fa5],这里说主要是因为这个范围并不完整,比如没有包括全角(中文)标点,不过,在大部分情况下,应该是够用的。
假设现在想把字符串 title = u’你好,hello,世界’ 中的中文提取出来,可以这么做:
import re

title = '你好,hello,世界'
pattern = re.compile(r'[\u4e00-\u9fa5]+')
result = pattern.findall(title)

print (result)
注意到,我们在正则表达式前面加上了两个前缀 ur,其中 r 表示使用原始字符串,u 表示是 unicode 字符串。
执行结果:
['你好', '世界']
注意:贪婪模式与非贪婪模式
- 贪婪模式:在整个表达式匹配成功的前提下,尽可能多的匹配 ( * );
- 非贪婪模式:在整个表达式匹配成功的前提下,尽可能少的匹配 ( ? );
- Python里数量词默认是贪婪的。
示例一 : 源字符串:abbbc
-
使用贪婪的数量词的正则表达式
ab*,匹配结果: abbb。*决定了尽可能多匹配 b,所以a后面所有的 b 都出现了。 -
使用非贪婪的数量词的正则表达式
ab*?,匹配结果: a。即使前面有
*,但是?决定了尽可能少匹配 b,所以没有 b。
示例二 : 源字符串:aa
- 使用贪婪的数量词的正则表达式:.*
- 匹配结果:test1bbtest2
这里采用的是贪婪模式。在匹配到第一个"
test1bbtest2"
- 使用非贪婪的数量词的正则表达式:.*?
- 匹配结果:test1
正则表达式二采用的是非贪婪模式,在匹配到第一个"
test1"。
2.2 案例:使用正则表达式的爬虫
现在拥有了正则表达式这把神兵利器,我们就可以进行对爬取到的全部网页源代码进行筛选了。
2.3 Xpath与lxml库
有同学说,我正则用的不好,处理HTML文档很累,有没有其他的方法?
有!那就是XPath,我们可以先将 HTML文件 转换成 XML文档,然后用 XPath 查找 HTML 节点或元素。
什么是XML
- XML 指可扩展标记语言(EXtensible Markup Language)
- XML 是一种标记语言,很类似 HTML
- XML 的设计宗旨是传输数据,而非显示数据
- XML 的标签需要我们自行定义。
- XML 被设计为具有自我描述性。
- XML 是 W3C 的推荐标准
W3School官方文档:http://www.w3school.com.cn/xml/index.asp
XML 和 HTML 的区别
| 数据格式 | 描述 | 设计目标 |
|---|---|---|
| XML | Extensible Markup Language (可扩展标记语言) |
被设计为传输和存储数据,其焦点是数据的内容。 |
| HTML | HyperText Markup Language (超文本标记语言) |
显示数据以及如何更好显示数据。 |
| HTML DOM | Document Object Model for HTML (文档对象模型) |
通过 HTML DOM,可以访问所有的 HTML 元素,连同它们所包含的文本和属性。可以对其中的内容进行修改和删除,同时也可以创建新的元素。 |
XML文档示例
<bookstore>

  <book category="cooking">
    <title lang="en">Everyday Italiantitle>
    <author>Giada De Laurentiisauthor>
    <year>2005year>
    <price>30.00price>
  book>

  <book category="children">
    <title lang="en">Harry Pottertitle>
    <author>J K. Rowlingauthor>
    <year>2005year>
    <price>29.99price>
  book>

  <book category="web">
    <title lang="en">XQuery Kick Starttitle>
    <author>James McGovernauthor>
    <author>Per Bothnerauthor>
    <author>Kurt Cagleauthor>
    <author>James Linnauthor>
    <author>Vaidyanathan Nagarajanauthor>
    <year>2003year>
    <price>49.99price>
  book>

  <book category="web" cover="paperback">
    <title lang="en">Learning XMLtitle>
    <author>Erik T. Rayauthor>
    <year>2003year>
    <price>39.95price>
  book>

bookstore>
HTML DOM 模型示例
HTML DOM 定义了访问和操作 HTML 文档的标准方法,以树结构方式表达 HTML 文档。

XML的节点关系
1. 父(Parent)
每个元素以及属性都有一个父。
下面是一个简单的XML例子中,book 元素是 title、author、year 以及 price 元素的父:
<book>
  <title>Harry Pottertitle>
  <author>J K. Rowlingauthor>
  <year>2005year>
  <price>29.99price>
book>
2. 子(Children)
元素节点可有零个、一个或多个子。
在下面的例子中,title、author、year 以及 price 元素都是 book 元素的子:
<book>
  <title>Harry Pottertitle>
  <author>J K. Rowlingauthor>
  <year>2005year>
  <price>29.99price>
book>
3. 同胞(Sibling)
拥有相同的父的节点
在下面的例子中,title、author、year 以及 price 元素都是同胞:
<book>
  <title>Harry Pottertitle>
  <author>J K. Rowlingauthor>
  <year>2005year>
  <price>29.99price>
book>
4. 先辈(Ancestor)
某节点的父、父的父,等等。
在下面的例子中,title 元素的先辈是 book 元素和 bookstore 元素:
<bookstore>

<book>
  <title>Harry Pottertitle>
  <author>J K. Rowlingauthor>
  <year>2005year>
  <price>29.99price>
book>

bookstore>
5. 后代(Descendant)
某个节点的子,子的子,等等。
在下面的例子中,bookstore 的后代是 book、title、author、year 以及 price 元素:
<bookstore>

<book>
  <title>Harry Pottertitle>
  <author>J K. Rowlingauthor>
  <year>2005year>
  <price>29.99price>
book>

bookstore>
什么是XPath?
XPath (XML Path Language) 是一门在 XML 文档中查找信息的语言,可用来在 XML 文档中对元素和属性进行遍历。
W3School官方文档:http://www.w3school.com.cn/xpath/index.asp
XPath 开发工具
- 开源的XPath表达式编辑工具:XMLQuire(XML格式文件可用
- Chrome插件 XPath Helper
- Firefox插件 XPath Checker
选取节点
XPath 使用路径表达式来选取 XML 文档中的节点或者节点集。这些路径表达式和我们在常规的电脑文件系统中看到的表达式非常相似。
下面列出了最常用的路径表达式:
| 表达式 | 描述 |
|---|---|
| nodename | 选取此节点的所有子节点。 |
| / | 从根节点选取。 |
| // | 从匹配选择的当前节点选择文档中的节点,而不考虑它们的位置。 |
| . | 选取当前节点。 |
| … | 选取当前节点的父节点。 |
| @ | 选取属性。 |
在下面的表格中,我们已列出了一些路径表达式以及表达式的结果:
| 路径表达式 | 结果 | |
|---|---|---|
| bookstore | 选取 bookstore 元素的所有子节点。 | |
| /bookstore | 选取根元素 bookstore。注释:假如路径起始于正斜杠( / ),则此路径始终代表到某元素的绝对路径! | |
| bookstore/book | 选取属于 bookstore 的子元素的所有 book 元素。 | |
| //book | 选取所有 book 子元素,而不管它们在文档中的位置。 | |
| bookstore//book | 选择属于 bookstore 元素的后代的所有 book 元素,而不管它们位于 bookstore 之下的什么位置。 | |
| //@lang | 选取名为 lang 的所有属性。 |
谓语(Predicates)
谓语用来查找某个特定的节点或者包含某个指定的值的节点,被嵌在方括号中。
在下面的表格中,我们列出了带有谓语的一些路径表达式,以及表达式的结果:
| 路径表达式 | 结果 |
|---|---|
| /bookstore/book[1] | 选取属于 bookstore 子元素的第一个 book 元素。 |
| /bookstore/book[last()] | 选取属于 bookstore 子元素的最后一个 book 元素。 |
| /bookstore/book[last()-1] | 选取属于 bookstore 子元素的倒数第二个 book 元素。 |
| /bookstore/book[position()❤️] | 选取最前面的两个属于 bookstore 元素的子元素的 book 元素。 |
| //title[@lang] | 选取所有拥有名为 lang 的属性的 title 元素。 |
| //title[@lang=’eng’] | 选取所有 title 元素,且这些元素拥有值为 eng 的 lang 属性。 |
| /bookstore/book[price>35.00] | 选取 bookstore 元素的所有 book 元素,且其中的 price 元素的值须大于 35.00。 |
| /bookstore/book[price>35.00]/title | 选取 bookstore 元素中的 book 元素的所有 title 元素,且其中的 price 元素的值须大于 35.00。 |
选取未知节点
XPath 通配符可用来选取未知的 XML 元素。
| 通配符 | 描述 |
|---|---|
| * | 匹配任何元素节点。 |
| @* | 匹配任何属性节点。 |
| node() | 匹配任何类型的节点。 |
在下面的表格中,我们列出了一些路径表达式,以及这些表达式的结果:
| 路径表达式 | 结果 |
|---|---|
| /bookstore/* | 选取 bookstore 元素的所有子元素。 |
| //* | 选取文档中的所有元素。 |
| html/node()/meta/@* | 选择html下面任意节点下的meta节点的所有属性 |
| //title[@*] | 选取所有带有属性的 title 元素。 |
选取若干路径
通过在路径表达式中使用“|”运算符,您可以选取若干个路径。
实例
在下面的表格中,我们列出了一些路径表达式,以及这些表达式的结果:
| 路径表达式 | 结果 |
|---|---|
| //book/title | //book/price | 选取 book 元素的所有 title 和 price 元素。 |
| //title | //price | 选取文档中的所有 title 和 price 元素。 |
| /bookstore/book/title | //price | 选取属于 bookstore 元素的 book 元素的所有 title 元素,以及文档中所有的 price 元素。 |
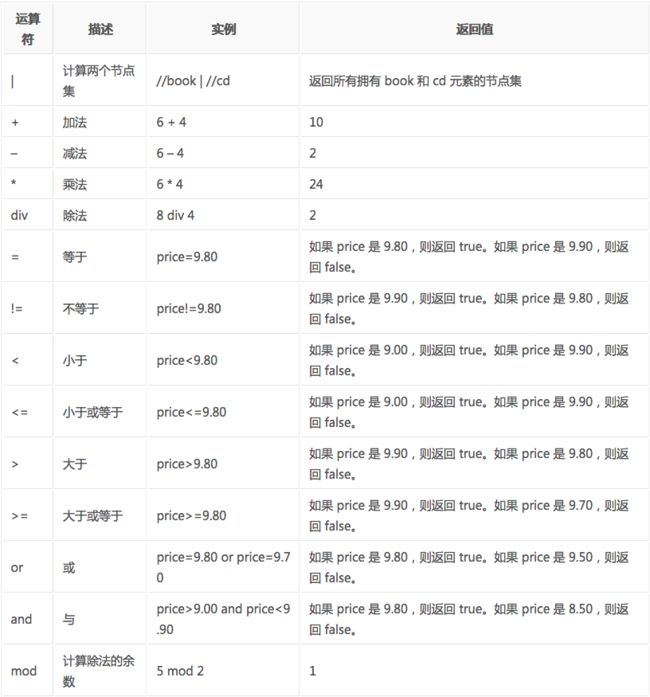
XPath的运算符
下面列出了可用在 XPath 表达式中的运算符:
这些就是XPath的语法内容,在运用到Python抓取时要先转换为xml。
lxml库
lxml 是 一个HTML/XML的解析器,主要的功能是如何解析和提取 HTML/XML 数据。
lxml和正则一样,也是用 C 实现的,是一款高性能的 Python HTML/XML 解析器,我们可以利用之前学习的XPath语法,来快速的定位特定元素以及节点信息。
lxml python 官方文档:http://lxml.de/index.html
需要安装C语言库,可使用 pip 安装:
pip install lxml(或通过wheel方式安装)
初步使用
我们利用它来解析 HTML 代码,简单示例:
# lxml_test.py
# 使用 lxml 的 etree 库
from lxml import etree
text = '''
- first item
- second item
- third item
- fourth item
- fifth item # 注意,此处缺少一个
闭合标签
'''
#利用etree.HTML,将字符串解析为HTML文档
html = etree.HTML(text)
# 按字符串序列化HTML文档
result = etree.tostring(html)
print(result)
输出结果:
<html><body>
<div>
    <ul>
         <li class="item-0"><a href="link1.html">first itema>li>
         <li class="item-1"><a href="link2.html">second itema>li>
         <li class="item-inactive"><a href="link3.html">third itema>li>
         <li class="item-1"><a href="link4.html">fourth itema>li>
         <li class="item-0"><a href="link5.html">fifth itema>li>
ul>
 div>
body>html>
lxml 可以自动修正 html 代码,例子里不仅补全了 li 标签,还添加了 body,html 标签。
文件读取:
除了直接读取字符串,lxml还支持从文件里读取内容。我们新建一个hello.html文件:
<div>
    <ul>
         <li class="item-0"><a href="link1.html">first itema>li>
         <li class="item-1"><a href="link2.html">second itema>li>
         <li class="item-inactive"><a href="link3.html"><span class="bold">third itemspan>a>li>
         <li class="item-1"><a href="link4.html">fourth itema>li>
         <li class="item-0"><a href="link5.html">fifth itema>li>
     ul>
 div>
再利用 etree.parse() 方法来读取文件。
# lxml_parse.py

from lxml import etree

# 读取外部文件 hello.html
html = etree.parse('./hello.html')
result = etree.tostring(html, pretty_print=True)

print(result)
输出结果与之前相同:
<html><body>
<div>
    <ul>
         <li class="item-0">
             <a href="link1.html">first itema>
        li>
         <li class="item-1"><a href="link2.html">second itema>li>
         <li class="item-inactive"><a href="link3.html">third itema>li>
         <li class="item-1"><a href="link4.html">fourth itema>li>
         <li class="item-0"><a href="link5.html">fifth itema>li>
ul>
 div>
body>html>
XPath实例测试
- 获取所有的
标签
# xpath_li.py

from lxml import etree

html = etree.parse('hello.html')
print type(html)  # 显示etree.parse() 返回类型

result = html.xpath('//li')

print result  # 打印标签的元素集合
print len(result)
print type(result)
print type(result[0])
输出结果:
<type 'lxml.etree._ElementTree'>
[<Element li at 0x1014e0e18>, <Element li at 0x1014e0ef0>, <Element li at 0x1014e0f38>, <Element li at 0x1014e0f80>, <Element li at 0x1014e0fc8>]
5
<type 'list'>
<type 'lxml.etree._Element'>
- 继续获取
标签的所有class属性
# xpath_li.py

from lxml import etree

html = etree.parse('hello.html')
result = html.xpath('//li/@class')

print result
运行结果
['item-0', 'item-1', 'item-inactive', 'item-1', 'item-0']
# xpath_li.py

from lxml import etree

html = etree.parse('hello.html')
result = html.xpath('//li/a[@href="link1.html"]')

print result
运行结果
[]
- 获取
标签下的所有标签
# xpath_li.py

from lxml import etree

html = etree.parse('hello.html')

#result = html.xpath('//li/span')
#注意这么写是不对的:
#因为 / 是用来获取子元素的,而  并不是  的子元素,所以,要用双斜杠

result = html.xpath('//li//span')

print result
运行结果
[]
from lxml import etree

html = etree.parse('data/hello.html')

#result = html.xpath('//li/span')
#注意这么写是不对的:
#因为 / 是用来获取子元素的,而  并不是  的子元素,所以,要用双斜杠

result = html.xpath('//li/a/@href')

print (result)
运行结果
['link1.html', 'link2.html', 'link3.html', 'link4.html', 'link5.html']
# xpath_li.py

from lxml import etree

html = etree.parse('data/hello.html')

result = html.xpath('//li[last()]/a/@href')
# 谓语 [last()] 可以找到最后一个元素

print (result)
运行结果
['link5.html']
- 获取倒数第二个元素的内容
# xpath_li.py

from lxml import etree

html = etree.parse('data/hello.html')
result = html.xpath('//li[last()-1]/a')

# text 方法可以获取元素内容
print (result[0].text)
运行结果
fourth item
2.4 案例:使用XPath的爬虫
现在我们用XPath来做一个简单的爬虫,我们尝试爬取某个贴吧里的所有帖子,并且将该这个帖子里每个楼层的信息打印出来。
from urllib import request,parse
from lxml import etree

global i
i = 0

def loadPage(url) :
    #headers = {'User-Agent':' Mozilla/5.0 (Windows NT 10.0; Win64; x64) AppleWebKit/537.36 (KHTML, like Gecko) Chrome/75.0.3770.142 Safari/537.36'}
    #req = request.Request(url,headers=headers) #构建请求体
    response = request.urlopen(url)             #发送请求-得到响应对象
    html = response.read()                      #读取响应内容
    return html

def writePage(html,filename):
    html = html.decode('utf-8')
    with open(filename,'w',encoding='utf-8') as f:
        f.write(html)
    print('正在下载%s·····'%filename)


def teibaSpider(url):
    name = input('请输入贴吧名字:')
    beginPage = int(input('请输入起始页:'))
    endPage = int(input('请输入结束页:'))
    kw = {'kw':name}
    ret = parse.urlencode(kw)
    print(ret)
    url = url + ret + '&pn='
    for page in range(beginPage,endPage+1):
        pn = (page-1) * 50
        fullurl = url + str(pn)
        print(fullurl)
        html = loadPage(fullurl)
        filename = name+'吧第%s页.html'%page
        #tiebaInfo = name+'吧第%s页.html'%page + 'Info'
        writePage(html, filename)

        tiebaInfo(html)

def writeInfo(info,filename):
    with open(filename, 'a', encoding='utf-8') as f:
        f.write(info)


def loadImage(url):
    '''匹配图片url'''
    html = loadPage(url)    #发送请求得到响应内容
    content = etree.HTML(html)   #解析html文档
    imgUrl_list = content.xpath("//img[@class='BDE_Image']/@src")
    for imgUrl in imgUrl_list:
        print(imgUrl)
        writeImage(imgUrl)

def writeImage(url):
    '''将图片写入到本地'''
    img = loadPage(url)
    #filename = url[-15:]
    global i
    i += 1
    filename = str(i) + '.jpg'
    with open('G:\\pythonProject\\pc\\爬虫\\data\%s'%filename,'wb') as f:
        f.write(img)
    print('正在下载%s图片'%filename)

def tiebaInfo(html):
    # 解析HTML文档
    content = etree.HTML(html)
    print(content)

    # 通过xpath规则匹配对应的数据信息
    title_list = content.xpath("//div[@class='t_con cleafix']/div/div/div/a/text()")
    link_list = content.xpath("//div[@class='t_con cleafix']/div/div/div/a/@href")
    replies_list = content.xpath("//div[@class='t_con cleafix']/div/span/text()")
    writer_list = content.xpath("//div[@class='t_con cleafix']/div[2]/div[1]/div[2]/span[1]/@title")
    introduce_list = content.xpath("//div[@class='t_con cleafix']/div[2]/div[2]/div/div/text()")
    lastResponer_list = content.xpath("//div[@class='t_con cleafix']/div[2]/div[2]/div[2]/span[1]/@title")
    lastResponTime_list = content.xpath("//div[@class='t_con cleafix']/div[2]/div[2]/div[2]/span[2]/text()")
    #print(type(lastResponTime_list))
    for title, link ,replies,writer,introduce,lastResponer,lastResponTime in zip(title_list, link_list, replies_list,writer_list,introduce_list,lastResponer_list,lastResponTime_list):
        fulllink = 'https://tieba.baidu.com'+link

        info = ' 标题:%s\n 链接:%s\n 回复数:%s\n 楼主名:%s\n %s\n 最后回复时间:%s\n 简介:%s\n '%(title, fulllink ,replies,writer,lastResponer,lastResponTime,introduce)
        print(info)

        loadImage(fulllink)

        filename = 'tiebaInfo'
        writeInfo(info, filename)


if __name__ == '__main__':
    url = 'https://tieba.baidu.com/f?'
    teibaSpider(url)

2.5 数据提取之JSON与JsonPATH
JSON(JavaScript Object Notation) 是一种轻量级的数据交换格式,它使得人们很容易的进行阅读和编写。同时也方便了机器进行解析和生成。适用于进行数据交互的场景,比如网站前台与后台之间的数据交互。
JSON和XML的比较可谓不相上下。
Python 2.7中自带了JSON模块,直接import json就可以使用了。
官方文档:http://docs.python.org/library/json.html
Json在线解析网站:http://www.json.cn/#
JSON
json简单说就是javascript中的对象和数组,所以这两种结构就是对象和数组两种结构,通过这两种结构可以表示各种复杂的结构
- 对象:对象在js中表示为
{ }括起来的内容,数据结构为{ key:value, key:value, ... }的键值对的结构,在面向对象的语言中,key为对象的属性,value为对应的属性值,所以很容易理解,取值方法为 对象.key 获取属性值,这个属性值的类型可以是数字、字符串、数组、对象这几种。- 数组:数组在js中是中括号
[ ]括起来的内容,数据结构为["Python", "javascript", "C++", ...],取值方式和所有语言中一样,使用索引获取,字段值的类型可以是 数字、字符串、数组、对象几种。
import json
json模块提供了四个功能:dumps、dump、loads、load,用于字符串 和 python数据类型间进行转换。
- json.loads()
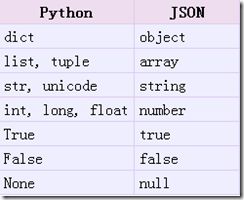
把Json格式字符串解码转换成Python对象 从json到python的类型转化对照如下:

# json_loads.py

import json

strList = '[1, 2, 3, 4]'

strDict = '{"city": "北京", "name": "大猫"}'

json.loads(strList)
# [1, 2, 3, 4]

json.loads(strDict) # json数据自动按Unicode存储
# {u'city': u'\u5317\u4eac', u'name': u'\u5927\u732b'}
- json.dumps()
实现python类型转化为json字符串,返回一个str对象 把一个Python对象编码转换成Json字符串
从python原始类型向json类型的转化对照如下:
# json_dumps.py

import json
import chardet

listStr = [1, 2, 3, 4]
tupleStr = (1, 2, 3, 4)
dictStr = {"city": "北京", "name": "大猫"}

json.dumps(listStr)
# '[1, 2, 3, 4]'
json.dumps(tupleStr)
# '[1, 2, 3, 4]'

# 注意:json.dumps() 序列化时默认使用的ascii编码
# 添加参数 ensure_ascii=False 禁用ascii编码,按utf-8编码
# chardet.detect()返回字典, 其中confidence是检测精确度

json.dumps(dictStr)
# '{"city": "\\u5317\\u4eac", "name": "\\u5927\\u5218"}'

chardet.detect(json.dumps(dictStr))
# {'confidence': 1.0, 'encoding': 'ascii'}

print(json.dumps(dictStr, ensure_ascii=False))
# {"city": "北京", "name": "大刘"}

chardet.detect(json.dumps(dictStr, ensure_ascii=False))
# {'confidence': 0.99, 'encoding': 'utf-8'}
*chardet是一个非常优秀的编码识别模块,可通过pip安装*
- json.dump()
将Python内置类型序列化为json对象后写入文件
# json_dump.py

import json

listStr = [{"city": "北京"}, {"name": "大刘"}]
json.dump(listStr, open("listStr.json","w"), ensure_ascii=False)

dictStr = {"city": "北京", "name": "大刘"}
json.dump(dictStr, open("dictStr.json","w"), ensure_ascii=False)
- json.load()
读取文件中json形式的字符串元素 转化成python类型
# json_load.py

import json

strList = json.load(open("listStr.json"))
print(strList)

# [{u'city': u'\u5317\u4eac'}, {u'name': u'\u5927\u5218'}]

strDict = json.load(open("dictStr.json"))
print (strDict)
# {u'city': u'\u5317\u4eac', u'name': u'\u5927\u5218'}
JsonPath(了解)
JsonPath 是一种信息抽取类库,是从JSON文档中抽取指定信息的工具,提供多种语言实现版本,包括:Javascript, Python, PHP 和 Java。
JsonPath 对于 JSON 来说,相当于 XPATH 对于 XML。
下载地址:https://pypi.python.org/pypi/jsonpath
安装方法:点击
Download URL链接下载jsonpath,解压之后执行python setup.py install官方文档:http://goessner.net/articles/JsonPath
JsonPath与XPath语法对比:
Json结构清晰,可读性高,复杂度低,非常容易匹配,下表中对应了XPath的用法。
| XPath | JSONPath | 描述 |
|---|---|---|
/ |
$ |
根节点 |
. |
@ |
现行节点 |
/ |
.or[] |
取子节点 |
.. |
n/a | 取父节点,Jsonpath未支持 |
// |
.. |
就是不管位置,选择所有符合条件的条件 |
* |
* |
匹配所有元素节点 |
@ |
n/a | 根据属性访问,Json不支持,因为Json是个Key-value递归结构,不需要。 |
[] |
[] |
迭代器标示(可以在里边做简单的迭代操作,如数组下标,根据内容选值等) |
| | | [,] |
支持迭代器中做多选。 |
[] |
?() |
支持过滤操作. |
| n/a | () |
支持表达式计算 |
() |
n/a | 分组,JsonPath不支持 |
示例:
我们以拉勾网城市JSON文件 http://www.lagou.com/lbs/getAllCitySearchLabels.json 为例,获取所有城市。
import requests
import jsonpath
import json
import chardet

url = 'http://www.lagou.com/lbs/getAllCitySearchLabels.json'
header={"User-Agent": "Mozilla/5.0 (Windows NT 10.0; Win64; x64) AppleWebKit/537.36 (KHTML, like Gecko) Chrome/83.0.4103.106 Safari/537.36"}
response = requests.get(url,header)
html = response.text

# 把json格式字符串转换成python对象
jsonobj = json.loads(html)
print(jsonobj)
# 从根节点开始,匹配name节点
citylist = jsonpath.jsonpath(jsonobj,'$..name')

print(citylist)
print(type(citylist))
fp = open('data/city.json','w')

content = json.dumps(citylist, ensure_ascii=False)
print(content)

fp.write(content)
fp.close()
2.6 糗事百科实例:
爬取糗事百科段子,假设页面的URL是 http://www.qiushibaike.com/8hr/page/1
要求:
- 使用requests获取页面信息,用XPath / re 做数据提取
- 获取每个帖子里的
用户头像链接、用户姓名、段子内容、点赞次数和评论次数 - 保存到 json 文件内
参考代码
__author__ = 'Administrator'
#爬取糗事百科段子
#目标网址:https://www.qiushibaike.com/
#第二页:https://www.qiushibaike.com/8hr/page/2/
#第三页:https://www.qiushibaike.com/8hr/page/3/

#第一步:通过构造url爬取前三页的页面
import requests
from lxml import etree
headers={'User-Agent':'Mozilla/5.0 (Windows NT 5.1) AppleWebKit/537.36 (KHTML, like Gecko) Chrome/63.0.3239.132 Safari/537.36'}
#循环构造url
for i in range(1,4):
    url='https://www.qiushibaike.com/8hr/page/'+str(i)+'/'
    response=requests.get(url,headers=headers).text
    # print(response)
    html=etree.HTML(response)
    #xpath解析出段子的链接

    result1=html.xpath('//div[@class="recommend-article"]//li/a/@href')
    print(result1)
    #https://www.qiushibaike.com/article/121207893
    #通过构造拼接具体段子的链接并爬取
    for site in result1:
        url2='https://www.qiushibaike.com'+site
        response2=requests.get(url2,headers=headers).text
        html2=etree.HTML(response2)
        result2=html2.xpath('//div[@class="content"]')
        print(result2[0].text)
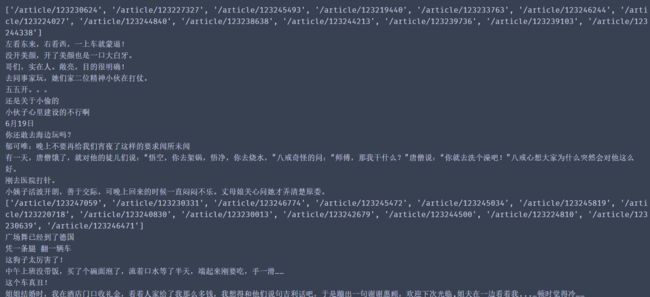
演示效果
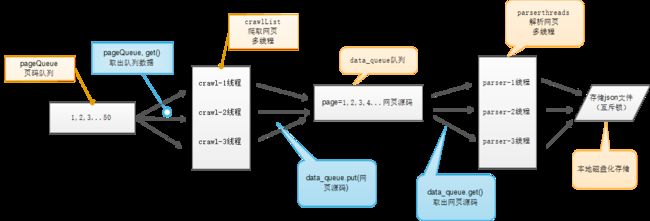
2.7 多线程糗事百科案例
案例要求参考上一个糗事百科单进程案例
Queue(队列对象)
Queue是python中的标准库,可以直接import Queue引用;队列是线程间最常用的交换数据的形式
python下多线程的思考
对于资源,加锁是个重要的环节。因为python原生的list,dict等,都是not thread safe的。而Queue,是线程安全的,因此在满足使用条件下,建议使用队列
- 初始化: class Queue.Queue(maxsize) FIFO 先进先出
- 包中的常用方法:
- Queue.qsize() 返回队列的大小
- Queue.empty() 如果队列为空,返回True,反之False
- Queue.full() 如果队列满了,返回True,反之False
- Queue.full 与 maxsize 大小对应
- Queue.get([block[, timeout]])获取队列,timeout等待时间
- 创建一个“队列”对象
- import Queue
- myqueue = Queue.Queue(maxsize = 10)
- 将一个值放入队列中
- myqueue.put(10)
- 将一个值从队列中取出
- myqueue.get()
多线程爬虫示意图
# !/usr/bin/python3
# -*- coding: utf-8 -*-

# 1. 导入线程池模块
# 线程池
import gevent.monkey

gevent.monkey.patch_all()
from gevent.pool import Pool
from queue import Queue
import requests
from lxml import etree


class QiushiSpider():

    def __init__(self, max_page):
        self.max_page = max_page
        # 2. 创建线程池,初始化线程数量
        self.pool = Pool(5)

        self.base_url = "http://www.qiushibaike.com/8hr/page/{}/"
        self.headers = {
            "User-Agent": "Mozilla/5.0 (Macintosh; Intel Mac OS X 10_14_3) AppleWebKit/537.36 (KHTML, like Gecko) Chrome/73.0.3683.86 Safari/537.36"
        }

        # 专门存放 url 容器
        self.url_queue = Queue()
        pass

    def get_url_list(self):
        '''
        获取 url 列表放入到 url 容器中
        :return:
        '''
        for page in range(1, self.max_page, 1):
            url = self.base_url.format(page)
            self.url_queue.put(url)

    # 3. 实现执行任务
    def exec_task(self):
        # 1> 获取url
        url = self.url_queue.get()

        # 2> 发送请求获取 html
        response = requests.get(url, headers=self.headers)
        html = response.text

        # 3> 解析 html 提取数据
        # 可以用来解析字符串格式的HTML文档对象,
        # 将传进去的字符串转变成_Element对象。
        # 作为_Element对象,可以方便的使用getparent()、remove()、xpath()
        # 等方法。
        # etree.HTML()

        eroot = etree.HTML(html)
        # xpath获取html源码中的内容
        titles = eroot.xpath('//a[@class="recmd-content"]/text()')
        for title in titles:
            item = {}
            item["title"] = title

            # 4> 保存数据
            print(item)
        self.url_queue.task_done()

    # 4. 实现执行任务完成后的操作,必须至少有一个参数
    # result 任务执行的最终结果的返回值
    def exec_task_finished(self, result):
        print("result:", result)
        print("执行任务完成")
        self.pool.apply_async(self.exec_task, callback=self.exec_task_finished)

    def run(self):

        self.get_url_list()

        # 5. 让任务使用线程池中的线程执行并且设置执行后的回调操作
        # callback 表示执行完成后的回调
        for i in range(5):
            self.pool.apply_async(self.exec_task, callback=self.exec_task_finished)
        self.url_queue.join()
        pass


if __name__ == '__main__':
    max_page = input("请输入您需要多少页内容:")
    spider = QiushiSpider(int(max_page))
    spider.run()
2.8 BeautifulSoup4
和 lxml 一样,Beautiful Soup 也是一个HTML/XML的解析器,主要的功能也是如何解析和提取 HTML/XML 数据。
lxml 只会局部遍历,而Beautiful Soup 是基于HTML DOM的,会载入整个文档,解析整个DOM树,因此时间和内存开销都会大很多,所以性能要低于lxml。
BeautifulSoup 用来解析 HTML 比较简单,API非常人性化,支持CSS选择器、Python标准库中的HTML解析器,也支持 lxml 的 XML解析器。
Beautiful Soup 3 目前已经停止开发,推荐现在的项目使用Beautiful Soup 4。使用 pip 安装即可:
pip install beautifulsoup4官方文档:http://beautifulsoup.readthedocs.io/zh_CN/v4.4.0
| 抓取工具 | 速度 | 使用难度 | 安装难度 |
|---|---|---|---|
| 正则 | 最快 | 困难 | 无(内置) |
| BeautifulSoup | 慢 | 最简单 | 简单 |
| lxml | 快 | 简单 | 一般 |
示例:
首先必须要导入 bs4 库
# beautifulsoup4_test.py

from bs4 import BeautifulSoup

html = """
The Dormouse's story

The Dormouse's story
Once upon a time there were three little sisters; and their names were
,
Lacie and
Tillie;
and they lived at the bottom of a well.
...
"""

#创建 Beautiful Soup 对象
soup = BeautifulSoup(html)

#打开本地 HTML 文件的方式来创建对象
#soup = BeautifulSoup(open('index.html'))

#格式化输出 soup 对象的内容
print soup.prettify()
运行结果:
   The Dormouse's story


    The Dormouse's story


   Once upon a time there were three little sisters; and their names were


   ,

    Lacie

   and

    Tillie

   ;
and they lived at the bottom of a well.


   ...
- 如果我们在 IPython2 下执行,会看到这样一段警告:
- 意思是,如果我们没有显式地指定解析器,所以默认使用这个系统的最佳可用HTML解析器(“lxml”)。如果你在另一个系统中运行这段代码,或者在不同的虚拟环境中,使用不同的解析器造成行为不同。
- 但是我们可以通过
soup = BeautifulSoup(html,“lxml”)方式指定lxml解析器。

四大对象种类
Beautiful Soup将复杂HTML文档转换成一个复杂的树形结构,每个节点都是Python对象,所有对象可以归纳为4种:
- Tag
- NavigableString
- BeautifulSoup
- Comment
- Tag
Tag 通俗点讲就是 HTML 中的一个个标签,例如:
<head><title>The Dormouse's storytitle>head>
<a class="sister" href="http://example.com/elsie" id="link1">a>
<p class="title" name="dromouse"><b>The Dormouse's storyb>p>
上面的 title head a p等等 HTML 标签加上里面包括的内容就是 Tag,那么试着使用 Beautiful Soup 来获取 Tags:
from bs4 import BeautifulSoup

html = """
The Dormouse's story

The Dormouse's story
Once upon a time there were three little sisters; and their names were
,
Lacie and
Tillie;
and they lived at the bottom of a well.
...
"""

#创建 Beautiful Soup 对象
soup = BeautifulSoup(html)


print soup.title
# The Dormouse's story

print soup.head
# The Dormouse's story

print soup.a
#

print soup.p
# The Dormouse's story

print type(soup.p)
#
我们可以利用 soup 加标签名轻松地获取这些标签的内容,这些对象的类型是bs4.element.Tag。但是注意,它查找的是在所有内容中的第一个符合要求的标签。如果要查询所有的标签,后面会进行介绍。
对于 Tag,它有两个重要的属性,是 name 和 attrs
print soup.name
# [document] #soup 对象本身比较特殊,它的 name 即为 [document]

print soup.head.name
# head #对于其他内部标签,输出的值便为标签本身的名称

print soup.p.attrs
# {'class': ['title'], 'name': 'dromouse'}
# 在这里,我们把 p 标签的所有属性打印输出了出来,得到的类型是一个字典。

print soup.p['class'] # soup.p.get('class')
# ['title'] #还可以利用get方法,传入属性的名称,二者是等价的

soup.p['class'] = "newClass"
print soup.p # 可以对这些属性和内容等等进行修改
# The Dormouse's story

del soup.p['class'] # 还可以对这个属性进行删除
print soup.p
# The Dormouse's story
- NavigableString
既然我们已经得到了标签的内容,那么问题来了,我们要想获取标签内部的文字怎么办呢?很简单,用 .string 即可,例如
print soup.p.string
# The Dormouse's story

print type(soup.p.string)
# In [13]: - BeautifulSoup
BeautifulSoup 对象表示的是一个文档的内容。大部分时候,可以把它当作 Tag 对象,是一个特殊的 Tag,我们可以分别获取它的类型,名称,以及属性来感受一下
print type(soup.name)
# - Comment
Comment 对象是一个特殊类型的 NavigableString 对象,其输出的内容不包括注释符号。
print soup.a
#

print soup.a.string
# Elsie

print type(soup.a.string)
#
a 标签里的内容实际上是注释,但是如果我们利用 .string 来输出它的内容时,注释符号已经去掉了。
遍历文档树
1. 直接子节点 :.contents .children 属性
.content
tag 的 .content 属性可以将tag的子节点以列表的方式输出
print soup.head.contents
#[The Dormouse's story ]
输出方式为列表,我们可以用列表索引来获取它的某一个元素
print soup.head.contents[0]
#The Dormouse's story
.children
它返回的不是一个 list,不过我们可以通过遍历获取所有子节点。
我们打印输出 .children 看一下,可以发现它是一个 list 生成器对象
print soup.head.children
#结果:
<p class="title" name="dromouse"><b>The Dormouse's storyb>p>

<p class="story">Once upon a time there were three little sisters; and their names were
<a class="sister" href="http://example.com/elsie" id="link1">a>,
<a class="sister" href="http://example.com/lacie" id="link2">Laciea> and
<a class="sister" href="http://example.com/tillie" id="link3">Tilliea>;
and they lived at the bottom of a well.p>

<p class="story">...p>
2. 所有子孙节点: .descendants 属性
.contents 和 .children 属性仅包含tag的直接子节点,.descendants 属性可以对所有tag的子孙节点进行递归循环,和 children类似,我们也需要遍历获取其中的内容。
for child in soup.descendants:
    print child
运行结果:
<html><head><title>The Dormouse's story</title></head>
<body>
<p class="title" name="dromouse"><b>The Dormouse's story</b></p>
<p class="story">Once upon a time there were three little sisters; and their names were
<a class="sister" href="http://example.com/elsie" id="link1"><!-- Elsie --></a>,
<a class="sister" href="http://example.com/lacie" id="link2">Lacie</a> and
<a class="sister" href="http://example.com/tillie" id="link3">Tillie</a>;
and they lived at the bottom of a well.</p>
<p class="story">...</p>
</body></html>
<head><title>The Dormouse's story</title></head>
<title>The Dormouse's story</title>
The Dormouse's story


<body>
<p class="title" name="dromouse"><b>The Dormouse's story</b></p>
<p class="story">Once upon a time there were three little sisters; and their names were
<a class="sister" href="http://example.com/elsie" id="link1"><!-- Elsie --></a>,
<a class="sister" href="http://example.com/lacie" id="link2">Lacie</a> and
<a class="sister" href="http://example.com/tillie" id="link3">Tillie</a>;
and they lived at the bottom of a well.</p>
<p class="story">...</p>
</body>


<p class="title" name="dromouse"><b>The Dormouse's story</b></p>
<b>The Dormouse's story</b>
The Dormouse's story


<p class="story">Once upon a time there were three little sisters; and their names were
<a class="sister" href="http://example.com/elsie" id="link1"><!-- Elsie --></a>,
<a class="sister" href="http://example.com/lacie" id="link2">Lacie</a> and
<a class="sister" href="http://example.com/tillie" id="link3">Tillie</a>;
and they lived at the bottom of a well.</p>
Once upon a time there were three little sisters; and their names were

<a class="sister" href="http://example.com/elsie" id="link1"><!-- Elsie --></a>
 Elsie
,

<a class="sister" href="http://example.com/lacie" id="link2">Lacie</a>
Lacie
 and

<a class="sister" href="http://example.com/tillie" id="link3">Tillie</a>
Tillie
;
and they lived at the bottom of a well.


<p class="story">...</p>
...
3. 节点内容: .string 属性
如果tag只有一个 NavigableString 类型子节点,那么这个tag可以使用 .string 得到子节点。如果一个tag仅有一个子节点,那么这个tag也可以使用 .string 方法,输出结果与当前唯一子节点的 .string 结果相同。
通俗点说就是:如果一个标签里面没有标签了,那么 .string 就会返回标签里面的内容。如果标签里面只有唯一的一个标签了,那么 .string 也会返回最里面的内容。例如:
print soup.head.string
#The Dormouse's story
print soup.title.string
#The Dormouse's story
搜索文档树
1. find_all()函数
find_all(name, attrs, recursive, text, **kwargs)
1)name 参数
name 参数可以查找所有名字为 name 的tag,字符串对象会被自动忽略掉
A.传字符串
最简单的过滤器是字符串.在搜索方法中传入一个字符串参数,Beautiful Soup会查找与字符串完整匹配的内容,下面的例子用于查找文档中所有的标签:
soup.find_all('b')
# [The Dormouse's story]

print soup.find_all('a')
#[, Lacie, Tillie]
B.传正则表达式
如果传入正则表达式作为参数,Beautiful Soup会通过正则表达式的 match() 来匹配内容.下面例子中找出所有以b开头的标签,这表示和标签都应该被找到
import re
for tag in soup.find_all(re.compile("^b")):
    print(tag.name)
# body
# b
C.传列表
如果传入列表参数,Beautiful Soup会将与列表中任一元素匹配的内容返回.下面代码找到文档中所有标签和标签:
soup.find_all(["a", "b"])
# [The Dormouse's story,
#  Elsie,
#  Lacie,
#  Tillie]
2)keyword 参数
soup.find_all(id='link2')
# [Lacie]
3)text 参数
通过 text 参数可以搜搜文档中的字符串内容,与 name 参数的可选值一样, text 参数接受 字符串 , 正则表达式 , 列表
soup.find_all(text="Elsie")
# [u'Elsie']

soup.find_all(text=["Tillie", "Elsie", "Lacie"])
# [u'Elsie', u'Lacie', u'Tillie']

soup.find_all(text=re.compile("Dormouse"))
[u"The Dormouse's story", u"The Dormouse's story"]
2. CSS选择器
这就是另一种与 find_all 方法有异曲同工之妙的查找方法.
- 写 CSS 时,标签名不加任何修饰,类名前加
.,id名前加# - 在这里我们也可以利用类似的方法来筛选元素,用到的方法是
soup.select(),返回类型是list
(1)通过标签名查找
print soup.select('title')
#[The Dormouse's story ]
print soup.select('a')
#[, Lacie, Tillie]
print soup.select('b')
#[The Dormouse's story]
(2)通过类名查找
print soup.select('.sister')
#[, Lacie, Tillie]
(3)通过 id 名查找
print soup.select('#link1')
#[]
(4)组合查找
组合查找即和写 class 文件时,标签名与类名、id名进行的组合原理是一样的,例如查找 p 标签中,id 等于 link1的内容,二者需要用空格分开
print soup.select('p #link1')
#[]
直接子标签查找,则使用 > 分隔
print soup.select("head > title")
#[The Dormouse's story ]
(5)属性查找
查找时还可以加入属性元素,属性需要用中括号括起来,注意属性和标签属于同一节点,所以中间不能加空格,否则会无法匹配到。
print soup.select('a[class="sister"]')
#[, Lacie, Tillie]

print soup.select('a[href="http://example.com/elsie"]')
#[]
同样,属性仍然可以与上述查找方式组合,不在同一节点的空格隔开,同一节点的不加空格
print soup.select('p a[href="http://example.com/elsie"]')
#[]
(6) 获取内容
以上的 select 方法返回的结果都是列表形式,可以遍历形式输出,然后用 get_text() 方法来获取它的内容。
soup = BeautifulSoup(html, 'lxml')
print type(soup.select('title'))
print soup.select('title')[0].get_text()

for title in soup.select('title'):
    print title.get_text()
2.9 案例:使用BeautifuSoup4的爬虫
我们以当当网的python书籍为爬取对象

使用BeautifuSoup4解析器,将网页上的书名,价格,描述存储出来。

import requests
from bs4 import BeautifulSoup

url='http://search.dangdang.com/?key=python&act=input'
header={'User-Agent':
'Mozilla/5.0 (Windows NT 10.0; …) Gecko/20100101 Firefox/70.0'}
# print(soup)
# for t in range(1,10):
#     totalurl = url + '&page_index=' + str(t)
r = requests.get(url, header)
r.encoding = r.apparent_encoding
html = r.text
soup = BeautifulSoup(html, 'lxml')
a = soup.find('ul', {'class': 'bigimg'}).find_all('li')
for li in a:
    total = []
    title = li.find('a', {'name': 'itemlist-title'}).get_text(strip=True)
    now_sprice = li.find('span', class_="search_now_price").get_text(strip=True)
    search_pre_price = li.find('span', class_="search_pre_price").get_text(strip=True)
    detail = li.find('p', class_="detail").get_text(strip=True)
    total.append([title, now_sprice, search_pre_price, detail])
    with open(r'G:\pythonProject\pc\爬虫\data\当当book.txt', 'a', encoding='utf-8')as data:
        for m in range(len(total)):
            print(str(total[m]) + ';', file=data)
    print(total)
a>, Lacie, Tillie]
print soup.select(‘a[href=“http://example.com/elsie”]’)
#[ ]
同样,属性仍然可以与上述查找方式组合,不在同一节点的空格隔开,同一节点的不加空格

```python
print soup.select('p a[href="http://example.com/elsie"]')
#[]
(6) 获取内容
以上的 select 方法返回的结果都是列表形式,可以遍历形式输出,然后用 get_text() 方法来获取它的内容。
soup = BeautifulSoup(html, 'lxml')
print type(soup.select('title'))
print soup.select('title')[0].get_text()

for title in soup.select('title'):
    print title.get_text()
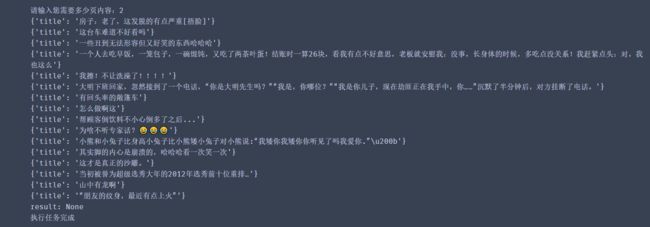
2.9 案例:使用BeautifuSoup4的爬虫
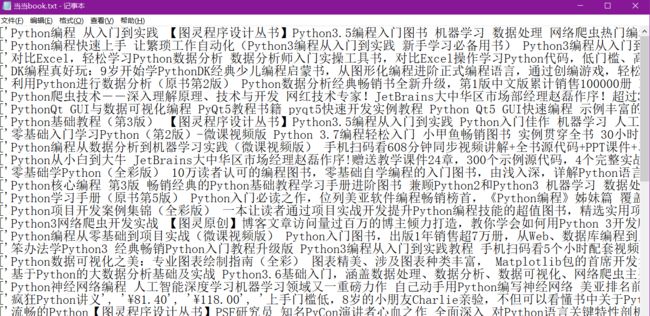
我们以当当网的python书籍为爬取对象
[外链图片转存中…(img-bXb9T6TG-1606982544180)]
使用BeautifuSoup4解析器,将网页上的书名,价格,描述存储出来。
[外链图片转存中…(img-zvGpWtYz-1606982544181)]
import requests
from bs4 import BeautifulSoup

url='http://search.dangdang.com/?key=python&act=input'
header={'User-Agent':
'Mozilla/5.0 (Windows NT 10.0; …) Gecko/20100101 Firefox/70.0'}
# print(soup)
# for t in range(1,10):
#     totalurl = url + '&page_index=' + str(t)
r = requests.get(url, header)
r.encoding = r.apparent_encoding
html = r.text
soup = BeautifulSoup(html, 'lxml')
a = soup.find('ul', {'class': 'bigimg'}).find_all('li')
for li in a:
    total = []
    title = li.find('a', {'name': 'itemlist-title'}).get_text(strip=True)
    now_sprice = li.find('span', class_="search_now_price").get_text(strip=True)
    search_pre_price = li.find('span', class_="search_pre_price").get_text(strip=True)
    detail = li.find('p', class_="detail").get_text(strip=True)
    total.append([title, now_sprice, search_pre_price, detail])
    with open(r'G:\pythonProject\pc\爬虫\data\当当book.txt', 'a', encoding='utf-8')as data:
        for m in range(len(total)):
            print(str(total[m]) + ';', file=data)
    print(total)